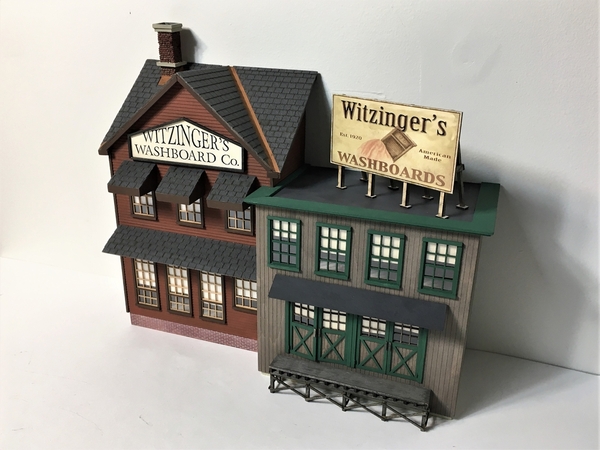
Witzinger's Post 4 - August 20, 2021

I attached “taskboard” foundation pieces (painted “concrete”) to the factory base and began to look at how to join the office and factory sections together. Photo 29 shows the two sections in position, lying flat on the workbench. The design of the kit requires the vertical rear edge of the short factory wall to be glued into the 1/16-inch-square notch at the right front corner of the office (see Photo 28 above). This surface does not have enough area to securely combine the two sections. A full-depth left factory wall would have avoided this issue. I applied glue to the right front corner of the office, and put the two sections into position flat on the workbench, having made sure that the bottoms of the foundations were aligned. When the glue dried, I turned the structure around and added reinforcement to the common wall, which can be seen in Photo 30.

MELGAR_PHOTO_29_WITZINGERS__ASSEMBLY_SETUP_FRONTMELGAR_PHOTO_30_WITZINGERS_SETUP_REINFORCEMENT

My next step was to add four small pieces for door-pulls on the factory doors, as shown in Photo 31.

MELGAR_PHOTO_31_WITZINGERS_FACTORY_DOOR_PULLS

The connection between the office and factory was further strengthened by inserting 1st floors in both sections, as shown in Photo 32.

MELGAR_PHOTO_32_WITZINGERS_REAR_VIEW

I next turned my attention to the office roof and chimney. Photo 33 shows the two cardstock pieces for the roof that were included with the kit and the unpainted chimney purchased separately from Bar Mills Models.

MELGAR_PHOTO_33_WITZINGERS_OFFICE_ROOF_CHIMNEY

I intended to use both cardstock pieces, but I was not satisfied with the fit of the folded triangular panels, so I cut two triangular pieces from basswood and fitted them exactly to the structure. The pieces and painted chimney are shown in Photo 34.

MELGAR_PHOTO_34_WITZINGERS_OFFICE_ROOF_PARTS

Note that I cut a hole for the chimney in the rectangular roof panel and surrounded it with rust-colored paper to look like roof flashing. My procedure for mounting chimneys is shown in Photo 35. I fabricate a horizontal mount just beneath the roof, and apply epoxy to secure the chimney to the mount. This attachment is stronger and looks better than simply gluing to the chimney to the surface of the roof.

MELGAR_PHOTO_35_WITZINGERS_REAR_VIEW_CHIMNEY_MOUNT

Photo 36 shows the office roof ready for application of shingles and the chimney.

MELGAR_PHOTO_36_WITZINGERS_OFFICE_ROOF_ASSEMBLY

I decided to install the factory roof before applying shingles to the office roof and chose to substitute a piece of basswood for the cardstock part that was supplied in the kit. I also cut three trim pieces to be placed around the upper perimeter of the roof that will be painted Hunter Green to match the green factory trim color, and a piece of black construction paper to cover the remainder of the roof to provide a rough texture without woodgrain, as shown in Photo 37.

MELGAR_PHOTO_37_WITZINGERS_FACTORY_ROOF_PARTS

Photo 38 shows the bracing I applied to the underside of the roof. Photo 39 shows the factory roof pieces painted before assembly.

MELGAR_PHOTO_38_WITZINGERS_FACTORY_ROOF_BOTTOMMELGAR_PHOTO_39_WITZINGERS_FACTORY_ROOF_PARTS_PAINTED

Photos 40 and 41 show the factory roof installed.

MELGAR_PHOTO_40_WITZINGERS_FACTORY_ROOF_ATTACHEDMELGAR_PHOTO_41_WITZINGERS_FACTORY_ROOF_ATTACHED

Photos 42 and 43 show the model on the layout.

MELGAR_PHOTO_42_WITZINGERS_ON_LAYOUTMELGAR_PHOTO_43_WITZINGERS_ON_LAYOUT

I expect that the next step will be applying shingles to the office roof.

To be continued.

MELGAR

Attachments

Images (15)
  • MELGAR_PHOTO_29_WITZINGERS__ASSEMBLY_SETUP_FRONT
  • MELGAR_PHOTO_30_WITZINGERS_SETUP_REINFORCEMENT
  • MELGAR_PHOTO_31_WITZINGERS_FACTORY_DOOR_PULLS
  • MELGAR_PHOTO_32_WITZINGERS_REAR_VIEW
  • MELGAR_PHOTO_33_WITZINGERS_OFFICE_ROOF_CHIMNEY
  • MELGAR_PHOTO_34_WITZINGERS_OFFICE_ROOF_PARTS
  • MELGAR_PHOTO_35_WITZINGERS_REAR_VIEW_CHIMNEY_MOUNT
  • MELGAR_PHOTO_36_WITZINGERS_OFFICE_ROOF_ASSEMBLY
  • MELGAR_PHOTO_37_WITZINGERS_FACTORY_ROOF_PARTS
  • MELGAR_PHOTO_38_WITZINGERS_FACTORY_ROOF_BOTTOM
  • MELGAR_PHOTO_39_WITZINGERS_FACTORY_ROOF_PARTS_PAINTED
  • MELGAR_PHOTO_40_WITZINGERS_FACTORY_ROOF_ATTACHED
  • MELGAR_PHOTO_41_WITZINGERS_FACTORY_ROOF_ATTACHED
  • MELGAR_PHOTO_42_WITZINGERS_ON_LAYOUT
  • MELGAR_PHOTO_43_WITZINGERS_ON_LAYOUT
Last edited by MELGAR
@MELGAR posted:

Joe,

As you know, people enjoy model railroading in different ways. For me, the most interesting part of the experience is building the layout - track, terrain, bridges, tunnels, structures, towns and scenery. But I do like running trains, too. I do more of that after the layout is finished.

MELGAR

Mel, I knew you enjoyed the modelling that's why I was glad when you another area that the town could grow into.

@ctr posted:

Melgar,

What kind of paint are you using to paint the model?

Do you use brushes or airbrush?

Thank you.

CTR

I prefer water-based acrylic paints and water cleanup compared to other types. I sometimes apply weathering with a mixture of alcohol and India ink, and may mix in some brown earth tone. I don't use an airbrush on the exteriors of wood buildings because I want them to look a bit weathered with variations in color and texture - which a brush produces on basswood.

MELGAR

Witzinger's Post 5 - August 28, 2021

Next step was to install the “slate” shingles covering the office roof. As shown in Photo 44, these are supplied as a sheet of paper strips.

MELGAR_PHOTO_44_WITZINGERS_ROOF_SHINGLES

Photo 45 shows the process of cutting and fitting each strip to correct length and angle, and gluing into position with yellow carpenter’s glue.

MELGAR_PHOTO_45_WITZINGERS_APPLYING_SHINGLES

The angled ends of the shingle strips were cut to match the rust-colored strips at the intersections of the roof panels, which are supposed to look like copper flashing. Each shingle strip overlaps the previous one and is also offset, as can be seen in Photo 46.

MELGAR_PHOTO_46_WITZINGERS_APPLYING_SHINGLES

I cut the strips slightly longer than necessary and trim the edges after all the shingles are installed, as shown in Photos 47 and 48. Shingle installation is a tedious process. It took me eight hours to do the office roof shingles.

MELGAR_PHOTO_47_WITZINGERS_OFFICE_ROOF_SHINGLESMELGAR_PHOTO_48_WITZINGERS_OFFICE_ROOF_SHINGLES

The remaining tasks on the model involve various details that can be omitted or customized, especially if the builder is willing to make some components from scratch.

The kit instructions show an auxiliary roof just above the 1st floor office windows, supported unrealistically and made from cardstock. Instead, I cut and assembled triangular supporting brackets and applied “slate” shingles to a basswood panel, as shown in Photos 49 and 50.

MELGAR_PHOTO_49_WITZINGERS_AUXILIARY_ROOF_PARTSMELGAR_PHOTO_50_WITZINGERS_AUXILIARY_ROOF_SHINGLES

I then attached the brackets to the auxiliary roof and mounted the assembly to the front of the office. The accurate cutting and assembly of the small parts for the brackets was time-consuming. I spent six hours on the auxiliary roof.

The instructions also show three awnings above the 2nd floor office windows. The kit provides colored paper to make the awnings by folding the paper into shape. Again, I did not find this satisfactory, so I fabricated three awnings from 1/32-inch-thick basswood, assembled and painted them, applied roof shingles, as shown in Photo 51, and mounted them to the front of the office, as shown in Photo 52. The accurate cutting and assembly of the small parts for the awnings was time-consuming. I spent five hours on the awnings.

MELGAR_PHOTO_51_WITZINGERS_AUXILIARY_ROOF_INSTALLED_AWNINGSMELGAR_PHOTO_52_WITZINGERS_AWNINGS_INSTALLED

The times I needed to make the numerous small parts for the auxiliary roof and awnings show the advantage of building from a laser-cut wood kit with its accurately cut parts, although the Witzinger’s kit did not include all such parts, and the instructions proposed short-cuts, that I did not use, to save time.

I also applied trim under the eaves of the office roof and attached the chimney with epoxy. Photos 53 and 54 show these parts.

MELGAR_PHOTO_53_WITZINGERS_AWNINGS_INSTALLEDMELGAR_PHOTO_54_WITZINGERS_AWNINGS_INSTALLED

Photos 55 and 56 show the model on the layout expansion.

MELGAR_PHOTO_55_WITZINGERS_ON_LAYOUTMELGAR_PHOTO_56_WITZINGERS_ON_LAYOUT

Several details remain to be completed. There will be a rooftop billboard that will require scratch-built construction of the billboard frame. This will be followed by a stick-built loading dock and an auxiliary roof at the front of the factory.

To be continued.

MELGAR

Attachments

Images (13)
  • MELGAR_PHOTO_44_WITZINGERS_ROOF_SHINGLES
  • MELGAR_PHOTO_45_WITZINGERS_APPLYING_SHINGLES
  • MELGAR_PHOTO_46_WITZINGERS_APPLYING_SHINGLES
  • MELGAR_PHOTO_47_WITZINGERS_OFFICE_ROOF_SHINGLES
  • MELGAR_PHOTO_48_WITZINGERS_OFFICE_ROOF_SHINGLES
  • MELGAR_PHOTO_49_WITZINGERS_AUXILIARY_ROOF_PARTS
  • MELGAR_PHOTO_50_WITZINGERS_AUXILIARY_ROOF_SHINGLES
  • MELGAR_PHOTO_51_WITZINGERS_AUXILIARY_ROOF_INSTALLED_AWNINGS
  • MELGAR_PHOTO_52_WITZINGERS_AWNINGS_INSTALLED
  • MELGAR_PHOTO_53_WITZINGERS_AWNINGS_INSTALLED
  • MELGAR_PHOTO_54_WITZINGERS_AWNINGS_INSTALLED
  • MELGAR_PHOTO_55_WITZINGERS_ON_LAYOUT
  • MELGAR_PHOTO_56_WITZINGERS_ON_LAYOUT
@MELGAR posted:

Witzinger's Post 5 - August 28, 2021

Next step was to install the “slate” shingles covering the office roof. As shown in Photo 44, these are supplied as a sheet of paper strips.

MELGAR_PHOTO_44_WITZINGERS_ROOF_SHINGLES

Photo 45 shows the process of cutting and fitting each strip to correct length and angle, and gluing into position with yellow carpenter’s glue.

MELGAR_PHOTO_45_WITZINGERS_APPLYING_SHINGLES

The angled ends of the shingle strips were cut to match the rust-colored strips at the intersections of the roof panels, which are supposed to look like copper flashing. Each shingle strip overlaps the previous one and is also offset, as can be seen in Photo 46.

MELGAR_PHOTO_46_WITZINGERS_APPLYING_SHINGLES

I cut the strips slightly longer than necessary and trim the edges after all the shingles are installed, as shown in Photos 47 and 48. Shingle installation is a tedious process. It took me eight hours to do the office roof shingles.

MELGAR_PHOTO_47_WITZINGERS_OFFICE_ROOF_SHINGLESMELGAR_PHOTO_48_WITZINGERS_OFFICE_ROOF_SHINGLES

The remaining tasks on the model involve various details that can be omitted or customized, especially if the builder is willing to make some components from scratch.

The kit instructions show an auxiliary roof just above the 1st floor office windows, supported unrealistically and made from cardstock. Instead, I cut and assembled triangular supporting brackets and applied “slate” shingles to a basswood panel, as shown in Photos 49 and 50.

MELGAR_PHOTO_49_WITZINGERS_AUXILIARY_ROOF_PARTSMELGAR_PHOTO_50_WITZINGERS_AUXILIARY_ROOF_SHINGLES

I then attached the brackets to the auxiliary roof and mounted the assembly to the front of the office. The accurate cutting and assembly of the small parts for the brackets was time-consuming. I spent six hours on the auxiliary roof.

The instructions also show three awnings above the 2nd floor office windows. The kit provides colored paper to make the awnings by folding the paper into shape. Again, I did not find this satisfactory, so I fabricated three awnings from 1/32-inch-thick basswood, assembled and painted them, applied roof shingles, as shown in Photo 51, and mounted them to the front of the office, as shown in Photo 52. The accurate cutting and assembly of the small parts for the awnings was time-consuming. I spent five hours on the awnings.

MELGAR_PHOTO_51_WITZINGERS_AUXILIARY_ROOF_INSTALLED_AWNINGSMELGAR_PHOTO_52_WITZINGERS_AWNINGS_INSTALLED

The times I needed to make the numerous small parts for the auxiliary roof and awnings show the advantage of building from a laser-cut wood kit with its accurately cut parts, although the Witzinger’s kit did not include all such parts, and the instructions proposed short-cuts, that I did not use, to save time.

I also applied trim under the eaves of the office roof and attached the chimney with epoxy. Photos 53 and 54 show these parts.

MELGAR_PHOTO_53_WITZINGERS_AWNINGS_INSTALLEDMELGAR_PHOTO_54_WITZINGERS_AWNINGS_INSTALLED

Photos 55 and 56 show the model on the layout expansion.

MELGAR_PHOTO_55_WITZINGERS_ON_LAYOUTMELGAR_PHOTO_56_WITZINGERS_ON_LAYOUT

Several details remain to be completed. There will be a rooftop billboard that will require scratch-built construction of the billboard frame. This will be followed by a stick-built loading dock and an auxiliary roof at the front of the factory.

To be continued.

MELGAR

Superb modeling; sure wish I had as nice a roof on my house, particularly because my existing roof is about 25 years old.

Witzinger's Post 6 – September 4, 2021

I chose Witzinger’s as a model for my layout expansion scene because I needed a background building and because it had a rooftop billboard that would be noticed even though it would be at the rear of the layout.

As packaged in the Bar Mills kit, the billboard was printed on paper and had to be attached to a rectangular backing piece and then to a framework, as shown in Photo 57. I applied a mixture of alcohol and India ink to give the wood parts a weathered look, as I did to the other wood parts that I added to the billboard framework. The backing piece had “peel-and-stick” adhesive on its front, so I simply removed the protective covering (peel) and pressed the printed billboard into position (stick).
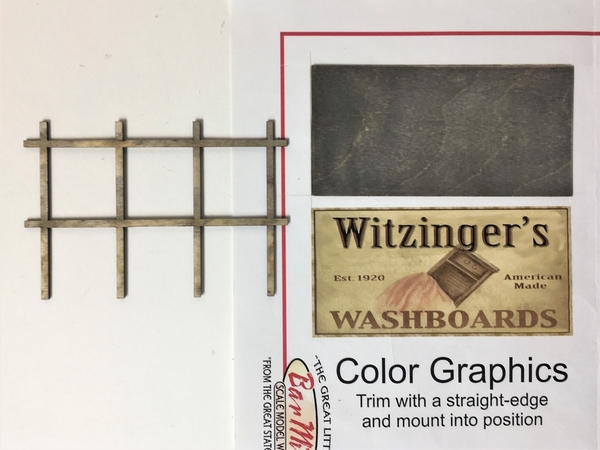
MELGAR_PHOTO_57_WITZINGERS_BILLBOARD_PARTS

No other parts to mount the billboard atop the factory roof were supplied in the kit – which I thought would not produce a secure attachment or look realistic. Therefore, I made a pattern from which I fabricated four “A-frames,” as shown in Photos 58 and 59. The pattern aided in making all the “A-frames” with nearly the same angle and dimensions.

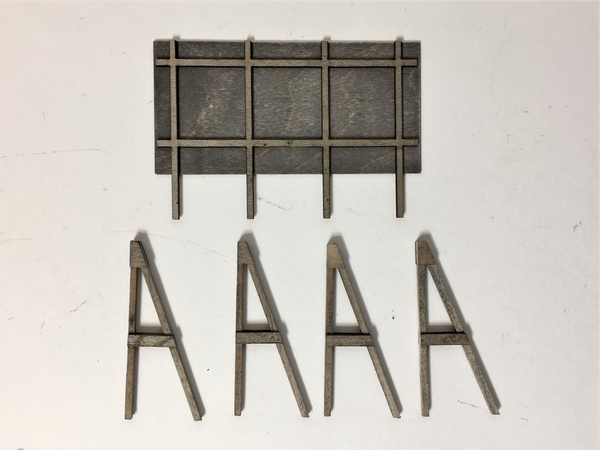
MELGAR_PHOTO_58_WITZINGERS_BILLBOARD_AFRAME_PARTSMELGAR_PHOTO_59_WITZINGERS_BILLBOARD_AFRAMES

I then mounted the “A-frames” to the rear of the billboard, as shown in Photo 60. I also added a connecting cross-member and square mounting pads at the bottoms of the “A-frames.” The mounting pads were punch-outs from the laser-cut window frames.
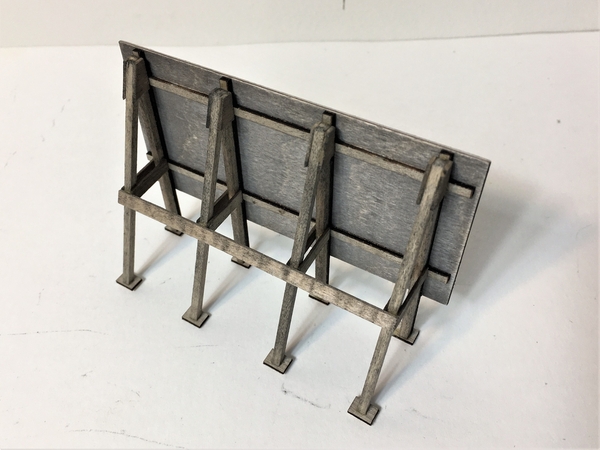
MELGAR_PHOTO_60_WITZINGERS_BILLBOARD_REAR

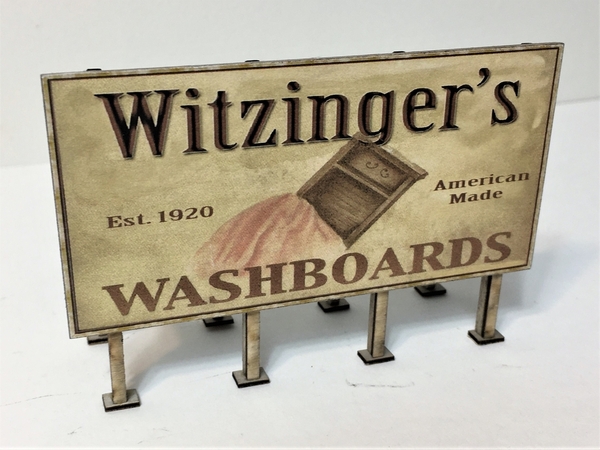
Photo 61 is a front view of the completed billboard.
MELGAR_PHOTO_61_WITZINGERS_BILLBOARD_FRONT

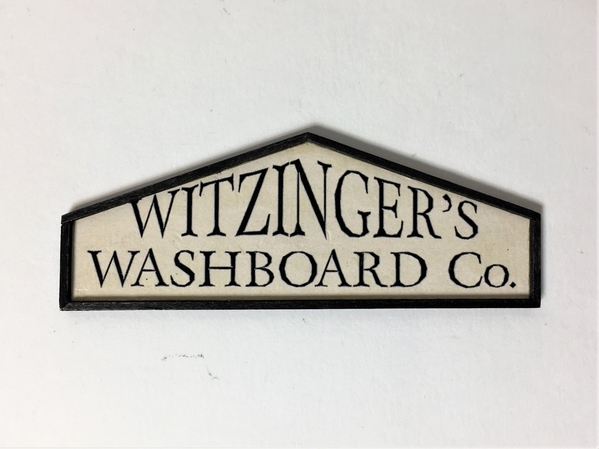
The kit also included a “Witzinger’s” sign that was sized and shaped to cover the front wall of the office above the awnings and up to the peak. Too big, in my opinion. Worse yet, the lettering was of variable size. Unfortunately, I don’t have any printing capability right now, so my choices were to use the kit sign or omit it altogether. So, I cut the sign down to a smaller size but retained the lettering and glued it to a thin backing. I also cut surrounding trim pieces, painted them black, and attached them to the edges of the sign. The completed sign is shown in Photo 62.
MELGAR_PHOTO_62_WITZINGERS_SIGN_ASSEMBLED

Photos 63 and 64 show Witzinger’s with the billboard and sign in place.

MELGAR_PHOTO_63_WITZINGERS_BILLBOARD_SIGN_MOUNTEDMELGAR_PHOTO_64_WITZINGERS_BILLBOARD_SIGN_MOUNTED

The loading dock and auxiliary roof in front of the factory doors were next.

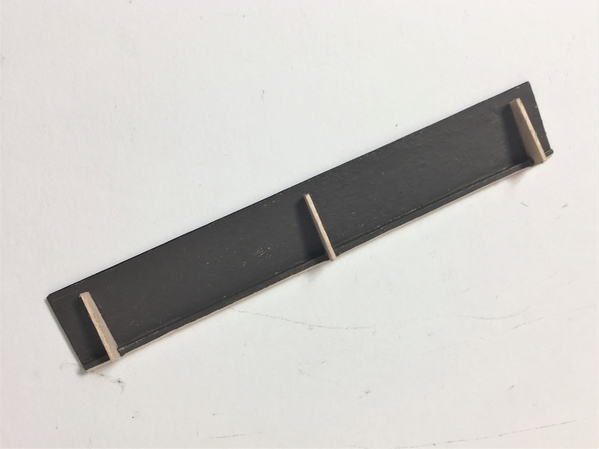
The auxiliary roof in front of the factory doors was made from a piece of basswood covered with construction paper and painted black to match the factory roof. As shown in Photo 65, I added a stiffener and three supporting brackets.
MELGAR_PHOTO_65_WITZINGERS_FACTORY_AUXILIARY_ROOF

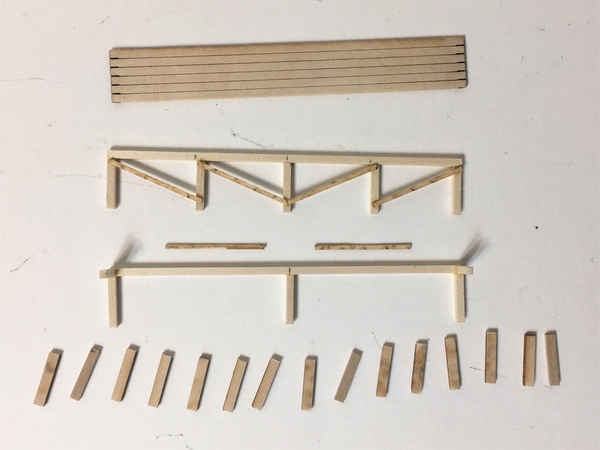
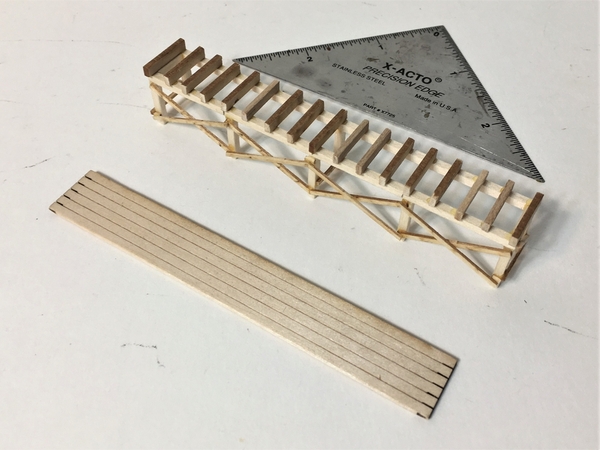
The loading dock was constructed from many small pieces, some of which are shown in Photo 66. Every loading dock part had to be cut to length individually from stripwood.
MELGAR_PHOTO_66_WITZINGERS_LOADING_DOCK_PARTS

Photo 67 shows the assembled loading dock and Photo 68 shows it ready to be attached to the factory front. It took me five hours to make the loading dock.
MELGAR_PHOTO_67_WITZINGERS_LOADING_DOCKMELGAR_PHOTO_68_WITZINGERS_LOADING_DOCK_ASSEMBLED

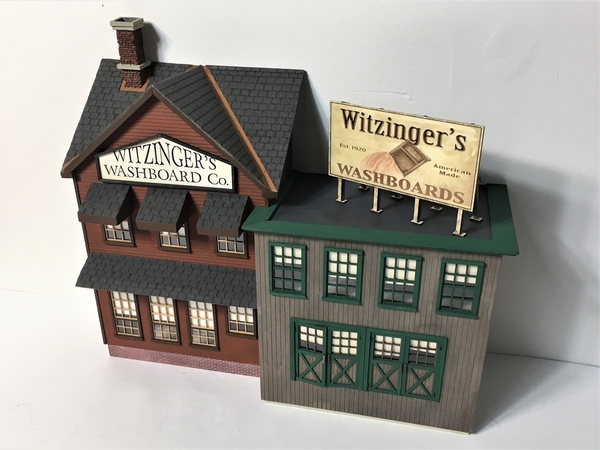
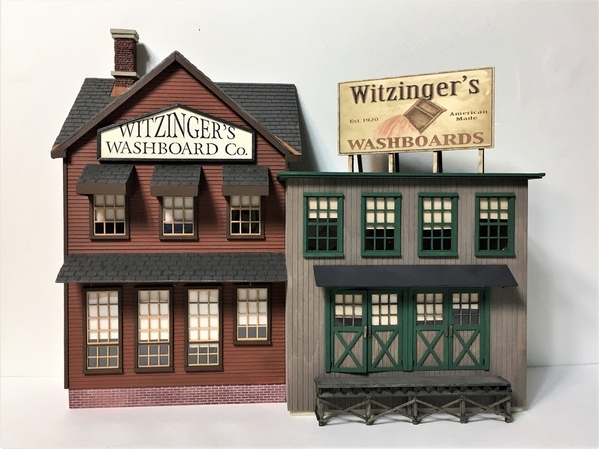
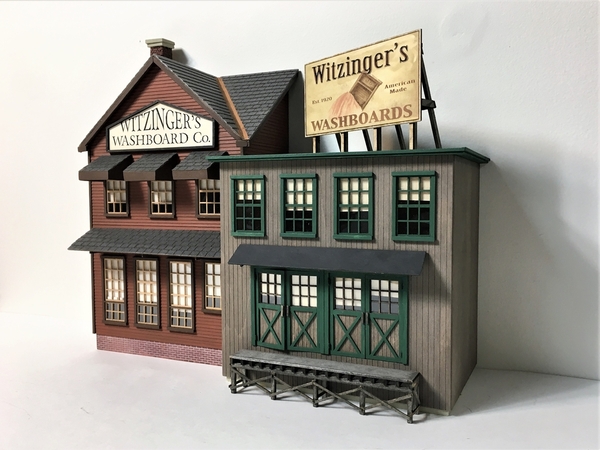
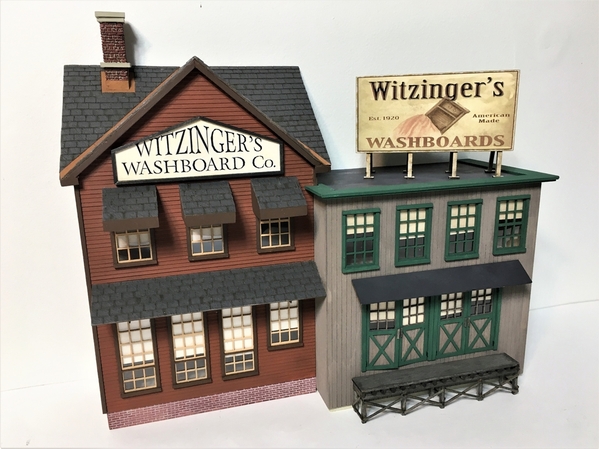
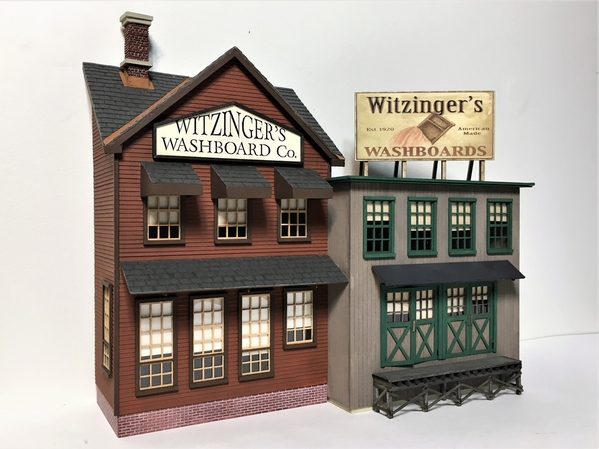
The completed model is shown in Photos 69 through 73, and on the layout in Photo 74.
MELGAR_PHOTO_69_WITZINGERS_COMPLETEMELGAR_PHOTO_70_WITZINGERS_COMPLETEMELGAR_PHOTO_71_WITZINGERS_COMPLETEMELGAR_PHOTO_72_WITZINGERS_COMPLETEMELGAR_PHOTO_73_WITZINGERS_COMPLETEMELGAR_PHOTO_74_WITZINGERS_COMPLETE_ON_LAYOUT

I spent eighty-five hours building Witzinger’s.

At this point, I plan to build another structure model for the layout expansion. Depending on the other models I select, and their placement on the expansion, there is a possibility that I will eventually expand Witzinger’s with an addition at the side of the factory.

MELGAR

Attachments

Images (18)
  • MELGAR_PHOTO_57_WITZINGERS_BILLBOARD_PARTS
  • MELGAR_PHOTO_58_WITZINGERS_BILLBOARD_AFRAME_PARTS
  • MELGAR_PHOTO_59_WITZINGERS_BILLBOARD_AFRAMES
  • MELGAR_PHOTO_60_WITZINGERS_BILLBOARD_REAR
  • MELGAR_PHOTO_61_WITZINGERS_BILLBOARD_FRONT
  • MELGAR_PHOTO_62_WITZINGERS_SIGN_ASSEMBLED
  • MELGAR_PHOTO_63_WITZINGERS_BILLBOARD_SIGN_MOUNTED
  • MELGAR_PHOTO_64_WITZINGERS_BILLBOARD_SIGN_MOUNTED
  • MELGAR_PHOTO_65_WITZINGERS_FACTORY_AUXILIARY_ROOF
  • MELGAR_PHOTO_66_WITZINGERS_LOADING_DOCK_PARTS
  • MELGAR_PHOTO_67_WITZINGERS_LOADING_DOCK
  • MELGAR_PHOTO_68_WITZINGERS_LOADING_DOCK_ASSEMBLED
  • MELGAR_PHOTO_69_WITZINGERS_COMPLETE
  • MELGAR_PHOTO_70_WITZINGERS_COMPLETE
  • MELGAR_PHOTO_71_WITZINGERS_COMPLETE
  • MELGAR_PHOTO_72_WITZINGERS_COMPLETE
  • MELGAR_PHOTO_73_WITZINGERS_COMPLETE
  • MELGAR_PHOTO_74_WITZINGERS_COMPLETE_ON_LAYOUT

Add Reply

Post

OGR Publishing, Inc., 1310 Eastside Centre Ct, Suite 6, Mountain Home, AR 72653
800-980-OGRR (6477)
www.ogaugerr.com

×
×
×
×
Link copied to your clipboard.
×
×