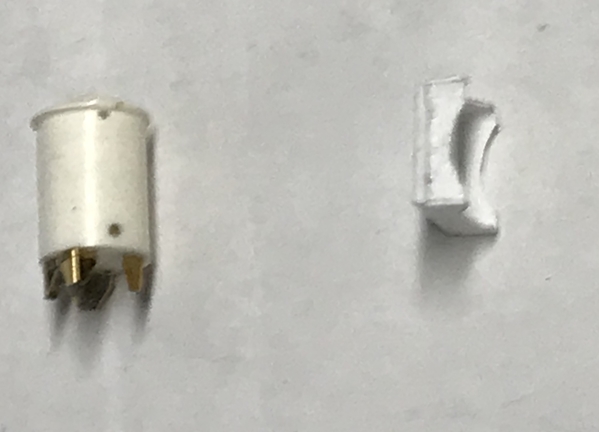
Making these stools was ridiculous. I had enough cut to produce 12 stools. I ended up with 7, and even with that, it's touch and go. They're sooooooo fragile. I had 8 done and set in the back of my work zone. A glue bottle bumped into them and two disassembled. I was able to get one back together. Instead of trying to paint them with clear gloss, I ended up dipping them into the bottle of Tamiya Clear Gloss. This worked okay, but even getting my tweezers to let go broke some joints that needed repairing. Next time I do this (actually, there never will be a next time) I would have them cut out of 1/32 aircraft ply or laser board. Laser board is rugged, but it's not wood and would need to be painted. This picture is before dipping.

NH Stools

I also coated the counter assembly with two coats on the sides and three on top. I sanded between coats with 3600 grit wet abrasive cloth. It's very wet in this image.

NH Counter 3rd Coat

Next up was the Westport Model Works resin coffee urns. They had a square plastic pad that was supposed to the the base, but it wasn't good enough for me.  So I first made a styrene set of supports for the square. I didn't like how it came out, so the next version was some brass legs bent and cut from PE sprue material.

NH Urn Base Choice

I covered the cylindrical exterior with Bare Metal Foil, and painted the top and legs with the Molotow Chrome Pen. Didn't know what I did without this exceptional source of very bright, metallic finish.


NH Urns WIP 1

Westport included a soldered assembly to represent the spigot, handle, valve and level tube. I installed this and then painted it also with the Chrome Pen with a touch up of semi-gloss black on the valve handle. Just tried it in the building here. I'm worried that gluing the stools in before all the front window work will put them in jeopardy. They're that delicate. Westport's urns appear to be of two different sizes.

NH Urns Done

I think I'll put all this aside and start working on all the details that surround the curved from window. There's trim above and below that will need to be crafted. I also need to start building the turret room, the mansard roof and the gables. Lots more to do. Just for the heck of it, I may attempt to build some stools out of styrene. I have the proper sizes to do it. Styrene does give you the opportunity to weld the pieces together which may be more secure. These stools could also be 3D printed in a laser/resin process. 

When we went with grandson #1 a week ago to visit the University of Wisconsin, we got to tour their "Maker's Space". They had 9-filament additive machines and 5 FormLabs Laser/Resin machines. The laser machines, since they put no torque or load on the part being created, have very high resolution and can do intricate shapes (Bar Stools) without lots of supporting webs. I was drooling and wanted one in my shop. Unfortunately, they're over 3 grand and that would make some very expensive bar stools. It's the modeler's dilemma.


Attachments

Images (5)
  • NH Stools
  • NH Counter 3rd Coat
  • NH Urn Base Choice
  • NH Urns WIP 1
  • NH Urns Done

I'm not following daily, because I want to view "Nighthawks" as a whole, enjoying the finish and working back into the build in a reverse order. I have always loved the image.

However, I caught the Afib out of the corner of my eye..... So good to hear it is mild. Mine is ok, but Afib runs strong in this family as well, even some teens. Hasn't killed anyone, just there.... or not there when it skips

I started having occasional irregular heartbeats shortly after I was married in 1968. I don't think there's a direct connection. I was also a first year shop teacher in a rough school (actually teaching middle schools kids is rough under any circumstances), and I started having full-blown anxiety attacks when I got those irregular beats. It was the anxiety attacks that had me firmly believing I was going to die in my 20s. I didn't know what they were and they scare the crap out of you. It took years and some very serious introspection to gain control over them. Now I'm going to be 73 on Monday so I guess my fears weren't very well founded.

The aFib was kind of new since my irregular beats were mostly of the pre-ventrical contractions (PVCs) variety. What really solved my anxiety problem was very bizarre. I will tell the story. 

In 2005 a very close friend of ours had a myocardial infarction. She's 5 years younger then me. With my crazy heartbeats, I started having sympathy symptoms. Then, on a business trip to San Francisco, I almost thought I was going to croak after dragging my roll-around travel case up one of those ridiculous hills. I went for a stress test. 

I finished the test, and the thallium die showed that immediately after the test that my central coronary artery was not profusing properly. After resting, the flow was fine. So they scheduled a cardiac catheterization. I'm a techie so I was watching the monitors during the test and could see nothing wrong (a layman's view), but the first test they do is insert the probe into the ventricles to measure various parameters. When he touched the inside of my ventricle my heart did the same palpitation that it had been doing for 25 years. I asked what he just did, and the doc replied "You have sensitive ventricles". And the then touched it again and the same reaction happened. I had an epiphany right there on the table.

One of the typical times when I would get the PVCs when we'd be on the interstate and passing over the expansion strips just when you enter an overpass. That jiggle was just enough to shake my torso and cause a PVC. And of course we'd be driving at 75 mph, and then I'd be fighting an anxiety attack. Now… all of a sudden, I find that it's MECHANICAL!. It is not pathological. It explained a lot since the PVCs also happened when I was scrunched over my computer (terrible posture) and my rib cage was compressed. 

Oh… as an upshot, my catheterization showed no occlusion of any artery. While on the table the doc said he "wanted to trade arteries." So my cardiologist dismissed me since I wasn't a heart patient. And that was kind of the end of the anxiety attacks since there was there nothing really to be anxious about. The aFib happened much more recently, but since it's not fatal, and I know exactly what it is (and why, since I had an echo cardiogram which showed a slight Left Artrium dilation which can cause aFib) I don't have any anxiety attacks over it.

I'm writing all this because others may be having similar, weird things that are scary, but you don't feel comfortable telling anyone about them. In the 70s, after I had the anxiety attacks for about 10 years, I was having lunch with a vendor and somehow the conversation led around to them. He had them for many years and controlled them, by self-hypnosis. I was relieved to find I wasn't the only person in the world with this affliction and found that I could stop the attack if I caught it just as I felt it kicking in. If I didn't catch it right at the beginning it would go the full monty. Sometimes I did, and sometimes I didn't. 

Back to train stuff. Started building the two-layer Mansard roof which gives this late 1800s building so much character. There is the lower roof which spans the width of the building plus a small 1/8" overhang on all sides, plus the attached base for the turret. 

Instead of pasting the plan onto the large piece of 1/16" aircraft ply, I laid it out the old fashioned way. I made datum lines and measure x and y coordinates to set up the intersection points for the hexagonal turret.

NH Lower Roof Layout

I drilled the 5/16" hole in the center of the turret space for the pin on the lower turret dome and then fit it to the building as a test… and it passed.

NH Lower Turret In Place

The Mansard curved walls are supported by six formers that held together in egg-crate fashion. I did all these layouts on SketchUp and then Illustrator/CorelDraw so I was pretty sure everything registered properly. I glued the plans to the ply and then cut them out individually on the scroll saw. A little clean up of the straight edges on the belt sander, and then clamped the sets (3 each) together to finish sand the curve with a Dremel sanding drum and opened up the notches so they would fit together. I suppose I could have screwed six pieces of ply together and cut them all at once, but that's an afterthought.

NH Mansard Frames Patterns

I glued them together with CA and Aleen's and held them flat to the surface with a piece of ply (the upper roof) and a heavy cast steel angle block so they would dry nested together properly. Not glued down yet in this image.

NH Mansard Frames

After gluing down the frames (again with Aleen's and CA weighted until it set), I dug up some old and very poor quality balsa sheeting left over from the monster B-17 project that was completed 8 years ago. I learned a trick building that plane; soaking the balsa with vinegar to make it pliable. Normally you wet the convex side of the curve where the grain swells and helps form the curve in the direction you want, but this balsa is so bad I soaked both sides. I used this balsa to build the bomber's fuselage and it was just awful. I scrapped all of it for the wing skinning and bought all new material. This is not that good stuff.  I had to find pieces that weren't already split. After soaking them I glued them down with both thin and medium CA.  I estimated the corner joint on the first piece by holding a straight edge held as close as I could with the diagonals I drew on the roof and used a #11 blade to cut it that shape. I then used that newly cut edge to trace the intersecting next piece and trimmed accordingly.

This was much easier to do on SketchUp. You skin both edges and click on "Intersect object with model" and it puts lines on the drawing where the parts contact one another. You just erase the extraneous edges and you have a perfect junction. It's a bit harder in real life.

NH Mansard Roof WIP 2

I ran out of time and have one more face to install. I will finish sand the corners and the base and then paper them over with first, black construction (tar) paper, and then with Rusty Stumps Victorian Fish Scale Shingles. Before I do that, I will paint the exposed portions. I also cut the upper roof flat, and then will cut the slightly pitched actual upper roof surfaces and their triangular supports. These too were laid out from SketchUp. I will put up a barrier board around the roof's perimeter (rain gutter). Downspouts will connect to scuppers. 

I have a lot of errands run tomorrow and Friday which may curtail a lot of shop time, but I'll try. 

Attachments

Images (5)
  • NH Lower Roof Layout
  • NH Lower Turret In Place
  • NH Mansard Frames Patterns
  • NH Mansard Frames
  • NH Mansard Roof WIP 2

Finally got a couple of hours work out of fastly-growing #2 grandson. He leaves on Saturday to visit other set of grandparents in California, and when they return school soon starts, so this session may have been it for a while. He turned 14 in June. That is not a real Herman Miller Eames Chair he's sitting on. It's a 40 year old knockoff we bought in the late 70s. The real one is upstairs without it's bottom cushion since a button popped off and it was sent back to H-M 5 weeks ago. They take a lonnnnnnng time to do warranty work.

NH Helper Making People

He made some sugar dispensers and napkin holders and then started working on the first person. Making O'scale people from scratch is not for the faint hearted and I really wonder how Artista does it. Sugar dispensers are clear scrap plastic model sprue paint the that Molotow Chrome Pen and some white put on with a toothpick.

NH Suger Containers and Napkin Holders

I probably will need to make the people because at some time in the not-to-distant future they would be on the critical path and will hold up buttoning up the building.

While grandson was doing his work, I was continuing to work on the Mansard roof. I glued on the upper roof base and trimmed the edges to conform to the curved lower roof. I then cut from patterns the upper pitched roof panels and the angle supports that lie underneath. I had to sand and trim the supports so they were all the same. This picture shows the in-process step of the gluing the roof pieces onto the forms.

NH Upper Roof Construct

After all four pieces were in place, I added some filler material under each of their exposed edges and used thin CA to tie it all together. Sorry about the soft focus.

NH Roof Before Filling

Last thing I did was add a bunch of joint compound to fill in all the remaining gaps and blemishes. This will be soldered next session… tomorrow? Not sure… exercise and then taking grandson to tennis practice. Otherwise, it will be Monday, which BTW is my 73rd B'day. I'm going to use some Balsarite balsa conditioning coating to seal it and make it more secure to accept the adhesive on the "tar paper" that goes one next.

NH Roof with Mud

While this was starting to dry, I began working on the turret structures themselves. I'm using styrene for all the construction other than the lower plate since it so easy to hold together with solvent cement. As I was cutting the other plates to support the window sets I realized that the two small edges of the bottom hex plate go back into the building at right angles to the building and NOT the correct angles to complete the total hexagon. But, the rest of the tower needs to be hexagonal. We'll see how this works out.

This building is why model railroading is such an amazing hobby. It uses techniques from all kinds of model making, even including miniatures and doll house building. It has some electronics in the LED lighting system. It uses scratch-building model airplane techniques in the use of former and balsa skinning. And lets not forget fine arts sculpting in making those four tiny people. I am not good at sculpting and am not hopeful that I'll learn how to do it soon enough.

Attachments

Images (5)
  • NH Helper Making People
  • NH Suger Containers and Napkin Holders
  • NH Upper Roof Construct
  • NH Roof Before Filling
  • NH Roof with Mud

Your grandson did a great job on those small items.  I agree, I am amazed at how folks can make such small items so realistic.  Our older daughter has the knack!  She got it from her late maternal grandfather.

On to the Mansard Roof!  That is quite an undertaking as well!  Well, it seems tough just like the turret!  You are doing a wonderful job, and of course the choice of material and methods have a lot to do with it!!  We once lived next door to a house with a Mansard roof, and I would often look at it in respect for the builders.

Thank you as always...

Very short session today. I sanded the joint compound on the Mansard and added just a tad more to further fill a depression. Joint compound shrinks a bit so two coats is often needed. I then got back to the turret structure.

The upper turret roof is framed in 1/8" square styrene that serves as a spacer and the upper structural framing supporting the windows.  I then sanded the injection molded Tichy windows on the True Sander so the edges were truly square. I set the Chopper fence to cut more 1/8" stock to make the side framing and glued these to the windows. I had sanded one end of the square stock and cemented it flush with one end of the window frame, and left the side pieces just a but long which I'm then sanding square and flush on the sander again.

NH Turret Build 1

And then, as you can see, I ran out of 1/8" stock and will run to the LHS today while grandson is at his tennis lesson. Won't have any time when I get back to work more so it will wait until Monday. There will be some corner gaps as I glue the four windows around the turret and these will be filled with some flat stock that will meet tightly in the corners. I will look pretty good. I will have to glaze all the windows before gluing them to the turret since access will be limited.

Went to the LHS and got what I needed, but as predicted, by the time I got home from the tennis lesson, the day was over.

I was seriously about to buy another plastic kit to build; a Takom kit of the M1-A1 Abrams MBT with a complete interior including the gas turbine power pack. I've been looking at it on line and saw it at the shop last week. So I was going to buy myself a birthday present and… it was sold. So if I want one, I'll have to order it and then it won't be an impulse buy, and I'll have to be thinking about it more. Then there's the problem of having about 8 other high-scale models on my wish list and if I'm ordering one, should it be that one? Oh! The decisions that I'm required to make. And then there's more train stuff, getting the Bronx Victorian laser cut, and getting to work on the engine house. Will this torment ever end???

Thanks Pat… yup! That's the general idea. Getting them in the young impressionable age...

Friday's image didn't post…hmmm.

Today I assembled the turret's window structure. I had to buy additional 1/8" square to do it and got to work today to finish this important step.

The side rails were joined to the sides of the trued-up window frames, both ends sanded so they were flush and square and then joined to the upper hexagonal frame which had it's own 1/8" square stock added. I used the centering lines on the hex pieces to guide the razor saw to create the joint angle. I then adjust the angles slightly on the True Sander.

NH Turret Build 1

While I had created a full-circle of supports on the hex piece, this was in error. Actually the hex is open at the back and connects into the attic with a hallway of sorts. So I removed the back two framing pieces and adjusted the hex piece as you'll see in this next image.

For window glazing I decided against using styrene but tried something else. Many, many years ago I was getting my shirts laundered at a place that included some nifty acetate collar protectors. I ended up saving them and throwing hime in a box thinking that, "someday I might need this acetate to make windows in some building or another." That day was today.

I had to cut the pieces to a measured width with the calipers, then cut one true end at right angles, then measure and scribe the other length and cut that. They make nice windows and I glued them in with the Formula 560 canopy cement. Dries clear. Doesn't fog or craze acetate.

NH Shirt Plastic Windows

I needed to then mask the window frames and acetate so I could spray the entire turret without fouling the windows AND I could glaze the windows AFTER putting the turret together since there's limited access.

NH Turret Window Masking

Instead of attempting to glue the styrene window frames to the wood turret room floor, I made a another hex piece that would hold the window frames and this would be glued to the wood substrate. Here's the windows glued to the bottom frames. The rearward view shows the modified hex plate.

NH Turret Windows

The gaps at the frame junctions needed to be filled. I'm doing this with some thinner strip stock joined at their edge. I just got the first corner done before we had to leave for my birthday dinner.

NH Turret Trim Start

I had to try it out on the building. I'll be building a clapboard wall that will be coped to snuggle against the Mansard portion of roof, continue over the top to the mid-point. I'll then build a mildly-curved roof similar to those that will run back from the gable windows. You can see the added piece I put on the hex plate to change its configuration.

NH Turret Fitting 1

Getting the turret built was a big step and a critical one to the appearance of this building. I had to change its dimensions since the Tichy windows were taller than the laser cut windows that were part of my original design. In fact a lot of thing changed when I went from the laser cut to the DIY build.  I'll be making a cardboard template of the side walls since they're going to require some fancy cutting to nest into that roofline.


Attachments

Images (6)
  • NH Turret Build 1
  • NH Shirt Plastic Windows
  • NH Turret Window Masking
  • NH Turret Windows
  • NH Turret Trim Start
  • NH Turret Fitting 1

Thanks guys! And Boy! What a load of effort. I did have a computer drawn template from the laser-cut version which I could have used to build the intersecting curve, but I change both the size of these side pieces AND the angle at which they join the roof so that drawing would not be accurate. Instead, I first cobbled together a cardboard pattern which I thought (notice that word…thought) was a curve match (top picture). I traced the pattern onto some clapboard siding and cut it out. It didn't fit! So I added pieces to the back to keep approximating the curve. (bottom picture). Point of information:  

NH Side Panel Fitting

This happened on both side pieces. I then traced that piece and made a second set out of clapboard. These were better, but there were still gaps that were too big for my standards. I then traced these pieces and then adjusted the curve to further close the gap. This third set worked pretty well, but the left side was still not as good as it could be so I made one last piece. That makes 7! It took just about the entire afternoon. Make sure you're cutting the clapboard with the boards facing in the right direction. I made this boo-boo when cutting the last version. DOH!

But the results I think are worth it. I had to put more backing pieces behind these panels so there were places upon which to glue them. I will also add some thin trim pieces over the junction between the windows and the panels.

NH Side Panels

I have absolutely no idea if this is even a remotely prototypical way to bring a turret into a building. It's different than my 1957 article and is different than my first set of designs, but it should work...

For the roofing over the turret hallway, I'm going to make it a slightly curved roof that will transition to the flat front roof. I made some formers to support this roof. The last one was still curing and will go behind the other two. It will be covered with "Tar Paper".

NH Turret Roof Formers

I took a picture on the sun porch with the top and bottom turrets in place.

NH Turret Status 2

Something was missing. Actually, several somethings. There needs to be something under the top turret which I cut as a circular piece of 1/16" ply that will extend out to the points on the hex roof. And then threes more work on the bottom. There is a small dentil molding that is under the main roof edge and also wraps around the underside of the turret. I had already CA'd the lower turret in place when I realized that more work was needed so I popped it off. 

The first step was to make a backing spacer to support the band board that the dentil pieces will be glued. The dentil pieces are going to be 1/16" deep (0.063") and the band board will also be 0.060" so I made a hex piece that was .123" back from the turret edge. The band board will only be under the turret. The dentil will be glued to a much thinner piece around the building perimeter since I only have a 1/16" roof overhand with which to work.

NH Under Turret Spacer

I have some half-round Evergreen strip stock to put a nice edge on the upper roof, and I have to build the s dormers and the chimney. For a little (6" square) building, the roof has plenty of challenges. It's a curse… I never pick stuff that's run of the mill. BTW: the roof has some 1/8" strip wood stock now placed so it can be easily removed and replaced. I don't like gluing down roofs unless I absolutely have to.

Attachments

Images (5)
  • NH Side Panel Fitting
  • NH Side Panels
  • NH Turret Roof Formers
  • NH Turret Status 2
  • NH Under Turret Spacer

Last session until Tuesday. Visiting our son and family over the weekend.

Continued work on turret refining the look with trim pieces and buttoning up the bottom making it ready for the dentil molding. Glued the lower plate to the upper turret, and started working in earnest on the gables.

I added the band boards to the perimeter of that hex piece I cut yesterday and then traced it's outline onto another piece of 0.040" sheet styrene, cut that our and glued it to the previous assembly. While it dried I laid out the 1/16" offset line on the turret bottom which would be where this assembly will reside. I then added some thin strip stock to trim off the area below the windows since there was exposed plywood there. I sanded the sides of the bottom assembly and then thick-CA'd it to the turret bottom.

NH Turret Final Trim

I finished up the formers for the hallway roof and then sheathed it with thin (0.010"). It's a slightly compound curve and therefore, the un-stretchable styrene is not particularly flat. For the roofs stemming from the gables to the center of the building I'm going to carve the shape out of balsa. I probably could have done the same for the hallway roof also, but didn't.

Here's a picture showing why the turret bottom is notched and how nice it snuggles next to the building.

NH Turret Underside Fit

I glued the base plate to the upper turret roof. It needed to be clamped to get the two pieces nice and tight, but the turret roof has that brass pin so I needed to compress the parts with clearance for the pin. I used an old socket wrench socket and clamped it in the wood working vise.

NH Gluing Turret Bottom

For the gables, I'm taking a different tack. Instead of trying to cope the side pieces to match the Mansard curve, I just made a couple of parallel cuts and removed the Mansard in that area. This means I can just build a straight cut side. I have drawings of the gable facings and again spray glued the drawing's back and stuck it to the backside of the clapboard sheet (making sure to check to see which direction the boards were going). I cut the window opening before separating the part from the big sheet to give more to hold on to. And instead of trying to bull my way through with the Xacto, I made three cuts to establish the line and then finished up with the micro-saw. This put a lot less stress on the part and gave a nice square edged hole. I then cut the rest of the perimeter the normal way. 

I awoke this morning thinking about how to make the gable rounded roofs. I didn't want to go the same route as I did for the hallway. I decided to recheck the 1957 article and, even though the whole building was illustration board and strathmore (old school for sure), he used carved balsa for these gable roofs. I have no probable carving balsa as can be seen in this picture of the huge amount of carving I had to do to make the four engine nacelles in the 1:16 B-17. The side and rear parts are carved from solid balsa.

Nacelle fairing bottom outboard 01

I don't have any balsa blocks so I glued up a stack of scrap that I had. I ended up with enough to do the three roofs… just barely enough so I can't screw any up. Luckily, the two gables' roofs that flank the turret aren't that long since they terminate at the hallway edge, not going to the very center of the roof.

NH Balsa Stock For Gable Roofs

I glued up one gable and tried it for fit. This method will work well, and solved a bit of a challenge and saved a few minutes of finicky work. Before gluing up the first one, I traced its side panels for the other two windows. I almost didn't do that, but caught myself. Again, had to pay close attention to the clapboard's direction. I also would like the boards to match from front to side. I'm not worried about the little imperfections at the gable cut edges since this will be hidden by shingles and flashing. Speaking of flashing, the roof will be "slate" so the flashing should be copper, and I have that terrific adhesive copper foil tape that I'm using for the surface mount LEDs that will work perfectly. I can even chemically treat it to get a natural patina.

NH Fitting the Gable 1

So until next Tuesday, Y'all have a nice weekend. In looking at the picture, I think I'm going to chop out half the mullions in the gable windows so they match the configuration of the rest of the building's windows.

Attachments

Images (6)
  • NH Turret Final Trim
  • NH Turret Underside Fit
  • NH Gluing Turret Bottom
  • Nacelle fairing bottom outboard 01
  • NH Balsa Stock For Gable Roofs
  • NH Fitting the Gable 1

Thanks guys! Just lost the entire post because I left the page without posting it. DOH!

The visit was good. My son is having a new house custom built and it's a big house that is now fully in sheetrock. There are many, many decisions that they're making on everything. I warned him that doing a custom home is an experience that can get very onerous. It's going to be a great house, but it's a lot of work.

Instead of stopping overnight, we drove straight through on Sunday. Instead of the usual 9.5 hours, the trip took almost 11 due almost entirely to nine, single-lane, 55 mph, long construction zones, a couple of which had significant backups. But I did do work yesterday and today, but didn't post last night. This post then covers two sessions.

I finished cutting and gluing up the plastic parts of the three gables and trimmed the middle horizontal mullions from the gable windows to match the style of the rest of the Night Hawk's windows. I then cut the balsa that would be the rounded gable roofs. The first one I did incorrectly. I made it so the wood fit between the plastic sides.

NH Gable Roof Problem

This position made it impossible to properly shape the roof. I did the other two differently, putting the wood on top of the side rails using thick CA. I then went back and re-skinned the incorrect one with thin, vinegar-soaked balsa and re-shaped it. There was a lot of area needed filling which I did using Milliput 2-part epoxy putty. This needed to cure completely so I let it harden overnight before attempting to grind it to shape. This picture shows the putting before finishing. Another mistake I made was using thin styrene sheeting to make the hallway roof. That too should have been shaped balsa. As a result the roof has a lot of crazy surface shapes. I am hoping that when covered with roofing paper and shingles the topography will be less obvious. That said, old roofs on real buildings can be pretty irregular too.

NH Gables

Today, I used the Flexi-shaft Dremel with a sanding drum and re-contoured the most obvious lumps and bumps. There were some smaller divots that needed filling so I used Tamiya filler this time. While this was curing I started building the chimney.

The chimney is made of four pieces of Plastruct brick sheeting and some square stock. I beveled the edges so the bricks would match at the corners and further helped by aligning the short and long bricks so the corners look right. The top works are pieces of various sizes of Evergreen styrene. The top has a hole in it which will be enlarged to fit the flue tiles. It is not finished and needs some filing, filling, mortar, painting the "concrete" and weathering.

NH Chimney Construction

Like with the gables, instead of shaping the chimney to nestle up to the irregular Mansard curve, I cut a "square" hole in the balsa roof. It's not a square since it's entering the curve at a very oblique angle. When the balsa is removed, there is a structural member, the former, behind that would block the chimney from sitting down. Instead of attempting to cut this web away, I simply notched the chimney. Here it is being test fit on the roof. You can also see in this image that the roof filling is much more regular looking although still not very good. I also glued on some half-round Evergreen trim on the roof upper edge to clean up that edge. It works. All the gables, and trim will be airbrushed with flat brown before roofing material goes on. I'm using the adhesive backed copper foil for all the roof flashing. That too is going to look very cool.

NH Chimney Fitting 

Oh… and one more thing. I've gotten firm communications from Railroad Model Craftsman magazine that the 3-part Bernheim Distillery construction article begins with the October issue. This thing's really happening!

Attachments

Images (4)
  • NH Gable Roof Problem
  • NH Gables
  • NH Chimney Construction
  • NH Chimney Fitting

Add Reply

Post

OGR Publishing, Inc., 1310 Eastside Centre Ct, Suite 6, Mountain Home, AR 72653
800-980-OGRR (6477)
www.ogaugerr.com

×
×
×
×
Link copied to your clipboard.
×
×