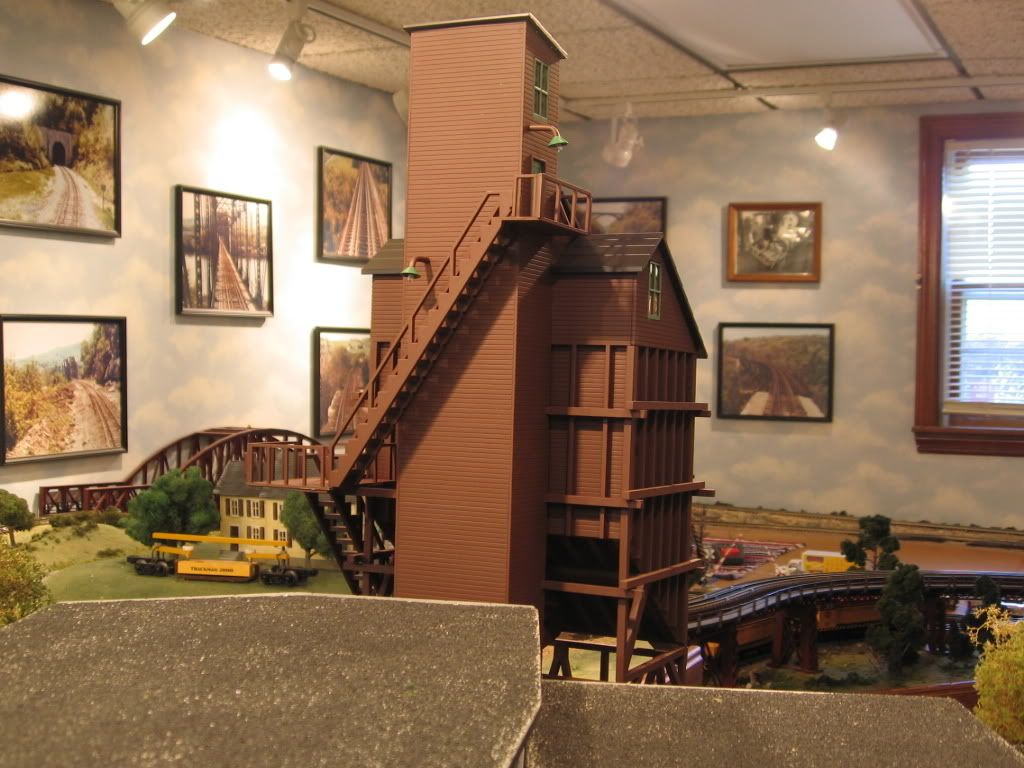
I've done some research on these and have decided on a fairly generic version. I drew up working drawings in 1/4" scale and have begun construction.
Here are a few pics. Sorry bout the poor lighting
Al


|
|
I've done some research on these and have decided on a fairly generic version. I drew up working drawings in 1/4" scale and have begun construction.
Here are a few pics. Sorry bout the poor lighting
Al
Replies sorted oldest to newest
Al:
Nice start - are you using basswood or balsa wood?
Joe
Hello Joe
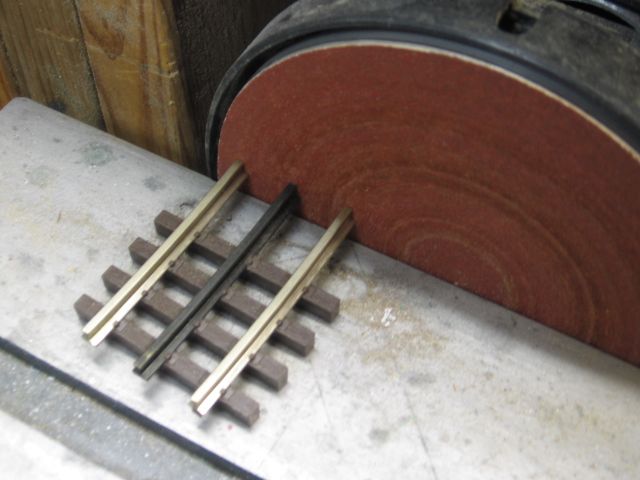
I actually ripped a piece of pine 2x4 into 3/16" beams and purchased some 1/4" basswood(less hassle than cutting your own).
I would like to find a good accurate mini table saw(4" blade) to do more accurate cuts but use my basic table saw for now.
I have assembled the sides and fronts, so far.
I will be working on the roof and cross bracing next. I can see myself building a few more CPR structures(sand house comes to mind).
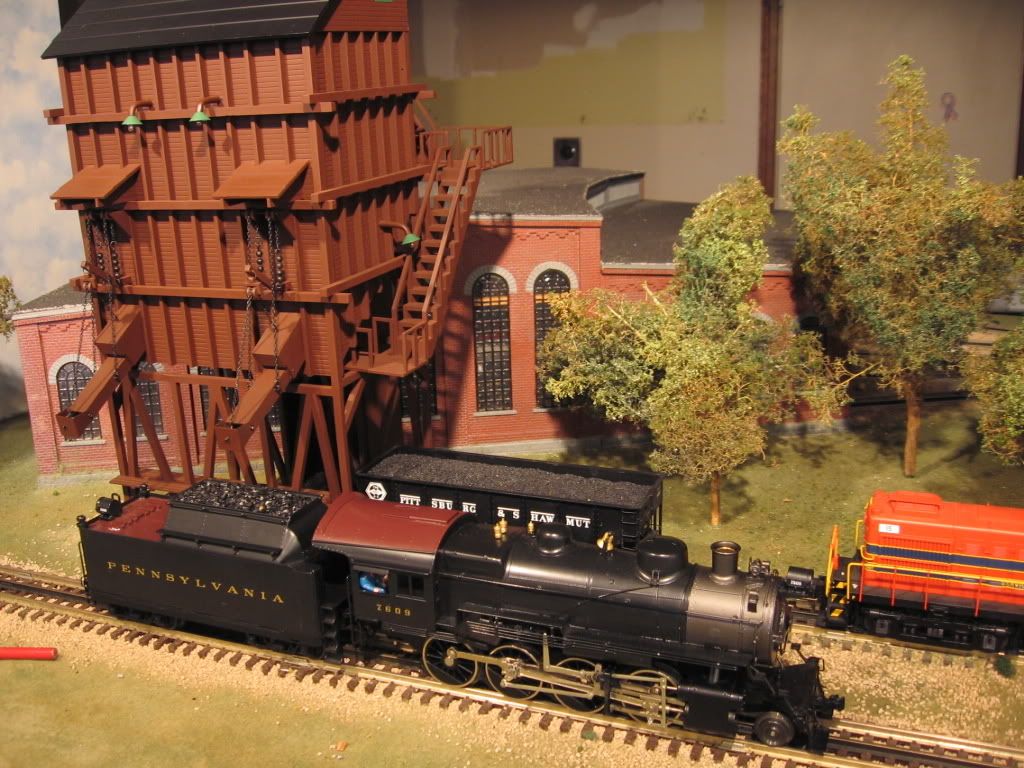
Here are few more pics of the progress from today
Al


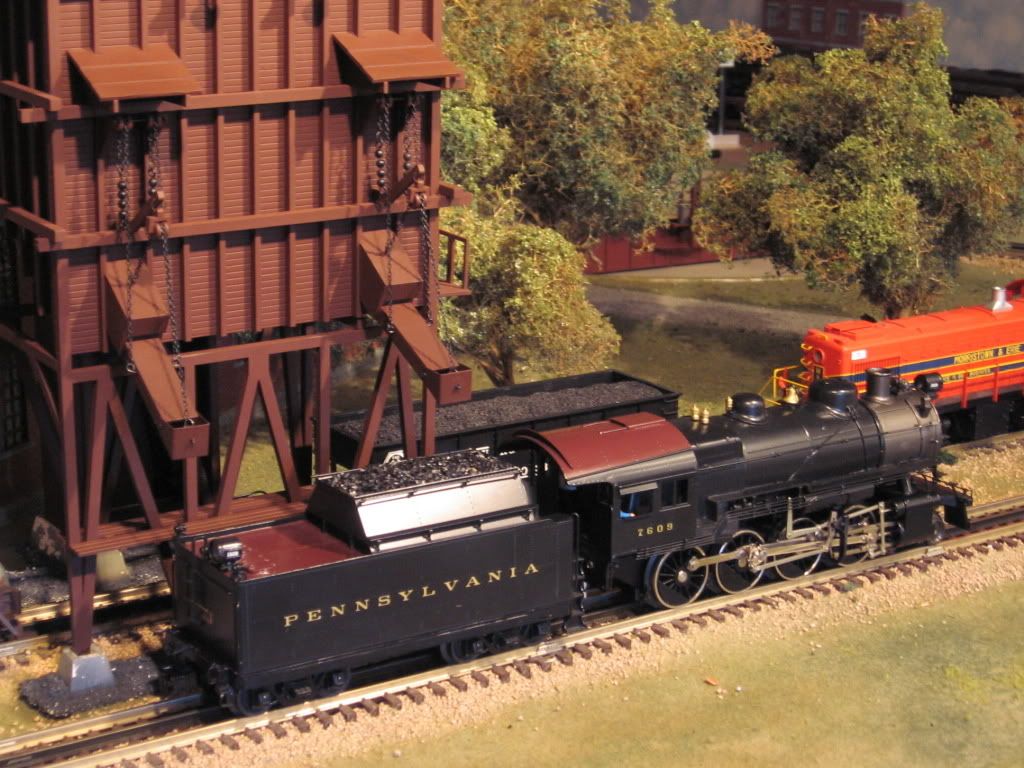
Here is a Prototype pic from back in the day.
That's gonna keep you busy a while, Al.
Hi Max
Your probably correct. I am enjoying the challenge of scratch-building and saving some $$ building one.
You should see my layout! That's has kept me very busy in a good way as well...lol
Al
Hi Al,
I also scratch built my coal tower. It's been about ten years since that build, and I still remember it being at least 3 months of evenings to complete it. Worth taking your time, and making it special since such structure become favorites for visitors, and as such receive close inspection. Scratch building is why I'm in O scale...nice to see your doing the same.
Bob
Me too.
Very substantial looking prototype. Loaded with intricate, eye-pleasing hardware. Think I see a boxcar in the coal receiving track........amazingly, boxcars were also used in company coal service !
Wow your doing a great job.Nick
The Golden Gate Depot, coaling tower from several years ago. Way back when it could be had for $160, new. Your scratch built model is wonderful, thank you for posting pictures. ![]() Mike CT
Mike CT
I had purchased a lot of Kapplar lumber, in dimension pieces, which seemed a bit easier to work with. This inside detail of a Korber 304 Round House was done with Kapplar Lumber. Most is Bass wood, a bit, more straight, and maintains straight and true, IMO. Can be stained most any color you want. Again beautiful project thanks for posting. ![]() Mike CT.
Mike CT.

I purchased a mini table saw last Tuesday of the 'bay and it showed before the weekend! So I have started cutting the bracing and installing.
Seems to be going a lot better with the saw for sure.
I had a first run of the GGD coaling tower. It was detailed and the G scale staircase was removed and an O scale version installed.
I sold it to a fellow 3 Railer in town here.
I was itching to build a CPR Version and so far, it's been a great project.
Here are a few more pics showing the bracing
Al


It has been a marathon Sunday workin on the project. A good 8hrs of time put in figuring out how to cut the acute angles on the small bracing without loosing fingers lol.
This has been much easier now with the recent purchase of a mini table saw.
Here are the latest pics
Al


A disk sander would help with some of those angle cuts. Another nice tool is an NWSL Chopper II that does some nice accurate cutting. Save those fingers, please ![]() Safety meeting of the day.
Safety meeting of the day. ![]()
![]()
Bench Disk Sander.
NWSL Chopper. 
Hello Mike
Great suggestion! Totally forgot about the Chopper. I will be looking to pick one up.
I would like to get a belt disk sander and a a few more tools too..$$
Al
At the time I also purchased a small band saw. My sweetheart. ![]()
![]()

...a little bit more done on the bracing.
Al


Laid out the windows for the top sections of the tower. Cut out one end tonite, to see how they will look. They are a little over-size(by 6" scale) and have the incorrect # of panes, but close enough. The windows were kitbashed from extra's from my Atlas roundhouse kits
I have been thinking about having operating chutes(atleast the front two). This would be a cool feature, if I can pull it off.
Hopefully, have the roof assembly completed this weekend and maybe all the ladder details, etc
Al


Good job! I like the saw! Been thinking about that for a while. All I have is a big chop saw, saber saw and Skil Saw. Great for building a layout and terrible for cutting O'scale pieces.
Here's a Gloor Craft coaling tower I built in 1997. I re-designed the chutes to make them sort-of operational and added lighting and NBW castings. The feeder track runs down the center, but I never installed an opening in the Ross track to simulate an unloading pit.


Well, I have finished the roof and it has been a challenge to get it "right".
Trainman, thanks for the encouragement!
I ended up finding a new 6" disc/belt sander for $120 and has made things easier.
Here are a few more pics showing the progress
Al


Like the project and detailed explanations. Neat structure and great modeling skills.
Thank you Pennsynut for the kind words.
I have purchased a bunch of Plastruct motors and pulleys for the operational end of things. Approx $25. This more $$ than I had into the project thus far lol.
I will make the chutes out of brass stock and figure out how I will design the system to work.
I am doing this on the fly, so bear with me.
I have drilled out where I will install 2-56 bolt and nut detail. Of course there is an approx 6"x6" plate behind each nut(so how do I do that?lol)
Here are some updated pics taken outside, so you can see how I managed to glue it all together.
Al


That is nice! l have a couple of different commercial kits for large coaling towers, but think l need to either kitbash one or scratch build a smaller one chute tower that would look logical for a short line in the boonies. On the "to-do"list.... Haven't found a one chute wooden tower photo l like.
Albert that sure is one quality build you've got going on. Enjoy and be proud.
Its coming along great!Nick
Well, here is tonites progress. I managed to install the windows on the back of the tower which would illuminate the stairwell/conveyor hoistway.
Framed almost all the windows and hopefully start the pilings/footings for the base. Here are a few more pics
Al


Albert that is quite impressive. Did you use masonite for the siding and roof? How did you scribe the "boards" into the siding? What gave you trouble while making the roof?
Abutments, pilings, footings..whatever you would like to call them(base?lol), were laid out and has now added the "missing" height, in my eyes.
I used 3/4" pine and 1/8" MDF for the foundation.
Al


Hello CoachJoe
To scribe the MDF(masonite) I first use a sanding block to remove the shiny glossy finish. This is essential to have white glue adhere correctly to bare "wood"lol.
I mark out my lines in pencil. Then, bring out the set square and I use a razor saw corner and scribe the line.
You can go over the line back and forth, to get the "depth" of line you like.
Home Depot sold 1/8" MDF at one time but now only Masonite board seems available.
I hope you go ahead with some of your own projects and see how "easy" it is to make your own projects.
The learning is in the mistakes and I have made a few with this project lol. It's all good and try never to get discouraged.
There is an in credible pool of talent on the OGR forum and lots to see and learn from others here.
Here is a pic of how I have done the lines
Al
Ooops! Yes, the sides and roof are all 1/8" masonite(MDF) which I had to remove all the gloss finish off with a sanding block(220 grit)
Al
I wasn't happy with the look of the base, so I went back to the drawing board to get it "right". I decided on one piece of 1/8" x 9" x 9" to layout the grid for the 3/4" cube pilings.
Here are the recent pics.
Al


Kitty thinks it's pretty. Me too.
Did someone mention a cat?


albertstrains posted:I wasn't happy with the look of the base, so I went back to the drawing board to get it "right". I decided on one piece of 1/8" x 9" x 9" to layout the grid for the 3/4" cube pilings.
Here are the recent pics.
Al
Nice work Al. But now the secret is out as to who is really supervising your project!!
Nick
Well, now everyone knows the "Cats out of the bag" lol
Kali is the Chief Carpenter overseeing construction and has a critical eye for detail.
Lola, well ......she plays with stuffed animals under the layout. This crew helps keep things working smoothly
Al

Nice chamfer on the tops of your pilings Al. And a fine looking crew of supervisors you've got there.
Max your Shepard is so life like. Your modeling skills always amaze me. LOL. But that is truly one handsome dog a near perfect specimen of the breed.
Thanks, Joe.
I had a little time tonite to work on the "nuts n bolts" of the project. Ideally, I would have used square nuts if available, but hex will work as well.
Here are a few pics showing one side with all the nuts n bolts installed. Probably look better when painted. They are too shiny imo.
Al


Why didn't you use NBW castings? Grandt has square bolt versions.
Trainman
I had used the Grandt line detail parts on a GGD tower I detailed before. I have been undecided and wanted to try the 2-56 screws to see what they "look" like.
I'm thinking these are oversize and I may order the Grandt line ones again. Not sure what size of bolts typically held these things together.
Like other tasks with this project I'm not afraid to redo things lol
Does anyone have ideas for making stringers for stairs? A jig or little known secret perhaps they would like to share?
Al
albertstrains posted:Does anyone have ideas for making stringers for stairs? A jig or little known secret perhaps they would like to share?
Al
I've used these successfully.
http://www.rustystumps.com/proddetail.asp?prod=D3502
Bob
I've made them by hand using the 90 degree corner punch sold by MicroMark, but I just purchased the laser cut stringers and treads along with the jig to assemble them from Rusty Stumps. I haven't used them yet since they just arrived last week, but I plan on using them for some upcoming projects. I'll post in my ongoing thread when I do.
I print out a template on a printer, lay balsa on it, and just cut away with a razor blade. Tedious, but not really hard.
Hi Pete
Sounds easy but I don't know how to print out a template with a printer. Lol
I decided to work on getting trains running now that the Tower has its base attached.
Here are some pics of where it will located, off track # 2 at the end of the platform.
Al


Well I decided to remove the 2-56 screws(just too big) for now and will probably go with Grandt line ones.
I have finished the main bracing and now I will be focusing on the ladders on the front, walkways and the sheave/pulley supports next
Al


Did a little work on the Tower tonite.
Made the sheave/pulley supports and have one of the Plastruct pulleys shown in one of the pics.
I have "pulled the trigger" and purchased a bunch of Grandt line Bolt/square washers to detail the Tower with. Should look good.
Next...walkways and chute construction!
Al


Well I didn't like the "look" of the pulley supports(too big) so I made new ones.
Also, debated using pre-made ladders, but decided to scratch build em(why stop now?)
Al


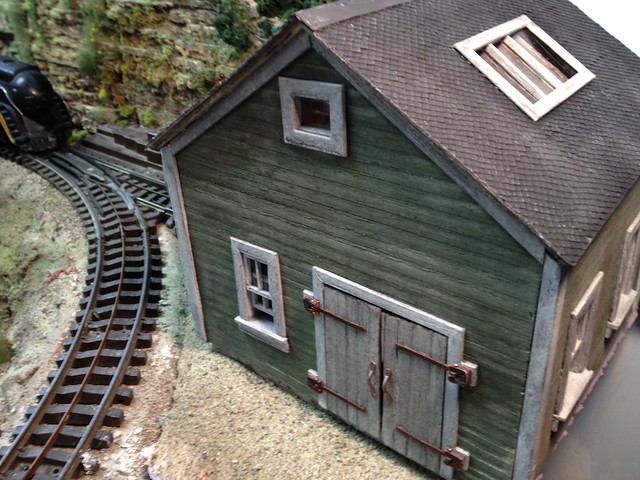
I have decided today that I am "done" all the wood construction on the tower, other than small details I will finish in the roof assembly.
Not to sure on what color this tower would have been back in the day. I have seen red oxide on most CPR wood structures but also some coaling towers that are just black.
I am going to try the tower in red oxide with yellow windows and black trim.
Decided to paint the structure before I add all the metal parts I will need to make(chutes, pulley shaft supports etc).
I thinking of 6 goose neck lites for various locations on the tower
Here are a few pics of the new paint.
Of course I will be painting the concrete pilings as well
Al


Yes! ![]()
Al,
you did a really nice job on this project.
alan graziano
Al:
Nice job
Joe
Great work and the red oxide gives it personality.
Thank you All for the encouragement! It's been an enjoyable and rewarding project.
I have painted it in red oxide for now but I'm thinking it's going to end up black...lol
The only color pic of this particular tower is shown in glorious black(with grey shingle roof).
Here are the latest pics and the one vintage color photo
Al


Great build!
Not that you asked, but if I were you I would leave the red oxide, but weather the heck out of it. Make up a heavy concentration of ink/alcohol and go at it. Follow up with black chalk. You could end up with an almost-black structure that still shows hints of a long-ago coat of red. I think that approach would honor the spirit (if not the letter) of your prototype very well, and give your model a lot of character.
Hello Pete
Great suggestion and another new skill to learn with ink/alchol! I will need to read up on the techniques.
I will also need to make "shingles" for the roof. I have a couple of ideas, mainly using grey 500 grit sandpaper and my paper cutter, but always open to suggestions lol
Al
One nice way to make scratch-built shingles is with pinking shears. I did this roof that way:
Avanti posted:. . . if I were you I would leave the red oxide, but weather the heck out of it. Make up a heavy concentration of ink/alcohol and go at it. Follow up with black chalk. You could end up with an almost-black structure that still shows hints of a long-ago coat of red. I think that approach would honor the spirit (if not the letter) of your prototype very well, and give your model a lot of character.
An excellent suggestion, Pete. ![]()
Gentlemen.....i have no idea what "pinking" shears are Lol
Please elaborate further on your method(s)....
I agree with the "honour the spirit" of the prototype. The coaling tower shown was in Winnipeg and had to been standing for almost 50 years already, when the color pic was taken.
I will need to weather this model, before I install the chutes, pulleys and counter weights.
Al
https://www.google.com.au/sear...biw=1920&bih=940
Used for dressmaking, Al.
Thank you Max! Now I know, I've forgotten as it has been many years since I made a dress Lol
I think I am going to go for the rectangular shingle look somehow for the roof.
Dug up another color pic of the coaling tower(looks pretty black to me), I may have to redecorate....
Al
albertstrains posted:Thank you Max! Now I know, I've forgotten as it has been many years since I made a dress Lol
Don't worry, Al. It will come back to you. ![]()
Here we are at the start of the long weekend and I have finally done something else to the tower....
It has been kinda crappy weather(wet snow rain) so I plan to hide in the basement if possible.
Anyways, I decided to spray the tower with flat black enamel(Demcote).
I didn't totally spray it solid, I would say I did "hi lites".
Once it was kinda dry I took some 220 sand paper and litely sanded over various areas to "blend" in the black.
It seems to be looking pretty good for now. Hopefully I can get the chutes made and install this weekend....
Al


Slow progress lately on the coaling tower(and layout) due to life and reality rearing their ugly heads.
My Wife recently had a serious medical event last week that has post-poned her long awaited trip to Europe and these things due happen.
Anyways, I did manage to apply all the Grandt Line bolt/washer castings to the tower but not much else.
One more week and I am taking a week off work to hopefully catch up on some "Train" time, with the Wife hopefully in Europe(for her sake)lol
Here are a few pics not that I think anyone can see the bolts/washers I glued on. Very tedious work
Al


Very convincing, Al. ![]()
Looks great! Thanks for sharing the steps.
Nick
I have had a week off(staycation)and have been finishing up the coaling plant.
Sway aprons(chutes)
have been installed with chains, pulleys and counter weights.
I cheated abit on the roof(no shingles) but have added additional details on the dummy chutes.
Here are the pics and vid of the movable chutes
Al


Very impressive, Al ![]()
Looks really nice! Weathering, design, execution and operating parts... all terrific!
I finally got back to the Tower project and decided to make a new roof with smaller windows and other changes from the previous.
I used Grandt Line window castings, which I cut and spliced for the sizes I needed. I also scribed the siding on front and back of the assembly. Finally found O scale shingles for the roof, so that was also added.
Lighting an additional ladder will be next things to do.
I am off work now on sick leave(due to RA) and hope to find an Rx that will get things under control, so working on the layout helps with the stress...lol
Here are a few pics of the progress
Al Before.......


 .....Done!(almost)


Looking terrific! Sorry to hear about you RA. They keep advertising some very powerful biologics for autoimmune illnesses, but the list of their side effects makes my blood run cold. Best of luck finding one that does the job for you.
Amazing! Love the shingles. Individual or strips of shingles?
Great work, Al! I like those counter-weighted chutes.
Plastruct......lol
Sheets of shingles definitely easier than individual.
Access to this requires an OGR Forum Supporting Membership
