As I am currently without a layout, the purpose of this build is two fold. I wanted someplace where I can display and photograph my trains for some current threads like "Do you have B&O...C&O", "show my your caboose..", to name a few. Secondly I want to be able to practice some scenery techniques I want to incorporate in my upcoming bedroom layout build.

Basically the diorama is mostly made up of materials I already had on hand. Namely, scrap plywood and particle board, 1/2 inch foam insulation board, 2x4's, etc.  Although I did buy a 24x48 inch sheet of 1/8 masonite for the back drop. 

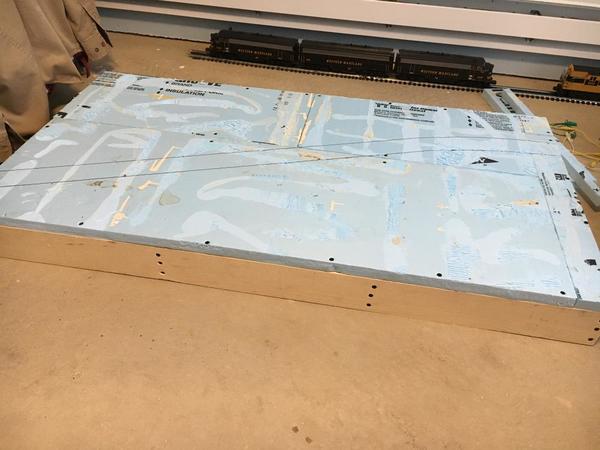
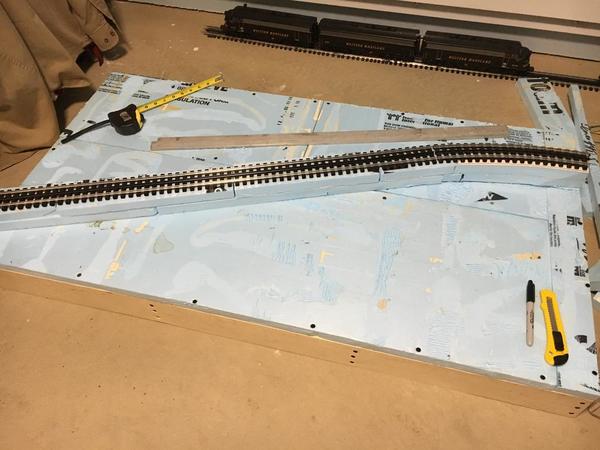
My vision was an elevated track (easier for taking photos) above a wooded meandering stream. I was eager to try and make a stream using Woodlands Easy Water. The track is a stretch of reused Gargraves flex track that I've salvaged from a previous layout. The roadbed is some scrap particle board salvaged from an old computer desk. I beveled the edges 30 degrees as I cut it. Here are some shots of the initial stages of the build:

IMG_0193IMG_0194

I hot glued, cardboard strips down the sides, forming a hill. Over which I will apply plaster impregnated gauze sheets to create the hillside.

IMG_0195IMG_0196 [2)IMG_0197IMG_0198 

I also made provisions for a retaining wall and culvert drain, to give the face of the hillside some character: 

IMG_0209

I've marked where the stream bed will go with a sharpie, scored the lines with a box cutter and gouged out the "squares" with a screw driver.

IMG_0206IMG_0207IMG_0208IMG_0210IMG_0212

after exposing the stream bed, I used a rasp to smooth out the bottom and bevel the edges of the stream shore.

IMG_0214

I applied the plaster sheets over the cardboard lattice. I protected the retaining wall by covering it with masking tape.

IMG_0219

I then covered the banks of the stream will cell-u-clay (what I had on hand), although sculptamold will also work. Note the piece of bamboo that is a stand in for my culvert, I will eventually install.

IMG_0218IMG_0220

Here I glued down some flat stones onto the stream bed. After all this dries I will pour Hydrtocal plaster all over the bottom of the stream to seal it in preparation for the addition of Woodland's Realistic water.

IMG_0221

Jumping ahead...the track has been glued down, and basic scenery is in place. Now the difficult part...waiting for the glue to dry. The fan will help that along nicely.

IMG_0229

Here I added some additional rock castings I made from simple molds of crumpled up aluminum foil. After applying the castings I painted on a layer of hyrocal and used a stiff wire brush to create the rock strata,

IMG_0230

Meanwhile the back drop gets it initial coat of sky paint...

IMG_0228

Here the stream bed is complete and ready for the Realistic water pour. Note the two dams added to each end of the stream to contain the "water". Also note the addition of some more vegetation along the base of the hill and the culvert has been installed...

IMG_0231IMG_0232

This is just after the water has been poured. I added some Acrylic Burnt umber with a few drops of  acrylic "Olive" to give the water a murky look. Looks like I've succeeded on that point.

IMG_0234IMG_0235

After reading online on some of the horror stories of using Realistic water, specifically that is it doesn't dry completely, I was worried I made a mistake using this product. 48 hours after I poured it, it was still "wet" in the deeper parts of the stream. So I carefully moved the diorama outside and let it sit in the sun for a few hours. After 5 hours in the sun, the stream bed was dry to the touch, thankfully.

IMG_0236IMG_0237IMG_0238

Now with the backdrop installed, and the installation of some cat tails in the stream, the diorama is complete.

IMG_0239IMG_0240

Here is first shot of the diorama in use...

IMG_0241

Attachments

Images (30)
  • IMG_0193
  • IMG_0194
  • IMG_0195
  • IMG_0196 (2)
  • IMG_0197
  • IMG_0198
  • IMG_0209
  • IMG_0206
  • IMG_0207
  • IMG_0208
  • IMG_0210
  • IMG_0212
  • IMG_0214
  • IMG_0219
  • IMG_0218
  • IMG_0220
  • IMG_0221
  • IMG_0229
  • IMG_0230
  • IMG_0228
  • IMG_0231
  • IMG_0232
  • IMG_0234
  • IMG_0235
  • IMG_0236
  • IMG_0237
  • IMG_0238
  • IMG_0239
  • IMG_0240
  • IMG_0241
Original Post

Replies sorted oldest to newest

WOW.

For a long time, I've been thinking of a diorama of one side of an embankment to take photos in natural light. Originally, I was thinking of a traight section on the top of a berm, but I really like what you did here and after seeing what you accomplished, I'm seriously considering making something similar but in On30...

That looks fantastic!  I am not a fan of the WS water having worked with it several times, but you did as nice a job as I have ever seen with it.  

Is your back drop removable?  I was thinking if so it would make for some outside pictures with real scenery is the backdrop, kind of like like the "What's Neat" guy on Model Railroad Hobbyist does.

TexasSP posted:

That looks fantastic!  I am not a fan of the WS water having worked with it several times, but you did as nice a job as I have ever seen with it.  

Is your back drop removable?  I was thinking if so it would make for some outside pictures with real scenery is the backdrop, kind of like like the "What's Neat" guy on Model Railroad Hobbyist does.

Thanks for the kind words. Yes, the backdrop is only screwed in from behind and certainly removable. I had Ken Patterson in mind, when I made this. I look forward to his features each month.

Basil posted:

That diorama is fantastic.  It's amazing how you transformed scraps into that scene.  What skill!  Did you take the pictures of the trees on your backdrop?  Can you give us some specifics on how you made the backdrop? From the choice of sky color to the addition of the trees, perhaps?

Hi Basil. There are many ways to do a backdrop, but I went pretty simple. It's not perfect but serves as a good background to enhance the subject (display track). The backdrop is a simple 24x48 inch sheet of 1/8th inch masonite (hardboard). The first step is to prime the surface. I painted the entire (smooth side) surface with white latex house paint I had on hand, applied with a roller. You could also use a true primer like Kilz. after it was dry I painted the surface again with the sky color. These are the two "blues" I used:

IMG_0254

I thinned the paint slightly with water and again used a foam 4 inch roller to paint the sky. Use the full strength blue at the top and painted the white toward the bottom (horizon), blending the two as you go.

After that dried, I drew some cloud shapes onto some poster board and then used a exacto knife to cut out the clouds. The poster board was laid over the sky and the clouds were painted on using a cheap rattle can white spray paint.

The trees are simply some panoramic photos I took along a highway near my home. I imported the photos into a word document and printed them out. I cut out the sky portion of the photo leaving only the foliage. I then sprayed the back of the photos with spray adhesive and pressed them into place on the backdrop.

I did spray the entire photo scene with a clear matte finish to tone down any reflective shine the photos may have had. Then I simply screwed the backdrop to the diorama from behind. And there you have it. Hope this helps.

Attachments

Images (1)
  • IMG_0254

I'm going the foam roadbed route for this static display module.  I put down a layer of bits and pieces of 1-inch for a base.  I then put down 2 layers for the roadbed.  I plan to stack more in the rear for a mountain.  I'll put down O scale cork beveled roadbed under the track.  I only have a knife, and do not want to tackle the beveled ballasted roadbed with it.  Then I have some Woodland Scenics plaster gauze I want to try out along with a couple of rock molds.  Here we are as of last evening.

2017-07-30 19.05.142017-07-30 20.46.48

Attachments

Images (2)
  • 2017-07-30 19.05.14
  • 2017-07-30 20.46.48
TedW posted:

What are those dimensions Mark?  Guessing 2' x 3' x3" or so?

Oh, I left out the most important piece of information.  Thank you for asking!!!

2' x 4' x 3".  You were close.  I thought of making it only 18" deep, but wanted to get a little more foreground/background scenery; then decided to skew the track more that first planned.  At least with this, it's easy to change if I don't like it.

Thank you both!

Great question!  Yes, first of all I won't use styrofoam for the roadbed.  I'll use plywood or OSB for that with homasote on top.  To not use so much wood and provide for a grade between towns, it will be an open grid.  I have built layouts using either open modules like this one and the L- girder.  I like both.  If I knew we would stay in this house until I am not able anymore or pass on first, I would go with L-girder, since my plan is a walkin affair.  However, we have moved before, so I may make modules that would be easier to move.  You can see my plan in the link in my signature line.

 I like cutting foam for scenery contours, then cover it with something.  The Woodland Scenics plaster cloth is something I'm trying for the first time, so this is a trial run to see how it goes.  The same goes with scenic features, I'll use methods I know and try some new ones as well.

Add Reply

Post

OGR Publishing, Inc., 1310 Eastside Centre Ct, Suite 6, Mountain Home, AR 72653
800-980-OGRR (6477)
www.ogaugerr.com

×
×
×
×
Link copied to your clipboard.
×
×