
I've only had DZ1000 turnout machines/controls for about four years.  Here is my discovery today hoping to save a headache for someone else down the line!


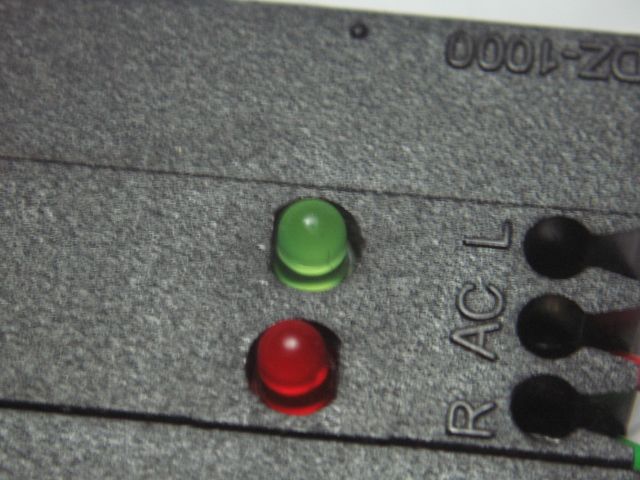
04-05-1015    I had an “AH HA!” moment today!!!  Hopefully this will be a long story short.  DZ1000 turnout machines and switch control have two LED lights, one red, the other green.  When a turnout’s points are set for straight the green light on both the turnout machine and switch control should be green.  When the turnout’s points are set for the divergent (curved) route the lights on both the turnout machines and switch control should be red.

          Also the switch control for a “left” hand turnout is set up differently from a right “hand” turnout in that the lights on the switch control are reversed.  On one the red is on top.  On the other the green is on top.

          I have always been informed that if the light on the turnout machine does NOT match the switch control one may simple remove the light and trade places with the other light.

          What I have never been told but discovered by chance today is that when you trade places with these lights it MAKES ALL THE DIFFERENCE IN THE WORLD how you place the light back into the insert.  Each light has two “poles” extending from its base.  One is long, the other short.

          YOU ABSOLUTELY MUST PLACE THE LIGHT INTO THE INSERT THE “correct” way! If you don’t both lights may activate, neither, light may activate, or some combination thereof may occur.

          I’m happy that after two pain staking hours of frustration trying to put tiny, tiny, miniature poles into tiny, tiny, miniature sockets, that FINALLY, FINALLY, FINALLY!!!, ALL OF MY TURNOUTS MACHINES’ AND SWITCH CONTROL LAMP INDICATORS ARE CORRECT!!!!

Original Post

Replies sorted oldest to newest

I recently bought a load of DZ-1000s to replace my NJ International motors ( wonder if there's a market for them).  These unmounted switch motors all come with the LEDs in the same position.  I found that to switch them around in the controllers, the easiest way was to take the controller apart.  I simply could not pull them out otherwise.  Keep the flat sides pointing towards the wire end.


On the motors, sometimes they pull out easily, and sometimes not.  Hard to get a grip on them.


John, if you have to relocate the motor on a switch, you may also have to reverse the LEDs.  Also if, as I have in a few spots, the main router may be through the curved portion, in which case I want that to be green. 

Originally Posted by RJR:

................................................................................................

 Keep the flat sides pointing towards the wire end. 

As pictured the flat side of the red LED is toward the wire end of the DZ1000.

The flat side of the green LED is toward the other end of the DZ1000.

To reverse the positions of the LED's you also have to flip them 180 degrees.


On the motors, sometimes they pull out easily, and sometimes not.  Hard to get a grip on them.   I've use a small pair of side cutters to grip the LED


John, if you have to relocate the motor on a switch, you may also have to reverse the LEDs.  Also if, as I have in a few spots, the main router may be through the curved portion, in which case I want that to be green. 

Last edited by Mike CT
Originally Posted by RJR:

I've tried the cutting pliers, but am afraid I'll cut the LED.  Trying to figure a way to increase friction on the side of the LED

Some have used a small piece of shrink tube to grab the LED. 


Place the cutters on top of the switch motor. gently grip the LED and rock the handles of the cutters down prying the diode up.  IMO.  Mike


Add Reply

Post

OGR Publishing, Inc., 1310 Eastside Centre Ct, Suite 6, Mountain Home, AR 72653
800-980-OGRR (6477)
www.ogaugerr.com

×
×
×
×
Link copied to your clipboard.
×
×