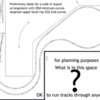
I have SCARM and RTR software.. I'm too ignorant to make either work.. I want to design a late 50s(with some poetic license) layout with the idea of running 3 trains at once if possible.. A passenger train, a coal train and a mixed freight local.. I will be using Gargraves track and Ross switches.. I want to incorporate a double crossover, and a 4 way yard lead, that I already have (nothing cast in stone here).. I would like to model the 'high/ low bridge crossing' of the Clinch River (Greatly scaled down because space/grade limitations).. Attached is an out of scale room room size that I have to work with.. I'm able to reach 42" with a table height of 36".. If I'm asking too much tell me to GTH, and I'll understand.. I'm at a point of frustration here.. I can build the layout frame work and put paper cut outs on it to get what I want, but that is the hard trial and error method.. I did this on my 4x11 layout..
Replies sorted oldest to newest
The dimensions didn't show up in the attachment.. Left side is 200", top is 159", right side is 14" to the door, 30" for the door and 94" to the wall.. The bottom to the L is is 87".. the L is 62" deep and 72" wide..
Hi Woodson,
I am laying out the area for you in SCARM. How deep is the 30" point on the right side? I am assuming it's object avoidance.
One uses a translucent polygon to define space perimeters. Then, the baseboard or table tool is used to define the deck. Then you can place the track.
It's quite a large area. if you just penciled in some lines on your ideas for lines and posted a photo of the drawing, it would help a lot.
Do you have maps from internet research that could assist with choosing elements of the railroad to include? or elements that you know you want?
it's not a GTH project, but time consuming.
The software helps with details, track purchase needs, grades, 3D visualization and such, but the creativity of the design should from your vision.
Giving you a work area defined to your Givens will enable you to drag and drop in SCARM with a little help. Sort of an electronic pencil and paper.
Then we can help or coach you to the refinements.
Moonman posted:I am laying out the area for you in SCARM. How deep is the 30" point on the right side? I am assuming it's object avoidance.
Carl, isn't that the door? ![]()
Carl, the 30" opening is the doorway to the room.. Coal will be 'king'.. I'd like to add the Clinch River with the two mains high and low.. I have pics, but can't find them.. If i need to I can make a trip your way to take new ones (on US23 west of Kingsport).. My girlfriend lives in Johnson City, and I visit the CSX yard in Irwin often.. I'd also like to add the Afton Mountain tunnel somewhere if possible C&O (CSX) near Waynesboro, VA.. Look at my bio and you'll get a bit of an idea of what I want to accomplish from my childhood memories.. I realize this is a time consuming project.. I am willing to pay for assistance if need be.. I'm just so frustrated with my total lack of skill with SCARM.. I've looked at many of the tutorials and they go too fast for me to grasp.. Yes, I've looked at many track plans, but I really haven't seen anything that hits my hot button.. Perhaps with your help I can get things started!! I am not lazy, believe me I've spent hours looking at layout plans.. I am very capable of building the bench work, laying track, electrical etc.. I have even helped build several layouts for friends over the years, and built my own 4x10 layout when my daughter was young and very interested in trains..
So, perhaps the N & W would provide some guidance.
here's a German page with some ideas; http://rm-dp.com/index.php/rmem/68-crrr
A track plan (from German guy) and another photo that I found.
Attachments
Carl, You ARE the man!!! This is a great start!! My favorite railroad book is: Steam Steel & Stars by O. Winston Link.. The layout plan would have to be greatly scaled down obviously, but the idea is spot on!!! Can't thank you enough!! I've looked and looked, obviously looking in the wrong places.. I'm ready when you are!! Thanks again, very, very much!!!
Still needing help with SCARM.. Should I start laying track within my dimensions?? I can come up with a square bounty plan 200x154, but that's it.. How do I remove the 62x77 rectangle?? I guess I'm going at it the wrong way.. Advise please..
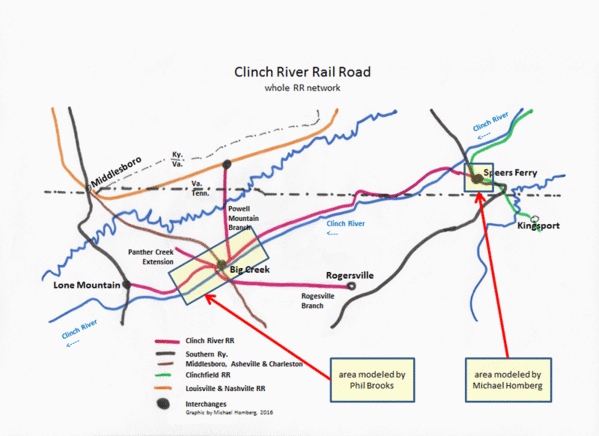
I think this diagram came from the German site.
Some design decisions can made from this diagram. One, the Clinch River needs to be there. it can be the open space of the around the walls type design, you can do it with scenery along the tables, say perhaps on a long and short wall.
Obviously you want Speers Ferry for the double bridge and then select a another city or two. Big Creek, seems like a no brainer as an interchange for the sidings and one more towards Kentucky. Were the coal mines that way?
It's seems to me that a 30" - 36" table around the perimeter with perhaps a peninsula to create a location or train activity would work. You can always expand into the open space with a wider table to create something.
Then, let's look at the opposite of that - a kidney shaped floating walk-around table with an aisle all around the room. This may restrict the larger curves.
perhaps utilize the 6' x 5' rectangle for a staging yard for complete trains and a work area.
let the layout touch that space to be able to create the access. perhaps only some curtains to separate it from the room. You can only turn-around in there with O54 - O63.
That leaves a 159" x 138" rectangle area to work in.
Check the 77" measurement on the wall near the small area. Should it be 87"? 159" -72" = 87"
let this marinate and let me know what you think.
Check out the attached pdf.
Attachments
Using shapes to visualize the options can sometime help decide on a table. here are some .
When you choose a railroad and some cities and elements, then a shape for tables in the space, the track plan will come to you.
What this revealed is with 30" walkways the layout space shrinks. This will impact the size of the curves that can be used.
A table height a little higher will let you sit on a scooter chair and move around under the layout.
I am liking the Clinch River aisle shape initially. Each one has pros and cons on construction time and cost and visual impact as well as other details.
Perhaps putting some masking tape on the floor will help you to decide. Create some different shapes and walk in and out of the room for a couple days and then try another.
Attachments
Woodson posted:Still needing help with SCARM.. Should I start laying track within my dimensions?? I can come up with a square bounty plan 200x154, but that's it.. How do I remove the 62x77 rectangle?? I guess I'm going at it the wrong way.. Advise please..
it's not laying track time yet.
Woodson posted:The dimensions didn't show up in the attachment.. Left side is 200", top is 159", right side is 14" to the door, 30" for the door and 94" to the wall.. The bottom to the L is is 87".. the L is 62" deep and 72" wide..
Moonman posted:I think this diagram came from the German site.
Some design decisions can made from this diagram. One, the Clinch River needs to be there. it can be the open space of the around the walls type design, you can do it with scenery along the tables, say perhaps on a long and short wall.
Obviously you want Speers Ferry for the double bridge and then select a another city or two. Big Creek, seems like a no brainer as an interchange for the sidings and one more towards Kentucky. Were the coal mines that way?
It's seems to me that a 30" - 36" table around the perimeter with perhaps a peninsula to create a location or train activity would work. You can always expand into the open space with a wider table to create something.
Then, let's look at the opposite of that - a kidney shaped floating walk-around table with an aisle all around the room. This may restrict the larger curves.
perhaps utilize the 6' x 5' rectangle for a staging yard for complete trains and a work area.
let the layout touch that space to be able to create the access. perhaps only some curtains to separate it from the room. You can only turn-around in there with O54 - O63.
That leaves a 159" x 138" rectangle area to work in.
Check the 77" measurement on the wall near the small area. Should it be 87"? 159" -72" = 87"
let this marinate and let me know what you think.
Check out the attached pdf.
The dimensions have been updated and are now correct.. I really like the River isle concept.. Perhaps 20" instead of 30" for the isle.. Using my old layout as a guide, the table height is 36", which I'm comfortable with.. My maximum 'comfortable' reach is 40" to 42".. I know this is too wide by normal standards, but I'm a big guy.. I found some of pictures of coal operations and small towns to model.. I'm not opposed to walk/crawl unders for bridge crossings.. Again, many thanks for your interest and help!!
Woodson, some of the key layout design factors you should define are:
* What minimum radius standard are you aiming for, based on the trains and locos you plan to use?
* Do you prefer a walk-in plan without duckunders or movable bridges, which might require tighter curves?
SCARM does have a learning curve, but once you get the hang of it you will find it really handy.
Yes, I'm still struggling with SCARM.. Duckunders or movable bridges are fine by me.. I'm shooting for o54 minimum on the mains wider if possible.. I don't see that as a problem given no opposition with above.. I can actually 'cheat' and 'tunnel' through the 87" wall as it goes to an adjacent closet which would add flexibility to a track plan.. Any help will be greatly appreciated!!
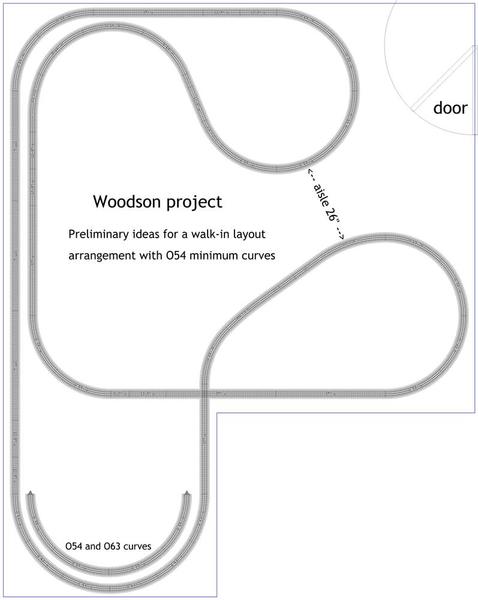
Here is a scaled outline of the room with some preliminary brainstorming for a walk-in plan arrangement. O54 minimum curves are a practical choice for this size of room. I hope others will feel free to use the SCARM file and see how they can fit their own ideas into it.
Some thoughts about the idea to include the two big Speers Ferry bridges at different levels: That's a lot of elevation difference between the two lines, and probably not feasible to connect them with a reasonable grade in this size of room. Consider building the upper line as a separate loop-to-loop or dogbone with tighter end curves to fit it in without overhanging the lower level excessively.
Attachments
Attachments
I modified my first plan so the room outline is made with a series of narrow rectangles, and the baseboard is now defined separately. This is all very preliminary. It looks like the best place for a yard is along the one longest wall.
Attachments
Woodson,
perhaps if we keep this collaborative we can get done. I worked with ACE's last version and created the town of sperry and the double bridge. I concur with ACE on the long straight for the yard.
I don't see double main fitting unless it's O42, but that will really crowd push the track to scenery ratio very high.
Anyway, here's what it looks like after about an 1 1/2 hours with the double bridge.
Right-click the SCARM files and select "save target as" and land it on your machine. Then you can examine the concepts further.
Thanks ACE for a foundation to work with...
Attachments
Thank all of you for your help so far!! I can 'tunnel' through the adjacent closet to marry up with the 063 curve in the bottom right corner.. I'm not opposed to a duck/crawl under (or two) to free up some layout space.. My first thought is a duck under one running from the right top across to the right side.. Thoughts?? Also, Carl when I right click on your files I don't get "save target as" on my menu.. You guys are going above and beyond to help me!! No amount of thanks can repay you!!
Moonman posted:Only the SCARM file to download - once it's downloaded double-click to open it in SCARM
Carl, I did that, but I don't have that menu item "save target as" on my computer..
Woodson posted:Moonman posted:Only the SCARM file to download - once it's downloaded double-click to open it in SCARM
Carl, I did that, but I don't have that menu item "save target as" on my computer..
I don't see "save target as" either. Try left click on the scarm file, it opens and displays text files. Then do right click on the text, save as (choose a destination). The file saves as xxxxx.scarm.txt. Rename it to end with .scarm (chop off the ".txt" ending). Now you can open it with SCARM. That's how it works for me with Windows 7 and Google Chrome.
I right clicked and save target came up and I saved it to SCARM and was able to view it.
Ace posted:I don't see "save target as" either. Try left click on the scarm file, it opens and displays text files. Then do right click on the text, save as (choose a destination). The file saves as xxxxx.scarm.txt. Rename it to end with .scarm (chop off the ".txt" ending). Now you can open it with SCARM. That's how it works for me with Windows 7 and Google Chrome.
I have that problem from time to time too. Usually a refresh gives me the Save Target As. In this case, I get the Save Target As.
Oh me.. Still not doing something correctly.. Try to open in SCARM and get an error message,,
If I look at this forum with Internet Explorer, a right click on a SCARM file brings up "save target as", among other things.
If I look at this forum with Google Chrome, a right click on a SCARM file brings up "save link as", which serves the same function.
Woodson, what operating system and internet browser are you using on your computer? When you try to open the SCARM file, make sure it has the proper ".scarm" ending on the file name, not ".scarm.txt" which happens with some downloads.
I suspect the browser uses different terminology depending on how it interprets the file, and may change the filename extension during a download, which isn't helpful with a SCARM file.
I am using Windows 7 Home Premium and Firefox as my Browser..
Woodson posted:I am using Windows 7 Home Premium and Firefox as my Browser..
I keep scarm files in my photo's, and I forget if that's the default save location, but if not, starting a new folder there ahead of time, and saving a scarm file to it right, the rest will likely land there after that.
Right click on the blue "Woodson/Moonman link" with FF, and choose "save link as". Pick a spot,(mine is in "my pictures"), and watch for a "make new folder" option or default choice, and do it if there. It should save as a scarm file that way, but if not, find it and rename the ending, from .txt to .scarm.
If you don't know where it is stored when done, check "downloads" or "recent" in an open Windows Explorer menu, or choose the OS drive (likely C) or "computer" from W.Ex., and enter "Woodson-111 -ACE MOONMAN" in the search up top & right. It may take a few minutes, but it will find it. (You really don't need to index it, just wait).
Your security settings might not like what you're doing yet, but usually you'll get a warning depending on the program, and issue, but I think a minor mistake somewhere is all that's stopping you. Try, try again.
Forget the scarm. Get a pencil and a 1/4" scale and draw out a track plan. Buy the switches, curves and long straights, a couple extras for the regular track, lay it out on the floor, cut pieces to fit as needed, design your benchwork around the track layout and build it. That is how it's done. If you actually want to build something.
William 1 posted:Forget the scarm. Get a pencil and a 1/4" scale and draw out a track plan. Buy the switches, curves and long straights, a couple extras for the regular track, lay it out on the floor, cut pieces to fit as needed, design your benchwork around the track layout and build it. That is how it's done. If you actually want to build something.
Thanks for your input.. The thought has crossed my mind.. BTW, I have "actually" built layouts in the past...
William 1 posted:Forget the scarm. Get a pencil and a 1/4" scale and draw out a track plan. Buy the switches, curves and long straights, a couple extras for the regular track, lay it out on the floor, cut pieces to fit as needed, design your benchwork around the track layout and build it. That is how it's done. If you actually want to build something.
Your diatribe on computer layout design is tiresome. The mantra is weak. Even Dr. Martin Folb couldn't resist using the computer to play with his trains on floor. (See 5/18/15 & 5/19/15 posts)
Why don't you scribble something out and post a photo of it? Woodson is seeking ideas. Have any to offer?
Nicely done
Um..."Help! I'm a rock"![]() .
.
Uncalled for "diss". It could have been worded better for sure, especially if it was just half joking. But, I have built ALL but one of my layouts that way too. Minus the drawing bit ![]() , because I just "build". But, I also happen to be pretty good at building things on a whim and a prayer, with no real plans. The layouts were pretty simple ones too
, because I just "build". But, I also happen to be pretty good at building things on a whim and a prayer, with no real plans. The layouts were pretty simple ones too![]()
I started to use SCARM mostly just for the 3d visual confirmation of scenery that I saw in my head.
"Anyrail" was the one program I used before it, to check the size and spacing of three kinds of track together. It was still was off a touch too( and I had to guess hard for Super O). Oh, and I used them to prepare for a graded line too. How much room did I need to climb 9 inches?
(Hey, That time period reminds me, where's Chessie Fan Stewart? It's been a loooong time since I've seen a post by him. [you there?] He really pushed SCARM on me till I conceded and learned the program better [thanks again!])(yes, he's still around!) You other guys also did your fair share of influencing me too, pat yourselves on the back, eh.
In the end, using them both saved me a few bucks just knowing (approx) how much more track I really needed. And after I was done, it also provided me with entertainment, as well as another drawing program when "paint" hits the wall, and fails to be useful. (half the options no longer function in paint, and "photo gallery" and "movie maker" are getting to be the same way; loosing options= on their last legs, and dying IMO.
Woodson- Any luck? If not what are the options upon you right clicking. (maybe take a "snip" of the menu?)
Got a SCARM file down loaded via an email attachment from Carl.. Many thanks, Carl!! Trying to experiment a bit unsuccessfully so far.. Trying to run a track from A to B, tunneling through the adjacent closet wall and a duck under from point C to D..
Attachments
Ok, the routing that you want would get you the 3 tracks to have 3 trains running. I was having trouble seeing a way to meet that Druther.
The tunneling is only 3D for "eye candy", same as bridges . Just connect the tracks.
O72, O63 & O54 would be good diameters to go around the rooms as they are all 4.5" centers in the Gargraves selection. Even if you run concentric curves, it keeps the geometry and fitment easier.
The third line will create a scenic problem for the Sperry double bridge. You'll need a triple line or make a short oval in the bump out end.
Consider how you would like to handle those concerns.
I did this loop and dropped in the 4-way yard and #175 cross-over for visualization. The long wall table needs to be 30" wide to hold the mains and the yard.
I didn't fix elevations. Lots of places to go from here.
Attachments
Woodson, you said the lower corner was available to run tracks through? I might be tempted to do that, but would like to know what's in there so as to not interfere with the present function of that space. Even if it's just a storage closet, you may not want tracks monopolizing the entire space, I'm thinking.
Attachments
Moonman posted:Ok, the routing that you want would get you the 3 tracks to have 3 trains running. I was having trouble seeing a way to meet that Druther.
The tunneling is only 3D for "eye candy", same as bridges . Just connect the tracks.
O72, O63 & O54 would be good diameters to go around the rooms as they are all 4.5" centers in the Gargraves selection. Even if you run concentric curves, it keeps the geometry and fitment easier.
The third line will create a scenic problem for the Sperry double bridge. You'll need a triple line or make a short oval in the bump out end.
Consider how you would like to handle those concerns.
I did this loop and dropped in the 4-way yard and #175 cross-over for visualization. The long wall table needs to be 30" wide to hold the mains and the yard.
I didn't fix elevations. Lots of places to go from here.
Ace posted:Woodson, you said the lower corner was available to run tracks through? I might be tempted to do that, but would like to know what's in there so as to not interfere with the present function of that space. Even if it's just a storage closet, you may not want tracks monopolizing the entire space, I'm thinking.
Carl, looks great!! No, I don't want to mess with the Sperry Double Bridge.. Your design of that is great!! The 'duckunders' I don't mind and they would seem to add a lot of flexibility to the layout out design.. I have no problem with the long wall being as wide as 42".. I know is too wide by standards, but I based it on my comfortable reach with a 36" table height on my current small layout which is 4'x10'.. I can reach the back of it on a step stool which is a real pain in the rear.. The elevations currently appear good..
Ace, I'm just planning on running the one 'tunnel track' through the adjacent closet.. I did some measurements, and it will have minimal effect on the closet (storage etc.) Thanks for the thoughts..
Woodson posted:... I would like to model the 'high/ low bridge crossing' of the Clinch River (Greatly scaled down because space/grade limitations).. Attached is an out of scale room room size that I have to work with...
Woodson posted:Carl, looks great!! No, I don't want to mess with the Sperry Double Bridge.. Your design of that is great!! The 'duckunders' I don't mind and they would seem to add a lot of flexibility to the layout out design...
Woodson, now you don't want the Speer's Ferry Bridges? I guess I wasted a lot of time working on that...
Ace, You miss understood what I said.. When I said I don't want to mess with the Bridges (and grades), I meant I wanted to leave them alone!! Your design is great.. I know you spent a lot of time on that and it is perfect!! Your design has become the base for my project!! I was talking about Carl's additions.. I meant no slight to you at all!! I apologize for any misunderstanding!!!
"... massive Clinchfield Copper Creek Viaduct in Speers Ferry, Virginia" ...
http://www.railpictures.net/sh...ntry=Virginia,%20USA
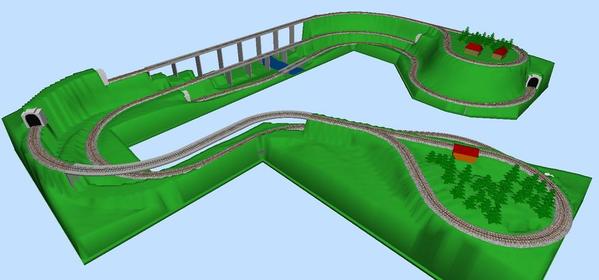
To try to do some justice to this feature on a layout plan ...
The lower level is a long dogbone arrangement with O54 minimum curves and grades up to 2%, big enough for two trains to cruise around on. The separate upper level is a loop-to-loop with no grades and O32 curves on the end loops. The O32 loops could perhaps be enlarged to O42 curves.
The plan needs more work to try to fit in other desired features. The large bridges are occupying space which might otherwise be used for a yard. So far I have maintained a walk-in plan with no duck-unders or movable bridges (which I personally dislike) but others can feel free to modify the plan. The SCARM file is attached.


