1st post.  So Hello!  

I've been trying to layout a plan for my younger kids (and me) to have fun with during the holidays.  Clearly, I'm not ahead of the curve this year.  I was originally thinking we could start one of the amazing plans I've seen on this amazing site, and expand it year to year - while trying not to spend $1K or more on switches all at once.  I've spent an embarrassing amount of time on Scarm trying to recreate many (probably have 20 incomplete plans), but can never get things to line up right.  A version of Ken-OScale's NW Minnesota is probably my absolute favorite, but after hours and hours, over several days, trying to recreate, I'm convinced some sort of voodoo or black magic was required for it's creation.  Frustration is not an adequate descriptor.  

I currently have a a 5.5'x18' double oval with one crossover (super boring).  We have a Lionchief Polar Express, but would like to add one or two more "like" trains in the future.  I also have an older MTH train, but haven't researched yet if it's compatible with my Lionel setup.  

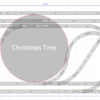
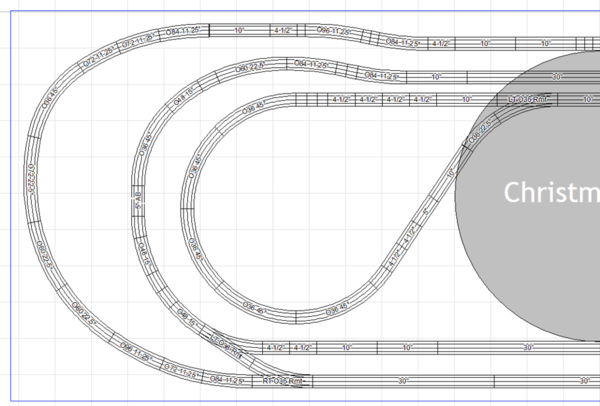
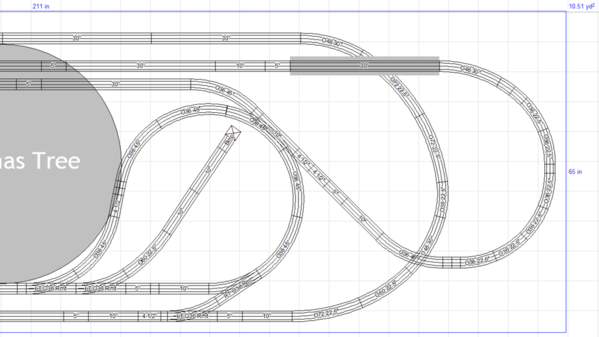
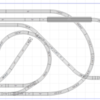
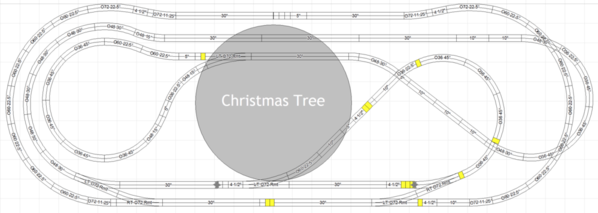
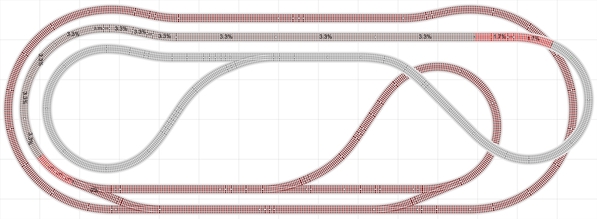
The best plan I can come up with (which started off as one of the AnyRail plans posted on this site) is below.  My wife really wanted (demanded ) to be able to reverse directions, multiple routes, 2 trains at same time, non-symmetrical curves, and elevation with the 30" MTH bridge with Christmas lights.  Most importantly, she didn't want it too symmetrical - i.e. she wanted "funky".

The problem is, this plan looks like rubbish to me.  And I had to adjust the Scarm tolerance to 0.11 (2 degrees) so all the pieces would match up (no idea if that's good or bad)... so I'm even not positive it'll even work well.

So, with that all said, anyone have any advice for someone that has no idea at all what they're doing?

Many thanks!
Skip

Screen Shot 2018-12-09 at 10.03.59 AM

Attachments

Images (1)
  • Screen Shot 2018-12-09 at 10.03.59 AM
Original Post

Replies sorted oldest to newest

Hello Mr. Skip!

Rubbish that notion of rubbish!  I'm no expert, but your track plan looks fairly entertaining to me.  I could easily sit back, relax, and watch a couple of trains tick off some scale miles on that plan for quite some time every evening while sipping on tasty beverage. 

Like you say though, just a matter of making sure everything fits properly.

Skipdup, I tried to piece this together in SCARM.  It worked okay for me.  The only place I ran into a problem was the left inside curve leading up to the elevation.  I couldn't get that to match up exactly but that's minor.  Do you have the track already?  There are some spots where you can save $.  For instance the curve on the far right has six O36 22.5's.  You can sub out three O36 45's.

beachhead2 posted:

Skipdup, I tried to piece this together in SCARM.  It worked okay for me.  The only place I ran into a problem was the left inside curve leading up to the elevation.  I couldn't get that to match up exactly but that's minor.  Do you have the track already?  There are some spots where you can save $.  For instance the curve on the far right has six O36 22.5's.  You can sub out three O36 45's.

Thank you very much!!  No, I don't have the track yet.  I tried to consolidate as much as I could see into bigger pieces...  Missed all this 22.5's!  Thanks for pointing out!

Thanks all!  

I wish I could remember who to thank...  as this is a mod of at least one plan I found on here (maybe several).  I can't even remember anymore.  Hopefully plagiarism isn't frowned upon.  

I think I'm going to do it.  If I change my mind later, I'm sure lots of the track could be re-used in whatever config I changed to...

Only thing holding me back is that darn NW Minnesota layout I saw.  That thing is just crazy good.

- Skip

bobdavisnpf posted:

I would shorten the inside lower loop shown on the right by 4 1/2", to provide a few inches clearance instead of a couple inches overlap with the upper loop. That would enable the inside upper loop to take a more gradual incline heading up toward the bridges.

Is it the highlighted loop you would shorten?

Thanks!

Attachments

Images (1)
  • Screen Shot 2018-12-09 at 1.10.06 PM

Yes, that's 

Skipdup posted:
bobdavisnpf posted:

I would shorten the inside lower loop shown on the right by 4 1/2", to provide a few inches clearance instead of a couple inches overlap with the upper loop. That would enable the inside upper loop to take a more gradual incline heading up toward the bridges.

Is it the highlighted loop you would shorten?

Thanks!

Yes, that's the one. You've got a 4 1/2" straight on the outside loop (not highlighted but visible in that snip), and a 4 1/2" straight on the inside loop off (to the left of that snip).

Skipdup posted:

10-4.  We played around with that section.  Wife liked it ducking under the raised section of track going to the turn-around.  That should all (from bridge, right turn, jog back, and the turn-around) be at a constant height...  going to look at it again.  

Thanks again!

It'll be easy enough to try it both ways, once you've got the track pieces on hand.

Nice design, btw. You've got lots of great running to look forward to!

Recommendation #1 would be a power feed for every 6 track joints. Just a SWAG, but maybe as many as dozen feeders.

If you're running command control only (including LionChief) a MTH Z1000 brick should be more than adequate. Another inexpensive option would be a Lionel P-135 (6-12866). For running conventional, a MRC Pure Power AH501 would be a decent choice. 

What transformer do you have now? The newest come with a wall wart. The oldest came with an early CW80. I honestly cannot recall a PE set that came with what I would regard as a "good" transformer.

Last edited by Gilly@N&W

I like it.  A lot of possibilities and action.

I once had a layout in two rooms with just four loops of track.  There were enough switch tracks to allow a train to go from the outside loop into the inner loop and back out again.  You could put a train on any track, start it up, step back, and watch it continuously work its way into the inner loop and back out to the outer loop.   For me it was relaxing

Ken-Oscale posted:

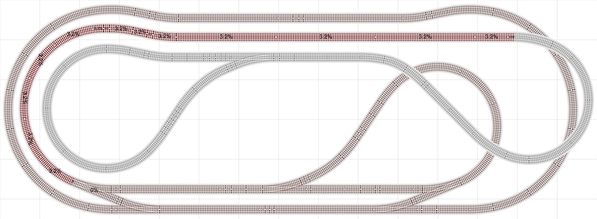
Here is a version with a 3.2% grade.

The outside route is O60 minimum with O72 easements.   O60 turnouts.  The O36 loop-to-loop has O72 and O60 easements.   Your trains should run smooth and gracefully through this layout, even with the tight O36 minimums.

That is amazing.  I think I can re-create that.

Are the switches O72?  Are switches the same as easements?

If so, those parts wouldn't be wasted when I try and re-create your NW Minnesota plan - maybe next year...  

Thank you!!

Last edited by Skipdup
Ken-Oscale posted:

Here is a version with a 3.2% grade.

The outside route is O60 minimum with O72 easements.   O60 turnouts.  The O36 loop-to-loop has O72 and O60 easements.   Your trains should run smooth and gracefully through this layout, even with the tight O36 minimums.

Ken-Oscale- I sent you an email a couple days ago.  Did you happen to see it?  Just making sure spam didn't eat it...

Skidup, I notice that you are not using the 1-3/8" fitters with roadbed trimmed, for the O60 turnouts.   The fitters are included with the turnouts.   It is usually possible to trim sections of fastrack to do without the fitters, but its harder when two turnouts meet together - better in that case to use the 1-3/8" without roadbed on each side in order to make the junction.  -Ken  email reply sent.

Here is the AnyRail file for anyone interested.   You can install the demo version of AnyRail and open the file to look at each piece of track - just put the mouse on a section and at the bottom of the window it says what the section is.

Attachments

Files (1)
Last edited by Ken-Oscale

re: power supplies...  just making sure I understand what I need to...

LionChief get's it's commands wirelessly and ProtoSound gets from a signal sent through the track, right?

So, I would need either a MTH Z-1000 (just the brick, without controller) or Lionel PH-135, plugged into a DCS Remote Commander, and then hardwire that into my Fastrack.  Right?

Anyone know if the PH-135 will plug directly into the DCS Commander directly?  Or are plug adapters needed?

Also, I (might) vaguely remember reading, or seeing a YouTube video, where Lionel (???) stated you needed to run the PowerHouse with the TMCC Lock On house thingy - for the short circuit protection - or something???

I don't imagine I'll ever need to run conventional.  I'm pretty happy with LionChief (and the PS 3.0 engine I already have).

Thanks Much!
Skip

Skip, here is a revision of my earlier track plan that incorporates vertical easements (inspired by another thread here on the forum).   The idea is to create an easement in the change of grade, in order to avoid the sharp change in grade from 0% to 3.2%   So that locomotives will have less time when a driving wheel is "lifted" above the rail for a short distance (thus reducing traction) over the track section joints.  Long ridged-wheelbase steamers will have the most difficulty with sharp vertical transitions, while two-axle trucks will tend to always have all four wheels in contact with the rail head.   

The short sections will gradually increase in grade when going from 0% to 3.2% (and the reverse when going from 3.2% back to 0% at the top of the grade).   Theoretically, with four short sections between 0% and 3.2%, each section will change by roughly 0.64%:  from 0%:  0.64%; 1.28%; 1.92%; 2.56%;  3.2%.  [You would not need to be as mathematically precise as this implies, this just shows how a vertical transition works.]

5-5by15_v1b

Incidentally, my Lionchief Plus FT ABA set is strong at climbing grades, in addition to motors in all units driving all 12 axles, in two-axle trucks, there are traction tires on each unit, and in an un-advertised feature, all three units have strong Magnatraction on all axles (I tested, and previously reported this feature here on the forum).

One could try to bend vertically, a long section of track (like a O48 30-degree curve) to form a vertical easement.   For a track system not composed of ridged plastic roadbed, of course.   This would be challenging to do, but possible.   Perhaps simpler in the long run to use four short track sections to build the easement as I have shown.   Its even better to use long sections of track for the vertical easement, like full O72 sections, but this track plan does not allow for this wide a diameter.

There is a trade-off between the length of the vertical easements, and the grade between easements.   In the plan shown, the addition of vertical easements increased the "ruling-grade" between the easements from 3.2% to 3.3%, a worthwhile trade-off in this case.

Finally, there is nothing mandated about using four sections of sectional track for a vertical easement, even a single section is an improvement over no easement, while using more than four track sections is only marginally better.   Four sections was just convenient for this plan, as Lionel makes quarter-sections of O48 FasTrack curves.

Attachments

Images (1)
  • 5-5by15_v1b
Last edited by Ken-Oscale

Bending curved track vertically does sound like an interesting challenge.  I've done transitions to grades up to 12% with O tubular straights, and to grades up to 8% with Gargraves Flex (vertical bend while straight, then formed the curve).  I always use plywood jigs for these bends, bending the face of the plywood for the vertical track bending, and cutting the edge of the plywood to the inside diameter for the regular curve bending.

You're looking at much lower grade changes, but with rigid plastic base/roadbed. I guess I'd build a heated jig for the vertical curve out of 1/2" plywood over an oil-filled space heater, then use a heat gun to warm the plastic a little more while pressing the track down into the jig, to form the bend. Has anyone done this with their plastic track?

Skipdup posted:

LionChief get's it's commands wirelessly and ProtoSound gets from a signal sent through the track, right?

So, I would need either a MTH Z-1000 (just the brick, without controller) or Lionel PH-135, plugged into a DCS Remote Commander, and then hardwire that into my Fastrack.  Right?

Anyone know if the PH-135 will plug directly into the DCS Commander directly?  Or are plug adapters needed?

Also, I (might) vaguely remember reading, or seeing a YouTube video, where Lionel (???) stated you needed to run the PowerHouse with the TMCC Lock On house thingy - for the short circuit protection - or something???

Yes, to run LionChief, just put the power to the track. The Z-1000 (brick only) is plug and play with the DCS Remote Commander. The PH-135 is not. You would need to swap the plug.

The TMCC Lock-on is "nice" but not mandatory. You probably do want to include a MTH 50-1014 12 Port Terminal Block. As I mentioned earlier, it's a good idea to plan for one track feeder for every 6 track joints.

Last edited by Gilly@N&W
Gilly@N&W posted:
Skipdup posted:

LionChief get's it's commands wirelessly and ProtoSound gets from a signal sent through the track, right?

So, I would need either a MTH Z-1000 (just the brick, without controller) or Lionel PH-135, plugged into a DCS Remote Commander, and then hardwire that into my Fastrack.  Right?

Anyone know if the PH-135 will plug directly into the DCS Commander directly?  Or are plug adapters needed?

Also, I (might) vaguely remember reading, or seeing a YouTube video, where Lionel (???) stated you needed to run the PowerHouse with the TMCC Lock On house thingy - for the short circuit protection - or something???

Yes, to run LionChief, just put the power to the track. The Z-1000 (brick only) is plug and play with the DCS Remote Commander. The PH-135 is not. You would need to swap the plug.

The TMCC Lock-on is "nice" but not mandatory. You probably do want to include a MTH 50-1014 12 Port Terminal Block. As I mentioned earlier, it's a good idea to plan for one track feeder for every 6 track joints.

Thank you.  Very helpful!

Ken-Oscale posted:

Skip, here is a revision of my earlier track plan that incorporates vertical easements (inspired by another thread here on the forum).   The idea is to create an easement in the change of grade, in order to avoid the sharp change in grade from 0% to 3.2%   So that locomotives will have less time when a driving wheel is "lifted" above the rail for a short distance (thus reducing traction) over the track section joints.  Long ridged-wheelbase steamers will have the most difficulty with sharp vertical transitions, while two-axle trucks will tend to always have all four wheels in contact with the rail head.   

The short sections will gradually increase in grade when going from 0% to 3.2% (and the reverse when going from 3.2% back to 0% at the top of the grade).   Theoretically, with four short sections between 0% and 3.2%, each section will change by roughly 0.64%:  from 0%:  0.64%; 1.28%; 1.92%; 2.56%;  3.2%.  [You would not need to be as mathematically precise as this implies, this just shows how a vertical transition works.]

Incidentally, my Lionchief Plus FT ABA set is strong at climbing grades, in addition to motors in all units driving all 12 axles, in two-axle trucks, there are traction tires on each unit, and in an un-advertised feature, all three units have strong Magnatraction on all axles (I tested, and previously reported this feature here on the forum).

One could try to bend vertically, a long section of track (like a O48 30-degree curve) to form a vertical easement.   For a track system not composed of ridged plastic roadbed, of course.   This would be challenging to do, but possible.   Perhaps simpler in the long run to use four short track sections to build the easement as I have shown.   Its even better to use long sections of track for the vertical easement, like full O72 sections, but this track plan does not allow for this wide a diameter.

There is a trade-off between the length of the vertical easements, and the grade between easements.   In the plan shown, the addition of vertical easements increased the "ruling-grade" between the easements from 3.2% to 3.3%, a worthwhile trade-off in this case.

Finally, there is nothing mandated about using four sections of sectional track for a vertical easement, even a single section is an improvement over no easement, while using more than four track sections is only marginally better.   Four sections was just convenient for this plan, as Lionel makes quarter-sections of O48 FasTrack curves.

Thank you for this.  I had no idea.

Made a track order yesterday.  I think I'll just need to buy the four O48 7.5...

"Yes, to run LionChief, just put the power to the track. The Z-1000 (brick only) is plug and play with the DCS Remote Commander. The PH-135 is not. You would need to swap the plug.

The TMCC Lock-on is "nice" but not mandatory. You probably do want to include a MTH 50-1014 12 Port Terminal Block. As I mentioned earlier, it's a good idea to plan for one track feeder for every 6 track joints."


The TMCC Lock-On has a fast electronic breaker, the PH135 has a slower breaker I think. I'm not clear about the MTH items. But I would like to use the Lock-On for the fast trip in case of a short.

This is an under-tree layout intended for play by and with kids, right?

No way I'd go without the TMCC Lock-On for its fast breaker.
I'd also plug it all into a Tripp Lite Isobar, or similar metal-housing surge protector.

Then again,
I'd also wire in a slow breaker like from Scott's Odds-n-Ends. (Or, does the DCS gear have this in it?)
I'd also upgrade the house panel with an Arc Fault Breaker for the train's circuit.
And a SurgeBreaker (assuming it's a QO panel)

Maybe all this is a bit much, but... you're not just protecting the trains - you're protecting the kids.

I got some extra track and power goodies on order.  Now the waiting.  

My MTH train is still in the shop getting it's board replaced/upgraded from 2.0 to 3.0.  So, I waited on the MTH Commander.  I'll get that when the train is ready (boards are on backorder).

I went ahead and got a PowerHouse 185 (more is ALWAYS better, right???) and the TMCC lock-on.

I'll figure out how to most easily add power drops once everything gets here.  I've got lots of electrical supplies/wire/etc already.

Thanks again for all the help!!!


Skipdup posted:

The O60 turns don't seem to want to lay flat.  Are there any tricks I should try?  Or, will they settle with time?

Thanks!!
Skip
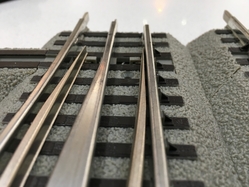
Doubtful.  I put together a small layout on my concrete basement floor with MTH Real Trax, using both new and used track.  Same problem, curved track didn't want to lay flat.  Ended up building a 6' x 16' table just so I could screw the track down to something and hold it flat.

Just wanted to update...  It's "done".  Soon as I clean up, I will post some pictures.  Thanks again for all the help.  I'm very happy with the layout and the kids are really digging it.

I'm really bummed about my switches (O60 Command Control/Remote - 6-81951 & 6-81950).  Severely bummed.  Like ready to put a match to them.  I'm having constant derailments.  Only one (out of six) seems to be working consistently.  These things are too darned expensive to have issues right out of the box.

I don't really know enough to diagnose.  But it seems like they're sticking in one direction and the anti-derailment fails.  Also, sometimes even the switch won't activate/switch them - you have to move them by hand (turning the light).  Don't know if they're faulty or need tweaking.  Will try and research later tonight.

Also, one of the (direction indicator) LEDs was not working.

Are issues like this normal with the switches?  Am I just unlucky?

Thanks again,
Skip
Skipdup posted:

Just wanted to update...  It's "done".  Soon as I clean up, I will post some pictures.  Thanks again for all the help.  I'm very happy with the layout and the kids are really digging it.

I'm really bummed about my switches (O60 Command Control/Remote - 6-81951 & 6-81950).  Severely bummed.  Like ready to put a match to them.  I'm having constant derailments.  Only one (out of six) seems to be working consistently.  These things are too darned expensive to have issues right out of the box.

I don't really know enough to diagnose.  But it seems like they're sticking in one direction and the anti-derailment fails.  Also, sometimes even the switch won't activate/switch them - you have to move them by hand (turning the light).  Don't know if they're faulty or need tweaking.  Will try and research later tonight.

Also, one of the (direction indicator) LEDs was not working.

Are issues like this normal with the switches?  Am I just unlucky?

Thanks again,
Skip

I’ve had an issue with a few Fastrack o72 switches that would stick. I took the bottom off and looked it over. It appeared to me that there was some extra plastic on the piece that throws the switch. I shaved off a bit and never had a problem after. Frustrating for sure on a new switch. 

As for the led. Same thing, you could look at the word connection, maybe it’s loose?  Worst case you may have to return for replacement  

good luck!  

MikeWalter posted:

I’ve had an issue with a few Fastrack o72 switches that would stick. I took the bottom off and looked it over. It appeared to me that there was some extra plastic on the piece that throws the switch. I shaved off a bit and never had a problem after. Frustrating for sure on a new switch. 

As for the led. Same thing, you could look at the word connection, maybe it’s loose?  Worst case you may have to return for replacement  

good luck!  

I'm tempted to open them up and take a look.  But I'm nervous that might come back to  haunt me, if I need to return.  I would understand the reseller or Lionel being suspicious if it was obvious I'd been in there...

Skip, that looks real nice, thanks for sharing the pics!   Any chance we can see a video of trains running?   You might want to put down a long piece of felt (white or green) to muffle the sound.

Question:  did the O60 curves ever "settle" and lay flat?  I haven't seen that problem myself, but have not bought track recently, and the production runs might vary some.

Sorry about your turnout issues, O60s for me have been bullet-proof, but have not purchased one recently. That is a bummer.   -Ken

Ken-Oscale posted:

Skip, that looks real nice, thanks for sharing the pics!   Any chance we can see a video of trains running?   You might want to put down a long piece of felt (white or green) to muffle the sound.

Question:  did the O60 curves ever "settle" and lay flat?  I haven't seen that problem myself, but have not bought track recently, and the production runs might vary some.

Sorry about your turnout issues, O60s for me have been bullet-proof, but have not purchased one recently. That is a bummer.   -Ken

I was going to video last night.  Couldn't keep a train on track long enough to video!  I'm going to look at everything again today with fresh eyes.  Will probably open a switch up and see what I see.  Maybe I can tweak or lube something...

The O60 turns haven't settled.  Doesn't seem to really bother the train(s).  Tempted to put may heat gun to them. 

I haven't got the right parts to run two trains at once yet.  So I can run MTH or Lionel.  But, I suspect Santa might have a LionChief RS-3 under the tree, so Christmas morning should be more fun.

I was super tempted while I started assembling all this to go order a Cab1L & Base 1L, so I could switch the turnouts from the couch.  I could see great value in that!  But, once I saw the turnouts were having issues, I'm glad I didn't spend...

 Thanks again All!
Skip

Last edited by Skipdup

  Break-in being needed is a possibilty if plastic "flash" was the excess plastic removed, (the thin excess material caught between mold/die sections in the seams).

Cloth of any kind under the track will make a huge difference in the noise produced. Carpets, bed spreads, terry cloth, and fleece work well, though you may want to add tvs protection too (cheap) with the added static risks.

The bigger brick was a wise choice.

  It is a very nice space you've got going. Merry Christmas 


The sticking turn-outs is one thing.  I could move those by hand and still enjoy watching the train go around.

What's killing the deal is both trains (Lionchief Polar Express & MTH AeroTrain) are going straight over the turn section.  I've tried "tweaking" the "rail turny thingy" so it sits closer to the main rail - but doesn't seem to make any difference.  Unless the train is crawling, I can't make it even partially  around the layout.

This is happening with five of the six turn-outs.  One has been 100% reliable.  The single good one is up under the tree, so I can't "presently" (see what I did there?) get to it to compare it against the others...

Does anyone have any advice?  Plan to call Lionel & the shop where I purchased after Christmas.  But dang, this really stinks.

The video below shows the issue.  The train should turn to it's right.  I'm running it at probably a little less than 1/3 speed on the lionchief remote - maybe 1/4.

Is there any way this is somehow user error?  Have I done something stupid and just don't see it?

Best,
Skip


Attachments

Videos (1)
IMG_0757
Skipdup posted:

The sticking turn-outs is one thing.  I could move those by hand and still enjoy watching the train go around.

What's killing the deal is both trains (Lionchief Polar Express & MTH AeroTrain) are going straight over the turn section.  I've tried "tweaking" the "rail turny thingy" so it sits closer to the main rail - but doesn't seem to make any difference.  Unless the train is crawling, I can't make it even partially  around the layout.

This is happening with five of the six turn-outs.  One has been 100% reliable.  The single good one is up under the tree, so I can't "presently" (see what I did there?) get to it to compare it against the others...

Does anyone have any advice?  Plan to call Lionel & the shop where I purchased after Christmas.  But dang, this really stinks.

The video below shows the issue.  The train should turn to it's right.  I'm running it at probably a little less than 1/3 speed on the lionchief remote - maybe 1/4.

Is there any way this is somehow user error?  Have I done something stupid and just don't see it?

Best,
Skip


Your switches are acting like they're still not getting enough power.  I have some MTH Scale Trax switches that acted the same way yours appear to be acting.  They were fairly sluggish and didn't always fully throw when powering them from the accessory terminals on a Lionel CW-80 (even after messing with the adjustable voltage setting).  I then hooked them up to the 14 volt accessory terminals of an MRC 270 watt Dual-Power transformer.  They didn't take "no" for an answer after that!

  The points (moving rails) must close 100% or the wheels will pick at the points and climb them If they don't, there is something wrong mechanically.

Wheel gauge vs the guide rails can cause this too. The guide rails use the back of a wheel for tracking while the opposing wheel losses its flanging ability going across gaps needed in the turnout rails.

Are they operating with a nice snap when they work?

It's not likely your fault, but will require you to look and watch close to decide exactly what's wrong.  I'd consider a call ahead, trip to and testing at the store asap to find at least one more that works better.

Hope everyone is having a wonderful Christmas.

Now that all the presents are cleared out, I was able to get to the one turn-out that's working correctly.

It appears the functioning turn-out's switch rail has a closer tolerance when compared to the malfunctioning one.  I took it apart, but I don't see any way to adjust.  

I took some more video and slowed it down.  The front wheels of the train are squeezing through, pushing the pointer rails slightly, and going straight.  The subsequent wheels do not squeeze through, and make the turn, derailing the train.

I've tried bending the pointer rails every which way - with no effect.  At this point, I'm afraid I'm doing more harm than good.

I'll plan on calling Lionel tomorrow (assuming they're open).  And/or returning the five bad ones and ordering new/different ones...  maybe from different supplier in the hope of getting a different lot.

Really frustrating.

IMG_0767IMG_0768

Attachments

Images (2)
  • IMG_0767
  • IMG_0768
Last edited by Skipdup

Before even seeing the "correct" switch I was going to suggest that your rails have too much gap. I have had this same issue and I fixed it by putting a flat head screwdriver behind the moveable rail and using needle nose pliers to bend the moveable rail over the screwdriver to get it closer. The thin pilot wheel flanges (the Polar Express Berk seems to be a bad one...) easily creep into that gap and cause a derailment. There is a youtube video of someone doing the fix that I described should you feel the need to check it out before surgery.

Skipdup posted:

Hope everyone is having a wonderful Christmas.

Now that all the presents are cleared out, I was able to get to the one turn-out that's working correctly.

It appears the functioning turn-out's switch rail has a closer tolerance when compared to the malfunctioning one.  I took it apart, but I don't see any way to adjust.  

I took some more video and slowed it down.  The front wheels of the train are squeezing through, pushing the pointer rails slightly, and going straight.  The subsequent wheels do not squeeze through, and make the turn, derailing the train.

I've tried bending the pointer rails every which way - with no effect.  At this point, I'm afraid I'm doing more harm than good.

I'll plan on calling Lionel tomorrow (assuming they're open).  And/or returning the five bad ones and ordering new/different ones...  maybe from different supplier in the hope of getting a different lot.

Really frustrating.

IMG_0767IMG_0768

We had a great Christmas.  I got a K-Line Pennsylvania Railroad Mikado 2-8-2 Steam Locomotive, seems to be working okay, it was used so it needs a little work. 

I had this issue with one of my o72 switches.  I was able to fix, but having 5 bad ones that are all new, wow that is extremely frustrating.  I hope you get it resolved quickly, as there is nothing like little switch annoyances to ruin your layout progress.  

Good luck and have a safe and happy new year!

-Mike

So, I received two replacement turn-outs.  One works splendidly!  One. 

The other is the worse than all the others.

Waiting on the other three.  Should be here next week.

I have to wonder...  Is this part of the hobby?  Growing pains?  User error?  Just unlucky?

On another note...  The RS-3 LionChief+ I got for Christmas is HUGE!  Were they that big?  Or is there something about scale I don't understand?

Best,
Skip

The quality isn't military spec anymore

The overhead shots finally loaded today. That gap is the issue.

It looks like the boss pushing the deversion rail (lower) needs to be built up inside the notch (along the vertical wall in the notch and/or the notch's top where it covers the rail's (partially hidden) tab.  

I bet a toothpick there between point and boss for a test would tell you.  Building the plastic up slightly to cause the point to close fully shouldn't be hard with gel super glue and/or plastic scrap, but make Lionel concede to your mods first so you are not violating the warranty. Make them put it IN PRINT(or e-mail..etc, not by voice) Send an overhead shot of each bad one too, explaining it.  Otherwise just keep sending them back till your satisfied or they grow weary and actually test some before shipping.

Adriatic posted:

The quality isn't military spec anymore

The overhead shots finally loaded today. That gap is the issue.

It looks like the boss pushing the deversion rail (lower) needs to be built up inside the notch (along the vertical wall in the notch and/or the notch's top where it covers the rail's (partially hidden) tab.  

I bet a toothpick there between point and boss for a test would tell you.  Building the plastic up slightly to cause the point to close fully shouldn't be hard with gel super glue and/or plastic scrap, but make Lionel concede to your mods first so you are not violating the warranty. Make them put it IN PRINT(or e-mail..etc, not by voice) Send an overhead shot of each bad one too, explaining it.  Otherwise just keep sending them back till your satisfied or they grow weary and actually test some before shipping.

Adriatic- Yeah, it sure looks to me like the pointer rails need to be spread further apart from each other and maybe raised off the track bed a hair.  Is that what you're saying too?

When I took one apart, it looks like the slider is moving it's full movement (based on the gear's teeth that it's connected to).  It seems like the problem might be where the metal rails attach to the plastic slider.  That might be what you're saying (still rusty on some of this terminology).

I can't quite figure out where you're suggesting shimming with a toothpick.  Is it where the arrow is below?

Sorry, I'm probably being dense.

How are the metal rails/pointer fingers attached to that plastic slider?  I can't quite "see" or figure it out.  It almost seems like a press, or friction, fit.  But I'm scared I'm going to break if I continue exploring that too aggressively.

Thanks much!
Skip

IMG_0758

Attachments

Images (1)
  • IMG_0758

One of the problems with injection molded plastic used for precision tasks is you make your molds for one plastic compound and then you have to find another supplier for one reason or another and you have different shrink properties. You cannot afford to rework your molds each time you change your resin or supplier. A good engineer can often take this into consideration in the design process. In this case a strong detent on the points end of the actuation linkage and some overshoot ability in both directions would have prevented the different resin characteristics from causing failure of the mechanism.   You can see this strategy  used on switches where you mount your own switch machines. These switch machines all use a spring in the linkage chain to the points so the actuation mechanism can overshoot in both directions. They use a second spring for detent.   Poorly engineered to begin with ! Probably some DWEEB who never had a train set as a kid. Hey Lionel, want me to fix your problem?  j                                                                                                                                                    

If that is as far as the points will go I would try lightly bending the straight rail so it meets the points when they are in the curved position as seen in your pictures. It is possible the straight rail is the problem. That really sucks, you'd think for all the money you spend on those switch tracks they would just work.

Add Reply

Post
The Track Planning and Layout Design Forum is sponsored by

AN OGR FORUM CHARTER SPONSOR

OGR Publishing, Inc., 1310 Eastside Centre Ct, Suite 6, Mountain Home, AR 72653
800-980-OGRR (6477)
www.ogaugerr.com

×
×
×
×
Link copied to your clipboard.
×
×