hey all,


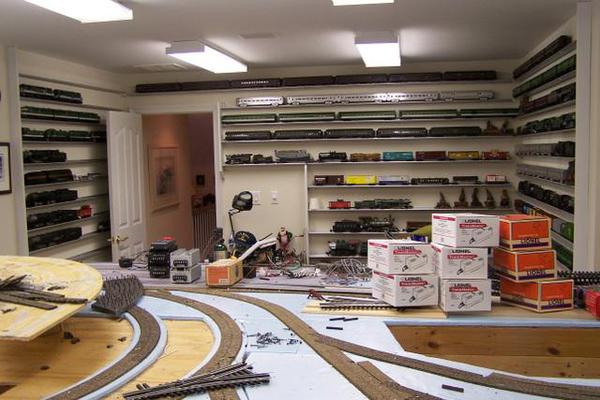
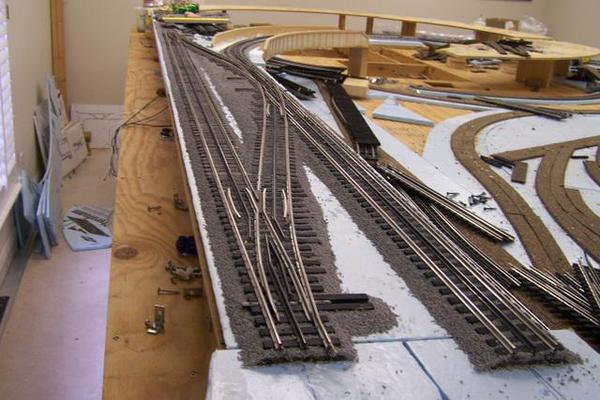
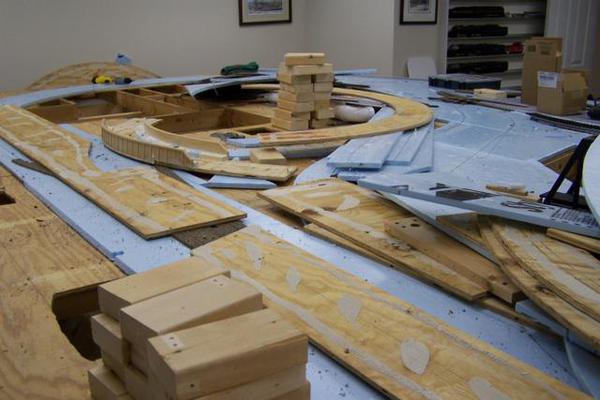
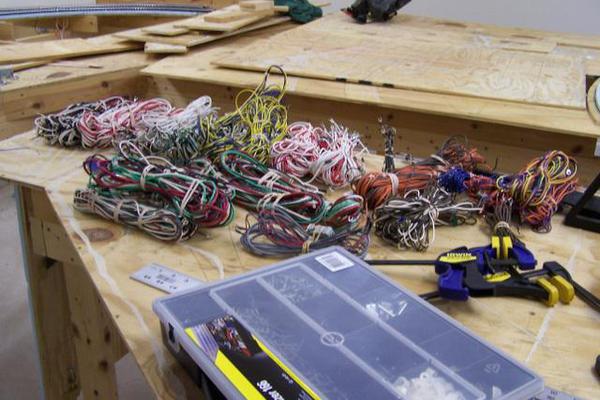
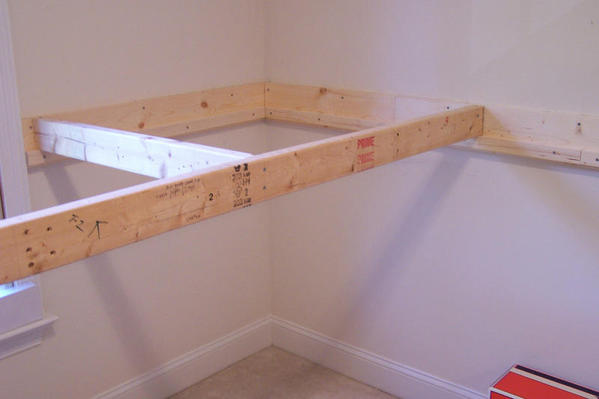
as some of you know i am taking down my On3 / O scale layout.  I am going back to just O scale, GN and NP.  i always see pics of layouts being built and pics of wonderful craftsman work.  which i greatly appreciate and gain inspiration from all the time.  pics i rarely see; the other side of model railroading, demolition of a layout.  so i figured i would post a few of my demo.  i started last night.  22' dumpster here in a couple weeks to throw it all into. the yard at point, CO has been purchased and is going to a good home so that will be saved.  anyway, a little different view of our hobby.  hope 2015 is treating everyone well!

DSCN0795

DSCN0800

DSCN0801

DSCN0802

Attachments

Images (4)
  • DSCN0795
  • DSCN0800
  • DSCN0801
  • DSCN0802
Last edited by zak98
Original Post

Replies sorted oldest to newest

a lot of construction hours going into the dumpster


sorry


but, it does raise a question about the initial build


do people consider how to initially construct the layout such that it is easier to take down (move or sell)


i have seen some beautiful layouts for sale and when you dig down, you realize that they cannot be moved without a tremendous amount of work in the take down and rebuild (that 100 hours you spent on the construction is not worth much on a resale)


i am part of a modular group, and will try to build my new layout using some of those ideas so that it is easier to handle when the inevitable happens


your thread reminded me of that principle


j


Jerry wrote:


do people consider how to initially construct the layout such that it is easier to take down (move or sell)


I sure didn't in my last house......I thought I would live there forever (and I lived there 17 years, from age 34 to 51).....I thought I would never mover.....Never say never....My pictures are worse! The layout was 14X30.


Here's a few shots while it was still up....It took me almost 4 months to dismantle! What a disaster and a mess!


P7260160

P7260150


Peter

Attachments

Images (2)
  • P7260160
  • P7260150
Last edited by Putnam Division

fair statement, no need to apologize.  no regard to saving anything went into my design. the hours spent constructing are not lost in the dumpster, they were enjoyed and part of the process of constructing a layout, part of the hobby(IMHO). just as demolition of the layout is part of the process. i learned a great deal. this is my 8th layout and i still learn things from the process. so it all is of value to me, even demolition and challenges presented, i am sure i will learn a few things from this demo and apply next time.  but if this post helps people think about construction techniques prior to building and if that is a key point for them, great this post served a purpose.  for me, demolition is pretty easy when you are not trying to save anything.  this layout will be down in a couple days. cycle of a layouts life, once again IMHO.  

Originally Posted by Choo Choo kenny:

     zak98 in the 2nd and 3rd pictures would consider selling the rock faces to me and shipping them to me in the PGH PA. area? Choo Choo Kenny

shoot me an email off list. email address in my profile.  but i would imagine the shipping costs may be a bit high.  

Originally Posted by christopher N&W:

It is something to think about, but I'm very much looking forward to seeing progress on your new layout.

thanks chris. ur layout is one i always enjoy seeing!  wonderful craftsman work you do.  very inspirational and building a layout on your own, one sometimes needs that inspiration or push to keep going.  i am going to start with an engine terminal section.  turntable and transfer table purchased from mill house studioz.  turntable is super.  waiting on transfer table. really thinking about trying the mainne benchwork solution for this 6x by 23' section. 

Yes, it is a big consideration!

At my age it is a problem that I have yet to solve. I have a very nice plan that encompasses everything that I would want in a layout. Yet, how do I design it in a manner in which it can be easily taken down if I have to downsize to another dwelling or when I croak? Right now the only solution seems to be a compromise to something on a much smaller scale than what I really want to achieve.

Liked your layout work, Mike. Looking forward to the next one.


As to doing a build that can be easily disassembled, I'm a proponent of sectional construction, not per se for being able to take it down, but for maintenance issues involving major work. A section can be removed and put up on a vertical stand rather than having to lie underneath it or reach over it for several hours. This is in situations where a turnout or track section needs replacing or major service.

Originally Posted by AGHRMatt:

Liked your layout work, Mike. Looking forward to the next one.


As to doing a build that can be easily disassembled, I'm a proponent of sectional construction, not per se for being able to take it down, but for maintenance issues involving major work. A section can be removed and put up on a vertical stand rather than having to lie underneath it or reach over it for several hours. This is in situations where a turnout or track section needs replacing or major service.

thanks matt.  absolutely.  great idea on the sectional pieces for maintenance.  even though my layout room is carpeted it still is a pain to get under the layout and wire, fix, whatever.  one thing i did design in the layout was there was nothing deeper than 36" or i could reach the track from both sides.  so that helped out immensely.

Originally Posted by rtr12:

That's a sad sight. I suppose the good part is the new layout. Starting over would be both difficult and fun I suppose? It would still be a tough decision to demo and start over. Good luck!

funny you mention it.  it is somewhat therapeutic and fun to demo something.  put ur leather gloves on, safety glasses, work boots and start cutting.  it is a difficult decision to come to, but once the decision is made i want it out and start working on the room to fix any drywall or other issues ASAP.  then start the next one!

Originally Posted by Spence:

When I built my layout I never considered anything about tearing it down at a future time. I can't worry about that. When I'm gone that will be someone else's problem.

ha.. fair enough.  at some point i will be right there with ya! my wife has been well prepared for that if i happen leave this world before her.  

Originally Posted by Ron045:

Why are you throwing so much away?  That looks like good lumber.  Can't you re-use some of it?


Ron


hey ron,


some of it may be useable, but I'm investigating other layout building options for the next layout.  mainne sievers, etc... so its all going this time.  some of the lumber on this layout has been re-used 4 times.

I considered take down before the onset of starting to build. But this is our first layout and there was just soooo much to consider (curves, inclines, declines, ensuring plywood roadbed was smooth with no dips or rises and was level from side-to-side, clearances, etc.) that it got overwhelming. I take a small amount of comfort in the fact that I'm using Lyn Westcott's old school techniques for benchwork - by the book - so I do not have any tabletops and can dismantle the benchwork in sections if need be.  And the plywood/homasote benchwork comprises only the roadbed. Scenery will be independent and attached to the benchwork in sections.  Peter


Last edited by PJB
Originally Posted by zak98:
 

some of it may be useable, but I'm investigating other layout building options for the next layout.  mainne sievers, etc... so its all going this time.  some of the lumber on this layout has been re-used 4 times.

Mianne is very nice and can easily be re-configured if you decide to make some changes. I chose Mianne last year and am quite happy with it. I have already ordered some more. I started with Mianne's 6'x16' package and it was ready for track in about 8 hours.

Having been in the construction business for many years and doing many many small projects here and there I NEVER NEVER throw anything away until the project is 100% complete.  You never know when you will need a small 1 or 2 foot piece of wood for something and if you don't have it now you have to buy an 8 foot piece just to get a 2 foot piece.  I see a lot of the wood you have still looks straight.  Even if you go with a platform system, like Mianne, I would try to salvage at least a few pieces.  Just in case.


Rick

When we decided to move on I took a saws all and cut up the entire two layouts with the track still on it. Moved it all outside and had a trash truck pick it up.

Oh my... This can't be the norm.  Who has the resources to to throw everything away including the track?


If this is very common, I'm going into the layout dismantling and recycling business. 


Ron


I Just unscrewed all the components of the 15x25/8x12, recycled enough to frame the small attic space replacement layout[last photo] and cut the rest for kindling at the Brunswick Stew Pot. My spouses Health issues drove us from our mountain cottage, home of the 14x32 twin shelf, 5 track operation at 7'-6'' and 9'-0 high. I removed it in '08 repaired the walls in prep of sale. I Oct. '09 the layout pictured came down in favor of medical rehab and exercise equipment up stairs in the Greensboro Condo.  My point, depending on age and general health, think about building too large to maintain or potential relocation. I was only a short ways along on the small and final attic layout when health derailed me(again). 

100_1189

100_1191

100_1209

100_1200-001


100_1226

100_1228

Attachments

Images (5)
  • 100_1189
  • 100_1191
  • 100_1209
  • 100_1226
  • 100_1228: attic start
Last edited by Dewey Trogdon
Originally Posted by RICKC:

Having been in the construction business for many years and doing many many small projects here and there I NEVER NEVER throw anything away until the project is 100% complete.  You never know when you will need a small 1 or 2 foot piece of wood for something and if you don't have it now you have to buy an 8 foot piece just to get a 2 foot piece.  I see a lot of the wood you have still looks straight.  Even if you go with a platform system, like Mianne, I would try to salvage at least a few pieces.  Just in case.


Rick

thanks rick!  i always have a "keep" pile.  you are absolutely correct, just in case....... always happens.  but great info to get out there to others.  thanks for the post!

Originally Posted by Ron045:

When we decided to move on I took a saws all and cut up the entire two layouts with the track still on it. Moved it all outside and had a trash truck pick it up.

Oh my... This can't be the norm.  Who has the resources to to throw everything away including the track?


If this is very common, I'm going into the layout dismantling and recycling business. 


Ron


hey ron,


not sure i have the resources, but once 2 rail track is ballasted and glued, it is very difficult to save any track or switches.  or maybe i just do not have the patience to try and chisel them out.  2 rail code 100 for my On3 section is pretty fragile to try and remove from glued ballast.  2 rail code 148 comes up a bit easier but still only minor parts are re-useable.  IMHO.  


this layout, i did exactly as mentioned in another post.  cut right through track and everything.  (have to watch the rail it can get twisted up in a circular saw or bound up in a saws all) but right or wrong, that is exactly what i did.  

not sure i have the resources, but once 2 rail track is ballasted and glued, it is very difficult to save any track or switches.  or maybe i just do not have the patience to try and chisel them out.  2 rail code 100 for my On3 section is pretty fragile to try and remove from glued ballast.  2 rail code 148 comes up a bit easier but still only minor parts are re-useable.  IMHO.  


this layout, i did exactly as mentioned in another post.  cut right through track and everything.  (have to watch the rail it can get twisted up in a circular saw or bound up in a saws all) but right or wrong, that is exactly what i did. 


I remember reading somewhere on this forum to glue the ballast only on the outside of the tracks.  Inside the rails the ballast is just sitting free.  The poster commented that it would be easier to dismantle.  So that is what I started doing on mine.


Good Luck.

Ron


Originally Posted by rtr12:
Originally Posted by zak98:
 

some of it may be useable, but I'm investigating other layout building options for the next layout.  mainne sievers, etc... so its all going this time.  some of the lumber on this layout has been re-used 4 times.

Mianne is very nice and can easily be re-configured if you decide to make some changes. I chose Mianne last year and am quite happy with it. I have already ordered some more. I started with Mianne's 6'x16' package and it was ready for track in about 8 hours.

great to hear a testimonial on mianne.  i leaning that way.  thanks!

Depending on the glue mixture used to secure the ballast, what I've found works pretty well is saturating sections with denatured alcohol (have good ventilation). It breaks the glue loose and the track lifts off pretty easily. It evaporates quickly enough that it doesn't seem to impact the wooden ties. It makes a gooey mess of the scenery cover but scrapes off with a putty knife.

Mike:


Glad to see you are moving back into GN and NP, my two choices. 


I admired your first layout for it's beautiful scenery, great motive power and equipment, and simplicity.  Your second venture was quite a change, and I'm sure did an outstanding job of satiating your love for narrow gauge.  It was also what I would consider a "gold standard" of modeling. 


Now you have decided to move on, and I'm very much looking forward to seeing what you come up with next.  I don't know what form it will take, but I know I (and others) will not be disappointed. 


I trashed about 50% of my HO layout when we did a home renovation.  What is resulting out of that will be far better than before.  At some point, I may trash the old part of my existing HO railroad when the new section in fairly complete.  Techniques, materials, and our skill levels improve.  Why worry about trashing some track, when what results is far better than what was before? 


Regards,

Jerry


Originally Posted by daveb:

That looks like it was a very nice layout. What was the shortcomings or change in modeling desire that made you want to tear it down and start over? ........DaveB

hey daveB,  it was just time, nothing wrong with it at all.  my first passion is GN and NP steam/diesel era, so i have all my O std. engines in cases around the room. i was lucky enough to keep all of them vs. selling them off.   it was up 8 years. i found myself working on other projects other than the layout, so down it came.  really loved building it and learned quite a lot about DCC (that was my first DCC layout) so now i am going to incorporate DCC into the std O layout.  probably start with just an engine terminal of 6' x 23' or so.  i purchased the millhouse studioz turntable and transfer table.  those two should give me plenty of options.  

Originally Posted by gnnpnut:

Mike:


Glad to see you are moving back into GN and NP, my two choices. 


I admired your first layout for it's beautiful scenery, great motive power and equipment, and simplicity.  Your second venture was quite a change, and I'm sure did an outstanding job of satiating your love for narrow gauge.  It was also what I would consider a "gold standard" of modeling. 


Now you have decided to move on, and I'm very much looking forward to seeing what you come up with next.  I don't know what form it will take, but I know I (and others) will not be disappointed. 


I trashed about 50% of my HO layout when we did a home renovation.  What is resulting out of that will be far better than before.  At some point, I may trash the old part of my existing HO railroad when the new section in fairly complete.  Techniques, materials, and our skill levels improve.  Why worry about trashing some track, when what results is far better than what was before? 


Regards,

Jerry


thanks jerry,  i appreciate the comments!  it will be fun to start over. this new layout will be my first in std O with DCC.  i learned quite a bit about DCC with the current layout i just took down.  thanks again for the support!

Originally Posted by zak98:
Originally Posted by RICKC:

Having been in the construction business for many years and doing many many small projects here and there I NEVER NEVER throw anything away until the project is 100% complete.  You never know when you will need a small 1 or 2 foot piece of wood for something and if you don't have it now you have to buy an 8 foot piece just to get a 2 foot piece.  I see a lot of the wood you have still looks straight.  Even if you go with a platform system, like Mianne, I would try to salvage at least a few pieces.  Just in case.


Rick

thanks rick!  i always have a "keep" pile.  you are absolutely correct, just in case....... always happens.  but great info to get out there to others.  thanks for the post!

and i just used some wood from the "keep" pile to reinforce some of the yard tables that are sold.  

Originally Posted by AGHRMatt:

Depending on the glue mixture used to secure the ballast, what I've found works pretty well is saturating sections with denatured alcohol (have good ventilation). It breaks the glue loose and the track lifts off pretty easily. It evaporates quickly enough that it doesn't seem to impact the wooden ties. It makes a gooey mess of the scenery cover but scrapes off with a putty knife.

thanks matt, i may have to try that next time. i never thought of of it!

well everything is down.  only the 16' yard table up but it is unscrewed from the wall and ready for the new owner.  all in all it took about 8 hours to dismantle.   8 years to build, 8 hours to demo.  kind weird how that worked out.  now on to cleaning up the room, fixing some minor dry wall issues, painting and finally cleaning the carpet. (and finding a place for all the stuff that was UNDER the layout!) 

Originally Posted by jpc:

Did you talk about your new location yet


size, room, etc


i learned a lot from this thread, thank you and good luck


j

j,  since i am going to try out the modular mainne layout system i am going to build this one in sections.  first section will be 6' x 23'.  loosely based on the mrr graphic in an above post.  the room is 23 x 40' overall. (it is actually bigger but i like having a lounge area, and workshop area that is not under or near the layout.)  so that is what i have to work with.  glad this post is of value!  thx for the feedback.  

There is a thread running about changing from an around-the-wall layout to the "usual"

loop layout.  In shows there are displayed these modular layouts, which, obviously,

are designed to be set up, taken down, and transported.  IMO, that looks like the

practical design if you ever think the layout will have to be moved, taken down, or

even worked on (where you could yank one section out of it).  I think building this

type of point-to-point layout is as realistic as running the trains, out to today's

end of line where the Chinese are putting in trestle piles , just like real railroads

were built.  Start at one end and lay track toward the other.  This type gives more access, and is more easily divisible for takedown, and more easily built for that eventuality.  Of course, there are wider areas that are not as accessible, such as yards, and the terminals with their wyes, yards, and turntables.  The negative:  you can't just set it all up and watch the trains run.

I agree Colorado Hirailer,

i had an HO 4x8 in our basement as a teenager.  As a young married adult, I started building a larger N scale layout, but had to tear it down when we moved.  I then built modular, and moved it twice, before I discarded it when we moved again and I was thinking of going back to HO.  I moved HO modules twice.  In the case of the last HO the ultimate plan was to have provision for continuous running, but I never got that far.  I ran point to point.  Now I have a 'temporary' 4x8 O gauge hirail, but anticipate building another modular once our last daughter moves out and I can claim a full 12x12 room.  It will be around the walls modular, in case we move in retirement.  That way I can reuse some or all the modules.  I like continuous running, but at the slow pace I build, I have spent most of my years running point to point.  I get my dose of continuous running at shows where the Pittsburgh Independent Hirailers or the Fort Pitt HiRailers set up their marvelous modular layouts and run the big engines!!

Originally Posted by zak98:

hi all,


i just started on a new website.  it is a work in progress but i will be posting pics and updates there as well.


http://www.michaelluczak.com/index.html


hope everyone has a great spring and summer modeling season!


mike

Mike,

Very nice Web site.  I see you make your drawings on paper.  How novel.  Just kidding, I'm an old paper and pencil draftsman and never got the hang of CAD.


I really like you locomotive roster!

Originally Posted by Mark Boyce:
Originally Posted by zak98:

hi all,


i just started on a new website.  it is a work in progress but i will be posting pics and updates there as well.


http://www.michaelluczak.com/index.html


hope everyone has a great spring and summer modeling season!


mike

Mike,

Very nice Web site.  I see you make your drawings on paper.  How novel.  Just kidding, I'm an old paper and pencil draftsman and never got the hang of CAD.


I really like you locomotive roster!

thanks mark!  i actually let my dad draw up all my layouts.  he has done it a dozen times over the years for myself and various people. he enjoys it and i do not have to try and remember all my CAD, or purchase a layout drawing package. more pics coming of the room (its finally repainted and carpet cleaned) as well as motive power pics.  i am working on the well hole flat car now and going to start putting DCC in my engines. 


thanks again for the comments and taking the time to view.


mike

Last edited by zak98

Mianne is a great choice, I'm sold on it (as I said earlier in the thread). And, if you ever decide to do another tear down and rebuild, all you have to do is re-configure the bench work. Mianne will help you do it too, just as they have with this layout. It also goes together very fast so you can get right to track laying. Good luck with it if you go that route.

Originally Posted by up148:

Mike,


Great website and presentation. I will follow your progress closely as I'm planning on using the same benchwork and want to see how you like it as work progresses. One question. Where did you get that wonderful prime mover on the 62ft wellhole flat? Is that a kit or ??


Butch

hi butch, thanks for the post.  i found it at:


http://www.dhsdiecast.com


not cheap, but well worth the money in my opinion.


thanks again!


mike

Originally Posted by rtr12:

Mianne is a great choice, I'm sold on it (as I said earlier in the thread). And, if you ever decide to do another tear down and rebuild, all you have to do is re-configure the bench work. Mianne will help you do it too, just as they have with this layout. It also goes together very fast so you can get right to track laying. Good luck with it if you go that route.

i just purchased the benchwork system from tim at mianne.  looking forward to it in about 4 weeks!  thanks for the post and taking the time to view the site.


mike

hi all,


a few new pics on the site. also i uploaded a couple short videos to the youtube channel as well.  


i installed a QSI Titan DCC decoder in one of my PFM GN E-6, 4-6-0s.  video there.

i purchased a yoder GE 45 ton switcher. video there.


youtube link below in signature line.  have a great week, all.


mike

hi j,


4 weeks from the time i called tim at mianne to the day it showed up (2 days of shipping time in there)  here is a pic of the completed (minus one piece that was broken in shipping) of the benchwork.  took about 4 hours for me to do it by myself with a couple screwdrivers, hammer and a pair of pliers.  

Last edited by zak98

thanks rtr12,


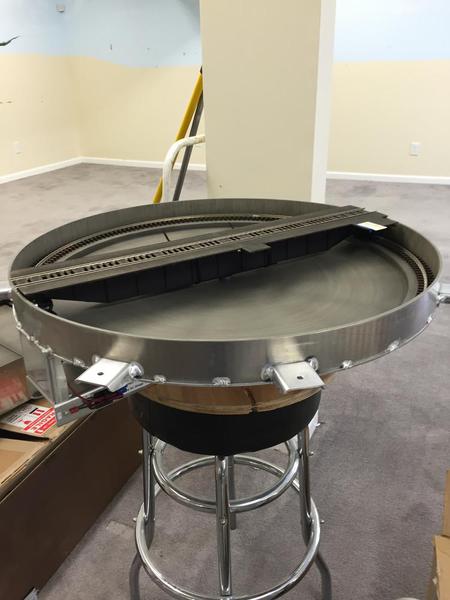
it is really nice.  well engineered.  a lot of steel used for connection points.  just a solidly designed system.  i just put the millhouse river turntable in the plywood and placed on the top of the table. i may have to screw the benchwork to the wall in a couple places, but that may be just my over "over engineer / think everything" pet peeve.

Glad you like it and are also impressed. Nice turntable and engine too.  


Once you get it loaded up with plywood top, track, scenery, accessories and trains it will be more solid. Mine is free standing in the middle of a space and it's pretty solid with just track, trains and a few accessories. It might move a little if I hit it really hard or really pushed on it though? Yours being on carpet would probably also be more stable. Mine is on a bare concrete basement floor.

thanks rtr12,


yea i have to see how it all settles and if i need to attach to the walls.  the table top is at 51" so it is pretty tall. i laid the plywood on the table just so it would straighten out a bit. it started to bow while it was leaning against the wall for a couple weeks.  question... the "L" brackets supplied to hold the table top to the benchwork. can you place those "L" brackets anywhere?  the instructions seem to show only to place them at the top of legs to attach plywood to benchwork.  but i know i have a couple places where i need to pull the plywood down to the benchwork because of a bow (which i am hoping comes out as the plywood lays there a bit).  thoughts?  


also, here is a quick pic of the transfer table, i just got it in this AM.


Last edited by zak98

Hi Mike,


You are obviously going to have a very nice engine service facility with lots of operational activity and modeling potential, but are you intending to tie this in to a running loop or just have a world class engine facility. I ask because I've been thinking along the same lines (service facility) but don't have the room width you appear to have to build up a decent running loop.


Butch

hi butch.  my first plan is to try and "complete" this engine terminal.  see how long that takes, my willingness or just how life goes/is, at that time. to see if i want to take on the next phase.  so not really sure. but this section will take a year or two to get to the 90%  complete level i like to be at before moving on.  at one section there is a 72" curve and curved switch( it is 54" long! from signature switch company)  that leads to the "future" section.  it may just end up being a 10' straight section that dead ends to a mirror vs. moving on to a full loop.  i HATE duckunders.  but mianne solved that problem too with their motorized table section lift.  so we shall see.  thanks for taking the time to comment and view, butch.


mike

Originally Posted by zak98:

thanks rtr12,


yea i have to see how it all settles and if i need to attach to the walls.  the table top is at 51" so it is pretty tall. i laid the plywood on the table just so it would straighten out a bit. it started to bow while it was leaning against the wall for a couple weeks.  question... the "L" brackets supplied to hold the table top to the benchwork. can you place those "L" brackets anywhere?  the instructions seem to show only to place them at the top of legs to attach plywood to benchwork.  but i know i have a couple places where i need to pull the plywood down to the benchwork because of a bow (which i am hoping comes out as the plywood lays there a bit).  thoughts?  


also, here is a quick pic of the transfer table, i just got it in this AM


I used all the L brackets that came with my original kit on the legs, as per the assembly instructions. I also had a couple of places where there was a slight gap between the plywood and top of bench work. I got some more L brackets and screws from Mianne and added them at the gap locations. This solved my gap problems. The L brackets are too big for the solid wood strip at the top of the cross braces, so I was only able to add them to the cross braces at the ends where the locking fasteners are. You could probably use the smallest metal L brackets available at hardware stores with piercing pan head screws similar to the ones that came with the kit. 


I just ordered more brackets and screws from Mianne because as soon as I got everything set up I placed another order for a transformer cart and some extra cross members for the bench work kit I got so I could add some shelves under the layout. I had talked to Tim about adding shelves below when I ordered my first kit. He added extra holes in the legs for the shelf cross members.  


Tim had some other brackets he said were for the problem I had with the gaps and he sent me a couple. They were long steel L brackets with short flanges (each L part about 1/2") with only one hole for one screw in one L part. I never figured out how they were supposed to be used so I didn't use them. Since the other ones fixed my gaps I never called to ask.


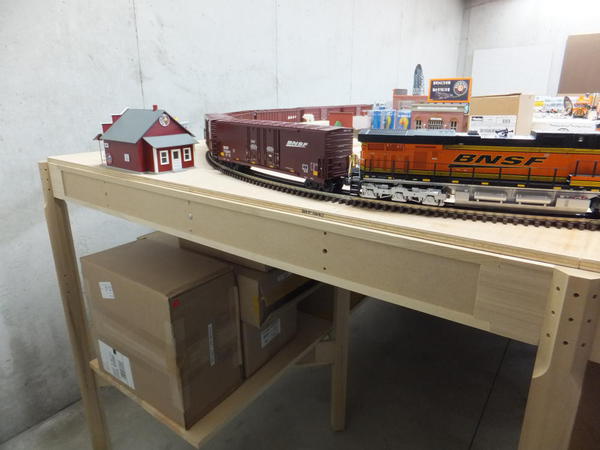
Here is one of the extra brackets I added and where I put it. Probably weren't all needed, but I added several more after I got going (even where there were no gaps), just because of the long span with no fastener in places like this.


DSCF7514


The bracket was in the middle of one of the 48" long cross members like this one. 
 

DSCF7515

Forgot to add that one of my problems was extra joints in the plywood, I had it cut into 2'x8' pieces. I has extra joints in the plywood that you wouldn't have with full 4'x8' sheets. I can't handle a full sheet anymore, even had to get help getting what I got downstairs. Home Depot cut it up and loaded it for me.


Transfer table looks nice too. Is that the same manufacturer as the turntable? Some of the indexing systems on turntables and transfer tables I have seen on youtube are worth the price of admission. Really neat stuff.

Attachments

Images (2)
  • DSCF7514
  • DSCF7515
Last edited by rtr12

thanks rtr12,  I did a similar thing with the brackets. moving off of just the top of legs. I will have to run over to local home depot / lowes / ace to see what options they have for metal brackets. I am interested in the transformer shelves as well, but not sure how they would attach to an existing leg(s)? thanks for the pics and the explanation!


morning mike


you are making great progress


a question about the mianne bench work, it looks like the four foot width of a plywood sheet does not completely cover the the depth of the bench work - are the outer edges of the rails and the hex shaped legs depth four feet exactly - is this a problem if you try to max the coverage of the plywood (for example - a 4/8 plywood sheet would not completely cover the 4/8 footprint of the benchwork)


i am trying to figure out if you need to speck the mianne product a little less than four feet wide


thank you


j

Originally Posted by zak98:

thanks rtr12,  I did a similar thing with the brackets. moving off of just the top of legs. I will have to run over to local home depot / lowes / ace to see what options they have for metal brackets. I am interested in the transformer shelves as well, but not sure how they would attach to an existing leg(s)? thanks for the pics and the explanation!


The transformer cart comes with wheels and is a separate, free standing thing. I ordered an extra shelf for that one too.


Originally Posted by jpc:

morning mike


you are making great progress


a question about the mianne bench work, it looks like the four foot width of a plywood sheet does not completely cover the the depth of the bench work - are the outer edges of the rails and the hex shaped legs depth four feet exactly - is this a problem if you try to max the coverage of the plywood (for example - a 4/8 plywood sheet would not completely cover the 4/8 footprint of the benchwork)


i am trying to figure out if you need to speck the mianne product a little less than four feet wide


thank you


j

The Mianne bench work is made for the plywood to fit in the center of the legs and cross pieces. If you order a 4'x8' Mianne kit it will be 4' center to center of the legs and cross pieces. Same with the 8' length. I have about 7/8" at the legs and 3/8" at the cross pieces. The advantage is if you ever want to add on you can just go from there without having to change anything. It wasn't a problem for me and won't be as I plan to add on to my original kit.


The only time this might be a problem is if you were trying to fit it exactly between two fixed walls or other items. In that case I would call Mianne and talk with them about the sizes and the space you are trying to fit. They are very helpful. 

Originally Posted by rtr12:
Originally Posted by zak98:

thanks rtr12,  I did a similar thing with the brackets. moving off of just the top of legs. I will have to run over to local home depot / lowes / ace to see what options they have for metal brackets. I am interested in the transformer shelves as well, but not sure how they would attach to an existing leg(s)? thanks for the pics and the explanation!


The transformer cart comes with wheels and is a separate, free standing thing. I ordered an extra shelf for that one too.


Originally Posted by jpc:

morning mike


you are making great progress


a question about the mianne bench work, it looks like the four foot width of a plywood sheet does not completely cover the the depth of the bench work - are the outer edges of the rails and the hex shaped legs depth four feet exactly - is this a problem if you try to max the coverage of the plywood (for example - a 4/8 plywood sheet would not completely cover the 4/8 footprint of the benchwork)


i am trying to figure out if you need to speck the mianne product a little less than four feet wide


thank you


j

The Mianne bench work is made for the plywood to fit in the center of the legs and cross pieces. If you order a 4'x8' Mianne kit it will be 4' center to center of the legs and cross pieces. Same with the 8' length. I have about 7/8" at the legs and 3/8" at the cross pieces. The advantage is if you ever want to add on you can just go from there without having to change anything. It wasn't a problem for me and won't be as I plan to add on to my original kit.


The only time this might be a problem is if you were trying to fit it exactly between two fixed walls or other items. In that case I would call Mianne and talk with them about the sizes and the space you are trying to fit. They are very helpful. 

thanks j, exactly what rtr12 said.....  and my table is 6' wide. so I had home depot rip one 4x8 sheet into (s) 2x8' sheets.  I just have not installed them yet.i may have to trim a bit as I have a small drywall section that covers a pole. so it may be a little too tight for the 2 x 8' wide section to just drop in. not sure.  going to try that out this weekend probably see how it al fits.

Last edited by zak98

Zac,

I have not read very much of this thread but I wanted to say I am there with you, buddy.

Taking down the Munoz Lines was monumental and I planned it as a modular railroad, too. Things happen along the way. Now, two and a half tons (Yes, TONS) of debris later, little is left. Our lower level is now empty. All done with a plan in mind. One day, the Munoz will rise again. 


As you said, no wasted hours of construction (five years for me), just enjoyment.

You Go, Zac !


Scrapiron Scher

I would be willing to bet that the vast majority of layouts never even reach the finished scenery stage before getting torn down. That's a pretty sobering thought...  One of my pet peeves is looking at an unfinished "plywood prairie". Honestly, if I knew that my layout would get torn down before the scenery was complete I wouldn't even bother building it. It is all good learning experience, but I've torn down several layouts that never got finished and I am bound and determined to finish my next layout. If I'm not reasonably sure it can be accomplished I won't even start.

hey jonathan,


thanks for the comments.  to a point I agree with you.  all of my layouts have got to the point of 80% in scenery in some way. (not sure I have ever "finished" a layout, really.)  I enjoy getting to that point.  my intent is always to get to that point so I will always start something.  but I am sure there are people out there that get enjoyment out of just running trains.  plywood  or scenery just running or operating meets their needs and wants.  I am fine with either way, really.  its your money, your time and your hobby. do what makes you happiest and let people say what they will. 

Hi all,


I've added a few new sections under the "construction" bullet item at the left side of my webpage.  there are a few new pictures there.  Mianne delivered the shelving for my control station area, this week. I have been laying track. Altoona Models delivered the roundhouse kit as well.  


i hope everyone is enjoying a good summer modeling season!  


http://michaelluczak.com/construction_of_gnprr


mike

hi ted,


the GPM engine is fantastic.  would be great for switching and locals.  just put a kadee (or your fav coupler mfg) on the pilot and off you go.  dcc or dc the engine runs wonderful.  i have seen a couple on eBay recently for sale.  jimmy (GPM) brought in two numbers.  1369 and 1374. 

hi all,


the roundhouse is about 90%.  still some weathering and details to finish up.  i have been working on getting DCC into several engines. 


NP W3

NP W5

GN M2


all the new econami, from soundtraxx.


there are a few videos out on my youtube page.  (link below)  just quick "shorts", a minute or so.


have a great fall modeling season!


mike

Add Reply

Post

OGR Publishing, Inc., 1310 Eastside Centre Ct, Suite 6, Mountain Home, AR 72653
800-980-OGRR (6477)
www.ogaugerr.com

×
×
×
×
Link copied to your clipboard.
×
×