Is there a metal replacement gear on the market to replace the nylon one? I heard that a Northwest Shortline sells part number 37410-6 that is a brass replacement. I cannot seem to locate the phone number or any contact information to purchase a couple of them. I would like to know if anyone else has been able to purchase and replace the gears that are breaking.
Replies sorted oldest to newest
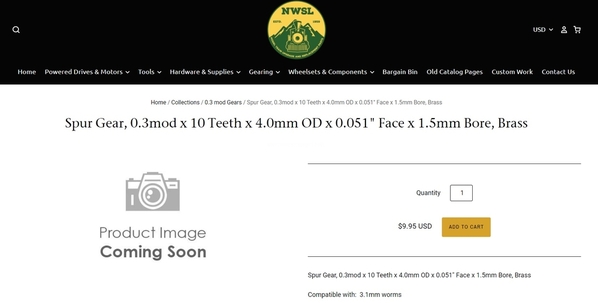
Like many businesses, they tend to do their business online and not over the phone. Looks like you can order the part here from the product page:
https://nwsl.com/products/spur...e-x-1-5mm-bore-brass
Edit: See Don's note below regarding the PN duplicity
Hi Bob,
For some reason, Northwest Short Line has two gears listed for that p/n. The correct one is the ten tooth, not eight. I just fixed two of these yesterday that I bought new on eBay. You can go that route, but I just took off the OEM pinion gear, cleaned it and the motor shaft, and put a dab of Locktite super glue on the end of the shaft and slid the gear back on. Make sure not to push it on all the way, and make sure the motor keeps turning as the glue sets. You can see the armature and easily turn it. Don’t turn it with the gear until you’re certain it set. Both work perfectly now. Who knows for how long. Only time will tell. Another good idea I read was to put a connector on the short wires before installing, so the gate can be removed easily if another repair is needed. Hope this helps. Here’s a link to the correct gear.
https://nwsl.com/products/spur...e-x-1-5mm-bore-brass
Don
Don, thanks for pointing out the part number duplicity - I wasn't aware of that numbering issue! ![]()
@bmoran4 posted:Don, thanks for pointing out the part number duplicity - I wasn't aware of that numbering issue!
I was planning on going that way and then I thought, why not try Locktite? I only had the super glue, but maybe some of their other products would work better. The brass gear bore needs to be modified to fit properly and the engaging gear is plastic, so not sure that will work long term. They also cost $10 apiece. I went to the nwsl site and both 8 and 10t popped up. When I fixed mine, I actually counted the teeth, and it is ten.
A lot of people have trouble with these gates not working out of the box, so I was happy to see the thing about this gear. The OGR forum is great and has helped me out many times. Seems like I’m always fixing something in this hobby.
Don
I've accumulated/repaired several sets of these using the NWSL gear. In fact I have 6 more gears in transit as I write this. Until NWSL changed ownership within the past year or so, their parts were also available through Walthers/dealers. Now, however, it appears direct, only.
The split nylon motor gear I've found to be the most common ailment for this accessory. The brass replacement gear solves that problem nicely...and, IMHO, forever more. I have some notes on that specific repair, below.
But the secondary problem is sometimes the plastic segment worm gear within the gate box. It's quite unique with its molded arms to contact the limit switches. It appears that the worm has chewed the gear teeth so they no longer effectively engage.
Frankly, I can only imagine that this worm gear damage occurs when 'someone'(![]() ) is using the ol' pinky-poke in an effort to get the gate to move...which could be due to the motor gear finally giving up. Manually forcing the gate arm to go up or down is a MAJOR no-no on this accessory! That gate box worm gear often pays the ultimate price for such meddling!!
) is using the ol' pinky-poke in an effort to get the gate to move...which could be due to the motor gear finally giving up. Manually forcing the gate arm to go up or down is a MAJOR no-no on this accessory! That gate box worm gear often pays the ultimate price for such meddling!!![]()
Regardless, I have not found that molded worm gear to be available from MTH as a separate repair part. I know that the new MTH parts operation is in a state of improvement and growth. I'm hoping that eventually that gear will also be available. Right now I could use a dozen of them to restore some of the remaining gates awaiting disposition in the workshop. Or, has anyone else had any luck in obtaining these unique gears from MTH?
In the meantime, because the LED flasher circuit just keeps on working regardless of all the mechanical ailments, I converted two of these accessories to crossbucks, only...no gates. Not hard to do, but would rather have those neat gates fully functional.
The other thing I've done as I return/install these gates to the layout is to add a mini 6-pin in-line connector (really only need a 5-pin, but they're more difficult to find, it seems). These are, indeed, not the most robust of accessories, and there's a fair chance that they'll need some further service down the road. The in-line connector is a time saver in removing/replacing the gates in this situation.
Re my notes regarding the NWSL brass 10-tooth gears... To fit the motor shaft you will have to carefully ream the brass gear's bore with a fine round needle file. NOT BY MUCH, though! First, unsolder the black and white wires at the motor to free it, making a note or marking the OE orientation of the black and white wires. (Most of these motors I've worked with seem to have a blue dye marking near one attachment point that has always had the white wire attached. I also just put a 'B' on the motor frame to mark the black wire side)
To ream the bore ever so slightly, I give a couple gentle twists of the needle file equally from both ends of the bore, check the fit, repeat as necessary. When the gear can be just snugly started on the motor shaft it's time to drive it home. The motor shaft should then be solidly supported at the opposite end (where the wires were attached) when giving the brass gear a final press onto the shaft. I do this with a modelers hammer with a plastic head and a small steel support block. If the gear bore has been properly reamed, it'll take only 3-4 light taps of the hammer. The brass gear is not as long as the OEM plastic gear. I've found that the brass gear should end up flush with the end of the motor shaft for best engagement with the mating ring gear. Re-attach the wires, re-assemble the motor into the base (I put a drop of LaBelle 102 gear lube on the brass gear teeth and a drop of 108 oil at both motor bearings when doing this), check the function. Never fails to put a smile on this curmudgeon's puss when the gate arms resume their function with a quiet purr!
If only I could obtain those gate box worm gears, this bugger would be tamed forever!!! IMHO, of course.
KD
Don. I have some that are still in the box. If I put them on the layout, what is the longevity of the plastic gear if I do not touch it during operation?
Thanks
@DMASSO posted:Don. I have some that are still in the box. If I put them on the layout, what is the longevity of the plastic gear if I do not touch it during operation?
Thanks
The ones I just bought were definitely never used. All the wire ends were clearly tinned at the factory and never connected. Both didn’t work out of the box. One had a couple of intermittent actuations. I don’t know how old mine are, but I suspect several years, so age probably causes the deterioration. The gear apparently cracks and loses its press fit, so the motor just spins freely. I found an old post from KD that pointed to the gear problem, so that’s how I learned to fix it. No question that the brass gear is the way to go. Hope MTH fixed this for their later runs. They are a very nice accessory when they work.
Don
Thanks Don. Hope to see you at Trainstock.
Interesting topic. I have a couple of these on the layout that have been operating flawlessly for 7-8 years now, but they are quite noisy. Would disassembly and greasing help to quiet them down at all?
Rod
@Rod Stewart posted:Interesting topic. I have a couple of these on the layout that have been operating flawlessly for 7-8 years now, but they are quite noisy. Would disassembly and greasing help to quiet them down at all?
Rod
If they are working, don’t touch them. Crank up the sound on your engines to mask it. I doubt greasing would help anyway.
@HiloDon posted:...
The brass gear bore needs to be modified to fit properly and the engaging gear is plastic, so not sure that will work long term. They also cost $10 apiece. I went to the nwsl site and both 8 and 10t popped up. When I fixed mine, I actually counted the teeth, and it is ten.
Per link provided earlier:
So for a typical pair of gates - I figure if you're going to replace one gear you minds as well do both at the same time - that's $20 (plus shipping?). And you apparently still need to fuss a bit with the gear to make it fit.
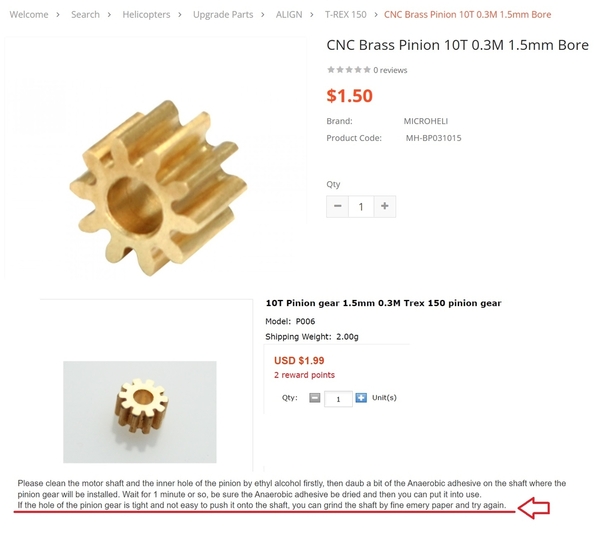
That said, has anyone tried to find another source for a compatible brass gear? When I google some of the key parameters (M0.3 10T 1.5mm), there are buckets of options from the toy market - slot cars, etc.
I'm NOT saying the following is compatible but the pricing is typical (less than $1 each instead of $10). Makes one wonder. ![]() It stands to reason that MTH did not design a "custom" gear for their crossing gates and used a catalog "off-the-shelf" gear choosing the nylon version (instead of metal) to save a few pennies.
It stands to reason that MTH did not design a "custom" gear for their crossing gates and used a catalog "off-the-shelf" gear choosing the nylon version (instead of metal) to save a few pennies.
Attachments
Has anyone got a picture and/or actual specs for the OEM nylon gear that fails? Or of the NWSL replacement gear? I have never had one of these apart, but I can see the possibility my future.
The gears Stan pictured are a regular spur gear, but it seems to me if the driven gear in the crossing is a 90 degree segmental gear, and given it's low speed, the drive mechanism is likely worm drive. Which means the small motor gear should be a spiral gear, similar to those used on the motor shaft used to power our trains. Am I missing something? Is there another stage of reduction? And what does the "0.3M" parameter in the description refer to?
And what kind of a file do you need to ream out the 1.5mm hole in said drive gear? Where do you get such a file? 1.5mm is 0.059", which is 3 thou shy of 0.0625", or 1/16. So I suppose the motor uses a 1/16" shaft, which of course won't fit anything in metricland. Would simply drilling the hole out to 1/16" work?? Has anyone tried this?
Rod
@Rod Stewart posted:Has anyone got a picture and/or actual specs for the OEM nylon gear that fails? Or of the NWSL replacement gear? I have never had one of these apart, but I can see the possibility my future.
The gears Stan pictured are a regular spur gear, but it seems to me if the driven gear in the crossing is a 90 degree segmental gear, and given it's low speed, the drive mechanism is likely worm drive. Which means the small motor gear should be a spiral gear, similar to those used on the motor shaft used to power our trains. Am I missing something? Is there another stage of reduction? And what does the "0.3M" parameter in the description refer to?
And what kind of a file do you need to ream out the 1.5mm hole in said drive gear? Where do you get such a file? 1.5mm is 0.059", which is 3 thou shy of 0.0625", or 1/16. So I suppose the motor uses a 1/16" shaft, which of course won't fit anything in metricland. Would simply drilling the hole out to 1/16" work?? Has anyone tried this?
Rod
There is a reduction gear set between the motor pinion gear and worm drive in the post. I wish I took some pictures, but just from memory, the reduction set is in the base with the motor and it’s axes are perpendicular to the motor axis. The pinion appears to engage a bevel gear and I thought that was strange, but it does engage and works. I’ll post more after I check it further.
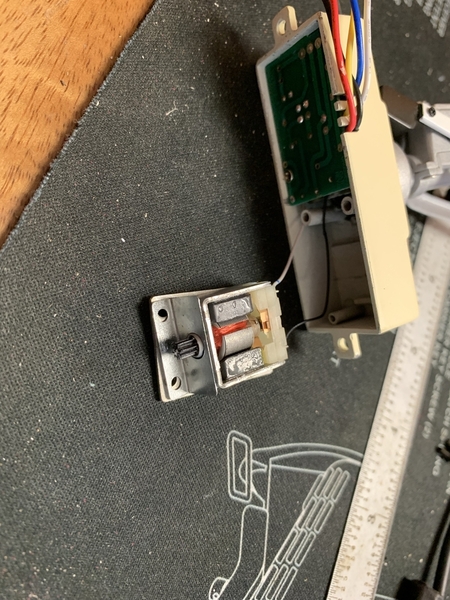
I took one apart and got some pics. I was correct, but on close inspection, the bevel gear appears to have no bevel. Not sure if there’s a name for that or just that the bevel is zero degrees.
Some tips on taking it apart. The motor is easy to get out. Take the black cover off first. It’s just retained with double stick tape. Remove the two black screws and the one silver screw in the motor cover. The motor will come out easily. No need to remove the circuit board. Be carful with the motor wires. They’re very fine and can detach easily. Just solder them back on if they break off.
Attachments
@Rod Stewart posted:Has anyone got a picture and/or actual specs for the OEM nylon gear that fails? Or of the NWSL replacement gear? I have never had one of these apart, but I can see the possibility my future.
The gears Stan pictured are a regular spur gear, but it seems to me if the driven gear in the crossing is a 90 degree segmental gear, and given it's low speed, the drive mechanism is likely worm drive. Which means the small motor gear should be a spiral gear, similar to those used on the motor shaft used to power our trains. Am I missing something? Is there another stage of reduction? And what does the "0.3M" parameter in the description refer to?
And what kind of a file do you need to ream out the 1.5mm hole in said drive gear? Where do you get such a file? 1.5mm is 0.059", which is 3 thou shy of 0.0625", or 1/16. So I suppose the motor uses a 1/16" shaft, which of course won't fit anything in metricland. Would simply drilling the hole out to 1/16" work?? Has anyone tried this?
Rod
Here's a picture of two cracked plastic gears taken from this OGR thread where another member sent me his broken crossing gates in the hopes it was strictly an electrical problem which I figured I could fix. I also drew out the electrical schematic for the gate and posted it on OGR for the greater good.
0.3M means the so-called gear Module is 0.3.
Hobby motors of this ilk are cranked out by the zillions in Asia and have metric shafts like 1.0, 1.5, or 2.0mm. This one is 1.5mm. The brass gear I show above says it's 1.48mm hole diameter. I suspect the NWSL gear is also 1.48mm diameter which is why it must be reamed another 0.02mm (or so) to manually (bare-hands) press the gear onto the shaft. I figure production machinery would have no problem press fitting the "soft" brass gear onto the "hard" steel motor shaft.
Attachments
The 10-tooth motor gear engages a plastic ring gear. (I'll try to post a picture of the ring gear later.) The teeth on the ring gear are molded vertically onto the face of the gear, parallel to that gear's bore. That's how they make the 90-degree turn for for the mechanism that extends up through the accessory mast.
Re time-to-split on the OE nylon motor gear... If your gates are NIB, never used, several years since purchased...the gears may indeed already have split. This is perhaps the most common problem for nylon gears pressed on a straight or knurled shaft. Most nylons used for 'toys' are of the hygroscopic variety. That is, they can absorb/desorb moisture (humidity) in the air. Just sitting there, never operated, this material characteristic is causing stress in the part. Since the part thickness is the thinnest at the root of the gear profile, adjacent to the bore, that's it's weakness...that's where they split when they've given up, so to speak. Nearly impossible to control by yourself...even in homes with tight humidity control in their HVAC system.
Why does the industry continue to use this material in this situation? It's cheap. Period. The gear can be made more robust to this type of failure if there are hubs molded into the part at either end. But that complicates the part die...read: expense.
If you want to get an earful about this problem, talk to the HO crowd. They've been living with it for YEARS in the best of drive lines...used by multiple manufacturers. All of the manufacturers offer replacement parts, but NorthWest ShortLine has made an entire business out of making corrective parts from Delrin and brass, both of which are machined by NWSL, not molded. Other companies have made molded gear replacements for locomotives/accessories using stronger, more expensive materials that don't have the inherent issues of nylon. BTW, you can't simply use a different plastic in the same die as made for nylon unless it has nearly identical molding specs...such as shrinkage.
To the reports of 'growling' from some of these gates during operation... Yes, I have the same thing on a couple of mine. As HiloDon suggested, let it be for now. I believe the noise comes from the motor gear having too MUCH engagement with the mating ring gear...i.e., the motor gear teeth are actually fully engaged to the root of the ring gear teeth. There's a couple things that could be checked/done to verify/correct this, but, IMHO, life is too short to dig this deeply........especially when most everything else on the O layout is making noises, too.![]()
Re the needle file... You're not going to use it to fully ream the bore. As I stated in an earlier response above, you're just trying to 'ease' the bore equally from both sides of the bore to initiate/facilitate a reasonable light press onto the shaft. Think of it as a very shallow-angled counterbore. So the needle file I have...which came into my tool collection from I-know-not-where-or-whence...is very fine, very small overall diameter (but larger max, than 1/16", of course), and you're only gently giving a couple turns of the file at a time, checking, repeating as necessary, to facilitate a start to the press fit on the motor shaft.
And, BTW, the reason for easing this fit is two-fold, IMHO... First, that cheap-o motor with an armature shaft about 1/16" cannot take a lot of press fit force of the gear. It's not that robust. Bend the shaft and you've wasted the motor. Secondly, it doesn't take a lot of press fit interference to achieve results for this accessory. I don't even use a drop of CA or anything like it when pressing on the gear. A light press fit of this tiny brass gear on the steel shaft is all that's needed to forever function on this accessory.
And, no...You do not want to use a 1/16" drill bit to ream the brass gear bore. It's too much...you will have trashed the gear. CA won't help. Trust me on this...I'm a graduate of the School-of-Hard-Knocks!
Again, I'll try to post some pictures later to help in understanding.
Now, if only I could find replacements for that molded gear in the gate arm box!
KD
Part of the failure problem is the design. There are limit switches, adjusted with the two screws on the back of the control cabinet. It takes time, and patients, to get these to operate properly, which for the most part, solves the gear problem. If the limits are correct, CA attachment, of the split gear, will operate for awhile. IMO, Mike CT
@Mike CT posted:Part of the failure problem is the design. There are limit switches, adjusted with the two screws on the back of the control cabinet. It takes time, and patients, to get these to operate properly, which for the most part, solves the gear problem. If the limits are correct, CA attachment, of the split gear, will operate for awhile. IMO, Mike CT
So are these limit switches not correctly set out of the box? I have never had to adjust mine, actually did not know they could be adjusted! ![]()
Rod
HiLoDon, if you still have the motor out of that gate, would you mind taking a caliper and getting the diameter and length measurements off that gear, for everyone's benefit?
That would help determine if those gears that Stan found might be a good substitute. They sure look about right. ![]()
Rod
@HiloDon posted:I took one apart and got some pics. I was correct, but on close inspection, the bevel gear appears to have no bevel. Not sure if there’s a name for that or just that the bevel is zero degrees.
Crown Gear
@Dtrainmaster posted:Crown Gear
Thank you. Here’s a description of crown gear from Wiki.
“A crown gear is a gear which has teeth that project at right angles to the face of the wheel. In particular, a crown gear is a type of bevel gear where the pitch cone angle is 90 degrees. A pitch cone of any other angle is simply called a bevel gear.”
I stand corrected... The gear mating to the 10-tooth motor gear is, indeed, correctly identified as a 'crown' gear. As I promised, here is a photo of the gear...
I painted the periphery silver in order for the teeth to show up more clearly on this all-black molded part.
So those crown gear teeth mesh with the motor gear...
...of which the NWSL brass gear installed on the motor shaft is shown.
I also noticed that there are at least two suppliers or designs of the motor in this accessory...
The one on the left has the original nylon gear yet in place...firmly, even!!
Re the correct fit/installation of the motor in the accessory's base, there are a couple of important parts...
On the left is the motor field plate. Mounted beneath it is the L-shaped plate which aligns the motor in the proper position for correct gear mesh. The large hole must be placed over the hub of the motor, as shown below...
...and is held in place with the same 2 screws that hold the field plate.
There was a question, also, about the needle file I use to gently ream the brass gear bore...
It's maximum diameter at the handle is about 0.083", so you can see that the taper is long and gentle which allows careful sizing of the bore to just achieve a light press fit to the shaft. Again, I give the same number of turns from each side of the bore to keep the fit 'balanced'. Motor shafts have measured 0.059-0.060". The gear bore stated as 1.5mm would convert to 0.059". So you can see that bore and shaft are nominally very close to begin with. Assembly just seems easier by reducing the amount of interference slightly...gently. But, as always, TEHO.
--------
Re the question about NWSL's spec of "O.3 MOD"... Go to their website and read the several pages about gears, the science and engineering behind them. They do it better than I could ever restate it!.
-------
Still looking for those elusive gate box gears, though. (sigh)
FWIW...
KD
Attachments
This is an awesome discussion....I'm so glad I came across it!
I do have several of these crossing gates new in the box that I bought more than 5 years ago. I need to test them but I suspect they will suffer from the same malady that other gate owners have encountered.
I read the whole discussion several times, but I could not find what the motor's shaft diameter is. Has any one measured the diameter of the motor's shaft? From the above discussion I get the impression the shaft diameter Is larger that 1.5mm? If the shaft is 1.5mm, then why does the replacement gear's bore need to be adjusted if it also is 1.5mm?
As you can guess, I don't have a lot of knowledge or experience with friction fitting gears to motor shafts.....but I'm willing to learn!
@Junior posted:This is an awesome discussion....I'm so glad I came across it!
I do have several of these crossing gates new in the box that I bought more than 5 years ago. I need to test them but I suspect they will suffer from the same malady that other gate owners have encountered.
I read the whole discussion several times, but I could not find what the motor's shaft diameter is. Has any one measured the diameter of the motor's shaft? From the above discussion I get the impression the shaft diameter Is larger that 1.5mm? If the shaft is 1.5mm, then why does the replacement gear's bore need to be adjusted if it also is 1.5mm?
As you can guess, I don't have a lot of knowledge or experience with friction fitting gears to motor shafts.....but I'm willing to learn!
The last post by KD had this advice:
“Motor shafts have measured 0.059-0.060". The gear bore stated as 1.5mm would convert to 0.059". So you can see that bore and shaft are nominally very close to begin with. Assembly just seems easier by reducing the amount of interference slightly...gently.”
Thanks @HiloDon!
I did some research last night and saw that metal press fit pinion gears can be heated to enlarge the bore then pushed onto the motor shaft with little effort.
There was also a video where a person chilled the entire motor in a freezer for about an hour, then heated the gear and pushed it onto the chilled shaft.
Not sure the repair for the crossing gate would need to go to that extreme though.
And yet another technique is to slim down the motor shaft.
I just can't get over the idea of paying $10 (plus shipping) for a gear that "should" be less than a buck. And then have to hassle with filing, grinding, or whatever. After all, you can get a pair of the MTH crossing gates for less than $50 shipped.
Again, I do NOT have a crossing gate in my possession. I only dis-assembled a pair of non-functioning gates to reverse-engineer it more from the electronics perspective. Because of the $10 replacement gear price, the owner of the gates chose to convert them to flashing crossing signals ONLY - removing the crossing bars. OTOH, IF the metal replacement gears were, say, $1 or so I figure he would have pursued the replacement gear approach.
Attachments
Maybe some of you missed my earlier post about just using some Locktite on the gear bore and pushing it back on. I used their super glue, but some of their other products may work as well. Both my gates are working fine now, but just not sure for how long. I figured it was worth a try. The brass gear is the ultimate fix but will take more effort and cost.
Or just buy replacement plastic/nylon gears. If the brass ones are less than a buck each, plastic ones ought to be next to nothing. As I stated earlier it's virtually inconceivable that MTH "designed" a unique gear for a product like this. Instead they no doubt just chose a stock/catalog gear choosing the plastic version to save a few pennies.
Well, it's been a few months but a potential alternative to the $10 each brass gear from NWSL arrived today with a Kyrgyzstan return address. Again, I no longer have the 30-11012 crossing gates in my hands but figured this would be my good deed for the day, for the common good, etc. etc.
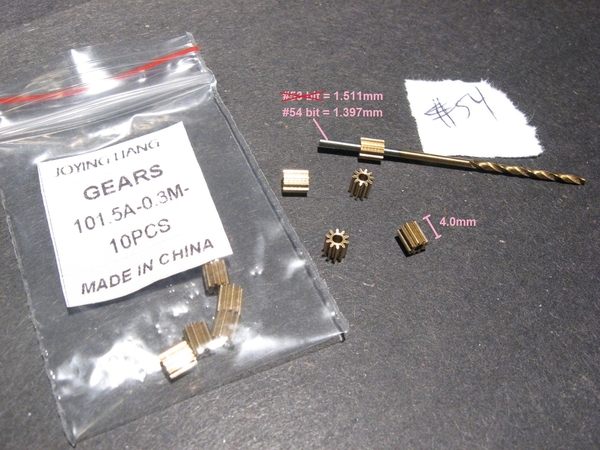
To a previous comment, the motor shaft is undoubtedly 1.50mm diameter. Low-cost hobby motors like this are typically 1.0, 1.5 or 2.0 mm shafts. The gear is slightly less than this (e.g., 1.48mm) to accommodate press-fit. I only had numbered drill bits but #54 fits loosely but #53 was too big...so pretty certain this is correct for a 1.50 shaft.
There are several online sources using the search terms I described earlier - these are readily available for less than a buck per gear shipped (from Asia). I do NOT want to say exactly which one these are since I don't know if they work and don't want to spread mis-information. However, if someone stumbles across this thread in the future...and is willing to do some DIY (it appears even the $10 NWSL brass gears require some DIY adjustment)...I will send a couple of these to you assuming you would attempt the replacement in a timely fashion and report back to the forum one way or the other. If they work, I'll gladly document my source.
Attachments
Stan, I'll be your test guinea pig on this one! I have one failed gate sitting in the "to do" pile, and a second that is pretty noisy. I am happy to pay shipping if you want to generously share a couple. I will shoot you a private email with my address etc. ![]()
Thanks, Rod
EDIT; couldn't find your email. Mine is in my profile.
When I was working as an industrial distributor we sold small metric and inch gearing manufactured by WM Berg. They had a tremendous catalog. Worth looking into for gears needed to repair some of our stuff. Web WMBerg .com.
Both inch and metric catalog available for download.
@Rod Stewart posted:Stan, I'll be your test guinea pig on this one! ...
Check your spam folder for my email. ![]()
We are home now and I checked the gears Stan2004 generously sent me, using my metric drill bits. 1.4mm is loose, the gear wobbles slightly. A 1.5mm bit is tight, it won't just push on. Likely its a press fit on a 1.5mm shaft. I miked the 1.5mm drill bit and it comes in at 1.49mm
Now I need to try and find my failed crossing gate, but so far no joy. It's around somewhere, just not sure where. May have to dig out a spare NIB gate to check the gear with. I'll keep you posted.
Rod
So I have great news about Stan2004's gears that he found. They fit with minimal effort. ![]() I put one in a NIB crossing gate just to try it out. Sure enough when I grasped the OEM plastic gear it literally fell off in my hand. So it is split no doubt and this gate would not have worked anyway.
I put one in a NIB crossing gate just to try it out. Sure enough when I grasped the OEM plastic gear it literally fell off in my hand. So it is split no doubt and this gate would not have worked anyway.
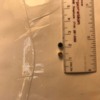
The brass gears from Stan2004 are 3.42 mm diam x 3.97mm long; 10 tooth. The original black plastic gear measured 3.56 mm diam x 3.93 mm long; 10 tooth. Here are a couple of PIX. BTW, I used a vernier caliper for my measurements; not the ruler you see!
So the brass gear is 0.14 mm smaller in diam and 0.04 mm longer. It is not known if the smaller diameter will adversely affect gear engagement with the crown gear??
The motor shaft measured at 1.51 mm. My 1.5 mm drill bit measured at 1.50 mm. The gear would not push onto the shaft so I carefully reamed it out by hand with the 1.5 mm bit in a pin vice. There were a few very fine brass shavings came out when done. But it was quick and easy compared to what I read earlier in this topic about using a tiny rat tail file! Took only a couple of minutes. My guess is the internal diameter of the brass gear was about 1.48 mm to produce an interference fit on a 1.50 mm shaft.
After reaming the gear it pushed easily part way onto the shaft. I finished the job using my small hobby vise to carefully squeeze the shaft end against the gear on the other end. The inboard end wound up close to the motor frame housing, per the pic below. No adhesive should be needed for the minimal amount of torque needed to run the gate I figure.
The next step is reassembly of the gate and see if it works! I am concerned about the gear mesh, but we shall see. ![]() Hopefully get to that later today.
Hopefully get to that later today.
Rod
Attachments
The third of 4 gates failed last week. Would like a link to buy the gears. Motors make noise, gates no longer go up or down.
Major project as I have to cut wires and detailed scenery out to work on the gates. Then rebuild area again.
Thanks in advance.
Today I re-measured the OEM plastic gear against the other brass gear that Stan2004 sent me, and I find the diameters measure almost identical; 3.57 vs 3.56 mm. I think when doing my original measurement of the first brass gear I must have been “bridging” gear teeth so to speak, whereas today I made sure I was at the widest spot; tooth peak to tooth peak.
So as of today I am quite sure the diameters are the same. They are a slightly different lengths, but this is of no consequence.
Rod
GREAT NEWS!! After I figured out how to adjust the limit switches, thanks to the how-to pic from Stan2004, I got it running perfectly with the new brass drive gear. Works great. I added a small dab of synthetic grease to the brass gear just before putting the motor back in and that really seems to have quietened it down. All good.
Bottom line: IMO the brass gears that Stan2004 sourced are perfect replacements for the crappy plastic OEM gears used on these gates.![]()
I highly recommend anyone doing this mod should source a 1.50 mm drill bit online and use it to ream out the ID of the brass gear. There is no way you want to try and force this puppy onto the shaft as is. It goes very easily after a slight reaming however.
Rod
@Rod Stewart posted:...
Bottom line: IMO the brass gears that Stan2004 sourced are perfect replacements for the crappy plastic OEM gears used on these gates.
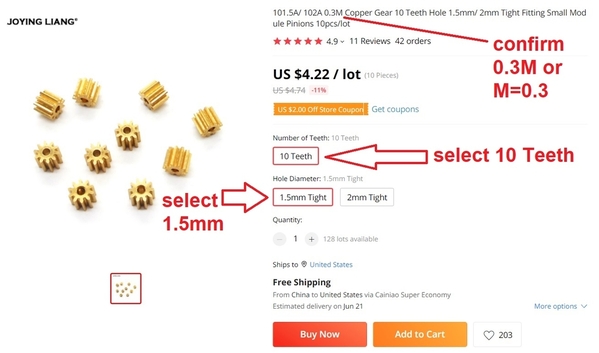
I got them at aliexpress.com. Above shows the current webpage of exactly what I ordered. Note that it estimates a 2 month delivery time and that is about what it took. I notice you can find several listings for what appear to be the same item on Amazon and elsewhere. That's great - just look carefully. Some also have quite a long delivery time. Some listings are confusing and I'd question if you'd actually get what you think. All I'm saying is this is what I ordered and this is what I sent to Rod with which he successfully replaced his broken plastic gear.
As discussed in beginning of thread, if you are in a rush there are the NWSL gears. The last time I looked it was still $10 each (plus shipping).
If you only need 1 or 2 and commit to sharing your DIY repair effort in a timely manner here on OGR like Rod did, I have a few extras.


