I had Lionel O gauge as a kid, but just recently got back into it. Using Lionel Fastrack. So far I the Pennsylvania Flyer set and the
Santa Fe passenger train sets. I have more green felt coming to finish covering where my sidings are.


|
|
I had Lionel O gauge as a kid, but just recently got back into it. Using Lionel Fastrack. So far I the Pennsylvania Flyer set and the
Santa Fe passenger train sets. I have more green felt coming to finish covering where my sidings are.
Replies sorted oldest to newest
You are going to like the current O gauge far more than the old ones!!
Back then - a little smoke and we were happy. Now, you can walk around a layout, no longer tied to a transformer, see the trains running through your miniature World, blow the whistle even when the train is running slow, make the engineer and dispatcher talk!! Have fun.
I like those long straight runs!
Think about a switch between the inner and otter loops, maybe just before the station. This way you can move trains between both loops without having to move them by hand.
Good luck
Ray
I think a good initial modification would be replace your single track bridge with a dual track bridge?
Keith
For a new Guy you caught on fast adding a one track extension already! Great start.
Charlie
@Ray of sunshine posted:Think about a switch between the inner and otter loops, maybe just before the station. This way you can move trains between both loops without having to move them by hand.
Good luck
Ray
Not sure i have room to do that between the tracks?
@TM Terry posted:I think a good initial modification would be replace your single track bridge with a dual track bridge?
I was thinking of ordering a second tresslle to put next to that one. ![]()
@Choo Choo Charlie posted:Keith
For a new Guy you caught on fast adding a one track extension already! Great start.
Charlie
I made two sidings so i can back one set of cars in one and connect to the other set in the other set. Also switches to kill the power to each. Wait, you guys know all that stuff. ![]()
Fantastic Start... and, welcome to OGR!
You may have enough room for a crossover. Using O-72 switches, you only need 6" spacing measured from center rail to center rail.
See page 19 of the Lionel 2016 Track and Power catalogue (available for viewing on-line) for diagrams and specs for different configurations.
@Richie C. posted:You may have enough room for a crossover. Using O-72 switches, you only need 6" spacing measured from center rail to center rail.
See page 19 of the Lionel 2016 Track and Power catalogue (available for viewing on-line) for diagrams and specs for different configurations.
Thanks! Turns out I can do this with 036 switches, i ordered them. Will the transformers on the two loops phase OK?


If the AC power plug-ins for the two transformers are both "polarized" (different size blades) the "hot" and "ground" wires are already identified. Plug the two transformers into a power strip and they will be in phase.
Mike Mottler LCCA 12394
@Keith Bliss posted:Thanks! Turns out I can do this with 031 switches, i ordered them. Will the transformers on the two loops phase OK?
Building a switch set up using 036 switches to move trains between my loops. It will fit right in the outer loop, but inner loop needs some small pieces to reconnect. Still waiting on a couple pieces. Got the idea from right here, pointing me to 2016 power catalog. Thanks!


@Ray of sunshine posted:Think about a switch between the inner and otter loops, maybe just before the station. This way you can move trains between both loops without having to move them by hand.
Good luck
Ray
See my latest post here. Thanks for the idea!
All done.

I'd like to welcome you to the forum as well, Keith. It looks like you have a cool setup so far (actually, both the train layout and the gaming center setups are cool). What transformer(s) do you use for power, by the way?
A few suggestions that might make your layout better.
1. Add a few more sidings on the inside of the loops. Then you can switch cars on both loops of track.
2. The top of the tunnel area could be great for an upper level elevated line. More trains! A town area could be cool, too.
3. Insulate the two loops of track. That would be better for power.
4. Also, phase your transformers. Lionel has a video that will show you how. It's easy.
5. Power your accessories with a separate transformer. Again, phase your transformers.
6. Add a few Lionel operating accessories. They add fun and interest to any layout.
@Dylan the Train Man posted:I'd like to welcome you to the forum as well, Keith. It looks like you have a cool setup so far (actually, both the train layout and the gaming center setups are cool). What transformer(s) do you use for power, by the way?
A few suggestions that might make your layout better.
1. Add a few more sidings on the inside of the loops. Then you can switch cars on both loops of track.
2. The top of the tunnel area could be great for an upper level elevated line. More trains! A town area could be cool, too.
3. Insulate the two loops of track. That would be better for power.
4. Also, phase your transformers. Lionel has a video that will show you how. It's easy.
5. Power your accessories with a separate transformer. Again, phase your transformers.
6. Add a few Lionel operating accessories. They add fun and interest to any layout.
Thanks for the tips! Some is done, planning a upper level. I have to Lionel basic transformers that came with my sets. they are phased. I am adding a second bridge when it arrives. Here is my layout so far.

Given the long straight runs, consider installing structures (as downtown and suburbia and an industrial area) at an angle to the tracks for visual variety. With structures and action accessories, you'll soon have an empire!
Another tip: mount the control switches for the accessories on a perimeter fascia board - in line with each accessory. At those locations, visiting kids and families can enjoy the fun of operating them. On my 15x19-feet L-shaped layout, there are 16 accessories - a mix of Lionel and MTH products. My great grandkids never tire of operating them.
Carry on, regardless ...
Mike Mottler LCCA 12394
@Mike H Mottler posted:Given the long straight runs, consider installing structures (as downtown and suburbia and an industrial area) at an angle to the tracks for visual variety. With structures and action accessories, you'll soon have an empire!
Another tip: mount the control switches for the accessories on a perimeter fascia board - in line with each accessory. At those locations, visiting kids and families can enjoy the fun of operating them. On my 15x19-feet L-shaped layout, there are 16 accessories - a mix of Lionel and MTH products. My great grandkids never tire of operating them.Carry on, regardless ...
Mike Mottler LCCA 12394
Thank you.
@Keith Bliss posted:I had Lionel O gauge as a kid, but just recently got back into it. Using Lionel Fastrack. So far I the Pennsylvania Flyer set and the
Santa Fe passenger train sets. I have more green felt coming to finish covering where my sidings are.
Welcome! Those are some nice long runs. Welcome to the never ending world of building a layout. I look forward to see your additions. Some good suggestions above but remember it's your railroad so take the advice given but make sure you keep your vision.
thank you Marty
Welcome!
Peter
@Putnam Division posted:Welcome!
Peter
Nice web site and U Tube page!
Welcome and run for your life before this hobby turns you in to a basement rat. LOL
Thanks Superwarp1!
Welcome. Just a quick scenery suggestion, if you decide to add any roads, don't bother making them scale. In my experience, scale roads take up way more space than they're worth. A lot of towns have one way streets and you'll have more space for buildings and accessories.
One other thing, quality is usually better than quantity. It seems obvious, but as you start expanding your railroad it can be easy to forget.
Above all, have fun!
FWIW, not trying to scare you but rather give you best long term advice when using Fastrack.
Bottom line, be aware and possibly wary of the folded tab electrical contacts of Fastrack. Since the metal is already "tinned" soldering is relatively easy and will not melt the plastic roadbed in the process.
From this topic of another user having electrical problems on a Fastrack based layout- after the scenery was done....
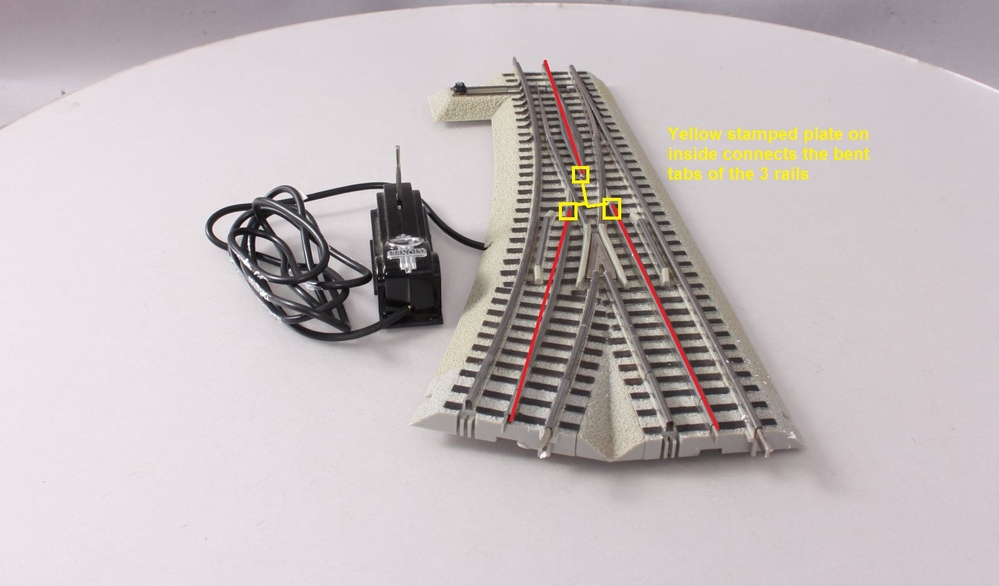
@Vernon Barry posted:Each section of fastrack normally has the shorting bar/plate that connects the outer 2 rails.
Now granted- that is the same folded tab construction that is known to loosen over time and potentially be subject to intermittent connection or higher resistance, but again, each typical curved or straight section of fastrack has this, so it makes a redundant and parallel connection down the outer rails of the track like a ladder if viewed from above. If one single outer joint was bad, in theory this bridges that failure.
This is the same reason I posted the switch information. That is because the center rail and it's connections are also folded tab through the switch- and thus a known possible failure point. So again, this area specifically is likely depending on the switch to carry power through it, center rail, and then center rail is also not redundant/parallel connections in track pieces making it prone to high resistance or intermittent connection through them.
Inside the switch, this stamped metal plate T or Y shaped and folded tab connections (not soldered from the factory) easily explains a loss of power or higher resistance intermittent connections as load and the weight of a train crosses.
Oh look, there is a switch there, right in the middle of this "dead zone" , heavily depending on it for carrying and connecting power- specifically center rail.
Again, the reason why I'm raising this is simple- do the work now, or do the work later, but eventually you are likely to run into this continuity problem and hopefully not end up finding this out long after you already locked down your track and began scenery.
I know, you might be asking- "You really want me to take apart my brand new switches and make mods, and then further, solder all those folded tabs all around my layout?".
Yes, an ounce (well maybe a pound) of prevention, pays off in knowing you have solid low resistance power to all track sections with good continuity for the long term of your layout.
Again, since using Fastrack, specifically the switches, there are a few things to know and inspect:
#1 inspect the terminal order of the wire screw terminals and especially if using aux power for constant power rather than track power. This is because far too many switches have manufacturing errors. My personal record was 9 brand new switches from 2 different dealers all were mis-wired internally. Failing to do this can result in shorts and other problems. Example https://ogrforum.ogaugerr.com/...ack-switch-aux-power Also, a fix PDF https://ogrforum.ogaugerr.com/...520Issue%2520Fix.pdf
#2 About 2 stages beyond "recommend" you solder your folded tab track power connections inside your switches. Nothing worse than having to rip up a few sections of track in all directions around to remove a problem switch that lost continuity because of the folded tabs not being factory soldered.
#3 specific to the larger switches (O-72), there are the short 1 3/8 sections with a jumper. Those too have folded tabs and another point to solder.

#4 The metal backing plate can and does in some switches short to the screw terminal internal wire solder tabs because they face up when the switch is screwed down tightly to the table. Recommend insulating the metal back cover in the rows just above the terminals either using plastic, tape or some other insulating material.


Access to this requires an OGR Forum Supporting Membership