Been working on this layout is there anything I can improve on ? can anyone find improvements that I could make/suggest ? Using atlas track Thanks
Attachments
Images (1)
Files (1)
Original Post


|
|
Been working on this layout is there anything I can improve on ? can anyone find improvements that I could make/suggest ? Using atlas track Thanks
Replies sorted oldest to newest
Thank You for your input
@bmoran4 posted:I would consider adding reverse loops so you can turn a train around and then back again.
The purple and green go clockwise to counter-clockwise (so pick one or more) and the blue goes counter-clockwise to clockwise.
Could someone help me with doing this design with the RR-Track file I have attached above. I'm trying to add reverse loops as @bmoran4 posted but have trouble aligning tracks up. When I use the RR Track stimulation the train stops at different points to say "end of track" yet it all seems to be attached. I'm having some problems with the program since it cuts out sometimes during the stimulation session. Thanks for any help
Apologies for not having RR-Track or being proficient in it.
No problem there, just thought someone out there know the program who could help. Thanks !
I had problems with RR-track reading your file. Also, I've forgotten to much about using it to modify your file. so I redid your plan in SCARM with a few modifications. I then added the reversing loops. The before and after plans are shown below. I've also included the SCARM files for anyone who wants to play with the plans. The gaps that I could not remove without cutting are small, 1/8" or less, are at the ends of long sections that can be shifted to connect.
I've included a pdf of possible gaps and the Atlas sections required to fill them. Not all gaps can be filled but try removing an additional section to make the gap larger and then see if it can be filled.
Jan


@Jan posted:I had problems with RR-track reading your file. Also, I've forgotten to much about using it to modify your file. so I redid your plan in SCARM with a few modifications. I then added the reversing loops. The before and after plans are shown below. I've also included the SCARM files for anyone who wants to play with the plans. The gaps that I could not remove without cutting are small, 1/8" or less, are at the ends of long sections that can be shifted to connect.
I've included a pdf of possible gaps and the Atlas sections required to fill them. Not all gaps can be filled but try removing an additional section to make the gap larger and then see if it can be filled.
Jan
Oh Thank you, I've been trying to work it out with the RR-Track today and just have a hard time making it work. I will check out your view on SCARM Someone gave me the RR program so that's why I am using. I know fitting it is my problem with the gaps Thank you for the help.
Jan, couldn't see the SCARM files, did not show only thousands of numbers and letters bunched. I will continue to work it out on RR
You need to right-click and save link as... Then open the file with SCARM.
Jan
Ok Thanks
Here are some variations. The red track sections are cut pieces. The few gaps present are less the 1/10" and should be closed by shifting the tracks.
Jan


Looking good so far!
You might consider making your yard lead as long or longer than your longest yard track so you don't foul up the 2nd mainline during switching operations. You might be able to extend it around and connect it to the mainline on the lower left side instead of at the top.
Michael
There looks like some long reaches to get to some of the track. 30" max reach is good, 36" could be a little too long to be comfortable. It looks like you will walk around the outside of the track plan. You may need some access hatches in the middle to reach parts of the yard.
Have you considered an "around the room" layout where you stand in the middle and can more easily reach all the track on the layout?
Good help is often hard to find, but the OGR FORUM hobbyists have come to your rescue with good suggestions -- especially with track changes for reversing loops. Without them, layouts quickly become monotonous loops and sidings.
If you intend to add action accessories at some sidings, you may need to sacrifice one or more close-spaced siding tracks to allow room for accessories: Up and Over Log Loader, Saw Mill, Coal Ramp with a Coal Loader under it, Culvert Unloader and Culvert Loader, Barrel Loader, Log Loader, etc. Placing action accessories at sidings avoids blocking main lines and the devices give your railroad a reason for being -- moving freight to /from an industrial district, farm to city, forest to mill, coal mine to power plant, and so on and on.
Perhaps the biggest benefit of action accessories is ... watching kids pushing the control buttons and enjoying the action!
Carry on ...
Mike Mottler LCCA 12394
@Mike H Mottler posted:Good help is often hard to find, but the OGR FORUM hobbyists have come to your rescue with good suggestions -- especially with track changes for reversing loops. Without them, layouts quickly become monotonous loops and sidings.
If you intend to add action accessories at some sidings, you may need to sacrifice one or more close-spaced siding tracks to allow room for accessories: Up and Over Log Loader, Saw Mill, Coal Ramp with a Coal Loader under it, Culvert Unloader and Culvert Loader, Barrel Loader, Log Loader, etc. Placing action accessories at sidings avoids blocking main lines and the devices give your railroad a reason for being -- moving freight to /from an industrial district, farm to city, forest to mill, coal mine to power plant, and so on and on.
Perhaps the biggest benefit of action accessories is ... watching kids pushing the control buttons and enjoying the action!
Carry on ...
Mike Mottler LCCA 12394
Yes, good idea about the sidings. I do have a saw mill and some other items which need to be placed. In the future I would like to add another level above part of the layout.
@Joe K posted:There looks like some long reaches to get to some of the track. 30" max reach is good, 36" could be a little too long to be comfortable. It looks like you will walk around the outside of the track plan. You may need some access hatches in the middle to reach parts of the yard.
Have you considered an "around the room" layout where you stand in the middle and can more easily reach all the track on the layout?
Thanks for the input, I do have access around the whole layout since I need to access a closet and other areas around the room. I had to fit this type layout as exact.
@Michael Cimba 040217 posted:Looking good so far!
You might consider making your yard lead as long or longer than your longest yard track so you don't foul up the 2nd mainline during switching operations. You might be able to extend it around and connect it to the mainline on the lower left side instead of at the top.
Michael
Yes good idea, I am still playing around with design concepts. How would your reroute look on diagram, I am leaning on the V4 I do have to stay in the realm of the size it is I can't go out any further on it. Thanks !
Another question I have is about buss wiring, how many feet is the usual distance between Atlas tracks to add wire leads ? Also I have some extra Atlas switches left over from a previous layout and thinking to convert to Ross switches but the prices are so high I would need like 18 switches. If I just added some Ross switches which areas would be best placement for them. I really can't afford to replace all. I will need to buy more switches anyway but Atlas are cheaper I know, I know, you get what you pay for lol. Thanks
I will echo what Mike says. The original plan has no producers / customers. Trains will be running around the track with no where to go.
Consider cutting down on the sidings in the yard and add track for customers for your railroad. You can also add some track at the bottom of the layout for a producer.
 With Poles-1 (1) (1) 3")
OGR Test (1) With Poles-1 (1) (1) 3.rrt
 With Poles-1 (1) (1) 3")
@Joe Fauty posted:I will echo what Mike says. The original plan has no producers / customers. Trains will be running around the track with no where to go.
Consider cutting down on the sidings in the yard and add track for customers for your railroad. You can also add some track at the bottom of the layout for a producer.
OGR Test (1) With Poles-1 (1) (1) 3.rrt
Ok, What about the reverse loops ? The SCARM v 4 version show the design with the X crossing. Thanks
@Not seasoned yet posted:Another question I have is about buss wiring, how many feet is the usual distance between Atlas tracks to add wire leads ?
What is your control system? Conventional, TMCC/Legacy and/or DCS?
Generally speaking, run leads every 10-12 sections of track regardless of whether those 10-12 sections represent 15 inches or 40 feet. But my answer would be different if you are only running conventional or if you are using DCS.
-Greg
@Greg Houser posted:What is your control system? Conventional, TMCC/Legacy and/or DCS?
Generally speaking, run leads every 10-12 sections of track regardless of whether those 10-12 sections represent 15 inches or 40 feet. But my answer would be different if you are only running conventional or if you are using DCS.
-Greg
Thanks I am Running with DCS
Then you do not want to use bus wiring but you want to use star wiring. I need to get to an appointment so I don't have time for a detailed explanation. Simplified, this is star wiring (ignore the command base):
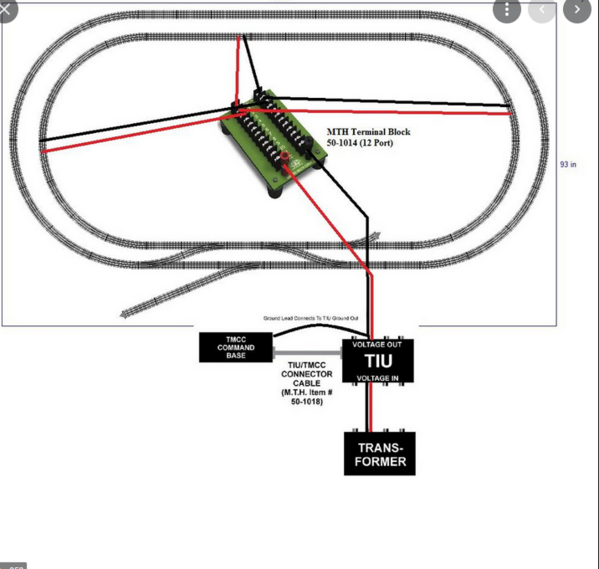
What is shown is star wiring for the inner loop. You do the same with the outer loop which is insulated from the inside loop at the crossovers. Each section is a block with hot and common to each. Use no more than 12 sections of track for each block and connect your hot and common as close as possible so as to have equal distance in that block to the left and right of the connection. Just do a forum search on "star wiring for DCS."
You can get away with shortcuts such as having a common ground but for best results best to follow best practices from Barry Broskowitz in his book The DCS Companion.
Note: the above graphic is not from his book. I just found it on the web to give a high level idea.
-Greg

 I took Joe's advice ans added sidings for industries. I also and passing sidings, lengthen the yard lead as Michael suggested, and created a third loop which includes the yard so you can run 3 trains. Their are more cut sections simply because diagonal tracks usually result in sub-quarter-inch gaps of 1/8" or less.
Jan

@Jan posted:
I took Joe's advice ans added sidings for industries. I also and passing sidings, lengthen the yard lead as Michael suggested, and created a third loop which includes the yard so you can run 3 trains. Their are more cut sections simply because diagonal tracks usually result in sub-quarter-inch gaps of 1/8" or less.
Jan
Nice Thank you ! Jan, Joe, Michael I really like this a lot ! I thought I could only run two trains at best with the space I had, love the added third train. Nice Ideas guys. Thank You !
@Greg Houser posted:Then you do not want to use bus wiring but you want to use star wiring. I need to get to an appointment so I don't have time for a detailed explanation. Simplified, this is star wiring (ignore the command base):
What is shown is star wiring for the inner loop. You do the same with the outer loop which is insulated from the inside loop at the crossovers. Each section is a block with hot and common to each. Use no more than 12 sections of track for each block and connect your hot and common as close as possible so as to have equal distance in that block to the left and right of the connection. Just do a forum search on "star wiring for DCS."
You can get away with shortcuts such as having a common ground but for best results best to follow best practices from Barry Broskowitz in his book The DCS Companion.
Note: the above graphic is not from his book. I just found it on the web to give a high level idea.
-Greg
Thank You !
The changes to the layout design look great! This layout will have the potential for a lot of action. I highly recommend to get a copy of Barry Broskowitz's book the DCS companion as mentioned above. I can't tell you how many times I have referenced and re referenced it as I have been working on my layout. It is well worth it for DCS operation. Enjoy!
Michael
@Michael Cimba 040217 posted:The changes to the layout design look great! This layout will have the potential for a lot of action. I highly recommend to get a copy of Barry Broskowitz's book the DCS companion as mentioned above. I can't tell you how many times I have referenced and re referenced it as I have been working on my layout. It is well worth it for DCS operation. Enjoy!
Michael
Yes, and thank you, I have a copy of the book also, I was a little familiar with the buss wiring but I never used it in my other layout and never had any issues I wanted to see what other members thought. I am sure I will have more questions along the way. This forum is a great place for help on any train subject.
Charles

Access to this requires an OGR Forum Supporting Membership


 With Poles-1 (1) (1) 3")