Fred

what kind of clear silicone are you referring to, the type in the household caulking tubes or something else?


Right now I am waiting for a reply from mfgr as to whether they will make it right. If the catalog had not specified the color, I might be less upset.


Bob

Good idea. I don't know if it would work but they are already assembled with old fashoned wax paper. We will see when lights are on, shortly.

Thank you both for your input.

Confused
Talked to Mark at mfgrs.

The problem is new seats are acrylic, old were not, and need special glue to seat seats.

DrMikes acetyl glue is only reccomended glue.

A lot of anger and anguish would have been eliminated if they had simply informed customers that they had changed base ingredients.

It is nice to know you are not totally crazy.
quote:
Originally posted by PRRTrainguy:
Talked to Mark at mfgrs.

The problem is new seats are acrylic, old were not, and need special glue to seat seats.

DrMikes acetyl glue is only reccomended glue.

A lot of anger and anguish would have been eliminated if they had simply informed customers that they had changed base ingredients.

It is nice to know you are not totally crazy.


Good lesson for all manufacturers. The cat food I was getting our pets was made in Australia. Now it's made somewhere in NC and my cats won't eat it!

The seats I got were all gray, but I don't recall having any problems with them once glued in place.

I like the headrest covers you put on the seats Cool A friend of mine's grandfather used to work in the passenger car shops here in Portsmouth and my friend has a number of those covers.
Update and serious question.

Now have 3 cars with shades, seats, people, lights and end of car detailing installed.


Pictures 2 & 3 show details of end. The Barco steam line is installed per pictures in PSC catalog. There are two upward rods or something other on top. I suspect they should be removed but do not want to make that kind of mistake without checking with others who may be more knowledgable.


Any help would be appreciated.

Once decision is made will paint and finish by installing grabirons and stirrups. Three down and 9 to go.

Are we having fun yet.
I have 11 and 3/4 cars almost finished.

All cars except observation are finished except grabrails, observation is in need of guidance.

I started making grabrails from wire and realized they looked bad at best. Plan 2 PSC grabs, need 94 and ordered 100. Will have to paint when received since they are brass. Wait is at least several weeks.

The observation as pictured show additions as whitish. They all have lights in them and need a little more delicate sanding.


Question. Buy bottle of Testors silver to paint?

I have spray Testors silver metallic already, should I try masking and spraying?

The running lights should be red. Get cheap nail polish or better suggestion.

Any and all opinions are welcomed.

With a little luck and good planning, in several weeks should be able to post pictures of completed Silver Meteor and details of modifications.

Oh for a spell checker.
quote:
Originally posted by marker:
You might try MV lenses if they have the diameter you need. They are silver backed, clear or colored lenses. It is even possible to get the silver backing off if you need to light them. Definitely better than nail polish.

Good place to buy them.


Thanks for the information, I appreciate it. As soon as it stops snowing and I recover from shock, I'll check it out.
quote:
Originally posted by marker:
You might try MV lenses if they have the diameter you need. They are silver backed, clear or colored lenses. It is even possible to get the silver backing off if you need to light them. Definitely better than nail polish.

Good place to buy them.


Tried and he replied back that telling him size without item number did not work.

Suggestions or has anyone ordered lens covers that they do not need and might be interested in donating for nominal fee to cause. 1/4" clear need one and 1/8" red need two.

Thanks guys and gals
quote:
Originally posted by marker:
You might try MV lenses if they have the diameter you need. They are silver backed, clear or colored lenses. It is even possible to get the silver backing off if you need to light them. Definitely better than nail polish.

Good place to buy them.


I tried and have the email correspondence to confirm that he is one irritable dealer and definitely not someone you need to deal with, if you need help.
I did order CV Lenses from the engine tender, I hope its ok to mention name.

I have received grabirons from famous mfgr in Montana and have painted them silver. Now i have 94 good reasons to apply to cars, 8 per car.

Keep slowly sanding additions to end of observation car so as to not s***w it up to point of nonfixable. IMHO looking better.

Need help, proves you can overdo it. Looking for source of electrical cables for ends of cars. Three on left are with cables and three on right are matching round boxes without cables. Talked with Keil and their product is not what I am looking for, does anyone know where they can be found, or is this a cable too far?
Mike,
I looked thru the PSC catalog and they have electrical connection boxes, junction boxes, 220 volt receptacles, and a few other oddball parts (page 34 of catalog #5).

Man, you're going to town on these cars Good Thread

I still haven't put all the people I want in mine, but I did get 2 sets of GGD trucks to replace those that came with the OK Engines cars. They ride smooth as silk now and look great.

If you need anything, send me an email.
Nothing on page 34 seems to be the right thing.


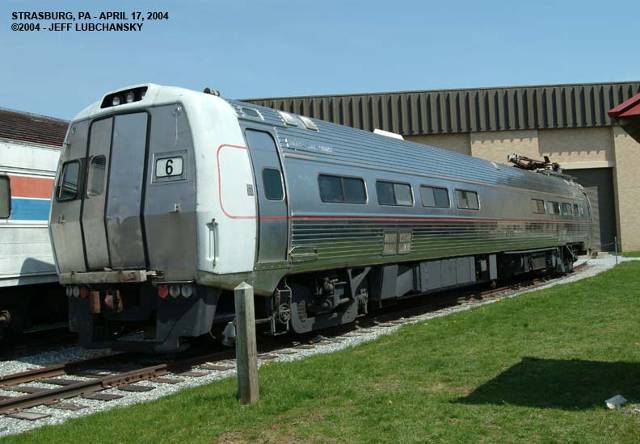
I realize that the picture is a Metroliner but it clearly shows the electrical connectors I am talking about.

GG-1's also seem to have this type, but off the top of my head,cannot think of any pictures showing this aspect of ends of GG-1's.

If I strike out well so be it.

Addendum: GGD trucks roll wonderfully, and I haven't even lubricated them.
Thank you Scott Mann.

mikeg
Have totally struck out on electrical connectors even called P&D in Detroitcity.

I am after the weekend going to get some 1/8" dowel and try cutting into short segments and see how it looks, obviously painted silver.

If a winner I can put short segments of something to model the cables. The investment in a piece of dowel if not successful is minimal.

We will see

11& 3/4 done except for this.

Does a fake or Kadee look better on observation end?

Oh for a spell checker.
Believe it or not finally finished.

If anyone had told me what I was getting into, I don't know. Many hours, days and more dollars than I care to remember.

Additions to origional shells include, Williams end scrounged from old cars, GGD trucks.

Keil Line parts especially prototypical accurate roof details.

From PSC diaphrams including rocker arms and Keil Line spring; also seats and tables.

From GGD trucks, LED lighting, underbody detail.

Kadee couplers,

PSC barco steam line and both air lines, also all grabs for all cars, including roof on 10-6,5-2-2, sunlounge, and 11 br sleeper.

Special thanks to Bob Delbridge, Fred Brenek, Ted Brebeck, Scott Mann, Mike at PSC and all the others who were involved. Hopefully spelled everyone's name correctly.


baggage, crew quarters


10-6 sleeper


next 10-6 sleeper


sun lounge sleeper


10-6 sleeper


5-2-2 sleeper


11br sleeper


diner


coach


coach


coach


side of observation, coach, lounge


end view of observation


Overview of all.

There are things that are not perfect but for a first try, I am pleased.
Thank you all for allowing me to share all this with all of you. Now I can resume work on layout, which has been neglected and also HOPEFULLY a Metroliner.
Mike,

They all look fine!!! The fact that your topic has gotten almost 16,000 views says people are interested in what you did with this train.

I really like the look of your diaphragms and all the stuff hanging on them, makes me want to redo the ends of my 2 cars.

I always thought I liked switching better, but I'll have to say I like watching my short 5-car Seaboard train "The Tidewater" go round&round just as much Cool

The GGD trucks sure make the 2 OK Engines cars I have perform much better and look great.

I still need to put passengers in my cars and add lighting back in, but that's down the road.

Good Thread
I am working on getting pictures. Most of Midway, part of Morris are tracked and Fair sheets with discombobilated track are at least on top. 485 feet of HO upside down track for hidden caternary has been strung.

Besides that I haven't done much. Used Word spell checker for unusual words. hopefully didn't miss anything

mikeg

Would the people in the northest PLEASE send us some of your excess water.

Smile Big Grin Confused

Midway partially tracked.

Morris partially tracked, due to space partially on Delaware River Bridge.


Curve from Morris to Trenton Station


Showing lower level below Trenton Station. Will be hidden when completed.


View of lower tracks at other end of Trenton Station at Fair Will be hidden when completed.


View of river end of Trenton Station tracks not repaired. Tubes are full of brass for caternary poles etc.

Long way to go and have not shown piles of switches, track etc.

mikeg
Thanks for kind words. I only showed relatively clean areas.

Midway & Morris are 4 track interlockings, Fair which is totally disconnected is 8 track interlocking.

FWIW I still have track and roadbed in boxes.

Am looking foreward to seeing trains on lower level able to run thru to upper level. Silver Meteor, Broadway Limited, Clevelander & Akronite, Clocker etc. Some day, hopefully soon.

Back to work.

mikeg
A few pictures of passenger cars many GGD as well as Silver Meteor, all nonpowered as of now.


"Trains" from closest

Clevelander and Akronite, I really wanted to have a Cincinatti Limited but no combine baggage and lounge car available.

Parts of Broadway Limited, not finished putting Kadees on this set. My Broadway has two thru Santa Fe cars immediately after mail car.

Silver Meteor

PRR clocker

Last two pictures, cars off to side are Nelly Blye to Atlantic City from New York.

Note 3 gaps in tracks, from left Phila and South & West, next Newark & New York, and last but not least low level for locals and Atlantic City trains including engine change.

Lots to be done, most of my time has been spent converting GGD to Kadees. Plastic easy, aluminum, federal case despite provided adapters. First must drill out old couplers since screws are upside down, To line up with Kadee product must use 2 styrene plus 1 micromark shim or 9 micromark shims.
Try this on 20 cars and watch your eyes cross.

I think I am actually getting somewhere.

mikeg
Have been laying track. Finished end of Trenton Station area and began Fair interlocking.


North end of Trenton Station tracks showing location of the three platforms.


Looking down toward Fair interlocking


From Fair into station.


This is Fair, or will be in next few weeks.

The cars on tracks are in approximately same position as in earlier pictures.

Since the train off to side is PRSL train, Nelly Blye NYC to AC, it does have a parlor car. I am debating if I should name it, not yet named, Nucky Thompson.

After I proceed more into Fair, eight more feet, I plan on stopping, cleaning area, and rails, painting side of track, putting all bases in and ballasting area.

Shouldn't take more than 2-6 weeks.

Right now this is priority over everything else.

mikeg
Don't believe how time flies.


One month later. Have ballasted tracks at station, using brownish on mainline tracks and black for yard tracks; all yard tracks at station are passenger storage. Another passenger storage on other side of Fair on east side and freight yard and Belvidere branch on west side.

The ballast has not been glued yet, everything is a big deal due to size and complexity. Working alone makes everything a big deal.

The three platforms bases are secured and platforms in place for pix but need more work and ballast glued down and switches secured. Also need to drill holes for catenary poles; in future.

The pictures show two mainline trains stopped at high level platforms. The lower platform in front has Nelly Bly to Atlantic City.


The black girder bridge in distance will be the Clinton Ave. bridge with a timber floor. Always made you a little nervous when bus rumbled over it.


The greyish wall in back is concrete wall that keeps Assunpink Creek off of tracks. The creek is between the tracks at same level and station at higher level on west side. Very tight clearance and south of this the creek mostly runs through underground concrete channel to Delaware River, markedly limiting flow when flooding occurs.

In two instances creek overflowed and first time had only low level platforms but steam locomotives so traffic continued. Last time creek spilled over and no service between NYC & Phila. Electric motors and flood water only leads to disaster.

The signal bridge at beginning of Fair has been painted black, but have not yet mounted signals.

The work goes on.

Mikeg
Happy New Year

Some progress since last posting. Rusted rails, some places both sides, took 9.5 bottles of Floquil rust just for Fair interlocking. Applied ballast (roofing stones). Brownish for mainline, black for secondary. Track # 4 in Fair interlocking has been reballasted by section crew with new ballast. I have had 4 boxes of grey ballast, boxes are by volumne and price written on it is 0.29 cents. Probably Trenton Hobby Center on State street near Stockton in 50's.

curve ballasted


south end of station with ballast .


south end with ballast # 3 low platform installed and painted black (asphalt)board will be concourse to tracks, eventually


north end of station with signal bridge at Fair interlocking


distant Fair after rust


Fair with rust


Fair into station


Fair with ballast


They may not be obvious, but if you look closely you can see many PRR minature signals in place.

Do not plan on more tracklaying now, but will glue ballast and GROAN begin wiring, both for power and Custom Signals. Shouldn't take more than several months.

Love the cars and I have a tip you may be able to use. I make a lot of hand rails for stair cases and catwalks out of N scale track . I usually drill two holes in every up right for the handrail and run wire thru it. on several projects I've needed as many as a hundred up rights so that's two hundred holes.

Get your hands on a cordless or corded variable speed drill you can lock the speed on. lock it in slow speed and use that flex shaft with it instead of the dremel. That dang dremel turns way to fast to drill with and you end up breaking bits like crazy . The slow speed will give you more control and since I've been using the drill I haven't broken a bit.

David

Originally Posted by PRRTrainguy:

Sorry about second pix.  Tried 3 times and it disapears each time after including it.


DPC


I think I understand exactly what you are talking about with two holes, could you post a pix?


Good idea with slower speed on dremel.


Thanks


mikeg

Well I could post some of my projects but I don't have a pic of my drill laying around LOL Some variable speed drills have a trigger lock you pull the trigger to the desired speed and set the lock and you can take your hands off the trigger and it'll stay running . If you put the shaft in the drill that you'd normally put in the dremel it'll turn the flex shaft slower. You don't want a small bit turning at 2000 RPM you want it to turn at 200 RPM. This gives you more control and doesn't snap the bit like a twig.

I also found if you suspend your drill above the table it gets rid of the slack in the flex shaft and makes it operate smoother.

here is one of the projects I was talking about

087

021

038

100
All the up rights,Hardware and catwalk under braces had to be drilled.
All that hardware was mounted to the structure with N scale track nails
The chutes and pulley systems also had to be drilled.

If you slow the bit down they won't break.

David

Attachments

Images (4)
  • 087
  • 021
  • 038
  • 100
Originally Posted by DPC:
Well I could post some of my projects but I don't have a pic of my drill laying around LOL Some variable speed drills have a trigger lock you pull the trigger to the desired speed and set the lock and you can take your hands off the trigger and it'll stay running . If you put the shaft in the drill that you'd normally put in the dremel it'll turn the flex shaft slower. You don't want a small bit turning at 2000 RPM you want it to turn at 200 RPM. This gives you more control and doesn't snap the bit like a twig.

I also found if you suspend your drill above the table it gets rid of the slack in the flex shaft and makes it operate smoother.

here is one of the projects I was talking about

087

021

038

100
All the up rights,Hardware and catwalk under braces had to be drilled.
All that hardware was mounted to the structure with N scale track nails
The chutes and pulley systems also had to be drilled.

If you slow the bit down they won't break.

David


Thanks for pix.  I misunderstood your origional post and thought you were drilling holes in uprights to wire n scale tracks to uprights as railings. Nice work and good idea. 


I personally have primarily broken drill bits because, I had wrong bit or pushed too hard and slightly bent bit which then broke. 


thanks


mikeg

Post

OGR Publishing, Inc., 1310 Eastside Centre Ct, Suite 6, Mountain Home, AR 72653
800-980-OGRR (6477)
www.ogaugerr.com

×
×
×
×
Link copied to your clipboard.
×
×