Looking for your help in deciding how to proceed, or not, with Ross Custom 042 Switches, manual models 110 and 111...or auto models 110m and 111m...

Do you have answers, experiences with or knowledge of the following:

1. Have you used Ross Switches with 027 tubular track and the available 027 mating pins? If yes, then...did they install easily, are they close in footprint to the Lionel 042 switch version and have they performed satisfactorily?

2. Have you operated them manually with the throw lever accessory and without the anti-derailment feature...if yes, did it add interest, make operating your trains more enjoyable and did you stay disaster free???

Please respond if you have had any personal experience with the above...

I want to replace about a half dozen Lionel 5167 and 5168 42" radius remote switches and I'm thinking that I would actually enjoy operating the manual throws and having it more hands-on as they would all be located close to the front of the layout and very accessible for operating...but I would like some opinions and feedback from others too...operating them by remote and having the anti-derailment option functions is, of course, the other alternative.
Thanks

Last edited by UKE KAT
Original Post

Replies sorted oldest to newest

I have 4 Ross Custom switches and like them much better then the Lionel switches I took out. You will need adapter pins to go to 027 track for your needs, no height issue to be concerned with as Ross switches are about the same height as 027 track. Ross Custom switches work much better then any current Lionel switch.

You can buy the Ross switches with DZ-1000 switch motors installed on them, when bought that way they have the center rail connected to both output tracks. They can be wired for anti-derailing feature if you get the wiring diagram from either Ross, Gargraves  or DZ Industries website.

FYI; I am using Ross switches instead of Gargraves which I started out with about 7 years ago as Ross switches work better with my MTH steam engines, no derailments with Ross.

Lee Fritz

It depends on what you're running. If you're running prewar tinplate, according to Steve at RCS, his switches will give you a problem due to the deep flanges. I did a lot of research on this a couple of years ago and was surprised at what I found. So far the only modern switches I've found that are truly compatible with all O-gauge trains are the RMT (formerly K-Line, now O-Line Reproductions) switches.  

At this point I would not buy any other brand of switch than Ross.  Its 100% American made quality at a competitive price. IMO, they are simply the best.   If you plan to use these switches with anything other than Ross or Gargraves track, give them a call and find out what they recommend. IIRC, at one time Ross made a version of a tinplate compatible track but again call and you will receive an honest answer.

BlueComet400 posted:

It depends on what you're running. If you're running prewar tinplate, according to Steve at RCS, his switches will give you a problem due to the deep flanges. I did a lot of research on this a couple of years ago and was surprised at what I found. So far the only modern switches I've found that are truly compatible with all O-gauge trains are the RMT (formerly K-Line, now O-Line Reproductions) switches.  

Agree, first question is what equipment you will be running. Pre-war? Marx? Post War? Modern? I think some older engines with big gears won't work with modern track and some sliding pick-up shoes may snag on the guard rails.  The idea of hand switching sounds great!

Even a perfectly running railroad can't be disaster free! Head-on's, side swipes, etc, etc.,

BlueComet400 posted:

It depends on what you're running. If you're running prewar tinplate, according to Steve at RCS, his switches will give you a problem due to the deep flanges. I did a lot of research on this a couple of years ago and was surprised at what I found. So far the only modern switches I've found that are truly compatible with all O-gauge trains are the RMT (formerly K-Line, now O-Line Reproductions) switches.  

Right now all of my locomotives are LionChief Plus and I don't forsee any deviation or change from that format in the future. The four (4) that I have at the present time fulfill my needs when it comes to appearance, ease of operation and enjoyment from the sights and sounds. If anything...as new models are released there could be some additions to the current fleet.

Right now I'm leaning toward using the Ross Custom 042 Switches...the manual models with Caboose Ind 208s throws...I think it will make my layout a more hands-on operation and add additional interest. The six (6) that would replace the current Lionel 042 switches are all located (see attached plan) at the front of my new layout and would be very reachable. At sometime in the future, I might replace others...of course, those being less accessable, would have to be replaced with Ross remote units...

New Layout:IMG_4683


Attachments

Images (1)
  • IMG_4683
Gilly@N&W posted:

The one suggestion I have regarding your ground throws. Paint the head red (switched) / green (straight). We have done this on our modular layout and it gives a quick visual of where you locomotive is headed.


Thanks Gilly...had that idea in my notes...being 70 something, I need all of the visual reminders that I can get!!!

I have 19 RCS turnouts on my soon to be dissembled () conventional Tabletop layout - I have purchased a Legacy system but did not have the chance to install it.  I have DZ1000s on all the turnouts, except the five nearest the control area.  For the manual turnouts, I have manual caboose industry throws as Gilly shows above.  While I may occasionally have a minor derailment, for me, its more fun to have to remember to throw the manual switch or press the button on the powered switches.

Jim

Dennis LaGrua posted:

At this point I would not buy any other brand of switch than Ross.  Its 100% American made quality at a competitive price. IMO, they are simply the best.   If you plan to use these switches with anything other than Ross or Gargraves track, give them a call and find out what they recommend. IIRC, at one time Ross made a version of a tinplate compatible track but again call and you will receive an honest answer.

We have over 50 ROSS turnouts on the CL&W.  Settled on ROSS after evaluating Atlas, Lionel, FasTrack , and some other that escapes me at the moment and ROSS met all our requirements.  Customer support is outstanding; you can call and talk with Steve himself.  The big trick we learned to enhance the reliability was to float the switch itself (not screwed down) and secure it to the tracks by the track itself.  This allows the switch base to flex slightly which is not a problem.  Screwing down the switch itself often warps it just enough to not allow it to function smoothly as designed.

And the newer ROSS switches appear to be even better constructed than those of 6-10 years ago.

I have used probably 30 Ross switches over the years. Only 1 bad DZ2500 controller, and that was replaced quickly and with no questions.

I also agree strongly with not screwing down the actual switch itself - they work much better if you attach the track in and out of them.  I learned that technique a good 10 years ago, and it has worked flawlessly.

Go for Ross, they work great, and Steve is always there for assistance if needed.

Depends, Mike.

RCS switches come with a diagram showing how to do it. That diagram is not as clear as it might be.

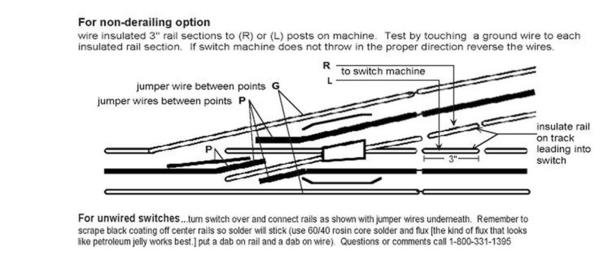
The rails requiring the additional leads for non-derail are already insulated from the rest of the switch.


zmacinstruct

All that you need to do is solder the leads to the insulated rails and use an insulated rail joiner on the other end of that rail. In one case, I decided I wanted to try a longer insulated section to allow a high speed train to trip the non-derail feature. With just using an insulated rail joiner at the switch proper, it is conceivable a fast train would derail before the switch had completed its movement. Hasn't happened to me yet, mind, but I guess it could. My layout is not a high-speed enviroment. In that case, I did cut the rail with a Dremel tool. The insulated section can be as long as you like. As soon as the loco wheels close the circuit by crossing the insulated joint, the switch flips.

All this sounds a lot more confusing that it really is BTW. Don't let that get to you. I LOVE the non-derail feature! Very glad I did it. It's a small nuisance at the time. After doing your first one, it's a cinch!


Attachments

Images (1)
  • zmacinstruct
Last edited by Terry Danks

Good evening Paul, as everyone else mentioned above Ross is the switch or turnout of choice.

When I first got back into O gauge about 20 years ago I seen the Ross Switch's and the Gargraves track at my local train shop and I was hooked and never looked back.

Steve is a great guy to work with and his crew are very helpful when you have a question or placing an order.

I seen you asked about hand throws and on my layout I have several Caboose Industries hand throws on the switch's that are easy to reach.

Reason for this is if I have visitors over and sometimes you can't get back to the control panel to throw a switch or you have a brain fart and you are away from the control panel you can easily throw the hand throw and divert a derailment. Most people that visit you tell them what to do and they will stand in that area and operate the hand throw after or before the train passes.

If there is a derailment you can blame them for not throwing the switch and causing delays on the railroad, just joking of course !!!!!

As mentioned earlier paint the hand throw red for the turnout and green for the straight thru position, this is very helpful very simple.

I have 3 switch's that are in the middle of my layout and over the holidays I programed these 3 switch's into my DCS remote and a DCS AIU, which I was surprised they worked the first time with no head scratching "what did I do wrong this time" !!!!

These 3 switch's have the Z Stuff DZ-1000 style switch motors. Very reliable product from Z Stuff.

Check out Ross's Lighted Switch Stand Item # 50 adds a nice detail to the switch, and when powered up looks great.

I don't think you will regret going the Ross Switch route.

Good luck and have fun !!!!!!

Hi Terry,
I read your reply to the post on Ross switches and specifically my question on wiring them for non-derail.  Per your reply “All that you need to do is solder the leads to the insulated rails and use an insulated rail joiner on the other end of that rail”. 
 Question 1.  The leads you reference are those 3” sections identified in the picture by the ‘R & L to switch machine’ and also on the far rights side of the diagram.    
Question 2.  Those leads get soldered to the R & L posts on the switch machine.  This requires wires to go under the table & back up again to connect to the switch machine, correct ?
Question 3.  Where is the “other end of that rail”  you reference ?  Can you please identify that for me. 
Question 4.  If need be, where would you cut the rail for a longer insulated section ?  Would it be one of the center rails on the right side of the picture (the 2 track end) or the left single track side. 
Question 5.  Does the non de-rail work no matter which direction the train is coming from ?  Would the center rail need to be cut on  both sides of the switch ? 
Thanks so much for the assistance and advice. 
Mike Miller  
Hi Mike:
All that you need to do is solder the leads to the insulated rails and use an insulated rail joiner on the other end of that rail”. 
 Question 1.  The leads you reference are those 3” sections identified in the picture by the ‘R & L to switch machine’ and also on the far rights side of the diagram.  
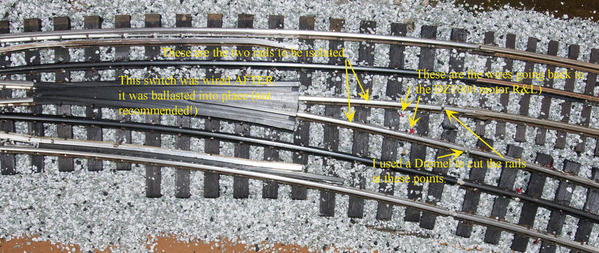
Here's a picture of one of my switches. (Click on it for full size). The insulated rails are identified, as are the cuts I made in them to isolate them. It is preferable to use insulated rail joiners but this particular switch was wired for de-rail AFTER it was already ballasted firmly into place and I could not use rail joiners. So I just cut the rails to isolate them.
RCS -non derail
 
 
Question 2.  Those leads get soldered to the R & L posts on the switch machine.  This requires wires to go under the table & back up again to connect to the switch machine, correct ?
I used wire nuts to connect the DZ1000 motors to track voltage. The leads were simply added to the appropriate power wire. If you get them backwards, and the switch moves the wrong way, simply reverse them.
Question 3.  Where is the “other end of that rail”  you reference ?  Can you please identify that for me. 
 
One "end" of the insulated rail butts against the black plastic part of the switch and is therefore, insulated at that end already. The "other" end can actually be anywhere you choose to make the cut. Or make no cut and just use an insulated rail joiner placed at any joint. Again, in the picture, this switch was already firmly in place and I had to cut the rails.
For a switch not yet cemented in place you could use an insulated rail joiner placed at any track joint on the rail, either at the switch itself, or further away from it.
 
Question 4.  If need be, where would you cut the rail for a longer insulated section ?  Would it be one of the center rails on the right side of the picture (the 2 track end) or the left single track side. 
Hope the picture and the above paragraph make that clear? No center rail is ever cut for this feature! Only the two rails shown in the image are insulated!
 
Question 5.  Does the non de-rail work no matter which direction the train is coming from ?  Would the center rail need to be cut on  both sides of the switch ?

Yes, the feature works on both the non-diversion and the diversion route. Again though, no center rail is ever cut! Also only the side of the switch shown in the image is changed for this operation. The other end of the switch, not shown at all in the image, is not affected or changed in any way. Just connect it to the track normally. ONLY TWO RAILS ARE EVER INVOLVED HERE! Never the center rail and never more than the two COMMON RAILS INDICATED IN THE IMAGE! The other common rails are also not affected or changed in any way.

Hope this clears it up? This is not a difficult procedure. Most complicated part of it is soldering the leads to the insulated rail sections.


Attachments

Images (1)
  • RCS -non derail
Last edited by Terry Danks

Paul ,looks like you're getting great feedback! I am currently planning my 1st layout and was up in the air as to what track, switches etc to use and of course a track plan! This thread ( which I  thank you for), has pretty much convinced me to seriously consider Ross track and switches. I have modern diesels and Imperial steam all MTH! Absolutely love your track plan! Exactly what I want! Your idea or can you tell where to go to find it? Thanks, love this forum!!!

My layout was started in 1987. I have used Gargraves phantom rail track and  Ross Custom switches since the beginning. They are powered by Tortoise switch machines. They have worked flawlessly for 29 years. If I break a throw bar or have some other problem because of my own carelessness, I return the switch to Steve at Ross Switches and it is repaired without cost. They even pay the return shipping. For me there is no other system that I would consider. The Atlas track looks fine, but their switch machines are huge and  gross looking. With the Tortoise switch machines there is nothing visible except a fine wire from beneath the table passing through a small hole in the tabletop to engage the throw bar.  The Ross switches are a "work of art." You will be proud to have them on your layout. There are few "no brainer" decisions in this hobby, but this is one of them. 

Last edited by triplex
play trains posted:

Paul ,looks like you're getting great feedback! I am currently planning my 1st layout and was up in the air as to what track, switches etc to use and of course a track plan! This thread ( which I  thank you for), has pretty much convinced me to seriously consider Ross track and switches. I have modern diesels and Imperial steam all MTH! Absolutely love your track plan! Exactly what I want! Your idea or can you tell where to go to find it? Thanks, love this forum!!!

You are correct, the feedback has been great and I have decided to go with the Ross switches...six (6) using the manual throws to begin with and then possibly an additional 4 remote units for the the unreachable locations. Actually I have sent a couple of extra emails to Steve with questions and haven't had a reply. Also tried calling on Thursday and Friday, but keep getting a recording...finally left a message, so hopefully I'll hear back from him on Monday so that I can place my order?

The final drawing, different from the one shown above, includes all of the track, switches, operating accessories, roads and buildings...and I have reposted it here:

IMG_5470

It does allow for future expansion...hadn't really given it much thought, but when my daughter and family were here visiting me at Christmas...she said "Dad...you have all of this space, why didn't you make it bigger?" Hmmm...and so I may...

Attachments

Images (1)
  • IMG_5470
Last edited by UKE KAT

Before re-designing my layout last year I had started to lay Atlas track with Ross switches.  I found the gap between the last Ross tie and the end of its rail didn't allow for the joiner to fully fit between the Atlas track and the Ross switch.  I had to 'cut' a small slit between the Ross tie and track so the joiner would allow both Atlas and Ross pieces to fit properly.   Otherwise, there was a larger gap than desired between the two.  Anyone else experience this problem ?

Mike 

Hi Paul, if you keep in mind that the Ross switch machine, the same used by Gargrave and others throws due to a return, or system ground from the push button unit.

This return signal electrical potential is the same as the outside rail of your track. That is why if you use a separate transformer to drive your track switches make sure it is at the same electrical potential as your track.

The isolated track section mentioned above is simply a short section of track, usually on the inside of the switches turn approach  that is not electrically connected to the return loop due to a insolated pin at each end of said section. Return is provided through the wheels of your engine, or car when it passes through this section and this return potential is passed onto the input of you switch motor via a 22 gauge wire placed in the same terminal as the command signal wire from your control button for that associated direction of travel.

What ever side of the switch motor you place it (  the wire) on will decide what direction the switch will throw.

IT is very important to remember that of the three motor screw terminals the center one is the + side, or the potential of the center rail of the track. Again that is why a separate switch motor power source needs to be phased with the track power as I stated above.

16 VAC is best to use for these motors, not the  18 VAC recommended for DCS, or TMCC, that is one of the best reasons for a separate Switch motor power source. Again, not to beat a dead horse please see my phasing warning above.

( At your transformers tie the return post or the outside track source together from one transformer to the other).

Have Fun.

Last edited by gg1man
@UKE KAT posted:
Have you operated them manually with the throw lever accessory and without the anti-derailment feature...if yes, did it add interest, make operating your trains more enjoyable and did you stay disaster free???

Please respond if you have had any personal experience with the above...

Paul...

I strongly recommend going manual op...

  • if you want to be more interactive with the operation.
  • if you don't want to spend hours contorting yourself (painfully, as testified by this near-octogenarian!) beneath a table running scale miles of wire for remote control.
  • if you can think of better ways to spend the difference in $$$ betwixt manual and motor/control.
  • if you have kids...grand-, not-so-grand-, neighborhood-, young-at-heart-but-not-of-body, etc.... who would love to be participants in the operation.
  • if your switches are within easy, comfortable reach from the aisle, and not surrounded by tall scenery, structures, details that are snag-worthy from clothing or clumsiness.
  • if you can't imagine that somebody in a distant place on the prototype of your railroad would be sitting in a comfy chair, beer in hand, before a magnificent whole-railroad control panel, or holding a gizmo/cell-phone in their hand to throw the switch to a siding to drop off/pick up a car.
  • If you want to have more fun...IMHO, of course.
  • etc., etc., blah, blah

...then, by all means, so go.

But, no, I guarantee that, remote or manual, NEITHER will be disaster-free.  It's the nature of the hobby...and the humanity-in-control.  (And, as an avid hobbyist, we are not alone in that regard!...just spend some time talking with folks in the R/C department...planes, helicopters, cars, boats, etc., etc.  FI, you can move an R/C lever about the same amount as the lever on a Caboose Industries 208 throw and have gravity ruin your day...saith the fly-guys!)

But I digress...   Ross (and Gargraves) products and the folks that provide them?...The absolute best in the biz.

IMHO, of course.

KD

Add Reply

Post

OGR Publishing, Inc., 1310 Eastside Centre Ct, Suite 6, Mountain Home, AR 72653
800-980-OGRR (6477)
www.ogaugerr.com

×
×
×
×
Link copied to your clipboard.
×
×