
A second project completed today, however this one took about a week working on it off and on.

K line 15" aluminum California Zephyr Silver Diner car interior upgrade. These come monotone gray, definitely needed some color and floor. This is the second diner in my CZ consist.

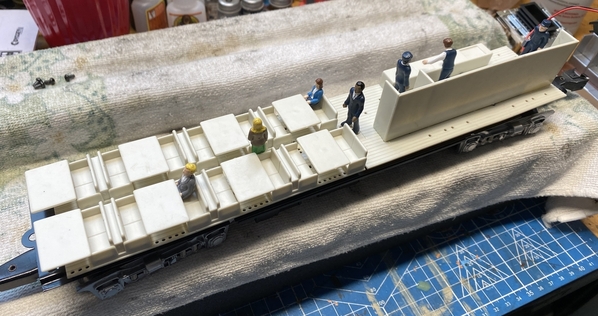
This is what it looked like new out of the box:

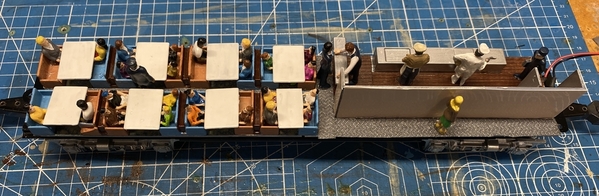
I removed all the love seats and tables and painted the tables flat white to simulate a white table cloth. Painted the love seats kind of a desert pink and blue and alternated the colors. I then painted the kitchen with silver to simulate stainless steel and added a small kitchen serving table that with a table I had laying around. Added carpet that I printed on my Canon printer, and installed a slatted wood floor in the kitchen. Added a bunch of passengers, Lionel and K-Line, and the two chefs are Arttista. All paint is Testors enamel.

Fun project! I'm mostly happy with the results. I wish the windows were larger in the kitchen!

Very nice!

American Motors dealership taking shape.  Still more to do.  Looking for a backdrop of service garage doors to cover the backwall. They are AMC's, service is inevitable. The yellow pacer already had the optional passenger side mirror fall off and need repair.

imageIt is the mid 1970s and AMC is trying to sell Pacers, Hornets, and Gremlins but the Jeeps are in stock and ready to move.   20240323_015240

Attachments

Images (2)
  • 20240323_015240
  • image
Last edited by VistaDomeScott

Was blessed with some "Patience" today,  I don't normally have much of that virtue...  Anyway, been trying for a while to figure out how to best get the Cream, yellow colored aged brick look that I was striving for....    Finally got it today...   Started by spraying the entire Ameritowne front wall  Rustoleum Camo "Sand" color, then patiently dry brushed the brick in two colors,  a light pale yellow called Lemonade, followed by another dry brush coat of "Antique Gold"...   The patience comes in getting enough paint off the brush so that I dont' fill in the mortar lines.   

Going to get the second front done for the matching pair...    I left one upper right corner undone in one of the photos so we could see what it looked like after the Lemonade color was applied....

First photo is entire before and after dry brushing both colors..   

DSC02109

Second photo shows top right corner after the 1st dry brush coat.   Side wall on the left was my attempt to get the result doing washes of both colors.  Probably going to wash and scrub all that off and start over.

DSC02107

Attachments

Images (2)
  • DSC02109
  • DSC02107

A second project completed today, however this one took about a week working on it off and on.

K line 15" aluminum California Zephyr Silver Diner car interior upgrade. These come monotone gray, definitely needed some color and floor. This is the second diner in my CZ consist.


It's a shame to have to put the car body on top of that great detailing. Nice work !!!

@chris a posted:

Was blessed with some "Patience" today,  I don't normally have much of that virtue...  Anyway, been trying for a while to figure out how to best get the Cream, yellow colored aged brick look that I was striving for....    Finally got it today...   Started by spraying the entire Ameritowne front wall  Rustoleum Camo "Sand" color, then patiently dry brushed the brick in two colors,  a light pale yellow called Lemonade, followed by another dry brush coat of "Antique Gold"...   The patience comes in getting enough paint off the brush so that I dont' fill in the mortar lines.   

Going to get the second front done for the matching pair...    I left one upper right corner undone in one of the photos so we could see what it looked like after the Lemonade color was applied....

First photo is entire before and after dry brushing both colors..   

DSC02109

Second photo shows top right corner after the 1st dry brush coat.   Side wall on the left was my attempt to get the result doing washes of both colors.  Probably going to wash and scrub all that off and start over.

DSC02107

I love the effect.....I even like the "lemonade" only over the Camo sand....

Thank you for the detailed explanation!

Peter

What about placing some vines climbing up the stone wall at the right side of the portal? It might "hide in plain sight" the narrowness of that side. I'm replying several days later so you may have already decided what to do.

John

Bob, what about just removing the portal entirely and just have stone supports on the left side and nothing on the right? I think you said it was difficult to see anyway so maybe not an issue?  Jeff

American Motors dealership taking shape.  Still more to do.  Looking for a backdrop of service garage doors to cover the backwall. They are AMC's, service is inevitable. The yellow pacer already had the optional passenger side mirror fall off and need repair.

imageIt is the mid 1970s and AMC is trying to sell Pacers, Hornets, and Gremlins but the Jeeps are in stock and ready to move.   20240323_015240

I had a friend who drove a Hornet; and yes it was Green!! 

I bought that dealership kit thinking it would look good in my 1950s town.  When I got it out of the box, I realized it takes up more real estate than I was imagining.  My other buildings are smaller.  I put it back in the box until my town is laid out and I see how I can fit it in.  Yours looks great!!!!

I love the effect.....I even like the "lemonade" only over the Camo sand....

Thank you for the detailed explanation!

Peter

Peter,  Thanks.  Yes I agree just the first coat with the "lemonade" pale yellow has definite potential as a variation.  I have dry brushed as a weathering technique before but never a large uniform area like this brick wall.   I'll be doing more of this now that I have developed a technique that's working.   

I found this great YouTube Video "O Scale Allied Switch Job" which is where I found the color scheme on these Ameritowne Building Front Walls.    There's a good street view shot of them at  3:39 in the video as well as later.....   This gentleman's modelling and weathering skills are exceptional as well as his ability to operate his railroad and switch cars in and out of a busy B & O industrial district.   

https://www.youtube.com/watch?v=vor28YPRQDk

@WesternPacific2217 That diner came out great. Those Arista figures in the kitchen are especially good.
@chris a  You captured that old yellow brick look.

The only thing I worked on recently is a 36" truss bridge that I got from a friend who sold me his trains. He made it out of wood but it needed piers to support the center. I added aluminum bar stock to make it self-supporting, finished the bottom edge of the truss, then added gussets, painted it, and fabricated abutments. I would like it to be part of an elevated loop of O-27 track for tinplate trains separate from my regular layout.

bridge1

bridge2
I
just had the nutty thought that my old decaying patio looks "very realistic." Should I remove some to use as a "dry riverbed"? Maybe not.

Attachments

Images (2)
  • bridge1
  • bridge2
@chris a posted:

Peter,  Thanks.  Yes I agree just the first coat with the "lemonade" pale yellow has definite potential as a variation.  I have dry brushed as a weathering technique before but never a large uniform area like this brick wall.   I'll be doing more of this now that I have developed a technique that's working.   

I found this great YouTube Video "O Scale Allied Switch Job" which is where I found the color scheme on these Ameritowne Building Front Walls.    There's a good street view shot of them at  3:39 in the video as well as later.....   This gentleman's modelling and weathering skills are exceptional as well as his ability to operate his railroad and switch cars in and out of a busy B & O industrial district.   

https://www.youtube.com/watch?v=vor28YPRQDk

Chris,

That is the layout of Don Smith! Wonderful modeler. When I first saw what you were trying to accomplish with the color, I thought of those same building flats on Don's layout. It looks like he used the Midtown Hotel walls.

Dave

Last edited by luvindemtrains

I decided with the CEO out of town for the weekend, that I would take care of a few things that have been bothering me and got a couple of bonus items done as well.

First, I decided I wasn’t happy with the Gargraves track on the upper level. It was all flex track and I was having difficulty with the trains derailing, so I decided to replace it with Atlas like the rest of the layout. While I had everything on the upper level torn apart I decided to get the piers painted properly to make them look like concrete columns. I also added a hand built bridge to the upper level. The bridge came from the O gager’s layout that I am taking apart due to his passing.  You can see the bridge and the columns in the pics below.
IMG_5032IMG_5031

The lower bridge is from Menards and I really love it but the scratch made one is looking pretty good as well.

My next project was inspired by the rest of you adding passengers to your passenger cars. I sat and debated about painting the interior and ultimately decided just to add passengers. Based on the end result I think it was the right idea for this car anyways. This passenger car is the one that is used on the solid rocket booster train that I have posted about earlier. When I removed the shell I was surprised to find 7 toilets and only 1 sink. It got me thinking about what the interior should look like based on first hand accounts of fellow employees that had ridden on the train to escort the rocket to Florida. There is supposed to be a common living area, a kitchen area and 4 or 5 bedrooms.  Anyways, when I put the shell back on I could only see about 3 or 4 of the passengers out of the 12 that I put in.
IMG_5025IMG_5026

Still working on more but needed to take a break.  Adding one more column and then putting the track up next. Hopefully everything will go well. 🤞🏼

Attachments

Images (4)
  • IMG_5032
  • IMG_5031
  • IMG_5025
  • IMG_5026
@Ross posted:

@VistaDomeScott

Where did you find the Pacers and Gremlins?


My Gremlin, Oswego NY,  January 1978

The 1/43 Pacers and Gremlins are hard to find.  Most are overseas and command rediculous prices.   I was lucky enough to find the 2 Gremlins for under $30 in Italy  shipped.  They were made by Polisto in Italy.  The Pacers are by IXO and used to be found for about $20 each.   They are rarely found in the U.S. and are always about $100 each.  There is a Hornet coupe and Matador coupe more easily found and were a part of a James Bond movie set of cars.

Last edited by OGR CEO-PUBLISHER

American Motors dealership taking shape.  Still more to do.  Looking for a backdrop of service garage doors to cover the backwall. They are AMC's, service is inevitable. The yellow pacer already had the optional passenger side mirror fall off and need repair.

imageIt is the mid 1970s and AMC is trying to sell Pacers, Hornets, and Gremlins but the Jeeps are in stock and ready to move.

Maybe you indeed are "Super-modeler" with that mirror on the ground next to the car here! You've captured the AMC ethos! Thanks for making me laugh.

Also, can you post a close-up of your track and ballast behind it? I'm looking for some sort of fake ballast/painted ballast (for a future layout) if that is what you have. Thanks in advance.

Tom

Last edited by OGR CEO-PUBLISHER
@chris a posted:

Peter,  Thanks.  Yes I agree just the first coat with the "lemonade" pale yellow has definite potential as a variation.  I have dry brushed as a weathering technique before but never a large uniform area like this brick wall.   I'll be doing more of this now that I have developed a technique that's working.   

I found this great YouTube Video "O Scale Allied Switch Job" which is where I found the color scheme on these Ameritowne Building Front Walls.    There's a good street view shot of them at  3:39 in the video as well as later.....   This gentleman's modelling and weathering skills are exceptional as well as his ability to operate his railroad and switch cars in and out of a busy B & O industrial district.   

https://www.youtube.com/watch?v=vor28YPRQDk

Thank you!

Peter

@PRR8976 posted:


Also, can you post a close-up of your track and ballast behind it? I'm looking for some sort of fake ballast/painted ballast (for a future layout) if that is what you have. Thanks in advance.

Tom

Tom- I added ballast to the sides of the fastrack. It improves the appearance greatly. I applied a liberal coating of elmer's glue and sprinkled the gravel into the glue. After it dried I went over everything again with wet-water and diluted glue.

2017-08-07 19.35.252017-08-07 19.35.322017-08-07 19.35.45

Here's the completed area.

2023-10-08 20.09.43

Bob

Attachments

Images (4)
  • 2017-08-07 19.35.25
  • 2017-08-07 19.35.32
  • 2017-08-07 19.35.45
  • 2023-10-08 20.09.43
@OhB1 posted:

I decided with the CEO out of town for the weekend, that I would take care of a few things that have been bothering me and got a couple of bonus items done as well.

.........and  "  WHILE  THE  CAT'S   AWAY .. ...... " 

.......and boy did this mouse PLAY

You really did a lot  more than I could ever get done on a weekend sir.     Nice looking layout.

@RSJB18 posted:

Tom- I added ballast to the sides of the fastrack. It improves the appearance greatly.                                           

2017-08-07 19.35.252017-08-07 19.35.32

VERY nice Bob.

Hard to tell it is Fastrack .   

  What kind of ballast did you use ?  It really looks to be an accurate size for the Fastrack.

Did you solder your track before ballasting ?    I only ask because I've had conductivity issues in the past with the Fastrack.   

VERY nice Bob.

Hard to tell it is Fastrack .   

  What kind of ballast did you use ?  It really looks to be an accurate size for the Fastrack.

Did you solder your track before ballasting ?    I only ask because I've had conductivity issues in the past with the Fastrack.   

The ballast is a floral gravel from Michael's. Available in several colors, I use gray/ silver, brown, and black.

2021-02-02 18.41.322021-02-02 18.42.132021-02-02 18.41.15

I didn't solder these tracks. They are only 2 short sidings for engines. Each spur is a separate power block.

I use FT for my Christmas tree loop and I always check the pins. I also use small binder clips to hold the sections together.

I'm not a fan of FT for permanent layouts but I would paint the track and hide the gray plastic and shiny rails first if I did.

@PRR8976 Thanks Tom.

Bob

Attachments

Images (3)
  • 2021-02-02 18.41.32
  • 2021-02-02 18.42.13
  • 2021-02-02 18.41.15
Last edited by RSJB18

The last area of my layout to get landscaped is the Mel's Gap/Maybrook area. This has been ongoing for the last few weeks. The first two pictures are before any green was applied. The next 5 are a good start but more will be added. The ballasting of the foreground tracks will hopefully get done with the arrival of my ballast order from Dennis Brennan. I have some auto gates to be installed to the right of the station and I need an access panel piece being done by a friend and then I can get the town of Maybrook finished. So much more to do. The girder bridge spans the track which runs through Mel's Gap, named for our friend Mel Garelick.


mek e 1mel e2mel 1mel 2mel 3mel 4mel 5

Attachments

Images (7)
  • mek e 1
  • mel e2
  • mel 1
  • mel 2
  • mel 3
  • mel 4
  • mel 5
@RSJB18 posted:

The ballast is a floral gravel from Michael's. Available in several colors, I use gray/ silver, brown, and black.2021-02-02 18.41.15

I didn't solder these tracks. They are only 2 short sidings for engines. Each spur is a separate power block.

I use FT for my Christmas tree loop and I always check the pins. I also use small binder clips to hold the sections together.

I'm not a fan of FT for permanent layouts but I would paint the track and hide the gray plastic and shiny rails first if I did.

@PRR8976 Thanks Tom.

Bob

Bob, I recognize the lid of that container.  Our older daughter gave me some product in those containers.  I need to find where I put them, since I wasn’t ready for scenery or ballast at the time.  Your looks great!!

@Mark Boyce posted:

Bob, I recognize the lid of that container.  Our older daughter gave me some product in those containers.  I need to find where I put them, since I wasn’t ready for scenery or ballast at the time.  Your looks great!!

Some of them are a little shiny. I just do an acrylic wash of what ever color I'm using to tone it down if necessary.

Thanks

@Bill Park posted:

The last area of my layout to get landscaped is the Mel's Gap/Maybrook area. This has been ongoing for the last few weeks. The first two pictures are before any green was applied. The next 5 are a good start but more will be added. The ballasting of the foreground tracks will hopefully get done with the arrival of my ballast order from Dennis Brennan. I have some auto gates to be installed to the right of the station and I need an access panel piece being done by a friend and then I can get the town of Maybrook finished. So much more to do. The girder bridge spans the track which runs through Mel's Gap, named for our friend Mel Garelick.


mek e 1mel e2mel 1mel 2mel 3mel 4mel 5

There’s some great work going on there Bill.

@RSJB18 posted:

Some of them are a little shiny. I just do an acrylic wash of what ever color I'm using to tone it down if necessary.

Thanks

Bob, I just found the little containers in an old kitchen cupboard my late pa-in-law had them hang in the garage when ma-in-law insisted on new ones in the kitchen.  😄  As it turns out, the containers are for air dry clay.  I recall now, she thought I could use them for scenery.  One is designed for modeling stone it says.  Hmmm.  Same containers, though.

Afternoon to all you folks on the east coast, I hope your all having a wonderful day and time with your layouts. I have to say there is a ton of wonderful work being done!

@myles great looking dessert scene and love the helo!

@OhB1 great job on the bridge and hope the new Atlas track fixed your problem!

@RSJB18 Bob great job on hiding the fast track, you can't even tell until you get close up!

@Bill Park Bill you have a great start on the Mel's Gap area! I know it is just going to get better and better!

I will probably check in next week when I get to Missouri and find some WiFi!

I hope you all have a great week and find time to have fun with your trains and layouts!

Add Reply

Post

OGR Publishing, Inc., 1310 Eastside Centre Ct, Suite 6, Mountain Home, AR 72653
800-980-OGRR (6477)
www.ogaugerr.com

×
×
×
×
Link copied to your clipboard.
×
×