This morning with a small  window to do something I decided to try some gorilla tape on the stream beds to keep the cliff colors from running into the beds. But the tape would not stick. I did some soulful thinking, which I should not do because I get a headache every time I do LOL and came up with this. I don't know if I read this or saw this somewhere or it is just a figment of my imagination. I took a full bottle of Elmer's white glue and with a foam applicator I coated all the stream beds. My idea is that it will seal the beds and when the colors runs down the cliffs they will not absorb into the plaster in the stream beds. Of course I will have plenty of paper towels to gather up the run off. Well time will tell. Doing train stuff out of the house for most of the day. If I get home early tonight maybe I can start to apply the coloring. If not there is always tomorrow. Pics......................Paul

DSCN0294DSCN0295DSCN0296DSCN0297


Attachments

Images (4)
  • DSCN0294
  • DSCN0295
  • DSCN0296
  • DSCN0297
645 posted:

Will Norma Bates Kitteh like having trolley wire restrict her access to the layout? Or will she attempt to pull the wire out to make her own "electrifying ball of fury"?

Knowing Norma, she'd do a guitar solo on the overhead.  Built in picks, don'cha know. ;-)

And for the cat's sake I assume this will be unpowered overhead, right? 

UNpowered?  Where's the fun in that?   

And if she can sit on a live center rail with no ill effects, I doubt 18V in the overhead will faze her... 

Mitch

paul 2 posted:

This morning with a small  window to do something I decided to try some gorilla tape on the stream beds to keep the cliff colors from running into the beds. But the tape would not stick. I did some soulful thinking, which I should not do because I get a headache every time I do LOL and came up with this. I don't know if I read this or saw this somewhere or it is just a figment of my imagination. I took a full bottle of Elmer's white glue and with a foam applicator I coated all the stream beds. My idea is that it will seal the beds and when the colors runs down the cliffs they will not absorb into the plaster in the stream beds. Of course I will have plenty of paper towels to gather up the run off. Well time will tell. Doing train stuff out of the house for most of the day. If I get home early tonight maybe I can start to apply the coloring. If not there is always tomorrow. Pics......................Paul

DSCN0294DSCN0295DSCN0296DSCN0297


Sounds like a great idea, I sure hope it works!

I got the coloring and the black wash on the cliffs. Learned that my idea of Elmer's Glue worked but only to a point. I found out quick that I could not let any liquid sit too long because it started to soften the glue. So I had to almost wipe as I went along. But the cliffs are almost done. One more thing I do is spray a diluted glue over all of it. Why I do that not quite sure if I read it somewhere. Pics of work so far.............Paul

DSCN0298DSCN0299DSCN0300DSCN0301DSCN0302DSCN0303DSCN0304DSCN0305DSCN0306

Attachments

Images (9)
  • DSCN0298
  • DSCN0299
  • DSCN0300
  • DSCN0301
  • DSCN0302
  • DSCN0303
  • DSCN0304
  • DSCN0305
  • DSCN0306
paul 2 posted:

I got the coloring and the black wash on the cliffs. Learned that my idea of Elmer's Glue worked but only to a point. I found out quick that I could not let any liquid sit too long because it started to soften the glue. So I had to almost wipe as I went along. But the cliffs are almost done. One more thing I do is spray a diluted glue over all of it. Why I do that not quite sure if I read it somewhere. Pics of work so far.............Paul

DSCN0298DSCN0299DSCN0300DSCN0301DSCN0302DSCN0303DSCN0304DSCN0305DSCN0306

Paul,

The cliffs look really good.  The only reason I know of to spray diluted white glue after coloring is if you are going to sprinkle ground foam vegetation on.  But on a cliff I would sprinkle the ground foam on when dry, so it only sticks to the relatively level places, then spray the glue solution to hold it in place, but most places would show your nice rocks 

Bruce Jacobsen posted:

Today I removed all the electrical under the table. Tomorrow we start removing the main level track.

What took nearly 3 years to build will be dismantled in about 4 weeks. Then a new start........

JAKE9894

IMG_1203

Sad to see something like that go, but cant wait to see what replaces it!

paul 2 posted:

I got the coloring and the black wash on the cliffs. Learned that my idea of Elmer's Glue worked but only to a point. I found out quick that I could not let any liquid sit too long because it started to soften the glue. So I had to almost wipe as I went along. But the cliffs are almost done. One more thing I do is spray a diluted glue over all of it. Why I do that not quite sure if I read it somewhere. Pics of work so far.............Paul

DSCN0298DSCN0299DSCN0300DSCN0301DSCN0302DSCN0303DSCN0304DSCN0305DSCN0306

Wonderful job there Paul, when the time comes I will be contacting you to get a step by step to your coloring! I can always come back here to remind me on how you did the cliff's. again just wonderful!

MIKE G, I would be glad to tell you how I did but because Menards just announced the new buildings I will have to charge you to recoup money spent there LOL. Just kidding. I found the technique on the Woodland Scenics website under videos. The process is called Leopard spotting and it is suppose to be fairly fool proof. This afternoon after coloring I decided to scrape up all the foam I had left to add to the top of the one side. I did not have enough of the good stuff so I got some packaging foam to work with. It is bad when you have to rummage for stuff. I hate that beaded stuff. And I couldn't even finish that because I ran out of hot melt sticks. The kicker is I brought a pack of them to the basement and I will be darned if I can find them now. Still have to add more in between the spaces before doing the plaster wrap, that is if I can find the hot melt. It is going to be high of the cliff side and taper down on the table top. I think it will help that area not look like a 90 degree angle. Pic. .....................Paul
DSCN0307

Attachments

Images (1)
  • DSCN0307

Yesterday was nice so got to have rain today. 48 heading to 63 and rain all day.

Worked on the elevated line yesterday. Took Fife’s advice on the flat black for the bents.

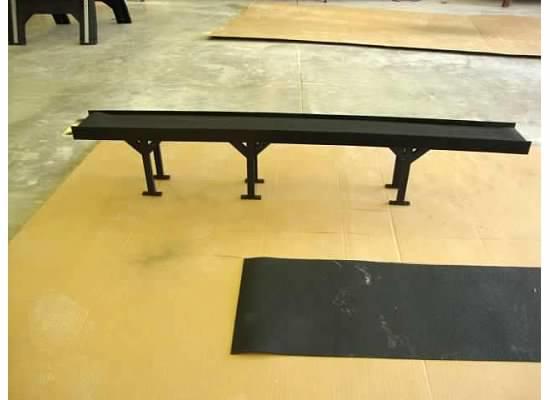
Started removing the upper loop for deck painting and girder rails. I found some neat 1/16" rubber mat on clearance at Menards I am cutting to fit the platform to kill the sound and it looks like black gravel ballast. I am gluing it down with old leftover headliner adhesive I had since the GTO restoration days.  

 So it should make it nice and easy. I bought two kinds of glue to see what will work best on the railing.

The light is for under the viaduct where the bump run is for the #50 car.

Hope to finish up the back straight sections and get them back in place. Then run the 110 for the lighting then figure out how to do the curve sections.

Here are some pictures .

Rubber mat.

Cut FRP strips for the railing.

Black bents and mat installed.

Glue work

First finished section.

Light strip four under the platform.

So far I have only used the power grab

The rebuilt old creeper.

Attachments

Images (10)
  • mceclip0
  • mceclip1
  • mceclip2
  • mceclip3
  • mceclip4
  • mceclip5
  • mceclip6
  • mceclip7
  • mceclip8
  • mceclip9
KRM posted:

Well I finished up the straight sections.

The under lighting worked out very well.

 They can be dimmed to my liking and will put some focus on the # 50 Gang car or the #69 Maintenance car running under there.

Now to wire the 110 under the layout.

I was going to say something in your earlier post, but now I don't have to. All there is to say is it turned out GREAT!

#KRM  Fantastice, great lights work, the North Bluff has never looked better. Very nice lights, the under bridge is top notch... I am loving those tall, round, Yard lights.... man... <Salute> (just watching your accomplishments.....now I need a nap)(then I will try to get my tiny train round trip thru two, 2, II, yup only two..... reliabley...repighabley....relightably..... successfully (spl ck on fritz)

Salute! thanks for sharing. Inspiriational

What have  I done on my layout lately?  A whole lot of nothing.  

Things have been crazy at work, wrapping up some projects and training my replacement as I start my new position on Saturday.  

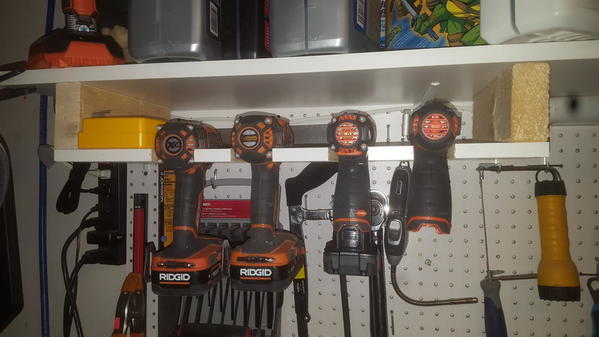
I did happen to get one quick project done, not on the layout but my work bench.  I have always wanted a hanging storage for all my drills and drivers.  I actually created this pretty quickly.  Only took me about 15 minutes to do.  

It is not the final project, but just kinda wanted to see if it worked. I will be buying some MDF and re-doing it.  I will use MDF as the sides instead of the scrap 2x4's I had laying around.  It will all be painted black and have storage on the side of it for my drill bit cases.  

20170413_203444

Attachments

Images (1)
  • 20170413_203444
Kerrigan posted:

Cursed the ever-raining skies once again for foiling my track painting plans and put it all aside for ... probably another month the way things are going out here in the very wet West Coast.

come on now, its been raining for months! It will make everything nice and green. I am just happy it's not snowing anymore!

Sometimes you look at something and say is it half full or half empty. I had a partial container of plaster and I really thought I would have just enough to finish off the area I just added foam and plaster wrap to. Darn, I was so close to finishing it off but today just didn't go my way. So I'll have to order more from Scenic Express. Funny thing is I just ordered from them and if I would of just order it then I would not be having a partial cliff. Pics of how far or how close I got to the end.................Paul

DSCN0313DSCN0314DSCN0315


Attachments

Images (3)
  • DSCN0313
  • DSCN0314
  • DSCN0315

This steam coach project has had many problems, over and beyond my procrastinating. In trying to get the body strong enough to support the turning motor in the chassis, l sealed it up before windows were installed. That made installing "glass" with a tweezers slow and frustrating. That was added onto getting the turning motor and drivers to work in the Walthers kit car body.  Well, finally, l am there, and am reaching the end, applying the external details.  I will have a steam coach.  This one has a 2-4-0 front power truck. Next will be another, smaller, with a two wheel power truck, that won't need to turn, in a Walthers Sierra combine kit body.  After all,  no railroad should have to do without a steam coach.  Anybody else ever modeled one?

Added two more Woodland Scenics buildings (department store & emporium) to my small in-work layout and began working on a small park scene by adding a wrought iron fence.  Originally I had planned to place a tavern where the park will be, however, the park will add some additional "green space" to the layout when completed.

Two more buildings to be purchased and added and then it will be time to add more people, street lights, accessories, signage, and scenery.

Attachments

Images (2)
  • 47 Apr 16 2017
  • 46 Apr 16 2017

Today I got the coloring on the cliff side. That is the extent I could go. I ordered more plaster Saturday but because it is the weekend I don't expect to get it till Tuesday at the earliest. So I guess work is done for a while. Now it is just a waiting game to see what comes first. My plaster and water kit or my next Menards buildings. I suppose until then I can run trains, as if that would be a bad thing. Pics............Paul

DSCN0316DSCN0317

Attachments

Images (2)
  • DSCN0316
  • DSCN0317

Busy week since Dave was here last Saturday. More ballasting and unpacking of trains were the main order of business, but I also got my computer relocated to its permanent home.

The mains at Hoffman are almost complete. Everything in this pic is glued.

IMG_7484

Just the far end to finish.

IMG_7485

Ballasting switches is time consuming.

IMG_7486

Pig's Eye is at capacity, with some 60+ cars.

IMG_7489

Looking back, Dave did over 3 dozen last week.

IMG_7492

The computer in its new home, at the center of the layout. It is right next to the TMCC command base, and I'll be making that connection very soon. I have some software that will control a train from the keyboard and mouse, but I also plan to implement JMRI WiFi throttles. This location is also just feet away from the C/MRI panel. Lots of cool stuff coming!

IMG_7491

Attachments

Images (6)
  • IMG_7484
  • IMG_7485
  • IMG_7486
  • IMG_7489
  • IMG_7492
  • IMG_7491

The unexciting Corner after the exotic Helix and conceptual "Shark Mountain, trestle with Ore pit and Giraffe crossing" removed... as holiday weekend trumps trains......  (perhaps the Ga-rage would work whispers Mitch and GI-raffe foreman Fortesque....) 

ohhhh, MTH NewHaven Caboose and Dummy engine for sale... dessert or, OR......  (don't it just feel great when a Sweet piece is coming in the mail??)

sun-ny day.....IMG_0751

Attachments

Images (1)
  • IMG_0751
Videos (1)
trim.88D746A0-6D4B-47F1-9E5B-A48BE86277D4
paul 2 posted:

Today I got the coloring on the cliff side. That is the extent I could go. I ordered more plaster Saturday but because it is the weekend I don't expect to get it till Tuesday at the earliest. So I guess work is done for a while. Now it is just a waiting game to see what comes first. My plaster and water kit or my next Menards buildings. I suppose until then I can run trains, as if that would be a bad thing. Pics............Paul

DSCN0316DSCN0317

Looks good Paul It matches the bottom just great! When you get a chance can you throw your bridge in so I can see what the whole this looks like?

Also those plastic bottles with the brown and black, I sure hope its the paint or your one tough model rail road builder that is drinking something nobody wants to know about! LOL

Thanks Paul and Scott.
I had another helper come over today. Walt is an HO guy and a JMRI guru. He finished gluing the ballast at Hoffman, while I cleaned the paint off the rail heads. We got the train around as far as St Croix, and with just a little more work, the lower deck should will be operational. The upper deck only has the Interstate segment that has to be cleaned.

Now that the computer has been moved, the monitor is still in the same place. So a long 50' VGA cable connects them. It runs over the doorway, under Red Wing, under the aisle through a pipe, and follows the edge of the hidden yard to the computer. I bought a wireless keyboard and mouse, but was having trouble getting it to work. Using a 30' USB cable and moving the dongle closer, did the job. I'm in business.

On to JMRI, we loaded the latest version, and Walt showed me some of the basics of the layout editor. I'll have to give it a shot, and see if I can begin drawing the dispatcher's panel.

Everything should be ready for the tour, which is now just under 2 weeks away. Lots of cleaning still to do.

Big_Boy_4005 posted:

Busy week since Dave was here last Saturday. More ballasting and unpacking of trains were the main order of business, but I also got my computer relocated to its permanent home.

The mains at Hoffman are almost complete. Everything in this pic is glued.

IMG_7484

Just the far end to finish.

IMG_7485

Ballasting switches is time consuming.

IMG_7486

Pig's Eye is at capacity, with some 60+ cars.

IMG_7489

Looking back, Dave did over 3 dozen last week.

IMG_7492

The computer in its new home, at the center of the layout. It is right next to the TMCC command base, and I'll be making that connection very soon. I have some software that will control a train from the keyboard and mouse, but I also plan to implement JMRI WiFi throttles. This location is also just feet away from the C/MRI panel. Lots of cool stuff coming!

IMG_7491

Elliot, things are turning out just Great, next thing you know it you will be sitting back running trains! I know it would be only for a little while till you start the next phase of the project. but it all looks wonderful!

Add Reply

Post

OGR Publishing, Inc., 1310 Eastside Centre Ct, Suite 6, Mountain Home, AR 72653
800-980-OGRR (6477)
www.ogaugerr.com

×
×
×
×
Link copied to your clipboard.
×
×