Great looking bridge, is it fixed or a lift out?


|
|
Great looking bridge, is it fixed or a lift out?
That is one excellent bridge, Joel. ![]()
mike g. posted:Great looking bridge, is it fixed or a lift out?
Yes, inquiring minds want to know.. Great looking bridge!!!!
MIKE G, I paint the cork before laying down the track. Then I add ballast to the beveled sides of the cork and glue it down..........Paul
Mike, that bridge looks fantastic. ![]()
Several days have passed, but I've returned to building the tug boat.
The first stage of the wiring is complete.

The right hand switch allows me to select shore power or shipboard power. The shore power cable actually connects to the quarter deck module, but I can plug it directly into the distribution panel for testing purposes.
Here I have the bridge deck on test, sitting in the bows of the boat. Counting from the right after the source selection switch, are the switches for the mast lights, the search light and the bridge lights; in that order.
The black cylinder is an .mp3 player which has 1 1/2 hours of a recording of a diesel motor running. It's set just loud enough to create the ambiance of a boat with activity. I hope. ![]()
RETINPA, great looking bridge. Max, tug is coming along. How about a video when completed to hear the sounds....Paul
Some of the heavy lifting equipment I brought in to set the bridge. ![]()

Close up The tunnel portal is a std MTH variety- grey plastic with a black smudge at the top. I decided that as a vehicle tunnel it should be white washed. I think the white portal and black tunnel hole make a visual "bulls eye" .

The remaining empty space between the layout & wall will get horizontal styrofoam painted/carved sheets.

Looking ahead...I have created several "corner properties" which require scenery. I begin by making a cardboard template of the space. I'll use this to determine the "footprint" of the piece I'll make to go there. Time to go to the store and buy me some styrofoam.

Paul 2,
You better get busy May 23 will be here shortly...lol
Congrats to my friend Paul on finally agreeing to host for our Tuesday Night Train Club. After 2 years of trying to convince him that is won't hurt that bad Paul pulled the trigger and agreed to host yesterday.
Bryan, how many more places are you going to announce this. I still have till a day or so before the 23rd to cancel. And seeing you will be off for the summer you can have all of us over for a summer get together.......Paul
MaxSouthOz posted:Several days have passed, but I've returned to building the tug boat.
The first stage of the wiring is complete.
The right hand switch allows me to select shore power or shipboard power. The shore power cable actually connects to the quarter deck module, but I can plug it directly into the distribution panel for testing purposes.
Here I have the bridge deck on test, sitting in the bows of the boat. Counting from the right after the source selection switch, are the switches for the mast lights, the search light and the bridge lights; in that order.
The black cylinder is an .mp3 player which has 1 1/2 hours of a recording of a diesel motor running. It's set just loud enough to create the ambiance of a boat with activity. I hope.
Looks very sea worthy Max. It almost could sail itself. The MP3 is a nice touch.
Bob
paul 2 posted:Bryan, how many more places are you going to announce this. I still have till a day or so before the 23rd to cancel. And seeing you will be off for the summer you can have all of us over for a summer get together.......Paul
Paul I'm putting an ad out on cleveshows.com to announce this. I'm hoping for a record breaking crowd...I mean you do have 2 layouts now half can look at the attic one while the other group is in the basement.
Honestly, I would have the crew over during the summer we could grill out on the deck and have a few drinks back there.
paul 2 posted:RETINPA, great looking bridge. Max, tug is coming along. How about a video when completed to hear the sounds....Paul
It's on the list, Paul.
Thanks, Bob.
Mike G, if that question was directed at me, it's fixed for the foreseeable future. I have no problem ducking/crawling under. When I sense the day coming that I can't do that, I'll convert it to lift out or swing up.
I made my own decals for the Whitcomb 50-tonner I recently bought.

I'm still unsure if I'll paint the loco grey, or just paint the running gears and walkway black, as I strongly suspect the Army did have some yellow-painted diesels during WW2.
But at least I got the decals done, either way.
They look good, Lee. ![]()
I'm still trying to find a way to get generic alphabet decals in white.
RETINPA posted:Mike G, if that question was directed at me, it's fixed for the foreseeable future. I have no problem ducking/crawling under. When I sense the day coming that I can't do that, I'll convert it to lift out or swing up.
Yep, that was me, I am glad you have no problems going under. I am so beat up I need a lift bridge!
Doing more Train Day prep. Used part of a tube from the Howard Roark Memorial Storage Facility project, a chunk of stripwood cut in half and three rubber bands to make a flatcar load...

Mitch
This was the only dry day outside so I had to get the grass cut and do a bit of yard work. I didn't get down to work on the layout till after dinner. I was going to start to paint the cork but decided to lay switches back down. Glad I did I had laid the cork on the wrong centerline and the switch did not match up. I tried to pull the cork up easy but there wasn't much left to reuse. I had to use new cork and that won't be dry for a while. But I went on to paint the cork that was ready. Paint wise I have decided to go with the grey for mainlines and black for sidings at all industries and freight yards. I also got the last part of the cliff colored. Tomorrow will be a better day. Might even get track down on some of the sidings and the approaches to the bridge. Pics....................Paul


We tested a recent purchase of a VisionLine Black Hudson and a recent trade back of the Lionel Shay from 2000...They will remain with me for a long time Hopefully..

Paul, The roadbed looks great. You are on your way to completion!
Larry, Both locomotives look great!!
MaxSouthOz posted:They look good, Lee.
I'm still trying to find a way to get generic alphabet decals in white.
Thanks!
Microscale made plenty of sets of alphabets. They're not tough to find online.
p51 posted:I made my own decals for the Whitcomb 50-tonner I recently bought.
I'm still unsure if I'll paint the loco grey, or just paint the running gears and walkway black, as I strongly suspect the Army did have some yellow-painted diesels during WW2.
But at least I got the decals done, either way.
I'd like to do that for some old tank cars i have
Dennis Holler posted:p51 posted:I made my own decals for the Whitcomb 50-tonner I recently bought.
I'm still unsure if I'll paint the loco grey, or just paint the running gears and walkway black, as I strongly suspect the Army did have some yellow-painted diesels during WW2.
But at least I got the decals done, either way.
I'd like to do that for some old tank cars i have
If you need black lettering, it’s pretty easy. Microscale makes blank letter-sized decal sheets. I upload typefaces I need, create the text I want in the right size, take it to a good photocopy place and run the paper sheet I printed out onto the decal paper. I then hit it with a pass of glosscoat.
After that, it’s ready to go. Works way better than any ink jet because you don’t have to worry about the letters blurring out in the water.
You can what I did for my own tank cars, making my own decals that are pretty darned close to what the ET&WNC used on their own tank cars. A good book on the RR said what the inspection data said, so I recreated that, too, even though I doubt someone running trains on the layout can read them without a magnifying glass (I know it’s there and reads correctly, though). I had the white letters from another set, but nobody has ever made decals for the gas tank cars that I’m aware of:
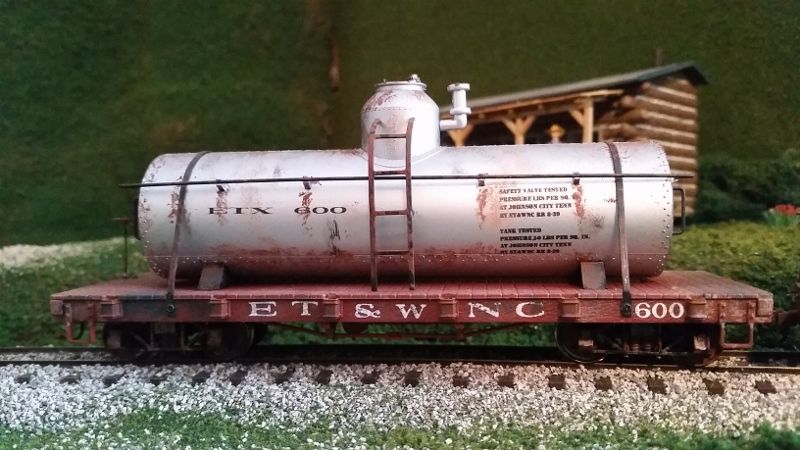
This is what the original cars looked like:

Today I finish painting cork and after it dried I laid down track connecting both sides of the bridge and some sidings. I don't have too much more I can do laying cork. I worked too fast and once again I ran out of switches. Had I brought my list to York I would of gotten the right amount of switches. So track laying is just about done except for adding a siding. After dinner I'll get out some plaster and do along the tracks and I can lay some ballast. I even put the bridge in place with some cars to see what it will look like. Pics.....Paul


Paul, The photos look great! You got a lot done!!
The Razorback Traction Co. has just taken delivery of a load of cars in need of TLC!

First up is the crane...

Mitch
p51 posted:Microscale made plenty of sets of alphabets. They're not tough to find online.
Thanks, Lee. I can make them on my laser printer - all but white.
I'll have another look at Microscale.
Microscale only have white alphabets in HO scale, Lee but I've ordered some anyway, as the bigger ones on the pages may fit my needs.
Cheers
paul 2 posted:Today I finish painting cork and after it dried I laid down track connecting both sides of the bridge and some sidings. I don't have too much more I can do laying cork. I worked too fast and once again I ran out of switches. Had I brought my list to York I would of gotten the right amount of switches. So track laying is just about done except for adding a siding. After dinner I'll get out some plaster and do along the tracks and I can lay some ballast. I even put the bridge in place with some cars to see what it will look like. Pics.....Paul
Looking Great there Paul! You are a fast mover, but I did notice that you must have been to Bob's place as you have a lot of cars that I seen in his layout picture! You must have got a great deal from him!~ LOL
MIKE G, actually it is on the hush hush but CABINET BOB has a rental program. So I rented them from him for the photo shoot.....LOL........Paul
paul 2 posted:MIKE G, actually it is on the hush hush but CABINET BOB has a rental program. So I rented them from him for the photo shoot.....LOL........Paul
I think a lot of us have similar rolling stock. LOL
No train stuff today but....
May The 4th Be With You!

upgraded TIU's, remotes and the WIU
Protip Of The Day: If you have a 6460 crane, and you can't remove one of the rusted truck screws because the captive nut is spinning in the truck frame, simply remove the wheels, flatten a piece of O31 rail, get a GINORMOUS Unger soldering iron with the tip that's usually used to weld automotive frames, solder the flattened end to the underside of the nut and then DARE that little indefinite to spin. Works like a charm, particularly when the screw has soaked in mouse **** penetrating oil overnight...
Mitch
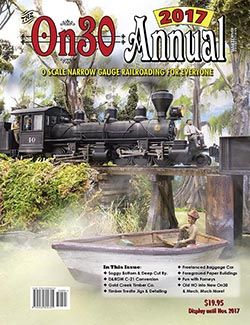
The On30 Annual is out now and even though I've yet to get my own copy (I have the digital proof of my article, though), I've already gotten some email kudos for it.
My article is on page 80, I think. I didn't make the cover, though, but I'm okay with that!
Funny how you never know how others are going to take what you put out there, but I never excepted the warm reception in the hobby I've gotten with my layout!
p51 posted:The On30 Annual is out now and even though I've yet to get my own copy (I have the digital proof of my article, though), I've already gotten some email kudos for it.
My article is on page 80, I think. I didn't make the cover, though, but I'm okay with that!
Funny how you never know how others are going to take what you put out there, but I never excepted the warm reception in the hobby I've gotten with my layout!
Very COOL Lee, you have to be excited to see your layout in print! I am so very happy for you!
mike g. posted:Very COOL Lee, you have to be excited to see your layout in print! I am so very happy for you!
I'm far from done. I'm looking to write a first-person perspective article on my layout as if it was written back in the 40s, complete with 'original' photos.
Still trying to figure out who to pitch it to. I'll almost certainly give OSR first crack at running it when I'm ready to make my pitch. If it goes like I'm thinking, it won't be like anything you've ever seen in a model RR mag!
Access to this requires an OGR Forum Supporting Membership


