


Dave, the green hood looks great! That's a lot of ore you are hauling on your wonderfully sceniced layout!
Dave, that is one beautiful layout. Love the track work.
needed more yard lights around the layout, started printing some more


Attachments
Images (2)

I am still painting the last 144 Preiser 65602 Unpainted Seated People that I have. It is taking more time than usual. I am splitting time gardening around the pool, painting the figures for my passenger cars, and my caregiver tasks. Where do all the dirty clothes and dirty dishes come from?
Sincerely, John Rowlen


Attachments
Images (2)
My son set up a Patriot train to help celebrate the 4th of July. As you can see, his train includes a number of Lionel's US President cars.
Attachments
Videos (1)

I have two projects stopped dead for parts, a 2-4-4-2 being bashed from a couple of Marx 999's, stalled until l can figure out reverse wiring, four cabooses stalled until l can get Grandt Line windows and doors, so l began a Brennan O B Long box kit. Now this kit is different from dozens of other structure kits l've built, as it builds up in press on layers =less glue, more thought. I am considering enlarging it as I plan to make it a caboose shop, a smaller one that was intended, but lost space to the creosote plant. Many kits use metal corrugated siding; this uses paper corrugated. Back to work ...
Fencing......
Back to the ink jet printer for a fence to put in front of the new building flat. Fence print scales to 6'. I made the posts from some balsa scraps and the stringers are thin styrene. The posts are glued up and I will work on the stringers after the glue dries.
Bob


Attachments
Images (3)


Good morining everyone! Looks like everyone is staying healthy and trying to keep busy. Got another video done on Lionel's Veranda turbine and I am now working on another for Menards' Criple Creek Lumber Yard. So stay tuned for that one and also keep an eye out for a video of the new Lionel catalog. Thanks for reading and happy railroading!
P.S. Sorry for it being a long one but there is a lot of history behind the locomotive and it is just plain huge!
Wow some great stuff here!
Dave nice job on the engine and what an amazing layout!
Ray, looks like you have a great start on your new lighting!
John, I cant believe your still painting people! You have more people then they do in NY City! LOL
Bob, looks like your tired of your neighbors to be building a fence! Looks good!
Well If you all will bare with me, you might like the end of my little story. I have been working on a motorized chair that I picked up for $50. It was all beat up and didn't run. The reason I picked it up is because my 85 year old mother might be coming to stay with us and she doesnt get around very well.
I took it all apart cleaned everything, sanded and repainted all the body parts and added 2 stickers, The wife loved the paint job until she realized what the colors were from. Here is a look and I hope I dont get in trouble for posting it here. It is some what train related! LOL


I have to wait another full day for the clear coat to cure then wet sand and polish!
I hope you all have a great week and find time for your layout and trains!
Attachments
Images (7)
That is awesome Mike!!!!! I hope Mom has a sense of humor......![]()
The neighbors are fine....just don't want anyone wandering onto the ROW.
Looks great, Mike! I hope it works well for your mum! From phone calls it sounds like my mum is still doing okay at the personal care home with her walker. She and Dad will both be 90 later this year.
I worked a good bit on my trestles in the inner part of my over and under this weekend. As one of you pointed out in a PM my steamers would have trouble with my transitions to and from the grades. Also there was a dip in the trestle line. The H9 has the lowest pilot and shorted there and at one transition from level to grade. They are all fixed now, I think. The H9 threw a tire on the trip around and it was getting late, so I didn’t get the other H9 off the high shelf. There really isn’t anything new to see so no photographs.
First time posting on this topic. ![]()
Over the weekend I have been doing some wiring on my 4x6 table. I got some of those selectors that were made by Atlas that allow you to route electrical current so you can change which route trains can go in when you have several switches, as well as allow you to run two trains at different voltages. I have two ovals that are connected via two pairs of switches, and then the inside oval has a siding, which then splits into two different areas to park a few cars. Everything seems to be ship-shape so far, and now I just have to mount the selectors themselves, and wire them to the transformer. I'm very happy with the way it came out. Next I'm gonna try to wire up some accessories and lighting. Also I wanted to add a very small siding to the outer oval, which I primarily intend to use as a dead-end for things like gang cars or trolleys to bump into.
Finished 3 yard lights 

the Gimlich & White Brewery has been waiting for more barley and hops etc. but during these times there is a shortage of grain sacks and pallets so time to make some


and production starts


Attachments
Images (8)
Taking the five Alaska 21" passenger cars for a loop around my layout. I am checking the recent cars I detailed and boxing them for storage. I have run out of people to paint and the energy to paint more.
Sincerely, John Rowlen
Attachments
Videos (1)

@John Rowlen posted:Taking the five Alaska 21" passenger cars for a loop around my layout. I am checking the recent cars I detailed and boxing them for storage. I have run out of people to paint and the energy to paint more.
Sincerely, John Rowlen
Very nice, John. I’ve been away for a couple of weeks helping my brother after spinal fusion surgery, but I couldn’t resist ordering a set of those amazing Alaska cars (a couple of years ago, my brother and I went to Alaska on vacation and road them from Fairbanks to Denali to Anchorage). I did make it home for a couple of days and ran the cars to be sure everything was good (it was!!!), and I used the engine that was on the layout - another recent purchase - and it was the same beautiful CP set you used - they really do look great together. Unfortunately, I don’t have your skill OR PATIENCE to add passengers!!! When I get back home, I’ll have to run out my set of TMCC Alaska F3’s to pull the consist.
Hi Everyone -- been away for awhile. Hope everyone is healthy. Those Alaska cars would look good on Brian's Alaska layout. John has more railroad people riding in cars than we have in our whole town here in NH. Time to clean tracks for me.
Good to hear from you, Matt! I'm taking a little time each day testing different engines on my main line, and while I have each one out, adding BCRs if not already in, doing a lubrication, and noting any problems with each engine. A complete lub program for all engines will be a first for me in over 50 years of having trains. What a slacker I have been! ![]()
didn't have enough trash around the layout ![]() so had to start making some
so had to start making some

Attachments
Images (1)

@Mark Boyce posted:Good to hear from you, Matt! I'm taking a little time each day testing different engines on my main line, and while I have each one out, adding BCRs if not already in, doing a lubrication, and noting any problems with each engine. A complete lub program for all engines will be a first for me in over 50 years of having trains. What a slacker I have been!
Mark, what are you using to oil friction areas. I have a reasonably small oil dropper, but no matter what I do I end up with oil migrating down the wheels and onto the track. Obviously applying too much oil, Is there some type of micro oiler around? I already repack white grease into curved small tip syringes for the gears - works well. Jeff
You want a nice needle tip oiler. A blunt syringe.
Regardless, Gramps would oil a loco on its side, let it sit, flip it, do it again, sit, wipe, repeat until the rag had no black, then stand the loco on a rag for the night and let gravity do it's thing. Wipe pooled excess and run. You seldom saw a freshly oiled wheel roll.
You can't rush oil.
He cleaned trains like that because they took his Garrand away. Cur Ra Hee ![]()
@ScoutingDad posted:Mark, what are you using to oil friction areas. I have a reasonably small oil dropper, but no matter what I do I end up with oil migrating down the wheels and onto the track. Obviously applying too much oil, Is there some type of micro oiler around? I already repack white grease into curved small tip syringes for the gears - works well. Jeff
Jeff,
Adriatic gave you a good description. I use MTH Lubricating Oil in the squeeze bottle with the long tip applicator. It comes in the Lubricating Kit MTH part number 30-50051.
![]()
Attachments
Images (1)

- As in metal tipped, maybe glass body syringe.
- I use gravity a lot, sometimes dribbling down an axle to an unseen bearing and waiting to see oil build and puddle between bearing and wheel. Then it sits.
- Flushing is important. That black oil is abrasive.
I have a needle-tipped oilier I found on ebay a while back. Works well but the bottle sweats and I always have an oil stain on the paper towel under the bottle. I've probably lost more from sweat that I've used. ![]() I agree with Adriatic- don't rush oil, and use it sparingly. I use toothpicks to apply grease to gears.
I agree with Adriatic- don't rush oil, and use it sparingly. I use toothpicks to apply grease to gears.
Mark- better late than never ![]()
Matt- good to hear from you. Have fun cleaning track.
Ray- one man's junk.....Love the grain sacks too.
Paul- Apples- hope your brother is on the mend. Please share some pix of your ARR consists when you get it running.
John R- sorry to hear you are our of people. A break is probably best anyway. The cars look great.
Bob
Last night before running trains I made a walk-around video of my layout, and then continued running the trains, and took more videos. Take a look:
John
John, thank you for the walk about video, very nice layout and collection
After procrastinating for several months and after much trial and error, I finally was able to complete a custom illuminated sign on the layout. I can still remember the sign from the 1950's lit up at night and as shown by the B&W photo, which is dated 1911, it was there for a very long time at the corner of Vincennes St. and E. Main Street in New Albany, Indiana as the south bound entrance to the K&I Bridge. Sadly it has since been removed.


Attachments
Images (3)

Barnum, What an excellent job in recreating that scene in the photograph! That is neat you remember the sign to Louisville form over 40 years after the photograph!!
")
")
")
")
")
")
")
")
Steve, your Turnpike interchange looks so much like the Pennsylvania Turnpike when they still collected cash
Over this past months I have not done any work on the layout. But I have tried to keep up with all the great work everyone is doing here. I did restock supplies a month ago. So now I have no excuse not to do something. So today I measured for another table. The first one to go across the back of the basement. I should be able to knock it out quickly seeing it is only going to be 8 feet long and 18 inches wide. Tomorrow a trip to the depot to get the plywood and a sheet of Masonite for the backdrop and I can get to work. I already had the 1X4's for the frame work. The wiring that is on the wall I plan to cover with a building, eventually. A pic of the area where the table is going. Of course the lights and the Keurig box will be moved first...............Paul 2

Attachments
Images (1)
@briansilvermustang posted:
Marci helped me put in some more shelving...
she also got me this cool looking taxi...
then we ran some trains, have a great weekend everyone !!


![]() WOW" what a collection' and a great wife too'... Nothing better than these two things in life'.....😀👍👌
WOW" what a collection' and a great wife too'... Nothing better than these two things in life'.....😀👍👌
Paul, I’m glad to see you are stocking up on supplies for an addition! I’ll be glad to see you get started on the project!


 Working the Road Orders tonight. The daily commuter (RPO, Combine and 2 coaches) started its return run EB from the Lillian Glen Depot toward Elliottville. Paused at a rural station and eventually made it to Elliottville. After passengers and mail were unloaded, the E6 #460 spotted the cars on the passenger team track. Meanwhile, a wb Isa enroute with 10 coal hoppers traveled from the coal yard team track through the countryside and eventually into Elliottville. After the decapod stopped for water, it continued to the Port yard. The engine will uncouple and head to the engine facility to take coal soon.
Edit: I switched out an N6b cabin car for a Weaver N5a for the coal train.
Attachments
Images (3)
The night time is the right time.
Attachments
Images (1)
ordered about over 200 interconnect cables for my signals. Yeah I was shocked at the number, but it's what it takes if you're doing switched route advance signaling. This is LIT ....LITERALLY! If I turn approach mode off, my layout should glow ... but then i was always fascinated by the signal lights I saw in rail yards near the big train stations of Europe in my early teens.
Probably could have saved a bit of money doing my own cables and just ordering a spool wire and RJ12 ends, but my past experience trying to do this with some cat5 cables told me "NO. dont be stupid, you'll mess up a wire or 2 along the way and be peeved while trying to locate it."
Cable zip ties are my friends.
@ScottV posted:ordered about over 200 interconnect cables for my signals. Yeah I was shocked at the number, but it's what it takes if you're doing switched route advance signaling. This is LIT ....LITERALLY! If I turn approach mode off, my layout should glow ... but then i was always fascinated by the signal lights I saw in rail yards near the big train stations of Europe in my early teens.
Probably could have saved a bit of money doing my own cables and just ordering a spool wire and RJ12 ends, but my past experience trying to do this with some cat5 cables told me "NO. dont be stupid, you'll mess up a wire or 2 along the way and be peeved while trying to locate it."
Cable zip ties are my friends.
Scott, Having crimped on dozens of RJ_ connectors over the years while I worked for a telecom company, I can tell you that I agree with your choice for buying ready made cables. We had a need for reversed CAT5 cables, and I made many of them. I ended up throwing away a lot of connectors, and documentation stated a home made CAT5 didn't have the same qualities as a factory made one. Later we were able to buy reversed cables. Of course you don't need to be up to CAT5 standards for your RJ12 cables, but you are correct, home made ones will become a thorn in your side as you have trouble locating a defective one after everything is installed and working.
Barnum, l remember early trips west beginning across the K&I bridge from Louisville, and passing that station on the Indiana side, for which plans were offered in an old issue of MR. After much free time was blown in C-19 downtown, l am making progress on this O B Long box co. kit, making it a caboose shop, probably adding on a car shed.
Got to the Depot this afternoon and got all the lumber and Masonite I needed plus they did all the long cuts for me. Saves me from trying to cut a 4X8 long ways on saw horses. So tomorrow I can start cutting the frame work for the table. Pic.............Paul 2

Attachments
Images (1)
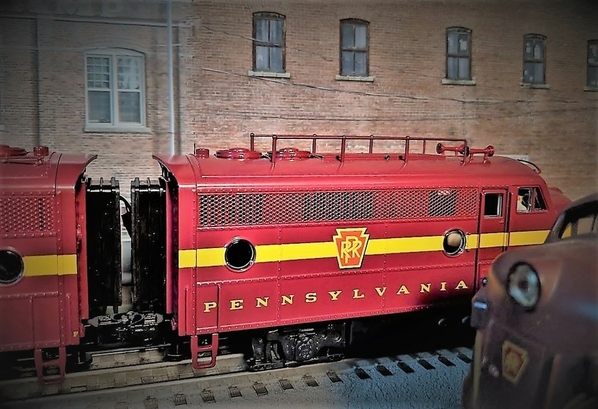
Swapped shells on this RK F3 (Santa Fe) to create a 2nd Penn Central F-unit. The PC shells are Williams and are an exact fit on the RK chassis. There is some internal trimming required and opening up of the exhaust stacks. Mounting holes, headlight, marker lights, etc all line up perfectly. Now I have an A-A lashup with both units powered. ![]()


Attachments
Images (2)


Geez Lionelski! Sorry to hear about your fall. Since my back went south, I've been trying to be extra-cautious. Luckily, my dog is way too lazy to get up just to trip me! Take care of yourself! And maybe to your list of things to do add "build some kits"? Just a thought.
Don
I am finishing the very last Preiser 65602 seated figures. The next two days of high heat gives me the excuse to sit inside and paint. There are five cars that need people: two NS coaches, an Alaska Coach #202, and the UP Excursion 2-pack #3. Legacy Station has the George Bush Funeral train in, and I am interested to see what Lionel has done with adding people to the four cars: the Station Sounds "Overland" Dining Car, "Council Bluffs" Baggage car with casket and Honor Guard, "City of Portland" Dome Dining Car, and "Kenefick" Business Car Observation.
This is the end of my passenger car detailing. It has been enjoyable, but new projects are on the to-do list.
Have an enjoyable summer.
Sincerely, John Rowlen
Been busy with work and outdoor projects but too hot for digging.
Finished up rehabbing an old used model I had and got my switch tower wired up.
Got my Cincinnatian running pretty well, now more ground cover, ballasting, and track.
Stay Safe,
Scott


Attachments
Images (4)
leaving Elizabeth Station.....

Attachments
Images (2)


 Slowly, working Road Orders in Session no. 2. In the Port yard, M1a no. 6759 backs on the team track to couple to lead car of a 10 car EB mixed freight train including four full reefers that today will travel into Elliottville to take water. The weekly freight run frequently involves a stop in the industrial/warehouse district to top off the tender with water to make the rest of the journey non stop except for block signals encountered on the way through Lillian Glen to the final destination, a classification yard several cities East. But the train is paused until the B6s switcher no. 505 pushes a N8 cabin car to couple to the rear of the train.
Attachments
Images (3)
Hey everybody. This is not train related but is super . This little bird was in a tobacco barn on my farm. A family of five made there home there. We put up barn owl boxes in the 80s for these birds. Have only seen 8 in all these years.
Attachments
Images (4)
")

")
(1)")
@colorado hirailer posted:I have two projects stopped dead for parts, a 2-4-4-2 being bashed from a couple of Marx 999's, stalled until l can figure out reverse wiring, four cabooses stalled until l can get Grandt Line windows and doors, so l began a Brennan O B Long box kit. Now this kit is different from dozens of other structure kits l've built, as it builds up in press on layers =less glue, more thought. I am considering enlarging it as I plan to make it a caboose shop, a smaller one that was intended, but lost space to the creosote plant. Many kits use metal corrugated siding; this uses paper corrugated. Back to work ...
love to see a photo of that 2-4-4-2
")
")
")
")
")
")
We ran a few trains in the last few days. Yard work takes so much time now, we have to wait on rainy days to play trains. Happy Railroading 


Attachments
Images (4)
SIRT- great lighting on the vehicles.
Larry- The UP 4141 is a sharp looking engine
Farmer John- very cool. They look like ghosts up there. Looks like they're all watching you too. I'm sure your mouse population has decreased significantly with 5 hungry mouths to feed.
Finished the fence yesterday. I have to shorten the posts but I wanted to see how it looked on the layout before cutting them. Way too hot to do anything outside today....
Bob


Attachments
Images (4)


Farmerjohn, amazing pictures of the owls, so cool, maybe you could model them somewhere on your layout, near the beautiful trailer park area. Here are some pictures I took of your layout last week. Farmerjohn, a Kentucky gentleman.


Attachments
Images (6)
Added LED headlights and interior light with on/off switch o this MTH B&O GP9 dummy. I sometimes run this as the lead unit and when I do I run it long hood forward and therefore that's where I put the headlights. I also added cab figures facing in the "correct" direction.


Attachments
Images (2)


I ran trains last night and made some videos. I replaced all the engines and cars and went with some more modern era trains. In these videos you will see engines from MTH, Dash-9 and a SD 70 in Santa Fe war bonnet and Union Pacific respectively. Rolling stock for these videos include some never run Atlas Hy-Cube cars from the Bob Thatcher era as well as a lot of cars from @MrMuffin'sTrains. Enjoy
Comments welcomed and appreciated.
John
added 3 yard lights

Attachments
Images (1)

ran a string of custom reefers......
Attachments
Images (1)
I have not spent 3 hours in one evening working the layout for so long I can't remember. I continued working the Road Orders in session no. 2. The Decapod and hoppers had trouble on the ridge trackage where it transitioned to a girder bridge and it also labored and jerked a bit so I stopped the train where I could remove the engine and tender to inspect and clean the wheels. After that it ran much better so I ran it over the same route again. I shimmed the track with a few popsicle sticks and that worked for now. The M1a hauled the mixed freight smoothly. I connected a track cleaning car to an H9 Consolidation and ran it around the layout for a good cleaning. Then I ran a 5 car mail train behind a K-line K4s. The only accurate cars are two Weaver B60s. I can live with the K-line baggage car but the two K-line RPOs are bugging me so much recently that I am tempted to try a kitbash of one as an experiment. I need a plan.
...while I'm waiting on connectors to arrive for my signals project ...back to creating more foil-based rock lining for my tunnels!
Drying on the back deck before another light spray coat to mute the strength of the white accents on the rock face. I just need to remember to pull it all in before the typical afternoon summer thunderstorms. ![]() What I love about this technique is that it's so easy to work with. Foil can be cut with scissors to required size, and can be easily adjusted/molded for small mods or clearance issues.
What I love about this technique is that it's so easy to work with. Foil can be cut with scissors to required size, and can be easily adjusted/molded for small mods or clearance issues.

Attachments
Images (1)
Hi Everyone,
I just completed an apron/retaining wall for my overpass. Still need to add some bushes and small trees to the hillside and surrounding area. Have to do the road and grade crossing on the other side of the bridge too but that's for another day. Oh yeah, have to put the bridge in too. If you look closely you can see some pin holes where I used T-pins to help hold the wall in place until the adhesive cured. I will "patch" those up as well.
Yeah, I know the track is a mess. Put ballast down for an open house but didn't secure it because I knew I would be doing work on the other side of the yard. I've "hoovered" most of it up after several projects around it. I almost wish I never put it down. Oh well!
Dave
Attachments
Images (3)


Found an old Model Power lighted figure at a great price at my local hobby shop. Cost me half of what the new Lionel figures will be. I hope to go back and pick up a few more while they last.

Attachments
Images (2)
I actually completed this Brennan kit, except for lettering, which l plan to make a railcar shop, after l find a structure l can bash into at least one more track bay to add to it. These kits are different, but went together well. I like the looks of the packing house, too,but l want it for meat, not veggies. Better to the bash first.
Good morning everyone! Sorry I have not been posting lately. I have been busy with other projects but was able to get this little video done. Thanks for watching and stay tuned for more upcoming videos!
Trainmaster04, That was a great video of postwar trains running! The 726 sounds great! It's funny, I really like the detail and sounds of today's scale trains, but when your postwar trains are running, I can't tell the difference.
Trainmaster, I agree with Mark. I don't own anything pre-2000 but wow I was surprised how nice that engine sounded. Some of my older TMCC engines sound like badly compressed static crap next to that.
NS1975, check out EB*y ... a HS is selling the whole set of Model Power figures at a very good price.
Thanks, Mark and Scott! I do have to say the Century Club 726 is technically not a post-war locomotive but instead a modern era remake from Lionel. The SF F3s can get a little noisy but thankfully by the time I recorded them they had warmed up. Kind of like an old Mustang that is just trying to get started. Gives you a hard time but when fully awoken she runs fine. Thanks for the nice comments and happy railroading!
A K4s with a full tender of coal and water leaves the Postal team track with just 5 express cars today. Two B60s, three B70 express baggage, two that are repurposed BM70 cars. The three hour sprint concludes without incident as does all Road Orders and Session no. two. Next up, staying at home, getting to some house todo's and thinking about possible kitbash projects.
I was happily making snails pace progress on updating my layout and decided to run a freight around my three loops after getting my switches rewired. I had recently installed a used Lionel truss bridge (on my swing out) and was fiddling with adjusting the track. Noticed my 18 inch Southern Crescent heavyweight passenger car would just clip the bridge coming out of a Ross curved switch (Just like Mark's problem with his engine house). Adjusted the bridge placement relative to the track and readjusted the track alignment and I was up and running until - whack. Good thing I was running at a reasonable speed so I only had a minor derailment and no damage. My K-Line scale intermodal stack is just a hair taller than the bridge clearance and caught an edge. Both pin boxes just clip the underside of the trestle opening at the highest point. (still have to change the date on the camera!) Thought about taking a Dremel to the arch but that would have removed the rivet detail. So I remembered the bridge is held to the deck with 4 screws. Removed the screws, removed the bridge, reinserted the screws into the bridge and then placed the bridge back on the deck, (so it now sits on the screws) aligning it back into the mating channel where the deck inserts into the bridge. Of course now I have to figure out how to secure the pieces together, but I did surprisingly gain about a 1/4 of an inch. Also have to check the rest of my stack cars to see if I need more clearance, before I screw anything down more permanently. This is such a fun hobby! In the bottom photo (right side) you can see the beginnings of a 3 track covered passenger terminal.


Attachments
Images (2)
UPS started to drop of some of my Christmas in July acquisitions from @MrMuffin'sTrains as well as a repair item. As I added both trains to the track at different parts of my layout and ran them, I ended up with a very interesting visual, the trains basically running on top of each other in what I refer to as my pass through room. I had not planned to shoot any video and my pass through room isn't very aesthetically pleasing, less wine cork mountain, but shot two. Take a look.
John
Jeff, that's a good solution to your clearance problem! Looks good!
Jeff, Great videos! What material are you using for your roadbed? The sides look so smooth.

That is going to look like Steamtown when you are done Myles. ![]()
I worked on the Alaska 2-pack with the Generator Car and #202 Coach.
The Generator Car has no lights. It has a volume pot, Max/Min Sound Selection and an On/Off for the sound system. I painted the floor even though it is impossible to see it without lights,
The #202 Coach has had all seats and bathroom toilets and sinks painted. I am now selecting, grinding, and gluing Preiser 65602 People into the Coach. Again, the single toilet was glued into the car backwards. All three Alaska Coaches needed the toilet rotated. I will add a few more people to the Coach #202. The seats do not line-up at each window. The best views are the three seats in the front, mid-car seats and last three seats. Window posts block the clear view on the other seats.
I located my two Alaska GP35 engines #2501 and 2502, and will post a brief video soon.
NEW PICTURES: I added a few more seated people.
Have a good weekend.
Sincerely, John Rowlen

Attachments
Images (14)


Testing a new engine with a new decoder, motor, gear and 13 lights.
https://www.youtube.com/watch?v=F0EzAAhU7Ig


Tonight I broke out my postwar 2065 steamer which I got with my first train set when I was 4 years old. I lubed it up and let it run for a bit. So nice to see that thing prance around the layout! All of a sudden I was bit with the post war bug. I had forgotten about the charm of post war locomotives. I broke out a couple more postwar locomotives and snapped some photos and really had BIG FUN!! 


Attachments
Images (6)
I am halfway through a TMCC Upgrade on my K-line GG1. I have the original K-line upgrade kit for this motor and it's still tedious. And what's with those weird wire joiners--like 1960's suitcase connectors? I just soldered the connections and used heat-shrink.
Also building an old plastic kit...This old old Russ Briggs Freight depot kit has 16 million parts and every one has big warts of plastic at every edge from where they were detached from the sprue. This was done before I bought the kit used, unbuilt. It's going to take longer by far to clean up the pieces than to put the kit together. I know nothing about molding plastic. But I have to wonder if all these attachment points are actually necessary to make these parts.
Also, Briggs repeatedly says in the instructions not to use ACC glue--to use glue designed for styrene instead. Why? None of my other plastic kits have come with this limitation. I dunno...
Don
Patrick, thanks for posting photo's of your postwar trains! I loved seeing your 2065 on your layout, and, I seen the Santa Fe Alco on the upper line, the Virginian FM, too!
Rusty
Myles,
Beautiful work.
Do you have a scale drawing for your roundhouse and turn you might be willing to share?
I am trying to figure out What the footprint might be - definitely more than a 4/8 sheet.
Thank you
Jerry Carr
@samparfitt posted:Testing a new engine with a new decoder, motor, gear and 13 lights.
https://www.youtube.com/watch?v=F0EzAAhU7Ig
WOW! Sweet engine and powerful puller. Love the scenery, lots of trees, mountains and long runs. That mixed train is fun to watch.
WinstonB,
The Amtrak passenger cars look beautiful. Nice work.
Sincerely, John Rowlen
Trumptrain: That 2065 is a real beauty. Loved seeing it do its stuff on a realistic layout vice a simple circle of track. It was great, thanks for posting those pictures.
Don
@trumpettrain I love your layout, I love your PW steamer, I love the whole thing! Yours has the look that I would like to attain on my first real layout build. Thanks for posting the pics!
George
5 gallon of Fine Gray Talus (ballast) from Woodland Scenics arrived yesterday . Tested it on my layout. Plan glue them this winter. 


Attachments
Images (4)
Finally it felt good to do something traain related. Yesterday I got all the wood cut for the frame and screwed and glued all the pieces together, Today I made up the legs adding Carriage bolts for leveling screws. Bolted them in place and then added the wood strips to attach the Masonite to. All I need to do tomorrow is make up a couple of cfoss braces for the legs, number all the wood so I can put it all back together in the basement. Pics...........Paul 2


Attachments
Images (3)
Paul, I'm glad to see you got time to get started on the next layout project. Building it out on the porch where there is room to work, make sawdust, and swing boards around is a great idea. I like the backdrop supports on the back and end. What are the overall dimensions.
I finished re-gluing my Thomas, West Virginia enginehouse I purchased from a modeler who is switching scales. Some of the rafters and center supports had come soose in transport. It is a Carolina Craftsman Kits product. I have it out of the train room so it doesn't get damaged until I am ready to place it on the layout. The seller had taken the doors off for shipping. I left them off but placed them in a plastic bag fore safe keeping.


Attachments
Images (2)


Mark:
That engine house is a GREAT model. Keep up the good work and please post progress photos.
Thanks Mark. Doing it outside is a little more work but a lot less dust from cutting wood in the basement. That is one nice engine house. The dimensions of the table come out to 17 1/2 inches X 8 foot. The supports for the Masonite are 2 ft high. I had to do that little indentation with the wood at the one end because I have an electrical wire that comes down the wall and goes out through the wall out to the garage. This is the smallest table the rest of the tables will be at least 2 ft X 8 ft....................Paul 2
Thank you Randy, Paul.
Paul, I missed seeing the indentation for the wire. Good plan.
found a few random layout photos....


Attachments
Images (6)

LOVE the enginehouse!
Go Mark!
Don Merz
Thank you, Don. I had to do some replanning to see if it would fit before I made the decision to purchase it. Originally I had planned for a one stall house. Reminds me of some conversation on another ongoing topic on the Forum. ![]()
Too dang hot & humid outside here on Long Island (100 with the heat index) so I went downstairs to run some trains.
I enjoyed watching my 746 postwar N&W "J" puffing smoke rings as it pulled its consist of 7 "baby Madison" passenger cars. It passed underneath my postwar 2379 Denver & Rio Grande A-B F3 pair pulling 12 Lionel chemical tank cars. It also passed by my LIRR freight set. This set consists of a postwar GP7, hoppers, tank cars and a caboose all painted in LIRR livery by me.
Gotta love the sound of 3 Lionel postwar trains pullin' a lot of cars at the same time on tinplate track screwed to plywood.
I'm on LI like John @Lionelski too....unfortunately I still have to go to work each day so I have to deal with the heat, but would much rather hide in the basement running trains.
So I know why @paul 2 has not been on the forum much lately...he's been tunneling out his basement to fit that new table ![]() . Nice work Paul, I'm with you on keeping the sawdust outside. I do most of my major woodworking in the garage. Still messy but I can clear out the dust with a leaf blower.
. Nice work Paul, I'm with you on keeping the sawdust outside. I do most of my major woodworking in the garage. Still messy but I can clear out the dust with a leaf blower.
Mark- that engine house is very nice. The steamers look right at home in there.
Gandydancer- your layout is a beauty. ![]() Love your postwar collection.
Love your postwar collection.
I'm building a pole and flood light to put at the end of my new siding. Nothing photo worthy so you will have to take my word that it exists......
Bob
Gandydancer1950, that is a beautiful pair of NH 209 Alcos - gotta get me a set. Something to look for when York comes back!
Are yours postwar originals or the LCCA remakes?
Wow a lot sure is going on! It took me a couple pages, I didnt go all the way back to where I last read, that would have taken me forever! LOL But what I did see is very impressive! I havent done anything lately as life has gotten in the way. I sure hope to sneak into the train room sometime soon, but that all depends on the CEO plans! LOL
I hope everyone has a great day and finds time for there layouts and Trains! Remember Just have some fun!
Gandydancer 1950, I alway enjoy when you post pics of your layout. I agree with Lionelski, those are good looking NH Alcos.
Bob, sorry no excavating...........too much outdoor work. Your corner really came out nice.
Mark, engine house is going to look great on your layout.
Today I got a coat of paint on the framework and legs of the table. I'll let that dry and do a second coat. I already numbered all the legs and supports so when I take it apart I can put it back together with no problem.....Pic....Paul 2

Attachments
Images (1)
@Lionelski posted:Gandydancer1950, that is a beautiful pair of NH 209 Alcos - gotta get me a set. Something to look for when York comes back!
Are yours postwar originals or the LCCA remakes?
The 209 New Havens are originals.
I'm still doing. Just a break before the scroll saw comes out to play. My lovely bride needed a social security nap, so I started running trains. I cleaned and lubed my #736 Berkshire last night. While it was building steam in the yards, #317 A5 switcher put a caboose on four milk can tossers headed back to the dairy. The Berkshire came ready to work. New smoke fluid left a chain of smoke rings lingering over the main line. It was a smooth trip with no time delays. When the milk cars were home, the Berkshire in it's stall, I was struck by lightening in the form of a NEW SPUR! I had to dig deep to find enough "good enough for a spur" track. I grabbed my random wood for proof of concept. Next I will make a pattern.
I'll be back. 
Attachments
Images (1)


 Several weeks ago I removed the stripes on a K-line scale baggage car. The last few days I worked on kitbashing the large door to make resemble a B70 baggage car. It was not too complicated in theory, but paint colors and rivets were and the site of the bash stands out too much. I ended up brushing a very diluted wash of an acrylic wash to dull the car color to weather it and try to disguise the problem area. The actual PRR passenger color scheme evolved over the years and model makers attempts to capture were challenged. Pictured is a stock Weaver B60, my K-line kitbash, and a K-line RPO/baggage mail car with the gold stripes removed. I ran it late last night and plan to run it again tonight.
Attachments
Images (2)
Finally, the Lionel Union Pacific "Walter Dean" Observation is finished. It only took a month.
The other car in the Excursion 2-Pack #3 is the "City of Denver" Dining Car. It will need seat backs, painted details, people, and maybe a custom-built kitchen in the open space where the sound system would normally go. The car has no sound.
Here are a few pictures of the UP Walter Dean Excursion car.
Sincerely, John Rowlen

Attachments
Images (13)


Took a little trip to Chattanooga Tenn. Wow what a great railroad historic place. The incline railroad is awesome. Just the history of Look out mountain is really something. . On the way down on highway 24 is an awesome concrete trestle support which I plan to use as a replica on my railroad.. I love the history of our nation. The work men and women have put in to it is amazing. The financing of the incline railroad was a woman.
Attachments
Images (3)


Add Reply
Sign In To Reply
