Mark,

   Big Mike G is my kind of guy always thinking about putting the other guy to work so he can play with his Trains!  A thinking man no doubt about it.

Big Mike G,

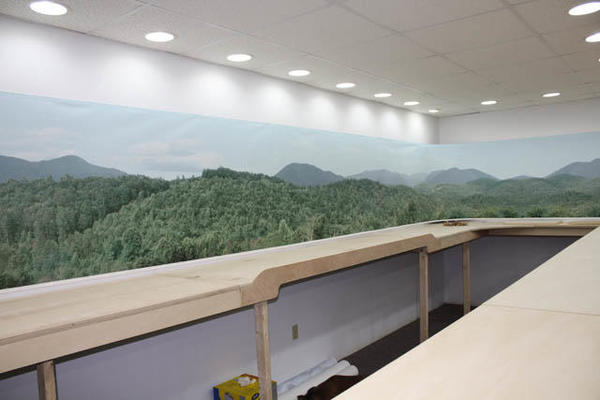
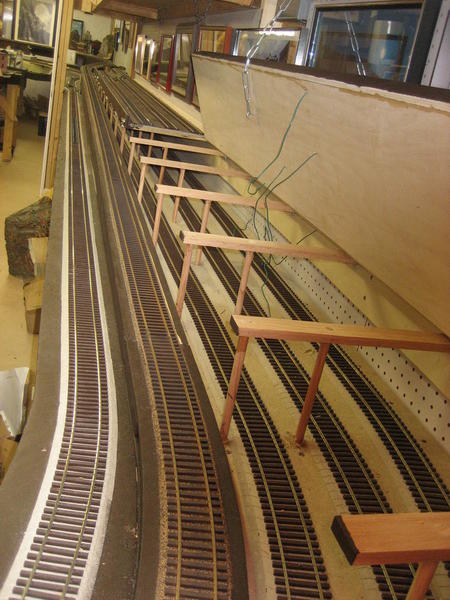
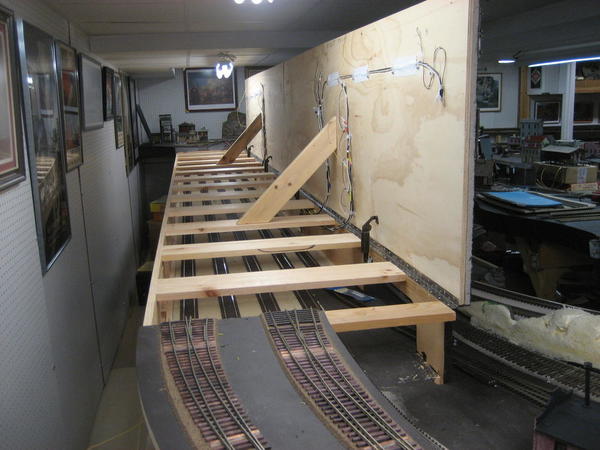
   The power drops run in a gap between the shelf and the wall on top of the shelf where you can hardly see them.  The wires run along the slot and come down at the power station, that is under construction in one of the corners of the Train room.  Works out real well due to the type of Brackets I used for the shelving and the 14 Gauge wire stiffness.  

PCRR/Dave

You can see the yellow wires in this picture that still need to be placed properly, they come out from under the shelving and are held on the wall, by a plastic electrical ties as they go into the Terminal Block.   It's working out pretty much like I planned, in fact the Bar Top Train layout will have its wiring routed in the same manner.  The bigger layout on the other side of the 29' room, will have its wiring drops connected to the over head layout also.  Placing the TIU up in the air on the wall between the layouts is working out well also, no signal loss at all so far, on any of the layouts under construction.

DSCN2390


Attachments

Images (1)
  • DSCN2390
Last edited by Pine Creek Railroad
Big_Boy_4005 posted:

I spent most of Christmas day inside the big helix, and finally finished all of the wiring. That means all of the feeders, ground and power, are connected to their buses. Also, all fourteen detection blocks are wired back to a terminal strip, and are ready to be extended over to the detection panel.

Yesterday, I stopped by the surplus store to get a few specific goodies for a couple of projects.

I found this really neat 24V motor with built in gear reduction box. Tried it on 12V, and it is almost slow enough for running the turntable. I'll keep dropping the voltage until I get it slow enough. I also picked up some belt gears to fit on both shafts. Just gotta figure out how to mount it.

IMG_7890

I might need a longer belt.

IMG_7891

I grabbed these large ring lugs for the uncoupler project, which I plan to get back on, after it stalled out due to technical difficulties. These are the last piece to the puzzle.

IMG_7892

I spackled most of the new backdrop. I need to get that sanded for Patrick, who should be coming over on Saturday.

IMG_7889

Finally, I want to get the last bit of fascia done this year. In prep for that, I added shims to the small helix. There is a lot more of this kind of stuff to do before Saturday.

IMG_7887IMG_7888

You, SIR, are Living The Dream!

Pine Creek Railroad posted:

Mark,

   Big Mike G is my kind of guy always thinking about putting the other guy to work so he can play with his Trains!  A thinking man no doubt about it.

Big Mike G,

   The power drops run in a gap between the shelf and the wall on top of the shelf where you can hardly see them.  The wires run along the slot and come down at the power station, that is under construction in one of the corners of the Train room.  Works out real well due to the type of Brackets I used for the shelving and the 14 Gauge wire stiffness.  

PCRR/Dave

You can see the yellow wires in this picture that still need to be placed properly, they come out from under the shelving and are held on the wall, by a plastic electrical ties as they go into the Terminal Block.   It's working out pretty much like I planned, in fact the Bar Top Train layout will have its wiring routed in the same manner.  The bigger layout on the other side of the 29' room, will have its wiring drops connected to the over head layout also.  Placing the TIU up in the air on the wall between the layouts is working out well also, no signal loss at all so far, on any of the layouts under construction.

DSCN2390


Thanks Dave, I hope you don't mind all the questions, but the yellow wire. I assume it has both red and black wires inside for your drops. If so where do you get the yellow wire, it looks so much cleaner then just a bunch of wires running everywhere! One more question that just came to mind is how do you attach the drops?

I'm still learning how to navigate this forum, so forgive me if I post or reply incorrectly. Anyway, an area of my shelf layout that has had some temporary bench work (been there since last year) & needed blended together, is in my cross hairs. The first pic is the eyesore & 2nd pic is the fix under construction; A dbl track trestle bridge with dbl support spans.IMG_20171231_095018[1]IMG_20171230_220754[1]IMG_20171230_220740[1] 

Attachments

Images (3)
  • IMG_20171231_095018[1]
  • IMG_20171230_220754[1]
  • IMG_20171230_220740[1]

Will Do. Gotta pickup some more wood pieces today when I take wife out for our anniversary (26th) dinner. Ahem! My woodworking tools are limited (jig saw-cutoff tool, handsaw, etc), but I'm not gonna let that hold me back. Not lookin to get graded on it (precision), but I am having fun! I have a jig drawn on bench so I get the angles of 2nd support to match.

Big Mike G,

   Unfortunately I purchased that particular high quality wire form a electrical Supply company years ago, that is no longer in electrical supply business.  You can purchase something similar on the Net from one of the Electrical Suppliers I am sure.  It's 14 Gauge Stranded has both Red & Black Stranded Wires inside the yellow otter shell. Neat and clean no doubt about it.

Wire identification nomenclature below.

Beckwith Electronic ENG  - P/N 25226 R-B  E57497  CL3P/FPLP  14AWG (UL)  Made in the USA.

PCRR/Dave


Attachments

Images (2)
  • DSCN2396
  • DSCN2394

Mike G, I agree with TOM TEE. A few years back when I decided to redo my wiring on the attic layout I emailed Steve at Ross Switches to ask where he got his wire for his switches. He said Way Tek. I found their web site where there is a lot of stuff and I was able to get 14 gauge in four colors for my mainlines and 20 or 22 gauge for the switches in the exact same colors on the switch machines and a color for the accessory power. Plus terminal strips and jumpers to make the strips all one. Now it is easier to trace any wiring problems. Paul F, that is a good idea about cork. I never used it because I don't ballast my whole track, just the sides and in freight yards where it gives me a little bit of ballast between the tracks. But this morning I pulled the nails out of the cork that dried from last night and painted them. Now I am waiting for the paint to dry so I can start applying some track. ballast, plaster in the area. Pics.............Paul

DSCN1186DSCN1187DSCN1189DSCN1190

Attachments

Images (4)
  • DSCN1186
  • DSCN1187
  • DSCN1189
  • DSCN1190

I've been working on my recent layout with the grand kids. We call it "The Mystery Mountain", because an 8' train completely disappears in 2.5' long mountain before it comes out the other side. I thought it would be cool to add some features with the grand kids names on it.

The junkyard is named after my grandson Mason (Mason's Junkyard). The produce stand is a play of words for my granddaughter Mackenzie, (Mack "N" Zee's produce) and the town was renamed Mackenzieville after my grand daughter.

They haven't seen the changes, it'll be a surprise for when they come over tomorrow.

3) lighted buildings [1)3) lighted buildings [2)3) lighted buildings [3)3) lighted buildings [4)


Attachments

Images (4)
  • 3) lighted buildings (1)
  • 3) lighted buildings (2)
  • 3) lighted buildings (3)
  • 3) lighted buildings (4)
RSJB18 posted:
Big_Boy_4005 posted:
Mark Boyce posted:

Elliot, The facia is looking good!  I’m looking forward to seeing the Mississippi River bridge!

Dave, the tin plate looks great up on the high line!!

Thanks Mark. It's going to be a while before I get to the actual bridge. I have to figure out how to build a straight bridge on a curve.

Image result for milwaukee road short line bridge

Image result for milwaukee road short line bridge

Image result for milwaukee road short line bridge

And how many times did we say " I'm never gonna need geometry in real life" in school......

Nice progress this week Eliot. The fascia really gives the layout a finished look. I need to put a couple of pieces on the front edge of my table too..a whole 4'

Thanks Bob. Totally agree about geometry. I use it all the time down here. I also agree the fascia does give the layout a finished look, even though there is no scenery. Starting tomorrow I'll be working on that, one scene at a time.

R.C. posted:

You, SIR, are Living The Dream!

Thanks R.C., I do believe I am, however sometimes it can be a nightmare. That's why I named my construction topic "My dream/nightmare layout". I'll be doing my year end review over there tonight just before midnight central time. It's going to be a big one, over 100 photos, and with luck a major new video.

Posting tip: when inserting photos have your cursor on a new line, that way they don't get bumped over from the text. Looks nicer.

Mike, when you order wire from them also get several bags of wire clamps.  I wouild suggest a bag of each size of their 6 smallest sizes.  They all take a #10 screw and a 100 count box is available at L & HD.

IMG_6962IMG_6935

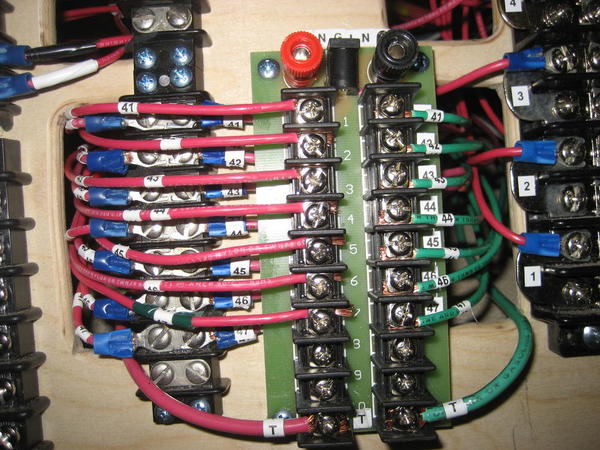
Plus, number tape.  There will be times when you will be using the same color wire for certain purposes.  It is available 0 to 49 and 50 to 99 plus an alpha series.

panels 020

This job has 8 control panels with about 70 blocks so I ran out of colors early.

Attachments

Images (3)
  • IMG_6962
  • IMG_6935
  • panels 020

This afternoon I decided to plaster first. I mixed up a batch and went as far as I could. I used a plastic spoon this time to lay down the plaster near the back of the layout. I am going to make something like a drainage ditch between the tracks ending up in a small little pond at the other end. So for tonight that is it till tomorrow ater the plaster has dried... Pics.................Paul

DSCN1191DSCN1192DSCN1193DSCN1194DSCN1195DSCN1196

Attachments

Images (6)
  • DSCN1191
  • DSCN1192
  • DSCN1193
  • DSCN1194
  • DSCN1195
  • DSCN1196
Tom Tee posted:

Mike, when you order wire from them also get several bags of wire clamps.  I wouild suggest a bag of each size of their 6 smallest sizes.  They all take a #10 screw and a 100 count box is available at L & HD.

IMG_6962IMG_6935

Plus, number tape.  There will be times when you will be using the same color wire for certain purposes.  It is available 0 to 49 and 50 to 99 plus an alpha series.

panels 020

This job has 8 control panels with about 70 blocks so I ran out of colors early.

Very nice job Tom. I use the numbers too. A real savior sometimes when tracing wires. I had a label maker too but it died. Need to get another one.

Tom Tee posted:

Mike, 

The slots.

When I do a bunk bed staging I usually hinge the top deck for access like this:

toy boxes 005

toy boxes 008

This permits physical and visual access.  However this time  I am going to use a fixed top deck with observation slots between the supports for visual access only.

Because the lower tracks are so  open  and accessible I do not feel the need to have a hinged deck.  Here is a shot of the lower deck uncovered:

IMG_8487

This is an off stage work room with hidden turntables serving three different branch line ends.

IMG_8491

As far as a track plan goes, well, er, I have  changed it so much that posting it would only be misleading.   This is a tee shaped  2k sq ft basement with an interchange yard serving five branch lines mounted off the wall.  Lots of of track, 87 turnouts, five turntables, 9 CM-20  powerpacks, three Dallee power packs and ten Z-1000 AC packs with 9 panels. 90% benchwork done, 80% of track down, several panels need built.  A maze of wires run and more to go.  Should have gone R/C battery.


An early shot before changes:

IMG_7687

The long arch bridges are now in the far back at top of photo below:

IMG_7700IMG_7699

Beautiful bench work and track work.

RSJB18 posted:
Big_Boy_4005 posted:
Mark Boyce posted:

Elliot, The facia is looking good!  I’m looking forward to seeing the Mississippi River bridge!

Dave, the tin plate looks great up on the high line!!

Thanks Mark. It's going to be a while before I get to the actual bridge. I have to figure out how to build a straight bridge on a curve.

Image result for milwaukee road short line bridge

Image result for milwaukee road short line bridge

Image result for milwaukee road short line bridge

And how many times did we say " I'm never gonna need geometry in real life" in school......

Nice progress this week Eliot. The fascia really gives the layout a finished look. I need to put a couple of pieces on the front edge of my table too..a whole 4'

I got a 100 on my geometry regents for what it's worth! LOL

Tom Tee posted:

Elliot, Have you given any consideration to having a Backdrop Warehouse wall paper installed on your above track fascia?  You can get a 18" tall by 6' sample from them for a small fee.  It really makes a plain area come alive.

Joe, Summer '09 017


Actually Tom I have looked at Backdrop Warehouse, and saw a couple things that might work for the scenes I'm doing. Most however are more specific, and I'm going to have to go out and take pictures and have them blown up. One of the four aisles will be a winter scenes. Fortunately I model the local area, so it's easy to get what I need.

Tom Tee posted:

Mike, when you order wire from them also get several bags of wire clamps.  I wouild suggest a bag of each size of their 6 smallest sizes.  They all take a #10 screw and a 100 count box is available at L & HD.

IMG_6962IMG_6935

Plus, number tape.  There will be times when you will be using the same color wire for certain purposes.  It is available 0 to 49 and 50 to 99 plus an alpha series.

panels 020

This job has 8 control panels with about 70 blocks so I ran out of colors early.

Tom, I want to thank you for all the information. I am saving it in my Track planning file. I have a track plan just not sure about wiring it. when I get to that point I hope you wont mind more questions! all your wiring looks just great! I hope to make mine look like that this time around. Last layout it was just red and black wire for everything and man was that a PIA when trying to trace wires for problems. Also this time around I will do the test as I go along, cause last time I just wired everything and then started to pull my hair out trying to find problems! Thanks again.

I would have responded earlier but Momma had me putting in a yard drain which ment digging down 2 feet to run a pipe to the drainage ditch in the front of our house! NOT FUN!

"HAPPY NEW YEAR" everyone. We're at the post and we're off. 2018 here we come. This morning was a plus and a little minus. As an after thought I decided to take a a bit of ballast from the track to add some culvert pipes which I made out of straws. Well as my luck goes I was too energetic in prying up the ballast. I wiped out a bit of the plaster I put down last night. So water over the dam. I applied earth color to all the rest of the plaster. I'll go back later and try to make a batch of plaster up small enough for that one section and maybe paint where the water will go. I glued the straws in place and as soon as it dries I have some aged concrete paint to paint the straws. Pics................Paul

DSCN1197DSCN1198DSCN1199DSCN1200DSCN1201

Attachments

Images (5)
  • DSCN1197
  • DSCN1198
  • DSCN1199
  • DSCN1200
  • DSCN1201
Big_Boy_4005 posted:
Tom Tee posted:

Elliot, Have you given any consideration to having a Backdrop Warehouse wall paper installed on your above track fascia?  You can get a 18" tall by 6' sample from them for a small fee.  It really makes a plain area come alive.

Joe, Summer '09 017


Actually Tom I have looked at Backdrop Warehouse, and saw a couple things that might work for the scenes I'm doing. Most however are more specific, and I'm going to have to go out and take pictures and have them blown up. One of the four aisles will be a winter scenes. Fortunately I model the local area, so it's easy to get what I need.

Hey Elliot- I was watching the Arial America series the other day and they did an episode featuring Minnesota. Around the Twin Cities they actually showed many of the areas you are modeling. I was kinda half listening until I heard them mention Pigs Eye and Red Wing. Was neat to put the real places together with your adventure.

Bob

R.C. posted:

Not sure how to continue from the bridge construction thread , but, it's ready for paint!IMG_20171231_232308[1]IMG_20171231_232321[1]

And here's the problem; If I wanna spray it rusty red primer, gotta do it in the mower shop; Brush painting would be tedious. suggestions?

IMG_20180101_082355[1]

Thanks for the posting tips  & encouragement all.

You may wish to add the angle supports at the top and bottom of each vertical and end.  No need to copy all the lattice work just the basic angle outline.  You can go as nuts as you want.  Even add web plates at all junctures.  Maybe hold off on the paint until you have given it some thought.

Possibly check out an Atlas Pratt truss to get some ideas. 

Add Reply

Post

OGR Publishing, Inc., 1310 Eastside Centre Ct, Suite 6, Mountain Home, AR 72653
800-980-OGRR (6477)
www.ogaugerr.com

×
×
×
×
Link copied to your clipboard.
×
×