Bob I think I saw Gunrunner John post a cool kit for changing them over.
Jim


|
|
Bob I think I saw Gunrunner John post a cool kit for changing them over.
Jim
briansilvermustang posted:
I like the Western Maryland engines Brian!!
Thank you everyone for the comments about me getting started on the layout benchwork. No work today.
Paul, The tanks look great and so does the sceniced base!
Mo, I have done what the others said; the 50/50 mix with a drop of dish soap. When in N-scale, the ballast was so fine, it was hard to get it smooth even with the 50/50 mix. HO wasn't so bad. I anticipate O gauge being a lot more forgiving.
Lee, The sign looks great weathered. It looks just like it came from a small railroad from long ago.
Warok, Your scenes look great! Very nice detail.
Bob, the RPO is looking good. Yes, once you dig into something, there is always something more to do.
I finally hung the WW2 flatcar builder's plate my brother recently gave me. I used a pair of the adhesive hooks as no conventional hook would work for the hole sizes. Each hook is rated for 5 pounds so it should hold it up.
I think it worked well.

This is hanging when you first walk into the room, to the right. If the door is open completely, though, you wouldn't be able to see it.
Well, I finally got a start on my scaled down layout. It's 3 x 12 and 48" above the floor. I didn't want to move the paint storage shelving. I have a light for the underside of the platform, so finding the right color paint should be a bit easier. I used 36" hollow core doors with 1/2" Homasote on top. This is what I accomplished today.

Dan Padova posted:Well, I finally got a start on my scaled down layout. It's 3 x 12 and 48" above the floor. I didn't want to move the paint storage shelving. I have a light for the underside of the platform, so finding the right color paint should be a bit easier. I used 36" hollow core doors with 1/2" Homasote on top. This is what I accomplished today.
Oh man I couldn't have that cable hanging thing! I'd hurt myself bad with that! Bench work looks great! What type of layout do you have planned?
Jim
eight ball anyone........?

Ooops .. Son just sent me another picture of the bridge I meant to post. What do you guys think about adding handrails on the deck of the bridge?
Jim

Well this weekend saw a great deal of activity. The CEO I work under has advised me that there will be a significant upgrade in flooring through out. So the two rooms with layouts needed to be dismantled. I purchased six large totes from Costco and six smaller ones. Over the corse of two days we packaged the entire layouts.
And today I was able to go to the Golden State RR train Show and purchased two horse cars I was looking for, a helicopter, and folding wing plane, some G gauge people and some plastic trestles.
And in an online auction I was able to secure an oil derrick and coal loader i had been looking for.
So this was a very good weekend. Come March I will post some photos of the new layout design and instal that will be taking place.
Till then I have some wall patching to do and a lot of painting. Yes Dear...
gandydancer1950 posted:eight ball anyone........?
Great detail here (as I've grown to expect from your work), I especially love the discarded newspaper!
carsntrains posted:
Ooops .. Son just sent me another picture of the bridge I meant to post. What do you guys think about adding handrails on the deck of the bridge?
Jim
Well, *I* would. That thing looks intimidating, especially the drop off the edge... ![]()
Don't forget to add someone bungee-jumping off it! ![]()
Mitch
p51 posted:gandydancer1950 posted:eight ball anyone........?
Great detail here (as I've grown to expect from your work), I especially love the discarded newspaper!
Thanks Lee....
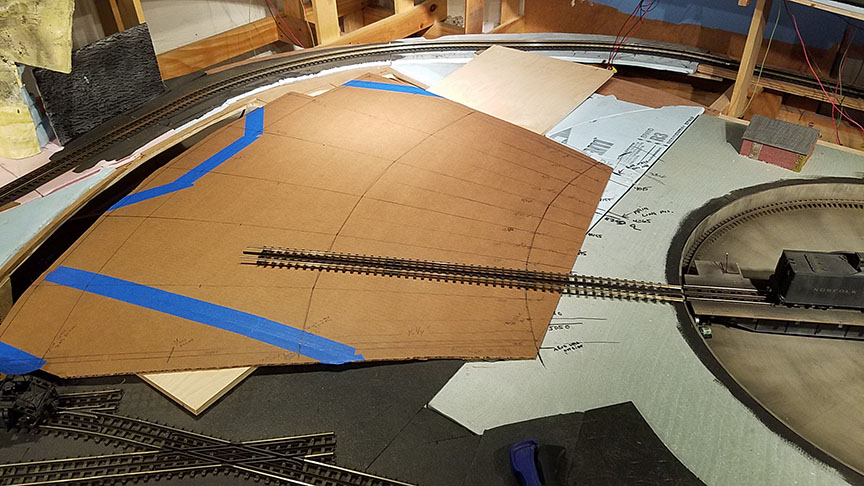
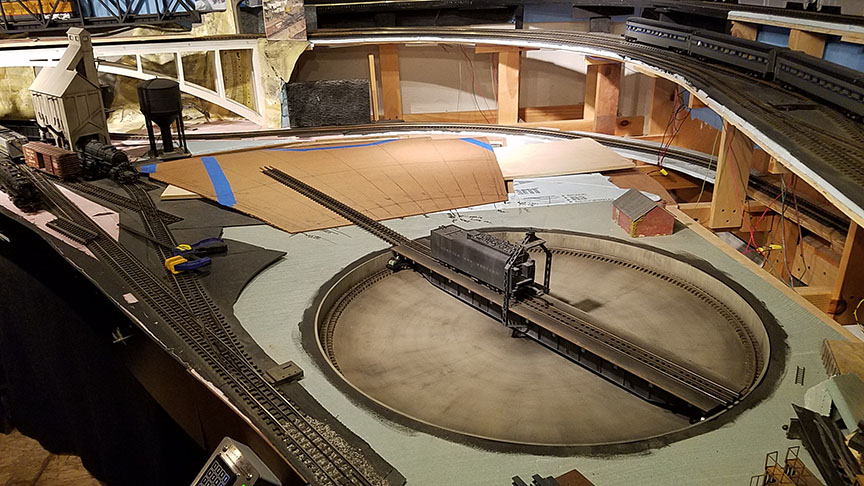
Did some needed demolition of the roundhouse ( Brennans). I had to dis-mantel what I had started a couple years ago, since I had pulled out my scratch built turntable 33" in diameter and installed one of my production units 34". Since the geometry changed I need to reconfigure the tracks and stall layout. So I made up a template and set it back 11" from pit wall and laid out the stalls and outer walls. I am also going to be installing the Mianne Benchwork lift table beneath the roundhouse for easy access to all 3 levels of tracks that run behind the roundhouse in that corner of the layout. I am going with a 30x30" lift table and securing the new roundhouse base to that. This way I can raise and lower the entire roundhouse without moving anything out. I hope to get it soon so I can get the roundhouse rebuilt .
It will be a 6 stall and will have 5 of them long enough for big boys etc. ![]()
carsntrains posted:
Ooops .. Son just sent me another picture of the bridge I meant to post. What do you guys think about adding handrails on the deck of the bridge?
Jim
My vote is for a railing. Also does the real one have ballasted roadbed on the deck?; If not, i'd figure a way to eliminate the Fastrack on the bridge - perhaps substituting Gargraves on the deck and raising the level of the deck to compensate for the difference in height. If it does then all is OK as is.
Finally figured out how to program a TMCC engine into Legacy controller.
This is on a of my favorite engines, oldie & goodie 
I love the DRG
Ran trains tonight for about 1 hour and took some photos. Had BIG fun!!!


South Main Street in Elizabeth City....
Dan Padova posted:Well, I finally got a start on my scaled down layout. It's 3 x 12 and 48" above the floor. I didn't want to move the paint storage shelving. I have a light for the underside of the platform, so finding the right color paint should be a bit easier. I used 36" hollow core doors with 1/2" Homasote on top. This is what I accomplished today.
48" is my height as well. I was a little apprehensive at first, but now I am SO GLAD I went with the extra height. Your back will love you for it.
Thanks guys!
Mike - It always looks like I'm getting so much done when I write about it, but to me I feel like I'm moving at a snail's pace. Now when Patrick comes over, we move with purpose. I'm not sure if I would have even persisted with this monster if I hadn't had all the help. Patrick has been helping me for the last five years, though the last three it has been less frequent than it was for the first two. He does have his own layout, and I'm a little surprised that he doesn't post about it. I've seen pics and videos.
Matt - Time lapse would be cool, but it would require so many camera positions to to capture all the action. From time to time, I do take a batch of pics, trying to capture the same angles a year apart. I'll have to bring the laptop down so I can create a new set based on an existing set, more of a before and after.
Bob - That's alright, I run out of words at times too. It's the thought that counts.
BTW gang, I did put in another full day today. More of the same for the most part, roadbed carving, filling between tracks, plywood painting, and some ballasting. I did do one new thing, I started dragging the scenery materials that I've been storing for the last 25 years. Time to start putting them to use.![]()
LaramieJoe posted:Dan Padova posted:Well, I finally got a start on my scaled down layout. It's 3 x 12 and 48" above the floor. I didn't want to move the paint storage shelving. I have a light for the underside of the platform, so finding the right color paint should be a bit easier. I used 36" hollow core doors with 1/2" Homasote on top. This is what I accomplished today.
48" is my height as well. I was a little apprehensive at first, but now I am SO GLAD I went with the extra height. Your back will love you for it.
Mine is roughly 49" as the legs are 48" and then the track goes over that with the plywood between.
My wife, who isn't quite 5' 2" said I was building it too high, but once it was done she didn't say anything about the height at all. I'm 6' tall and I think it's a good height. I can sit in one of the tall stools I bought and the trains are almost at eye level. And when I stand, I can still pretty much reach anything on the layout itself.

carsntrains posted:
Ooops .. Son just sent me another picture of the bridge I meant to post. What do you guys think about adding handrails on the deck of the bridge?
Jim
The hand rails will give it more detail, I would add them. If you want to add ballast, I found that if you spread glue on the side of the FT and sprinkle the ballast over it. It improves the look of the track by getting rid of the shiny plastic look.
Here's a sample from mine.


p51 posted:LaramieJoe posted:Dan Padova posted:Well, I finally got a start on my scaled down layout. It's 3 x 12 and 48" above the floor. I didn't want to move the paint storage shelving. I have a light for the underside of the platform, so finding the right color paint should be a bit easier. I used 36" hollow core doors with 1/2" Homasote on top. This is what I accomplished today.
48" is my height as well. I was a little apprehensive at first, but now I am SO GLAD I went with the extra height. Your back will love you for it.
Mine is roughly 49" as the legs are 48" and then the track goes over that with the plywood between.
My wife, who isn't quite 5' 2" said I was building it too high, but once it was done she didn't say anything about the height at all. I'm 6' tall and I think it's a good height. I can sit in one of the tall stools I bought and the trains are almost at eye level. And when I stand, I can still pretty much reach anything on the layout itself.
My table is 48" high. I had to go over the top of some file cabinets. I'm 6'5" so the added height is fine with me.
Dan- I would recommend covering the support cables with something to make them more visible. Hitting them with a swing of the arm will hurt a lot. You could split a piece of PVC pipe and hold it in place with a couple of hose clamps.
Bob
Lee, you have a eye for the little details that make your scenes even better...........Great job...........Paul


carsntrains posted:Bob I think I saw Gunrunner John post a cool kit for changing them over.
Jim
I have a roll of 12V LED's that I may try. I will look for GRG's post. Tx
p51 posted:I took an image of a gum label I found on eBay, a product made in Elizabethton, Tennessee, and printed it about the size I would think that a grocery store sign would be. Then, I use white glue and attached it to the Country Store.It's little details like this, that I really like doing.It's the middle sign, the thin horizontal one.
Excellent work Lee, I like adding small details like signage also!
p51 posted:I took an image of a gum label I found on eBay, a product made in Elizabethton, Tennessee, and printed it about the size I would think that a grocery store sign would be. Then, I use white glue and attached it to the Country Store.It's little details like this, that I really like doing.It's the middle sign, the thin horizontal one.
That looks JUST LIKE the gas stations I used to hang out at when I was a kid! And I just trolled your profile page and saw the camera - aside from just plain photography talent, that helps to explain the quality of your pics! Now don't tell me you took this one with a Brownie!! ![]()
Another slow morning in the basement watching and waiting for the glue to dry. Got the fueling shed together and waiting for the glue to dry so I can touch up the hoses and paint the nozzles. Glued the ground turf to the base of the main building, And starting putting together the main building. Also started the piping for the unloading and loading at trackside. I will say that since I posted the sign at the foot of the stairs saying no alcohol beyond this point during construction things have gone together much better LOL.......Pics............Paul


Ran some trains. Enjoyed every moment. Nothing like engaging the imagination!![]()
![]()
![]()
Trying some different things out, used some plaster cloth over cardboard strips to get a base, then I put down some drywall compound (stuff I had laying around) and put a base coat of paint in a few areas. Some of the area was pretty rough, but once the ground cover is down, I don't think it mattered. I was afraid that I need to sand it down a little, but tried it as it was and so for I like the results. I may also add a few shrubs or something of the like on the front parts, then make most of the back/steep parts rocky terrain.


paul 2 posted:Another slow morning in the basement watching and waiting for the glue to dry. Got the fueling shed together and waiting for the glue to dry so I can touch up the hoses and paint the nozzles. Glued the ground turf to the base of the main building, And starting putting together the main building. Also started the piping for the unloading and loading at trackside. I will say that since I posted the sign at the foot of the stairs saying no alcohol beyond this point during construction things have gone together much better LOL.......Pics............Paul
Gee Paul- I thought the sign was just a suggestion, not a hard and fast rule. ![]()
I get what you mean though. I often make "adult beverage" induced errors.


Elliot what do you mean by carving roadbed? always a good read when you post daily or month end accomplishments.
Thaddeus, the scenery is looking great, no matter what material you use!
Yesterday I ran trains for a bit, and took some pictures. I don't get down to work on my layout a lot. Though I think I need to yank everything up and redo all my wiring. As well as add a second transformer to my input power.
Is it possible to do a jumper between 2 inputs on the TIU in order to phase the Z-1000s I have on my layout?


StPaul posted:Elliot what do you mean by carving roadbed? always a good read when you post daily or month end accomplishments.
What I mean Ray, is just what it sounds like. This area has the excess fiberboard mostly removed to form a proper profile. I still have a little left on that top track, but I'll have to climb in there to get it.
That black coating is miserable. The brown on the right, is much easier. I still have a bunch left to do, mostly on the upper deck. Maybe that's why my shoulder hurts.

tcochran posted:Yesterday I ran trains for a bit, and took some pictures. I don't get down to work on my layout a lot. Though I think I need to yank everything up and redo all my wiring. As well as add a second transformer to my input power.
Is it possible to do a jumper between 2 inputs on the TIU in order to phase the Z-1000s I have on my layout?
I phase my transformers at the transformer. But I don't use DCC so I cant say about that.
Jim
carsntrains posted:
I got one side of the bridge detailed and ready to paint! I put a slightly wider upright every fifth one, similar to a bridge over the French Broad river near Knoxville TN. And took another shot from a bit higher so yall can see the S curve in the bridge! Very satisfied so far with my first real building project for a train layout! Think we have decided on green for color if I can figure out what color green they paint bridges!!!
Looks great @carsntrains! I'm currently considering building something similar for my elevated line - do you have any additional details as to how you built/assembled this? I can tell you used a jig saw and plywood for the track support and balsa wood for the uprights, but what did you use for the curved girder sides (black) that the uprights are glued to?
Access to this requires an OGR Forum Supporting Membership


