decoynh posted:briansilvermustang posted:Brian that turntable looks as old as I am LOL. I like the mix of the real Canadian Pacific TT with your O gauge Lionel. Is the TT manual or electric?
a manual home made turntable...


|
|
decoynh posted:briansilvermustang posted:Brian that turntable looks as old as I am LOL. I like the mix of the real Canadian Pacific TT with your O gauge Lionel. Is the TT manual or electric?
a manual home made turntable...
Deuce posted:beardog posted:Deuce posted:Got all the cover down. Then tested it with my Amtrak Silver Spike (with B unit addition) set that I way overpaid for. Honestly, doesn't sound quieter but looks better than the OSB board.
The Amtrak sparks and the lights flicker. Need to figure out why ...
flickering and sparks are usually dirty track and wheels
I'm going to assume dirty wheels because it's new FT and everything else doesn't spark. Wouldn't hurt to give it a wipe down anyways.
Deuce- I have bought a lot of used equipment. First thing I do is clean all the wheels and pick up rollers, and lubricate the engines. If its an older engine I clean out all the old grease and replace with new.
Bob
Bit of a special day on the RSJ&B. I was going through some photos last week and realized that today is the 2 year anniversary of the start of construction! Now - by no means is my humble layout much, but its mine and its the first permanent layout I've had in 30+ years. Hopefully not my last either. ![]()
Most important of all is that I joined this forum around the same time and have learned a ton of stuff from everyone and made maybe a few less mistakes. I hope that my contributions have helped someone else along the way too.
Finally a huge THANK YOU! to all of you who comment and support my little endeavor. The support and encouragement from everyone here is amazing. Maybe we can transfer some of the good will from here to Washington DC. ![]()
Happy Anniversary to my layout!
Here are photos from day one to last night.
Bob


NYC 428 posted:Just an FYI, if you need to replace the magnet on a flywheel, remove the motor from the locomotive and place it in your freezer. When its nice and frozen the magnet will slip right on. Once the motor is back to room temp re-install.
No need for a puller or cutting the magnet.
Interesting, thanks for the tip - I assume when you say it'll slip on, you mean over the motor housing (bottom-up) and not the top of the flywheel, correct? Just looking at this motor, I'd be surprised if the magnet would clear the top of the flywheel, even if the flywheel shrinks a bit at a cold temp.
RSJB18 posted:Bit of a special day on the RSJ&B. I was going through some photos last week and realized that today is the 2 year anniversary of the start of construction! Now - by no means is my humble layout much, but its mine and its the first permanent layout I've had in 30+ years. Hopefully not my last either.
Most important of all is that I joined this forum around the same time and have learned a ton of stuff from everyone and made maybe a few less mistakes. I hope that my contributions have helped someone else along the way too.
Finally a huge THANK YOU! to all of you who comment and support my little endeavor. The support and encouragement from everyone here is amazing. Maybe we can transfer some of the good will from here to Washington DC.
Happy Anniversary to my layout!
Here are photos from day one to last night.
Bob
Wow, Bob... you sure packed a lot into a fairly small space - very nice job. Happy Anniversary!!!
I can't imagine where you fit 14 switches in there ![]()
![]()
![]()
Congratulations, Bob!!! We are glad you are here!!
RSJB18 posted:Bit of a special day on the RSJ&B. I was going through some photos last week and realized that today is the 2 year anniversary of the start of construction! Now - by no means is my humble layout much, but its mine and its the first permanent layout I've had in 30+ years. Hopefully not my last either.
Most important of all is that I joined this forum around the same time and have learned a ton of stuff from everyone and made maybe a few less mistakes. I hope that my contributions have helped someone else along the way too.
Finally a huge THANK YOU! to all of you who comment and support my little endeavor. The support and encouragement from everyone here is amazing. Maybe we can transfer some of the good will from here to Washington DC.
Happy Anniversary to my layout!
Here are photos from day one to last night.
Bob
Bob,
Every time I see photo's of your layout, I get another idea for my own. Thank you for the photos!
RSJB18 posted:Deuce posted:beardog posted:Deuce posted:Got all the cover down. Then tested it with my Amtrak Silver Spike (with B unit addition) set that I way overpaid for. Honestly, doesn't sound quieter but looks better than the OSB board.
The Amtrak sparks and the lights flicker. Need to figure out why ...
flickering and sparks are usually dirty track and wheels
I'm going to assume dirty wheels because it's new FT and everything else doesn't spark. Wouldn't hurt to give it a wipe down anyways.
Deuce- I have bought a lot of used equipment. First thing I do is clean all the wheels and pick up rollers, and lubricate the engines. If its an older engine I clean out all the old grease and replace with new.
Bob
Deuce, quick question, how did you fasten the track down? Do the fasteners go all the way to the table under the
sound board. If so that may be where some of the noise is coming from.
mattrain posted:NYC 428 posted:Just an FYI, if you need to replace the magnet on a flywheel, remove the motor from the locomotive and place it in your freezer. When its nice and frozen the magnet will slip right on. Once the motor is back to room temp re-install.
No need for a puller or cutting the magnet.
Interesting, thanks for the tip - I assume when you say it'll slip on, you mean over the motor housing (bottom-up) and not the top of the flywheel, correct? Just looking at this motor, I'd be surprised if the magnet would clear the top of the flywheel, even if the flywheel shrinks a bit at a cold temp.
It should slip over the top of the flywheel. Different metals contract at different rates, however, it only needs to contract a tiny amount in order to accommodate the magnet.
beardog posted:RSJB18 posted:Deuce posted:beardog posted:Deuce posted:Got all the cover down. Then tested it with my Amtrak Silver Spike (with B unit addition) set that I way overpaid for. Honestly, doesn't sound quieter but looks better than the OSB board.
The Amtrak sparks and the lights flicker. Need to figure out why ...
flickering and sparks are usually dirty track and wheels
I'm going to assume dirty wheels because it's new FT and everything else doesn't spark. Wouldn't hurt to give it a wipe down anyways.
Deuce- I have bought a lot of used equipment. First thing I do is clean all the wheels and pick up rollers, and lubricate the engines. If its an older engine I clean out all the old grease and replace with new.
Bob
Deuce, quick question, how did you fasten the track down? Do the fasteners go all the way to the table under the
sound board. If so that may be where some of the noise is coming from.
Zero fastening at the moment. Wasn't even sure I was going to fasten the FT since given the environment (no heat, no AC), I didn't want buckling to occur.
Paul, Mark, Deuce,
Thank you!
Paul- yea it's tight. I may have gotten a bit ahead of myself but they are all there are are all operational. There is one manual on the small engine yard so its actually 15 switches ![]()
Bob


An engineering marvel, Bob!!! I wouldn’t attempt it myself. Too simple minded here! LOL
Deuce posted:beardog posted:RSJB18 posted:Deuce posted:beardog posted:Deuce posted:Got all the cover down. Then tested it with my Amtrak Silver Spike (with B unit addition) set that I way overpaid for. Honestly, doesn't sound quieter but looks better than the OSB board.
The Amtrak sparks and the lights flicker. Need to figure out why ...
flickering and sparks are usually dirty track and wheels
I'm going to assume dirty wheels because it's new FT and everything else doesn't spark. Wouldn't hurt to give it a wipe down anyways.
Deuce- I have bought a lot of used equipment. First thing I do is clean all the wheels and pick up rollers, and lubricate the engines. If its an older engine I clean out all the old grease and replace with new.
Bob
Deuce, quick question, how did you fasten the track down? Do the fasteners go all the way to the table under the
sound board. If so that may be where some of the noise is coming from.
Zero fastening at the moment. Wasn't even sure I was going to fasten the FT since given the environment (no heat, no AC), I didn't want buckling to occur.
In that case I would try to find some reallly thin foam rubber and put it under the track. That may help with
the noise. I think your board is too hard to really be effective. the noise is vibration which the board will transmit
right to the table top which will amplify it. Kinda like if you close a window it deadens the noise from outside, but if
someone taps on the glass, the vibrations travel right thru the glass and and you can hear it clearly.
Is the sound board glued down?
Mark Boyce posted:An engineering marvel, Bob!!! I wouldn’t attempt it myself. Too simple minded here! LOL
Thanks Mark! part of the problem is I was designing in HO in my head. When you start looking at O gauge in real life its very different.
RSJB18 posted:Paul, Mark, Deuce,
Thank you!
Paul- yea it's tight. I may have gotten a bit ahead of myself but they are all there are are all operational. There is one manual on the small engine yard so its actually 15 switches
Bob
Bob;
Is that your layout plan or a map of the intersection of the LIE and the BQE??? As I said, you packed a lot of action into your space. Very impressive job.
And you shouldn't have shown that to Duece... he is already on the slippery slope and has one foot on a banana peel ![]()
![]()
![]()
Yes, I have that problem too! It is really hard when we have such small space.
beardog posted:Deuce posted:beardog posted:RSJB18 posted:Deuce posted:beardog posted:Deuce posted:Got all the cover down. Then tested it with my Amtrak Silver Spike (with B unit addition) set that I way overpaid for. Honestly, doesn't sound quieter but looks better than the OSB board.
The Amtrak sparks and the lights flicker. Need to figure out why ...
flickering and sparks are usually dirty track and wheels
I'm going to assume dirty wheels because it's new FT and everything else doesn't spark. Wouldn't hurt to give it a wipe down anyways.
Deuce- I have bought a lot of used equipment. First thing I do is clean all the wheels and pick up rollers, and lubricate the engines. If its an older engine I clean out all the old grease and replace with new.
Bob
Deuce, quick question, how did you fasten the track down? Do the fasteners go all the way to the table under the
sound board. If so that may be where some of the noise is coming from.
Zero fastening at the moment. Wasn't even sure I was going to fasten the FT since given the environment (no heat, no AC), I didn't want buckling to occur.
In that case I would try to find some reallly thin foam rubber and put it under the track. That may help with
the noise. I think your board is too hard to really be effective. the noise is vibration which the board will transmit
right to the table top which will amplify it. Kinda like if you close a window it deadens the noise from outside, but if
someone taps on the glass, the vibrations travel right thru the glass and and you can hear it clearly.
Is the sound board glued down?
No, it's not glued down. Trying to make the layout as "un-permanent" as possible, because once I permanent-ize it, I'll need to make a change.
Apples55 posted:RSJB18 posted:Paul, Mark, Deuce,
Thank you!
Paul- yea it's tight. I may have gotten a bit ahead of myself but they are all there are are all operational. There is one manual on the small engine yard so its actually 15 switches
Bob
Bob;
Is that your layout plan or a map of the intersection of the LIE and the BQE??? As I said, you packed a lot of action into your space. Very impressive job.
And you shouldn't have shown that to Duece... he is already on the slippery slope and has one foot on a banana peel

I'm already trying to figure out how I can work that upper level into my layout. Should be space to fit, and I have the trains to run on it ... question is, do I need to grab anything at Home Depot?
Deuce posted:Apples55 posted:RSJB18 posted:Paul, Mark, Deuce,
Thank you!
Paul- yea it's tight. I may have gotten a bit ahead of myself but they are all there are are all operational. There is one manual on the small engine yard so its actually 15 switches
Bob
Bob;
Is that your layout plan or a map of the intersection of the LIE and the BQE??? As I said, you packed a lot of action into your space. Very impressive job.
And you shouldn't have shown that to Duece... he is already on the slippery slope and has one foot on a banana peel
I'm already trying to figure out how I can work that upper level into my layout. Should be space to fit, and I have the trains to run on it ... question is, do I need to grab anything at Home Depot?
Should I apologize to his wife now or after he brings home the lumber. ![]()
Paul- I was thinking more along the lines of the Harold Interlocking and Sunnyside yards. ![]()
ok, here is a suggestion, when you make your home depot run pick up enough foam carpet
padding to fit under the sound board, this will effectively give you an air layer and should
nullify a lot of the sound transmission
RSJB18 posted:Bit of a special day on the RSJ&B. I was going through some photos last week and realized that today is the 2 year anniversary of the start of construction! Now - by no means is my humble layout much, but its mine and its the first permanent layout I've had in 30+ years. Hopefully not my last either.
Most important of all is that I joined this forum around the same time and have learned a ton of stuff from everyone and made maybe a few less mistakes. I hope that my contributions have helped someone else along the way too.
Finally a huge THANK YOU! to all of you who comment and support my little endeavor. The support and encouragement from everyone here is amazing. Maybe we can transfer some of the good will from here to Washington DC.
Happy Anniversary to my layout!
Here are photos from day one to last night.
Bob
Bob, you have a great looking layout! For the detail you have there I would have guessed more then 2 years! Your moving right along, Great work! Keep it up!![]()
Thanks Mike 😁

Put up some background paper in the basement
I spent the evening running trains and plotting my next move! : ) Told myself I was only going to buy track related stuff and blew that out of the water over the past few days. Now I have to wait to buy track related stuff !!! URRRRGGGG I want to add another double ended siding on the long wall. Can yall believe that even with a 17 foot room, using 072 curves I can barely fit the Wabash Cannonball on the longest siding? Hmmmm I could go through another wall............................
Jim
carsntrains posted:I spent the evening running trains and plotting my next move! : ) Told myself I was only going to buy track related stuff and blew that out of the water over the past few days. Now I have to wait to buy track related stuff !!! URRRRGGGG I want to add another double ended siding on the long wall. Can yall believe that even with a 17 foot room, using 072 curves I can barely fit the Wabash Cannonball on the longest siding? Hmmmm I could go through another wall............................
Jim
Do it Jim DO IT! I am sure the wife wont mind! Just tell her it was the the only thing that would work! LOL![]()
Wife was feeling run down tonight, so I sent her to bed right after dinner. Even with having to get both kids ready for bed, I was able to get more done than I imagined. The O27 track isn't connected, but it's laid out, and gives me more room between it and my inner track than I expected. You know what that means? The elevated level is a GO! I figure an inch thick dowel cut to size, with a strip connecting two of them at the top, and secured to 1.5" bases screwed down into the plywood underneath the "soundproofing layer" will keep it pretty secure ... then run 2" by 1/2" thick strips between that, to which I affix O27 track ... and it'll be good to go. I think.
So I may extend the sidings by 4 to 8" on each one, but otherwise the inner loop is completed. Just need to make all the connections tight so they don't come apart while running, and then get the three remote switches (two thanks to @Apples55 and one an eBay find) working. Also need to thank Paul for sending me two bumpers, which went on the ends of the Inglenook Sidings. Other than that, just need to organize, and clean up the tabletop. I need to figure out what locomotive will run the shunting puzzle. Right now I'm leaning towards my LC Thomas, though I'd love to get my hands on a LC Plus engine sooner rather than later (come on eBay, be good to me!), so I can control the decoupling via something other than the track electromagnets.
Will I get it done by Friday? I don't know. Two of my summer students are giving presentations this Saturday at their colloquium, so Saturday afternoon is probably a wash. We shall see!

Busy man, Deuce!! Your layout is looking good!!
Deuce posted:Wife was feeling run down tonight, so I sent her to bed right after dinner. Even with having to get both kids ready for bed, I was able to get more done than I imagined. The O27 track isn't connected, but it's laid out, and gives me more room between it and my inner track than I expected. You know what that means? The elevated level is a GO! I figure an inch thick dowel cut to size, with a strip connecting two of them at the top, and secured to 1.5" bases screwed down into the plywood underneath the "soundproofing layer" will keep it pretty secure ... then run 2" by 1/2" thick strips between that, to which I affix O27 track ... and it'll be good to go. I think.
So I may extend the sidings by 4 to 8" on each one, but otherwise the inner loop is completed. Just need to make all the connections tight so they don't come apart while running, and then get the three remote switches (two thanks to @Apples55 and one an eBay find) working. Also need to thank Paul for sending me two bumpers, which went on the ends of the Inglenook Sidings. Other than that, just need to organize, and clean up the tabletop. I need to figure out what locomotive will run the shunting puzzle. Right now I'm leaning towards my LC Thomas, though I'd love to get my hands on a LC Plus engine sooner rather than later (come on eBay, be good to me!), so I can control the decoupling via something other than the track electromagnets.
Will I get it done by Friday? I don't know. Two of my summer students are giving presentations this Saturday at their colloquium, so Saturday afternoon is probably a wash. We shall see!
Happy to help you along the journey, Deuce...
"Slip sliding away, slip sliding away
You know the nearer your destination, the more you slip slidingaway"
Deuce posted:Wife was feeling run down tonight, so I sent her to bed right after dinner. Even with having to get both kids ready for bed, I was able to get more done than I imagined. The O27 track isn't connected, but it's laid out, and gives me more room between it and my inner track than I expected. You know what that means? The elevated level is a GO! I figure an inch thick dowel cut to size, with a strip connecting two of them at the top, and secured to 1.5" bases screwed down into the plywood underneath the "soundproofing layer" will keep it pretty secure ... then run 2" by 1/2" thick strips between that, to which I affix O27 track ... and it'll be good to go. I think.
So I may extend the sidings by 4 to 8" on each one, but otherwise the inner loop is completed. Just need to make all the connections tight so they don't come apart while running, and then get the three remote switches (two thanks to @Apples55 and one an eBay find) working. Also need to thank Paul for sending me two bumpers, which went on the ends of the Inglenook Sidings. Other than that, just need to organize, and clean up the tabletop. I need to figure out what locomotive will run the shunting puzzle. Right now I'm leaning towards my LC Thomas, though I'd love to get my hands on a LC Plus engine sooner rather than later (come on eBay, be good to me!), so I can control the decoupling via something other than the track electromagnets.
Will I get it done by Friday? I don't know. Two of my summer students are giving presentations this Saturday at their colloquium, so Saturday afternoon is probably a wash. We shall see!
Trainworld has some good deals on LC+. I think the discounts are on pre Bluetooth items.
JD2035RR posted:Deuce posted:Wife was feeling run down tonight, so I sent her to bed right after dinner. Even with having to get both kids ready for bed, I was able to get more done than I imagined. The O27 track isn't connected, but it's laid out, and gives me more room between it and my inner track than I expected. You know what that means? The elevated level is a GO! I figure an inch thick dowel cut to size, with a strip connecting two of them at the top, and secured to 1.5" bases screwed down into the plywood underneath the "soundproofing layer" will keep it pretty secure ... then run 2" by 1/2" thick strips between that, to which I affix O27 track ... and it'll be good to go. I think.
So I may extend the sidings by 4 to 8" on each one, but otherwise the inner loop is completed. Just need to make all the connections tight so they don't come apart while running, and then get the three remote switches (two thanks to @Apples55 and one an eBay find) working. Also need to thank Paul for sending me two bumpers, which went on the ends of the Inglenook Sidings. Other than that, just need to organize, and clean up the tabletop. I need to figure out what locomotive will run the shunting puzzle. Right now I'm leaning towards my LC Thomas, though I'd love to get my hands on a LC Plus engine sooner rather than later (come on eBay, be good to me!), so I can control the decoupling via something other than the track electromagnets.
Will I get it done by Friday? I don't know. Two of my summer students are giving presentations this Saturday at their colloquium, so Saturday afternoon is probably a wash. We shall see!
Trainworld has some good deals on LC+. I think the discounts are on pre Bluetooth items.
Egads, the E33 Rectifiers are down to $159. Unfortunately they're 14 inches long, which is a bit longer than I wanted ... decisions decisions.
Deuce posted:JD2035RR posted:Deuce posted:Wife was feeling run down tonight, so I sent her to bed right after dinner. Even with having to get both kids ready for bed, I was able to get more done than I imagined. The O27 track isn't connected, but it's laid out, and gives me more room between it and my inner track than I expected. You know what that means? The elevated level is a GO! I figure an inch thick dowel cut to size, with a strip connecting two of them at the top, and secured to 1.5" bases screwed down into the plywood underneath the "soundproofing layer" will keep it pretty secure ... then run 2" by 1/2" thick strips between that, to which I affix O27 track ... and it'll be good to go. I think.
So I may extend the sidings by 4 to 8" on each one, but otherwise the inner loop is completed. Just need to make all the connections tight so they don't come apart while running, and then get the three remote switches (two thanks to @Apples55 and one an eBay find) working. Also need to thank Paul for sending me two bumpers, which went on the ends of the Inglenook Sidings. Other than that, just need to organize, and clean up the tabletop. I need to figure out what locomotive will run the shunting puzzle. Right now I'm leaning towards my LC Thomas, though I'd love to get my hands on a LC Plus engine sooner rather than later (come on eBay, be good to me!), so I can control the decoupling via something other than the track electromagnets.
Will I get it done by Friday? I don't know. Two of my summer students are giving presentations this Saturday at their colloquium, so Saturday afternoon is probably a wash. We shall see!
Trainworld has some good deals on LC+. I think the discounts are on pre Bluetooth items.
Egads, the E33 Rectifiers are down to $159. Unfortunately they're 14 inches long, which is a bit longer than I wanted ... decisions decisions.
But with the upcoming layout expansion, you're going to need it lol. It's a good deal for sure
You're all enablers. You know that? LOL
Deuce posted:You're all enablers. You know that? LOL
You're welcome.🤑🤑🤑
Yes, there are so many good friends here to tell you how to spend your money! LOL It is a super deal if you are in the market. I don’t want any of them myself. Wrong engines and wrong road names for me. :-)
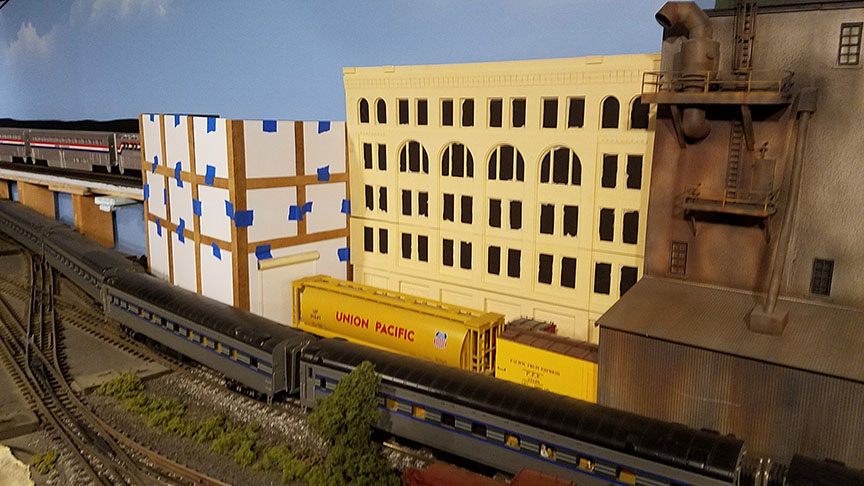
I didn't get to paint my card room kit tonight as I had to take my son to his soccer practice, which last 1.5 hrs. So that I didn't waste time tonight waiting around, I brought a scratch built building I wanted to finish up. So I sent the time waiting tonight working on this building which is a flat and will be part of a much larger plant. This is just a warehouse with track access overhead door. I cut all the styrene panels to fit in between the support vertical and horizontal members. I will glue them onto the foam core tomorrow and begin painting it a concrete color, weather and add some extra details to roof and side walls. Here are a couple shots of it on the layout where it will reside , to give you an idea where it is going . There are a couple shots off the layout to.


Deuce posted:Wife was feeling run down tonight, so I sent her to bed right after dinner. Even with having to get both kids ready for bed, I was able to get more done than I imagined. The O27 track isn't connected, but it's laid out, and gives me more room between it and my inner track than I expected. You know what that means? The elevated level is a GO! I figure an inch thick dowel cut to size, with a strip connecting two of them at the top, and secured to 1.5" bases screwed down into the plywood underneath the "soundproofing layer" will keep it pretty secure ... then run 2" by 1/2" thick strips between that, to which I affix O27 track ... and it'll be good to go. I think.
So I may extend the sidings by 4 to 8" on each one, but otherwise the inner loop is completed. Just need to make all the connections tight so they don't come apart while running, and then get the three remote switches (two thanks to @Apples55 and one an eBay find) working. Also need to thank Paul for sending me two bumpers, which went on the ends of the Inglenook Sidings. Other than that, just need to organize, and clean up the tabletop. I need to figure out what locomotive will run the shunting puzzle. Right now I'm leaning towards my LC Thomas, though I'd love to get my hands on a LC Plus engine sooner rather than later (come on eBay, be good to me!), so I can control the decoupling via something other than the track electromagnets.
Will I get it done by Friday? I don't know. Two of my summer students are giving presentations this Saturday at their colloquium, so Saturday afternoon is probably a wash. We shall see!
I'd concentrate on the lower level so you can run something this weekend. An elevation can take a lot of fiddling to get right.
For your pole bases, the old trestles are 3-1/4" wide at the legs fyi. Dowels like to split, be generous on pilot holes. The 1/2" support between risers tops wont help much. Support for the outside rail in curves is the weak spot. The bases mostly just have to be across the width of the track/ties. In the curves, the bases turn with the track and will stop the domino effect. One riser per track piece minimum, keep them near the track joints or the joint flexing will work the pin's fit loose in no time.


Deuce posted:You're all enablers. You know that? LOL
Yes we are ![]()
Make sure you make your second level high enough to clear trains on the track below. Mine is 5" and is a little tight for a couple of my diesels. I would go 5 1/2" min.
I second what Adriatic wrote.
Oh Wait ![]() is that more enabling?
is that more enabling? ![]()
RSJB18 posted:Deuce posted:You're all enablers. You know that? LOL
Yes we are
Oh Wait
is that more enabling?
Yes, it is enabling - of the rankest kind.... personally, I'd rank it a 4 or 5 ![]()
![]()
![]()
Apples55 posted:RSJB18 posted:Deuce posted:You're all enablers. You know that? LOL
Yes we are
Oh Wait
Yes, it is enabling - of the rankest kind.... personally, I'd rank it a 4 or 5
perfect 10!
Access to this requires an OGR Forum Supporting Membership

