Got the ballast I laid down last week all glued down and sprayed all my installed track's rails.


Got this landscaping installed under the btidge and began work on concrete retaining wall:

And got this in-between the tracks section in...


|
|
Got the ballast I laid down last week all glued down and sprayed all my installed track's rails.
Got this landscaping installed under the btidge and began work on concrete retaining wall:
And got this in-between the tracks section in...


That lumber from yesterday was used up today. Another milestone was reached as one end of the benchwork met the other. There is still some fine tuning to be done on evening out elevation transitions but all the big cutting is done.

After a few additional boards this graded curve will be ready for track laying. 3 concentric tracks make the grade here, with the outer most track connecting to that 072 Wye turnout at lower left, just not in that exact location. The sectional 072 curves were used as a template while constructing the roadbed. I just love it when a plan comes together!

Bruce
Bruce,
Your plan is coming together nicely! I really like how you are making use of your space
Thanks, Mark. Hopefully you can see the layout for the clutter. Usable space just got a lot smaller and it looks like a lot of ducking will be in order. The running changes meant I sacrificed a bit more square footage than planned, but there's still room to stretch out. Now that the configuration is solidified I need to draw out an exact layout design. It has changed considerably since this....

Bruce
I've been doing so much wiring lately, there have been very few photos to share. Today I switched gears and did a little construction for a change. I'm not ready to call this scenery, but it is the base for this scene.
I started by putting up a 23' long 1/8" thick Masonite wall.

The wall is 8" tall. My height checking car, an MTH double stack.

The 3 track yard will be under the bluff.

This is why the backdrop didn't need to be taller. The foam bluff will sit on the supports.

New camera for keeping an eye on the yard. You can just see another one in the upper left. That one will watch the hidden main along the east wall.

The Lionel auto rack is my curve clearance tester. There are some tight spots, but all OK.

This is two Lionel 450 signal bridges spliced together to span 4 tracks. I plan to keep the structure, but change the lights to 3 color LED searchlight style with prototypical multi head masts.

This is the real location, note the rock face. That's what's going to cover the Masonite.

This used to be such a great place to watch trains.


Elliot --- It's not anymore ??? Just curious
Layout looks great
dorfj2 posted:Elliot --- It's not anymore ??? Just curious
Layout looks great
Thank you.
Nah, the railroads used to turn a blind eye and allow railfans to park on the gravel patch of their property. Ever since 9-11 they have tightened up a lot and patrol regularly. There's really no place to park anymore.
Elliot,
I watched trains in yard area I used the over head bridge from cement area nobody bothered me of course I stood for about 4 hours. you also can park in the lot for that trail they made for hikers over where the wye is where the St Paul Depot is take the road that went under the passenger tracks it was a short cut to downtown still there when we visited you. get a camp chair you can walk a bit to get a better view or at least I did.
in my boyhood days we used to scale down the cliffs from above and perch on some rocks and watch trains. mounds park and those cliffs were a big part of my childhood.
also I scaled the old warner road bridge that crossed the CBQ and yard area but the railroad bull frowned on that one!
I can relate to your foam cliff area once I spotted the wye I knew exactly where you were modeling.
didn't there used to be 3 signal bridges that crossed the mainlines at one time? and one was silver other 2 were black ?I can remember the old switch towers and the rods used to change the switches.
layout looking good!
Ray
Thanks Ray.
One of the bridges got hit by a train, and nearly collapsed. They took it out and replaced the signals with stacked dwarfs. Closer to the wye, they have replaced the bridge and the signals with the modern color position style. I think there are just the two black ones left on either end of the plant. They still have their searchlights, but I don't think they are going to be there for long.
Part of my problem is I can't sit out in the sun. It was so nice when I could just pull up and park the truck roll down the window and listen to my scanner. There is the grassy triangle right there that belongs to the city. You just have to jump the curb and hope it isn't muddy. Actually, when they have large work crews down there, that's where they park. Railroad property is reserved for heavy equipment and materials.

The muddy triangle with all the crew vehicles.

The area where I used to park is used to stage materials and build new switches. This doesn't happen very often. I found it fascinating.

Yesterday, after coming home from the Timonium show, I ran my new purchases..... Lionel ballast tamper, K line small industrial switcher, and a William brass B&O caboose.... all of which look great on the layout. Of course I had to fish an engine and two milk cars out of the tunnel on the Mountain Division before running the new motorized units.
Big milestone...recently "finished" ballasting the layout like I wanted (no ballast between the rails). It took me a couple of days (ran out of ballast) and I'm glad that's out of the way.
Next thing is scenic-king each industry, need to get some small detailed pieces for each.
I just hope I don't go wild and get bored with it and tear it up to try something else!
Last night, I laid out several large sheets of paper over parts of the layout, cutting out 1:1 templates to cut pieces of insulation foam sheets from. I will be using these so I can just drop them into place once they’re cut and shaped to the right size and form I’m looking for (done away from the layout to make cleanup far easier), for terrain. The back two corners will be mounted on plywood pieces I already cut to drop in there, so those entire scenery sections can be completed well away from the layout them simply dropped into place and a little bit of ground cover applied to cover the seams. In a few places, the scenery is totally flat as there are several places along the real Stoney Creek that aren’t undulating and any railroad would build yards and sidings where they were easy to get to (in other words, flat). There’ll be enough changes in terrain to show it’s in the ‘bottom land’ of a valley. I’ll put a few ‘bumps’ here and there to break up the completely flat look of a couple of spots on the layout where there are yard areas.
I’ve never understood layouts that show what looks like a representation of the Big Thunder roller coaster at Disney. As most of you well know, even the Colorado/New Mexico 3-foot lines were built on level terrain where they could do so.
Elliot, side question. You know where I can get replacement parts for the 450 Signal Bridge?
Another vote for Menard's...after checking a closer big box home store looking for a screw-in type headlight bulb for a Marx #999, with no luck (expecting to maybe find them for old flashlights) I found Menard's had close matches in packets of two. I brought a packet home, screwed a bulb in, and it lighted brightly. In addition, I was going through parts stashes looking for things I can use to build an odd-ball caboose for my pickle train. Still have more of that search to do.
mike g. posted:Elliot, side question. You know where I can get replacement parts for the 450 Signal Bridge?
Which parts do you need Mike? Those four heads are expendable, as well as some from more bridges that I have could be be for sale.
Hi Elliot, if I just want it to show one direction, I just need 1 complete head unless you have extra parts so I could build one like yours. I dont want to buy a new one. I also put a post on here for other missing parts.
Had a couple of "good ideas" which led to rearranging track again ![]()
Hopefully it will be "good enough for now" soon, so I can start laying down some scenery.
mike g. posted:Hi Elliot, if I just want it to show one direction, I just need 1 complete head unless you have extra parts so I could build one like yours. I dont want to buy a new one. I also put a post on here for other missing parts.
Mike, let's continue this via email. I can probably help you.
Mo985 posted:Had a couple of "good ideas" which led to rearranging track again
Hopefully it will be "good enough for now" soon, so I can start laying down some scenery.
Despite the frowning face there, don't you actually like it when those "good ideas" come along and interrupt the plans? I do. The new ideas become a challenge moving us for the better and toward more creative adventure.![]() have fun. You're on-a-roll.
have fun. You're on-a-roll.![]()
FrankM.
Moonson posted:Mo985 posted:Had a couple of "good ideas" which led to rearranging track again
Hopefully it will be "good enough for no
w" soon, so I can start laying down some scenery.
Despite the frowning face there, don't you actually like it when those "good ideas" come along and interrupt the plans? I do. The new ideas become a challenge moving us for the better and toward more creative adventure.
FrankM.
Frank - I love your optimistic thinking!! Yes, problems on the layout can open us to new creative ideas, new directions, open us to various new possibilities, outside the box thinking.
Yes we have all been there with you Mo985 ... in the land of frustration ... and I for one can empathize with your frowning face. I can also tell you that most every problem I've encountered, while constructing my layout, has led to some wonderful "ah ha" moments. Its those "ah ha" moments which fuel the creative energy to keep me moving forward. May the force be with you!![]()
Frank and Pat,
Thanks for your votes of confidence. I really just want to avoid getting 3/4 of the way finished, then having to take apart to start over for something I could have done/ added now.
I bought some 3 axle trucks from Lionel the other day and used a pair of them to finish off this 0-27 tender that has been languishing on the scrap heap for a couple of years or more. Some day I may find some slightly smaller wheels to swap out. It is suitable to put behind post-war Hudsons and such.


JD Jr,
Put the final touches on the restoration/maintenance of my 2 old original Post War Lionel GP7's, a Brunswick Green Pa & a Northern Pacific. Both now operate as smoothly as when they were 1st produced, even as a Double Header.
PCRR/Dave

Spent the last week in do-over mode. I like my recent landscaping efforts on my new South half that I decided to re-do portions of the north half to blend. So I redid the area between my mainlines and started installing the area below the lines. Will have to wait for it to dry for a few days before I can paint and apply scenic materials.


Marc C posted:I've been wanting to do this for awhile now. Still need to do some painting to hide the wires. Should look good on the layout.
Oh for Heaven's sake, tell me that's not as cool as it gets! Wow. And another wow!
FrankM.
Moonson posted:Marc C posted:I've been wanting to do this for awhile now. Still need to do some painting to hide the wires. Should look good on the layout.
Oh for Heaven's sake, tell me that's not as cool as it gets! Wow. And another wow!
FrankM.
Agreed! It takes realism to the next level. Well done, Marc C.
Bruce
My my! my!! No helmet or protective gear.
Marc C...that is fantastic!!!!!!!!! You have got to post instructions on how you did that. However, that looks like a Honda, not a Harley.
I got very frustrated yesterday. figured I would wire up one signal light. 3 hrs later it still wasn't working. I finally gave up for another day. it's wired it turns on but doesn't switch colors with the IR sensor. which makes me wonder are all IR sensors the same ? so instead I ran trains and made a video ![]()
I abandoned the IR sensors altogether and went with insulated rail. I know wiring can be frustrating, but it's with it in the end.
Motor cyclist must be in good old Penna., we did away with the helmet ruling several years ago. Dumb move?
I use to do that too with relays and insulated rail. It worked but being electrically challenged didn't help the situation so when the controller boards came out I bought some and the trade off was timed color switch instead of if wheels were on the section it was on the other issue turned up was if the train was on 2 sections at the same time . because the second sections red output powered the previous sections yellow so I would end up with both yellow and red on at the same time . the sections couldn't be far enough apart to keep that from happening. so the control board was a simpler solution. but I have had a high failure rate with them. Out of 10 control boards I know of at least 4 that are bad. But I don't like the other solutions 100's of dollars. this was a cheaper solution. OH well I will get them to work it doesn't help I'm having issues seeing the small wires I think its time for glasses ![]()
what I did was mount all the controller boards to a board then wired up rj45 connector to the boards for the 4 wires of the lights and 4 wires for the sensors, I do the same on the signal end a rj45 connector for the 4 wires for the signal and the 4 wires for the IR sensors, I then run one cat5 wire between them. In testing it all worked. but when I went to apply it under the table. first was no lights at all opps wired the cat5 wire wrong not being able to see the small wires I didn't insert a wire far enough before crimping. then made another cable tested it with another signal and it worked fine. so fixed the cat 5 and I got lights ok that fixed that cool but now no IR switching Back to drawing board why isn't it working turned out the board (new just came in the other day didn't work ) so after 3 hrs of all of that nothing but trouble shooting issues I stopped and ran trains. 


Jhainer posted:I got very frustrated yesterday. figured I would wire up one signal light. 3 hrs later it still wasn't working. I finally gave up for another day. it's wired it turns on but doesn't switch colors with the IR sensor. which makes me wonder are all IR sensors the same ? so instead I ran trains and made a video

Did you check the IR manual (Lionel). It says in there which wires to connect from the device to the IR's ACC-GND, NO, and for three wire devices the NC too. However, there is an issue about connecting more than one device. Lionel says to add a Diode or multiple won't work. That happened to me . I had a Gateman and added a Crossing Flasher. All running on ACC voltage. The whole thing shut down the ACC Transf. I had ACC disconnected for 6mos or more through frustration. Then I reread the advanced part of the manual where it talks about the Diode. Then I disconnected the Gateman and left the Flasher because that is all I really wanted. Also, I never liked the Gateman's Buzzing.
Hopefully this will help in some way.
Cheers,
Eric.
Ericlinda posted:Jhainer posted:I got very frustrated yesterday. figured I would wire up one signal light. 3 hrs later it still wasn't working. I finally gave up for another day. it's wired it turns on but doesn't switch colors with the IR sensor. which makes me wonder are all IR sensors the same ? so instead I ran trains and made a video
Did you check the IR manual (Lionel). It says in there which wires to connect from the device to the IR's ACC-GND, NO, and for three wire devices the NC too. However, there is an issue about connecting more than one device. Lionel says to add a Diode or multiple won't work. That happened to me . I had a Gateman and added a Crossing Flasher. All running on ACC voltage. The whole thing shut down the ACC Transf. I had ACC disconnected for 6mos or more through frustration. Then I reread the advanced part of the manual where it talks about the Diode. Then I disconnected the Gateman and left the Flasher because that is all I really wanted. Also, I never liked the Gateman's Buzzing.
Hopefully this will help in some way.
Cheers,
Eric.
not lionels IR ![]()
tackindy posted:In the middle of a total rebuild. But today I just sat back and ran my trains. Mountains are rising and some trees are up.... and buildings are beginning to take their places.
that Is pretty cool looking layout
Jhainer, I know this may sound silly. But I was having the same problem with an IR sensor for a switching program I was trying. Come to find out it wasn't getting the signal do to the over head lighting. Once I made something to block the light to the sensor everything worked fine.
mike g. posted:Jhainer, I know this may sound silly. But I was having the same problem with an IR sensor for a switching program I was trying. Come to find out it wasn't getting the signal do to the over head lighting. Once I made something to block the light to the sensor everything worked fine.
I can see the IR working with my camera so I know the wiring is working. but just won't switch ![]() the one I am working on is on the lower section of the layout so it is shrouded from the overhead lights. the one I had working on the upper layout worked fine with the over head lights. I have a feeling the boards I got were late Friday afternoon boards
the one I am working on is on the lower section of the layout so it is shrouded from the overhead lights. the one I had working on the upper layout worked fine with the over head lights. I have a feeling the boards I got were late Friday afternoon boards ![]()
redball342 posted:Motor cyclist must be in good old Penna., we did away with the helmet ruling several years ago. Dumb move?
Yes I would have to agree. A few years ago a high school classmate was killed hitting his non-helmeted head on the pavement in a motorcycle accident.
All the gear-all the time. My son had the rear wheel come off his BMW at 55 MPH, slid across two lanes of I-81 in Va., got up and walked away. He knew how to tuck & rol but was very lucky. Plus full protective gear. I remember years ago the bikers wearing original German WW II helmets !! That would look cool on a layout. I have a lead British made military motorcyclist on my layout but not the lights.
Marc C posted:I've been wanting to do this for awhile now. Still need to do some painting to hide the wires. Should look good on the layout.
That's cool!!!!!!
Today is continuing ballasting the yard area. Received a new ballast shipment from Brennans Better Ballast yesterday. Thanks Dennis! Whoo Hooo!!
Pine Creek Railroad posted:JD Jr,
Put the final touches on the restoration/maintenance of my 2 old original Post War Lionel GP7's, a Brunswick Green Pa & a Northern Pacific. Both now operate as smoothly as when they were 1st produced, even as a Double Header.
PCRR/Dave

I think that Brunswick Green GP7 is a MPC maybe on a postwar frame?
Its been a busy couple of months with replacing base board and some rewiring. Also finished the intragration of my son's Slot car track into the layout.
Winterton Public works announces the completion of the street lighting and road repaving projects. Prior to the end of the holidays With the signing of contracts to allow European Racing teams to conduct testing on streets and ring road. The Winterton Village council had approved the upgrading and replacement of the old street lighting to improve safety and allow night testing and racing. In addition they also had approved the project to resurface the roads. A village official had stated that this was a win, win for all. With the money received from the teams paying 90% of the project. Both projects were completed ahead of schedule.
Day and night shots. Forgive the drone operator as he still learning to fly the thing.


Buzz 191, You are correct about JD Jr's Brunswick Green GP 7 (9?), being MPC on a possible postwar frame. I have had one for over 30 years bought new in the box (which i've upgraded to TMCC and can't seem to sell), and it has a different frame with plastic hand rails.
jackson
Hi JHAINER, Just wondering what type of IR Set up your using for the lower level? Are they across the track or under the track at any angle?
Today I was going to run out and get what I needed to continue my projects but instead I decided to relax and just enjoy running trains. ...................Paul
jim pastorius posted:All the gear-all the time. My son had the rear wheel come off his BMW at 55 MPH, slid across two lanes of I-81 in Va., got up and walked away. He knew how to tuck & rol but was very lucky. Plus full protective gear. I remember years ago the bikers wearing original German WW II helmets !! That would look cool on a layout. I have a lead British made military motorcyclist on my layout but not the lights.
We ride ATGATT, all the gear all the time. 45+ years on BMWs. Over 300, 000 miles, all states and most of Canada. I have been hot in 35 mph side winds in the west but the day you ride without it, it'll happen. Also though with the Goretex in the riding suit, Klim, we're dry as we ride in and out of the rain. My wife rides her own BMW...she says she has been riding one more year than I ![]() .
.
I try to be light about it and say at least if something happens I'll be all in one sack for them.
I don't ride, I like a metal roof but my son has done a lot. Their rule is no booze until the riding is done for the day.
jim pastorius posted:I don't ride, I like a metal roof but my son has done a lot. Their rule is no booze until the riding is done for the day.
Good rule during any task, even working on an engine or wiring ![]()
modeltrainsparts posted:Buzz 191, You are correct about JD Jr's Brunswick Green GP 7 (9?), being MPC on a possible postwar frame. I have had one for over 30 years bought new in the box (which i've upgraded to TMCC and can't seem to sell), and it has a different frame with plastic hand rails.
jackson
Thanks I thought that's what I saw.
How come you cannot sell the Geep?
I have 2 TMCC PRR Geeps and two MPC Brunswick Green and a Postwar PRR
mike g. posted:Hi JHAINER, Just wondering what type of IR Set up your using for the lower level? Are they across the track or under the track at any angle?
under the track at a slight angle
I had the same setup on my 2 rail layout and if they stuck to far up between the ties it wouldn't work. Just something to think about. I am trying to remember what else I had problems with it. At one point I talked to the rep and they sent me out new board.
More never ending wiring, It will take at least to the end of the weekend to complete it even if I work on it 8 hours a day and it is just on one of six sections. I am going to need more meds! ![]() Wahh!
Wahh!
to replace the bad boards I bought 6 azatrax boards
This mess is the result of a change to my workbench. The overhead lighting and shelf that was previously attached to the desktop really took up too much space and blocked visibility. I simply mounted the lighting header to the ceiling instead, greatly opening up the area and allowing access to the pair of tracks if need be. The dangling electrical wire is not to code.![]()

Bruce
Have you called and talked to the owner at Azatrax? When I was having problems with my reversing loop in my 2 rail he helped me out talked me threw some problems, and even sent me a new board.
I started last night on scenery forms with those pink foam sheets. I got one of those hot wire cutters from Woodland Scenic and the thing is great (knives don’t work well on foam at all, I found). But after messing around with it, I realized I needed to change my concept of terrain forms substantially. I was going to put entire sheets into place and sculpt through them but it just didn’t work that way. I had put contours into the fascia to show lightly undulating terrain. I eventually just cut foam sheets for a few inches from the edges and eased them down into the flat areas of plywood. I’ll also make numerous, small bumps and pile-shaped forms to randomly place here and there so it doesn’t obviously look totally flat. Along the back corners, the scenery will rise up right at the edge next to the walls and I think it’ll work okay. It’s hard, of course, to imagine it all as it just looks like wood and pink foam right now. I bet it’ll look decent with ground foam and static grass in place. All I know is once I get the forms done and in place, I’ll paint over everything with a color similar to the soil, then start with the ‘grass’, ‘rocks’ and trees. But once the shapes are in place, I’d think the rest should go pretty quickly. My goal is to have scenery looking halfway decent by the time spring officially arrives on March 20.
Step 1 / Degrease the plastic with DAWN dish soap.
Step 2 / Spray with Testors Dull Cote
Step 3 / White wash the bricks with acrylic paint.
Step 4 / Insert the window frames, plastic windows and paper behind the plastic.
Step 5 / Light weather, with chalk, will fine tune later, when flat is in final location.


p51 posted:I started last night on scenery forms with those pink foam sheets. I got one of those hot wire cutters from Woodland Scenic and the thing is great (knives don’t work well on foam at all, I found). But after messing around with it, I realized I needed to change my concept of terrain forms substantially. I was going to put entire sheets into place and sculpt through them but it just didn’t work that way. I had put contours into the fascia to show lightly undulating terrain. I eventually just cut foam sheets for a few inches from the edges and eased them down into the flat areas of plywood. I’ll also make numerous, small bumps and pile-shaped forms to randomly place here and there so it doesn’t obviously look totally flat. Along the back corners, the scenery will rise up right at the edge next to the walls and I think it’ll work okay. It’s hard, of course, to imagine it all as it just looks like wood and pink foam right now. I bet it’ll look decent with ground foam and static grass in place. All I know is once I get the forms done and in place, I’ll paint over everything with a color similar to the soil, then start with the ‘grass’, ‘rocks’ and trees. But once the shapes are in place, I’d think the rest should go pretty quickly. My goal is to have scenery looking halfway decent by the time spring officially arrives on March 20.
you got a lot of nerve posting on the ogr!
when all you do is bash the ogr forum on other forum!!!
mike g. posted:Have you called and talked to the owner at Azatrax? When I was having problems with my reversing loop in my 2 rail he helped me out talked me threw some problems, and even sent me a new board.
the bad boards were not from Azatrax . but it looks like the azatrax boards will do what I want them to do. they are a lot more expensive than the ones I was buying but if they work then it's worth it the other ones average 2 boards bad per 5 boards for $56 where as the 3 for $99 of the Azatrax boards I bought 6 boards ![]()
I went on a mission Friday to find more fork crimp connectors for the wiring on the train layout. I had previously bought an assortment of connectors in a tray from Harbor Freight and I have used them up and needed a lot more. I was not going to spend $10.00 a tray and get 5 trays to get what I needed. I went to the local hardware store and the ones they had were to wide I need ones for a #4 screw. Off to Gateway Fasteners when I get there they are no longer at that location. Next door is Fasten All so I go inside and they don't have any but they tell me where Gateway Fasteners moved to. Off to Plum industrial park no luck Gateway Fasteners has moved again and no one knows where they moved to. Off to Lowes in Monroeville but they don't have any. Off to Keller Hardware in Turtle Creek where I used to live and they don't have any. Off to True Value up on the hill and they don't have any. I figure that I have gone this far I'll go to Sun Ray Electric Supply when I get there they tell me they have some but I can't buy them because they special order them in for the mill in Braddock. Just for the fun of it the guy looks up the price and he tells me they are $64.00 for 100 I said that they were a little to rich for my blood. He asked if I had been to Barno Electronics in Little Boston and I told him I had never heard of the place. He calls them up and they have them. ![]()
![]()
![]()
![]() YES!!!!!!! He tells me how to get there so now it is 4:15 and they close at 4:45 I make it there in no time. When I go in he puts a round loop connecter on the counter and said is this what you are looking for?
YES!!!!!!! He tells me how to get there so now it is 4:15 and they close at 4:45 I make it there in no time. When I go in he puts a round loop connecter on the counter and said is this what you are looking for?![]()
![]() No sir it is not but on the wall is a display of connectors and I tell him that this one here is the one I need. He sais let me go take a look he comes out with a box blows the dust off it and opens up a box that has to be from the 50s. Is that what you are looking for?
No sir it is not but on the wall is a display of connectors and I tell him that this one here is the one I need. He sais let me go take a look he comes out with a box blows the dust off it and opens up a box that has to be from the 50s. Is that what you are looking for? ![]()
![]()
![]()
![]() YES IT IS WOO HOO!!!!! He sais the only problem is the 2 boxes he has are already opened. We each take a box and start counting and end up with179 Great I will take them. He rings me up and sais that will be$21.00 I hand him my bank card and he sais sorry only cash or check. I don't have any money on me so I ask where is the nearest ATM he sais the bank is down the road. Now the time is 4:40 he is closing in 5 min. I ask if he is open on Saturday and he sais no I asked him if he would stay open until I could get back and he said yes. Off to the bank now it is snowing pretty good and I am in a wheelchair and when I get to the bank the ATM is outside. I go over get in line and I had 3 guys just walk in front of me. A woman walks up to me and asks if I am in line I told her no I just like to come to banks in snow storms to watch people use an ATM. Finely got my money went back got the connectors gave the man an extra few dollars for staying open late. AS long as they are in business I will be going back to get whatever I need from them. Hope everyone does not mind a little step into my life and what I go through to get stuff for the train layout. Saturday Monster Trucks in Pittsburgh and Sunday back to soldering crimp connectors to the wires. Thank you and take care. Choo Choo Kenny
YES IT IS WOO HOO!!!!! He sais the only problem is the 2 boxes he has are already opened. We each take a box and start counting and end up with179 Great I will take them. He rings me up and sais that will be$21.00 I hand him my bank card and he sais sorry only cash or check. I don't have any money on me so I ask where is the nearest ATM he sais the bank is down the road. Now the time is 4:40 he is closing in 5 min. I ask if he is open on Saturday and he sais no I asked him if he would stay open until I could get back and he said yes. Off to the bank now it is snowing pretty good and I am in a wheelchair and when I get to the bank the ATM is outside. I go over get in line and I had 3 guys just walk in front of me. A woman walks up to me and asks if I am in line I told her no I just like to come to banks in snow storms to watch people use an ATM. Finely got my money went back got the connectors gave the man an extra few dollars for staying open late. AS long as they are in business I will be going back to get whatever I need from them. Hope everyone does not mind a little step into my life and what I go through to get stuff for the train layout. Saturday Monster Trucks in Pittsburgh and Sunday back to soldering crimp connectors to the wires. Thank you and take care. Choo Choo Kenny ![]()
I got my paint yesterday so there was no more procrastinating. So this morning I got the area behind the backdrop painted. Home Depot did a good job of matching considering all I had was this very small piece of the sky color. I may add a few clouds later on seeing it is such a big area of blue. Couple of pics...........Paul


Looking good !
All I have done for several days is check Hobby Lobby again to see if there are any artificial fruit I can make a caboose out of for the pickle train. Nope. They have a bid selection of fruit and veggies but tomatoes are not big enough, and if they were, would have too much overhang. I will have to find some oddball caboose photo to scratch-build, and paint it red, since all my cabooses normally are yellow.
I started adding grass to my traditional layout, we will see how it ends
Mainline track laying culminated in this circular gradient change. The inner circle is again a minimum of 072, with barely enough room to squeeze in the other 2 lines. Turnouts were added for a spur up top ( under the General's tender ) and a small siding below. These can be added later, after I give my wallet a bit of a breather.
Now I can run trains relatively unattended as I work on other aspects of the layout. Already I have spotted a couple of minor issues with roadbed that need attention.

Time to reflect on on what has been accomplished as the one year mark draws near.


Bruce
I have a lot of projects going I have been jumping around to much I think. Buildings half done, my station is still unfinished, bridge scenery unfinished, signals not working right, transfer table in and working but the tracks off of it are not. so today I decided to start working on some of the stuff not finished. so I wired up the transfer table lines and mounted the track and then of course tested it all out. works good. ![]() also got another shipment in today the controllers for the signals.
also got another shipment in today the controllers for the signals. ![]() also won a bid for another Santa Fe aluminum hopper that makes my 4th
also won a bid for another Santa Fe aluminum hopper that makes my 4th ![]() also picked up a switch tower for Pana Il. to go along with the theme of my layout It's Union pacific and like I have said most things on my layout have something to do with my life Pana Il. when I was a kid I use to play baseball well I was the catcher for the all star team and we played our games in pana Il. right across from the pool.
also picked up a switch tower for Pana Il. to go along with the theme of my layout It's Union pacific and like I have said most things on my layout have something to do with my life Pana Il. when I was a kid I use to play baseball well I was the catcher for the all star team and we played our games in pana Il. right across from the pool. 


Your Layout is looking great Let me know how the new boards work out and where you got them from. I can't wait to start my new one I hope this summer. It's been awhile with trains running. You can only do so much fixing changing wheels, displaying them, one really needs some run time! LOL
Cleaning off the track - just with an old (clean) cloth and 'elbow grease'; then running Ivor around his line.
I stumbled upon some toy train videos on the internet which I bookmarked and then watched most of them. Some were from CTT and others of clubs etc. All O gauge. I really haven't seen many other O gauge layouts and a few video clips here on the forum. It was interesting to see the wide variety of layouts out there. A lot of diesel which I don't like as well as steam. The only comment I will make is the poor quality of a lot of the sound. I know part of that is the recording camera but the constant hum or grind of the diesels I find annoying. I have experienced this at train shows watching the layouts. Watching the smoke was fun especially one steamer that was putting out billowing clouds. Another thing that was important was speed. The first one was agonizingly slow-all the trains !! , and, of course some were way too fast. I did notice that when the speed was "right on" it made the video more fun to watch. I have been thinking of buying some and wanted to see what is out there.
Looks like guys could use some really nice Signals on your Layout.
Please go to Integrated Signals systems .com
Good Luck, John
In the process of painting up some Alco FAs and FB and got back to my CNR passenger scheme B unit test bed re-painted from Rio Grande. It may work out okay (3rd time lucky?!) and then to start on the A units.

Another thing I did have an accident yesterday. while working on the layout running the track cleaning car I heard a big thud yep the sd90 fell to the floor what happened was the track cleaning car going over a switch switched the switch with the cleaning rollers so front trucks were going one way second trucks the other and after going so far it pulled the engine off of the layout to the floor. it was the switch going to the bridge so there was no room to hold the engine just let it fall. it's the switch to the right . this was before the wood was added under the track.
attached are some photo's of the town I grew up in. Ameri-towne building work great for this ![]()


Once again, Very nice layout, sorry to hear about your mishap! Side question, what kind of track are you using?
mike g. posted:Once again, Very nice layout, sorry to hear about your mishap! Side question, what kind of track are you using?
Fastrack ![]() the engine after falling 50+ inches made a loud thud but 2 handrails came off but went back on no problem I got very lucky
the engine after falling 50+ inches made a loud thud but 2 handrails came off but went back on no problem I got very lucky
Thanks for the information! And yes very lucky for a fall from that height!
Mud dried while I was in Arkansas. Sprayed then once dry, i laid down play sand, fine turf, and blended turf. Started on touching up the rocks.


After a 2-year hiatus due to health issues, I finally got back to the Ceiling Central RR this weekend, and finished the missing shelves. I also laid cork and two tracks about 2/3 the way around the layout. Well, I shouldn't say finished shelves. I still want to do something in the corners and make some cosmetic improvements.


Nothing makes better looking dirt except real dirt (sand).
a few more details. rusty rail on the rails granddaughter got to run Thomas tonight she did nothing but play with him on the table ![]() and made a few laps with him . if you look the track has some dents in it many years ago something fell over on the track and bent the rails the reason I used it was I had to cut the track for the turn table so it wasn't a big deal to cut this piece of track. works fine just a little bumpy.
and made a few laps with him . if you look the track has some dents in it many years ago something fell over on the track and bent the rails the reason I used it was I had to cut the track for the turn table so it wasn't a big deal to cut this piece of track. works fine just a little bumpy.


No matter what, its always a great time when you can spend it with the grandkids!
agreed
Just going through books of shortline cabooses, such as those in the back of "Mixed Train Daily", looking for an oddball to kitbash or scratch build. I gave up on finding an artificial vegetable that would work as a caboose body, except for a red pepper that I have already used as a water tank.
Just ran trains for the evening. Work session will start again tomorrow..........Paul
Back at the bank of transformers, I tied some cut off switches between the main power and the various control options. Now I can toggle between Legacy, TPC, DCS or plain old conventional. After hooking up DCS for the first time I spent tonight with my only MTH engine that has CC. It's a P5a with PS2. Along with getting acquainted with all the DCS bells and whistles, I also tested how the 2 CC systems played together. So far it appears everything is compatible but there really is a lot more I need to learn about both systems.
Bruce
Mark, glad to read that you are well enough to resume construction of Ceiling Central RR; and, thanks for the photos.
Looking good Mark. ![]() Keep us posted.
Keep us posted.
The trials and tribulations of saying what you are going to do and doing it. This morning I thought I would do the end walls in the attic. When I first did them I only painted the area on each end of the backdrops leaving white walls above them. Should of known when I tried to open the can of paint that after many years it may be rusted. Got the lid open but no good paint left. That ended that so with the paint I just bought I started working around the walls of the alcove. With luck Home depot can still make me a quart. Formula is still on the lid. So a short morning and a trip to the Depot is in order..............Paul
I tried to make some headway on the scenery forms over the past few days. I have most of the sections in the center of the room done, where most of the scenery forms need to be. The back corners will take a great deal of work, so I'm doing these slightly smaller ones first. I'll use caulk to secure them to the plywood and fascia, then paint all the ground in a color matching the dirt from the real location.
Pat Kn posted:Looking good Mark.
Pingman posted:Mark, glad to read that you are well enough to resume construction of Ceiling Central RR; and, thanks for the photos.
Thank you Pat and Carl! I will keep you posted!
p51 posted:I tried to make some headway on the scenery forms over the past few days. ...
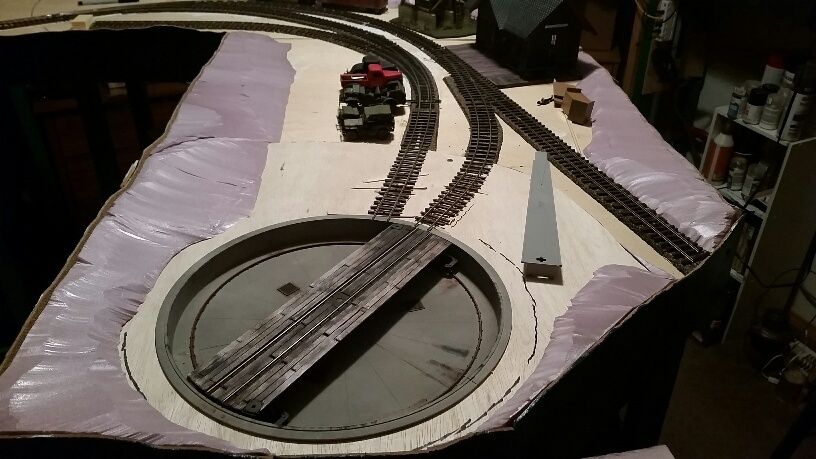
Hold-on there, Mr. P51; don't think you're getting by with just a few words. There is that excellent turntable bridge surface itself, complete with aged, 100-year-old-looking wooden planks, dirtier nearest and between the tracks, no less, and the visible, grimy seams and joints...Perfect. Who would want to change a thing? NObody. Real, real nice, Lee. (Plus, I just went to your website and saw its close-up there; it's even more authentic seen in-close.)
FrankM.
The Ceiling Central looks great, Mark. I'm glad you're feeling better and up to the task of completing it.
Country Joe posted:The Ceiling Central looks great, Mark. I'm glad you're feeling better and up to the task of completing it.
Thank you Joe! I could not continue due to a reoccurrence of carpal tunnel syndrome. I had to go though a year of braces and treatments, before getting my second surgery on each hand in 20 years last winter. I still have some issues but doesn't everyone who is 60. LOL
Mark Boyce posted:Country Joe posted:The Ceiling Central looks great, Mark. I'm glad you're feeling better and up to the task of completing it.
Thank you Joe! I could not continue due to a reoccurrence of carpal tunnel syndrome. I had to go though a year of braces and treatments, before getting my second surgery on each hand in 20 years last winter. I still have some issues but doesn't everyone who is 60. LOL
I hear ya, Mark. It seems the only thing golden about our golden years is the medical cost. Actually, layout construction has helped me deal with the pain of fibromyalgia. There are days when I over do it though. It's sure great that we can also operate trains at ground level when our nose bleed layouts are inaccessible.
Moonson posted:p51 posted:I tried to make some headway on the scenery forms over the past few days. ...
Hold-on there, Mr. P51; don't think you're getting by with just a few words. There is that excellent turntable bridge surface itself, complete with aged, 100-year-old-looking wooden planks, dirtier nearest and between the tracks, no less, and the visible, grimy seams and joints...Perfect. Who would want to change a thing? NObody. Real, real nice, Lee. (Plus, I just went to your website and saw its close-up there; it's even more authentic seen in-close.)
FrankM.
Frank,
Thanks for the kind words. That's a Peco turntable, covered in coffee stirrers. I weathered them with inks, then put nail heads with a pen.
I then liberally used rust paints and powdered chalks, and a lot of floquil weathered black... I have been around a lot of RR yards over the years, so it was easy to know where to put the heaviest weathering.
-Lee
Access to this requires an OGR Forum Supporting Membership


