Looks great Doberman!
Well the cool weather has arrived in the Foothills of the Ozarks maybe I can get some work done on the layout this weekend
Brian. I agree those NW look great
mike g. posted:Johan, !Great looking job on the engine! It will really be a nice addition to your RR and your layout!
Carl, That is going to be one good lucking car when your done! I sure hope you post pictures of the finished product!
Brian, Cool N&W photos! I sure hope you didn't hurt Izzy! Anything else can be fixed! LOL
Well today I didn't do anything in the train room. The CEO decided she would like to have pine toung and grove Pine installed around her new French doors, so that was my job today, get everything ready! Tomorrow I will start the install and hope it will go quick! I have many ideas for what to do in the train room, but at the rate the CEO is going who knows when I will get my chance again!
I hope everyone has a great weekend and please try and make some time to have fun with your layout and trains!
Mike. Thank you Sir.
Johan
Made some progress, got the track centerlines drawn and the cork stapled down. Also managed to get the #6 turnouts located for the long mine run grade and the engine "pocket" to store the steamer that will service the "mine run".... Haven't screwed this track down as I needed exact locations to drill the holes for the Tortoise switch machines.... but it feels like progress...
Received the 2 MTH Bank buildings I purchased from a fellow forum member this week, so I now I have my 4 Bank Buildings for the Union Station Kitbash....
The curved plywood jig in the photo below really helps make consistent bends in the Gargraves 37 inch straights.... Finally realized I needed to bend them first, then weather them with the Rustoleum Camouflage Brown. I had been painting them first then bending them but the ties don't slide on the painted rails nearly as easily as unpainted.
Attachments
Mark, I know what you mean! I hope this is the last remodel project of the year! I still have to buck and split all the trees we took down this summer. But there is no rush as it will be next winters wood, so a little here and there it will be done. I have so many ideas of what I am going to do when I get back in the train room, I have been making a list so I am not jumping all over the place.
Dobermann, Nice job on the corner and the boat! It really adds detail to the already wonderful dock with the girls!
Lee D, You can only hope so! LOL
Chris, Things are really looking good! I like how you mounted the jig right in place where the track is going. You can bend it and fasten it as you go, what a great idea!
Well I will be heading out to the garage to start cutting Pine tongue and grove soon, I hope it doesn't take all day! LOL
I hope everyone has a great Saturday and find time to have fun on your layout and trains!
P.S. Did you see that Seahawks game! LOL![]()
Chris, I can see that painting after bending would be easier. Looks great!
Mike, I remember making the old to do lists that have been referred to as punch lists for quite a while. Yes, I can find myself spinning my wheels without one
Fixed a major derailment which occurred on the mainline last week all the while running trains on the other 3 lines. Once the derailment was cleared up and the main was no longer fouled, I got that once derailed train with the Y6b at the point running just fine.
I straightened up the train room just a bit .... fixed some scenery issues .... made out my York shopping list ... and of course enjoyed the entire time I was in my train room! Here are a few pics. My N&W Y6b is pulling 24 freight cars which is about the maximum ( without the train derailing at it's midpoint ) for the 042 curve ahead. No doubt the Y6b can pull many more cars but given my tight O42 curve 24 mindfully placed cars is what trial and a whole lot of error has taught me. Love to watch those slow freight drags which makes the trains seem even longer!![]()
![]()
Attachments

have a great weekend everyone !!


Attachments
Today I spent the day with train buddies at the Berea train show in berea. Weather turned out nice. I don't usally find anything here but this time I was lucky. I found a Weaver Dow Chemical of Canada tank car for a good price. When I got home I was happy to see my tank car truck kits arrived and the decals I ordered were there too. The trucks are nice and are 1/48 scale and because they are of the right time era I want I think i'll get a few more. The decals are for an engine project. Years ago I bought two Boy Scouts of America 080's for a reall good price. I plan to strip the decals off them and make them Buffalo Creek engines. So it turned out to be a good day ll the way around. Pics..................Paul 2
Attachments
Attachments
paul 2 posted:Today I spent the day with train buddies at the Berea train show in berea. Weather turned out nice. I don't usally find anything here but this time I was lucky. I found a Weaver Dow Chemical of Canada tank car for a good price. When I got home I was happy to see my tank car truck kits arrived and the decals I ordered were there too. The trucks are nice and are 1/48 scale and because they are of the right time era I want I think i'll get a few more. The decals are for an engine project. Years ago I bought two Boy Scouts of America 080's for a reall good price. I plan to strip the decals off them and make them Buffalo Creek engines. So it turned out to be a good day ll the way around. Pics..................Paul 2
Paul. That is a very nice looking Weaver car. Hope i can 1-2 same one some day. 👍
Johan
Patrick, Wonderful looking engine! I also really like the red bridge! blends in with the rest of your layout!
Brian, cool Photos, Sure is a lot of black for such a nice weekend!
Paul 2, Nice tank car, and it also looks like your going to be busy with some trucks for awhile!
Johan, Wonderful looking Harbor! Very nice work!
Well I got most of the tongue and grove done, just some work in the morning! Then it should be train room time!
I hope everyone had a great day and an even better tomorrow!
Lou1985 posted:
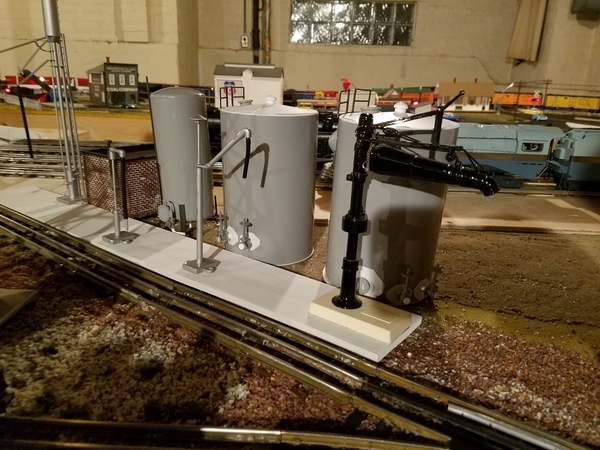
Lou, that's a great looking service island! Did you have to paint the tanks or did they come gray like that already?
mike g. posted:Lou1985 posted:Lou, that's a great looking service island! Did you have to paint the tanks or did they come gray like that already?
The tanks came molded in gray with gray and white details from Plastruct.
Lou1985 posted:mike g. posted:Lou1985 posted:Lou, that's a great looking service island! Did you have to paint the tanks or did they come gray like that already?
The tanks came molded in gray with gray and white details from Plastruct.
Well I would have to say they turned out looking great!
Spent last night and this morning getting the basement and layout cleaned up for my hosting sessions this Tuesday and Friday. Didn't have time to finish the cliff/lake area but did get the bridges back in place with just some minor cutting needed. Now the fun part deciding what to run and crossing the fingers that the gremlins stay away.
Attachments
mike g. posted:Patrick, Wonderful looking engine! I also really like the red bridge! blends in with the rest of your layout!
Brian, cool Photos, Sure is a lot of black for such a nice weekend!
Paul 2, Nice tank car, and it also looks like your going to be busy with some trucks for awhile!
Johan, Wonderful looking Harbor! Very nice work!
Well I got most of the tongue and grove done, just some work in the morning! Then it should be train room time!
I hope everyone had a great day and an even better tomorrow!
Mike. Thank you. 🤝
Johan
Maybe it's just the season, but I've been in a postwar mood lately. So I took my 2046 down from its shelf, lubed it up and put it on the layout. It's a lot of fun, watching these veterans chug along, pulling a string of 027 passenger cars!
Bryan, It looks like you are ready for the Tuesday Nighters to invade the train room. The layout looks great!
Bryan in Ohio posted:Spent last night and this morning getting the basement and layout cleaned up for my hosting sessions this Tuesday and Friday. Didn't have time to finish the cliff/lake area but did get the bridges back in place with just some minor cutting needed. Now the fun part deciding what to run and crossing the fingers that the gremlins stay away.
Beautiful train room Bryan.
I like the white shelves too
Attachments
Bryan, things are looking good! I sure hope you have a great time Tuesday and Friday! Tell Paul S. we all said HI! LOL
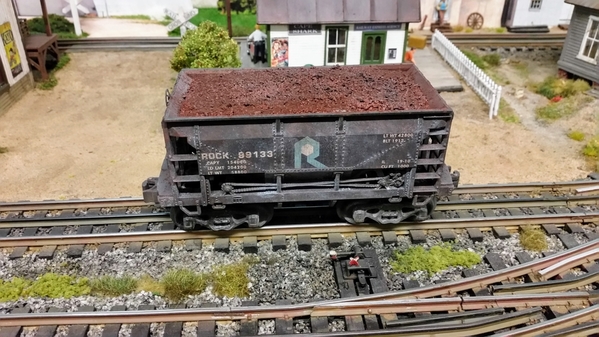
Johan, wonderful job on the oar car! The empty car looks even better then the full one!
So today I was able to the CEO's project done and got some train room time today. I started with my hillside between the upper siding and the grade returning down to the main level! Here are a couple photo's and I hope to get out there again tomorrow. Sofar everything has been free! I tell you its really fast to cut cardboard with the bandsaw! LOL
Attachments
The beginning of some scenic divide between levels. Looking good, Mike!!
I’m sure Bryan has something special for Paul. I’ll see what they say Saturday.
Mark Boyce posted:The beginning of some scenic divide between levels. Looking good, Mike!!
I’m sure Bryan has something special for Paul. I’ll see what they say Saturday.
I take it your going to see both of them Saturday! If so I hope you all have fun!
Bryan, do I see two stair cases in top photo? Set up for crowds with an entrance/exit?
mike g. posted:Mark Boyce posted:The beginning of some scenic divide between levels. Looking good, Mike!!
I’m sure Bryan has something special for Paul. I’ll see what they say Saturday.
I take it your going to see both of them Saturday! If so I hope you all have fun!
Well, they usually attend the Northeast Ohio breakfast, which they do graciously allow a few of us Northwest Pennsylvanians join in. LOL
I walked upstairs with the intention of getting my tennis shoes and then going directly to the gym for a workout. At the top of the steps is my train room and it was calling to me. For the next 1 hour 45 minutes, I ran trains, worked on tweaking some scenery, put some locos and freight cars onto their shelving, and just plain had fun enjoying every moment!![]() Then I went to the gym.
Then I went to the gym.
Attachments
Bryan, Great Train Room photos. That viaduct is really an outstanding piece !!! How is it constructed ?

Mike G: Nice work, make sure your cardboard isn't too close to your tracks on the upper level ??? It seems like almost no clearance between the end of the ties and cardboard, besides clearance for the trains, the ballast needs to slope down from the top of the ties to allow for drainage.
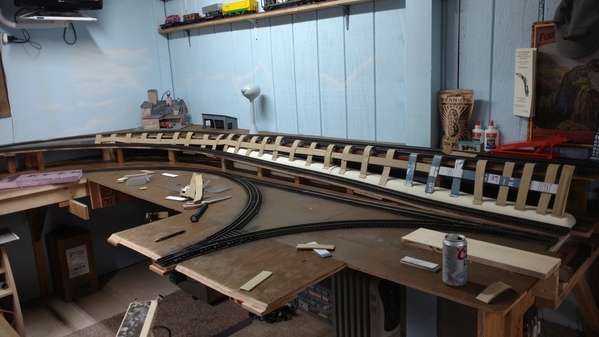
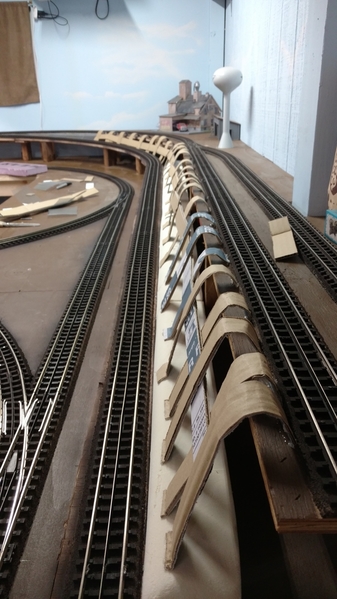
I laid a lot of track today, but at least what pictured is done, and the shims are in place for the super-elevated curve.... Have one straight section to cut for the inner track up by the crossover to the Mine Run, but I needed to get the easement/transition curve entering the 180 degree curve laid out, banked and mounted, then go back and cut the straight the right length.
Trumptrain: Nice photos, sounds like a good way to get motivated to go to the gym !
Attachments
Lionelski posted:
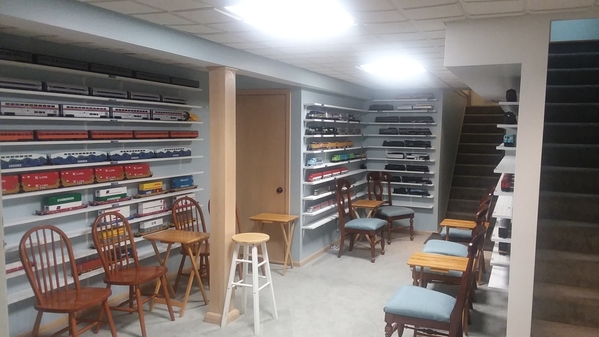
Thanks, the shelves started out just in one section but then quickly spread to almost every wall on that side of the basement. The first ones I did I attached track to them but the cost of that was going to be too much so did the small groove technique to keep the trains in perfect alignment.
Tom Tee - Yes two sets of stairs, one goes up to the main part of the house the other goes up to the garage. Wasn't a huge selling point when we bought the house but now I would never have another house without something like that. Can bring layout building materials in through the garage instead of all through the house, train guest can just come right down to the layout, and best I can sneak all train purchases into the layout room without wife seeing. lol
Mike - I am actually going to be very nice to Paul and will be unveiling his surprise to the group. He has already seen it so that is probably why he has been less ornery this summer.
Chris - Can't take credit for the viaduct bridge. My good friend Charlie Easton made that for me. I do know he constructed it out of ceiling tiles.
Mark - Just put in my RSVP for Saturday's breakfast and tour with the Northeast Ohio breakfast group. See you then.
Patrick, sounds like a good way to warm up before the gym! That way you wont pull anything during your workout! LOL
Chris, the cardboard is close, but I did that so the ballast wound not fall off the side to the lower level. Your track work is looking Amazing! But I have one question, in your 2nd and 4th pictures the inside track neat the switch looks like its missing the center rail. It that just the photo or is there a reason for it?
Bryan, Sure sounds like you have a week full of fun! Trains and friends on Tuesday, Friday and Saturday along with a breakfast! I have to say its really nice that its really nice that you guys in Ohio are letting Mark join you on Saturday! I am guessing the door by the chairs in your photo is where you hide your new purchases! LOL
Well This morning I was thinking about my work yesterday and realized that I am going to have to rework one section near the top of the slop, as I need to have a lift out section of hillside to have access to the switch machine under the siding track. Something I will work on today and maybe do some cleaning!
I hope everyone has a great day and please try and find time to have fun on your layout and trains!![]()
Very observant Mike G - That piece of track is just a "place holder" so I could roll cars through that section. I ended up cutting that center rail out and replacing a section of black center rail in one of the Ross #6 switches that I had purchased years ago from a forum member....
I should have just discarded the LH #6 Ross switch in the trash rather than try to repair all of it's issues... The points had too much play in the vertical plane, many spikes were loose, the hot center rails were pitted from "arcing", not sure why.. I ended up spending over 90 minutes on it, when you do the math, I should have bought a replacement !!
It won't see a lot of service over there on the entrance to the "mine run" and "engine pocket", and no lighted passenger cars will be going through it, so hopefully it can just serve out the rest of it's useful life there without issue. I'll know soon enough as I am about ready to power this whole area up and do some test running.
Johan, another nice pic of your weathering.
Patrick, always enjoy when you post pics of your layout.
Mike g, never would of thought to use a bandsaw for cutting cardboard. That saves time of cuting it. Looking forward to the completion of the scenery in that part.
Chris, I like the section you are working on. Trains will look good on those wide curves.
Mark, I also RSVP to go to the breakfast. Good to see that you can make another one.
Bryan is right. I am less ornery now but that is because I kept pushing him to finish the elevated line. That took a lot out of me. So much so I have not done anything at all on the layout. Now my pendilum has swung from work mode to buy mode again. At the Berea show where I bought that car myself and one of my Tuesday night train buddies stopped to see Bryan at the NMRA table. I showed him what I bought and he said because I never take them out of the boxes the only way I run them is to place the box down and push it back and forth. LOL. Which sad to say is true. Looking forward to Tuesday night...............Paul 2
"That piece of track is just a "place holder" so I could roll cars through that section. I ended up cutting that center rail out..."
Help the beginner out, Chris. Why?
I’m glad you plan to go Saturday, Paul. It will miss November because of knee surgery.
Im glad you are ready to get going on the layout. I guess we get so many cars, they don’t all get unboxed and find layout space
I love the smell of smoke pellets in the morning!
Attachments
Chris, I took what you said about the cardboard and thought about it. I ended up tearing it all out and redoing it this morning. Wish I would have done it this way in the first place, it was a lot faster and I think will look a lot better once it has some rocks, grass and maybe a tree or 2.
I hope I didn't throw you under the bus by picking out the missing center rail, I just didn't understand it, but now I do! Your just using the 2 outside rails to run cars on.
Cody, since I am pointing things out on this wonderful Monday, I thought I should point out that I love your saying about the smoke pellets in the morning! But in your video I didn't see any smoke! LOL
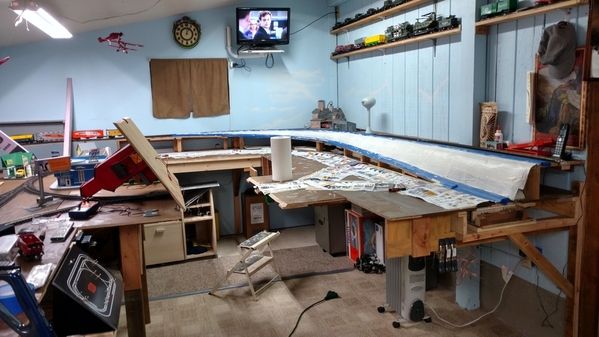
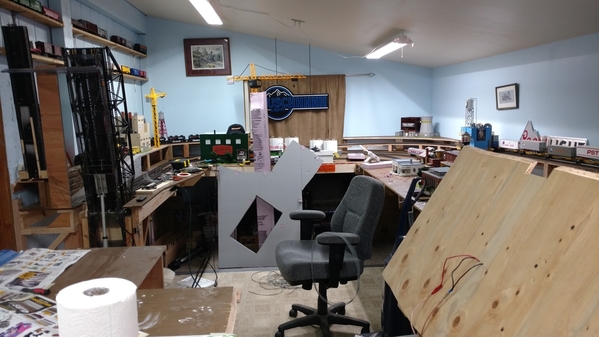
Well guys I went out and worked on my hill side between tracks and after lunch I will go back out and try to clean up some of the train room! It is quite a mess right now and really is starting to bug me that I let it get so bad. I have included some pictures of my hill side and one picture to show you all what a mess I have going! LOL
There wont be any train room work for the next 2 day starting tomorrow as I will be stuck at the store again! LOL

Attachments
Hi Vincent, sorry I made it difficult to understand. I am bending Gargraves for my wide radius curves so that I have what's called an "easement" or transition curve where the radius, or curvature, goes from being straight to the desired constant radius of the 180 degree curve. Using easements, or transition curves definitely makes a positive difference especially with longer passenger cars, and articulated steam engines, but it general I do notice that trains run smoother and look better entering and leaving curves with "easements". When you bend Gargraves, it's almost impossible not to end up with a natural transition or easement, unless you really try to force the track to go from straight to the desired curvature.
I find it best to start the curve somewhere near the mid point of a 37 inch section of Gargraves, and wasn't sure exactly where the end of that transition curve piece of track would finally end up on the "straight section".... I learned a long time ago, not to try and start or finish curves at the end of the piece of bendable GG track. So, I figured I would do the 1st transition curve piece, then get the 096 (48 inch radius) Ross sections positioned and keep them 4 1/2 inches on center from the outer main line curve and get all that track work done and "the curves banked".....
Once that was completed, I figured I'd go back and cut a piece of straight track to fill in the gap between the 2 curves.... It took so long to do the curves, and I was pretty tired by last night, that I just grabbed a piece of scrap track that pretty much fit the hole so that I could roll cars down the grade into the curve... So hence the "place holder", temporary as it's missing some center rail.... I still have to cut and install a new piece of Gargraves to replace that section...
Sorry for even longer explanation....
Mike G: Looking good... You would have made less of a plaster mess using the Low-loft batting LOL....
Mike,
i know what you mean! It’s hard to see and the 46 turbine just doesn’t smoke that well. I really need to take it apart and see if I can get all the old pellet material out of it. The stuff gets so built up it just won’t smoke right.


