A club member gave me about three pounds of white aquarium gravel. I used it for ballast in my train yard. I'm not done yet. I have to go to Petsmart to get some more. Tomorrow I'm going to clean it all up.


|
|
Hi guys! Been a while since I posted over here, was trying to maintain a low profile by only doing my monthly updates on the layout. Been keeping busy though.
The track is going down at Roseville. The plan is just a big reverse loop with half a dozen industrial spurs.

I'm about 2/3 of the way around the loop.

The straight leg of the near switch goes to close the loop. The other switch goes to a couple tracks in an oil loading facility.

The other thing I've been working on is fascia. Now that Matt is back with me and working on the manual switch throws, I have to stay ahead of him with the fascia. This little chunk will just have one switch.

I put in 16' to get over to a couple more switches and wrap the end of the first peninsula.

It really makes it look finished.

I'm still a few feet short of where Matt needs to work, but there's enough ready to keep him busy on his next visit.

Looking good Elliot! I'm glad Matt is helping you along!
Elliot your doing a wonderful job with your layout! Its amazing on how large it is, I would get lost in there.
This morning after breakfast I put a second coat of paint on the frame for the control panel. Have to run some errands but when I get home I'll take it to the attic and see if the frame fits. Keeping my fingers crossed on that one............Paul
paul 2 posted:This morning after breakfast I put a second coat of paint on the frame for the control panel. Have to run some errands but when I get home I'll take it to the attic and see if the frame fits. Keeping my fingers crossed on that one............Paul
I'll keep my fingers crossed too, Paul! You have a good plan!
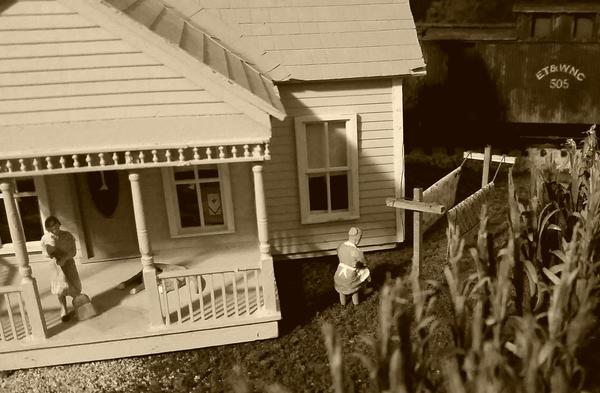
I made a clothes line for the farm house, after seeing some 1930s photos of farms and realizing it needed one. I had a woman milking cow figure that'll work great once I make a clothes basket for her. Tonight, I'll print out a 30s quilt design onto paper in scale, fold it in half and hang it up there.

It has been a productive couple of weeks since the weather outside has been either too hot or too wet. Finished ballasting my trolly line and added a passenger loading platform, built an extension to my country station platform, added and painted some more landscape rock features and constructed 10 more dwarf signals to indicate switch position. Soon I will need to begin adding some greenery.


Unfortunately, I have neglected cleanup and organization - I dislike this part of the hobby!


Dave

Lee, I think the detail you put into your layout is above and beyond what I might ever get around to. But when the time comes I will be going back over your layout for inspiration!
DARLANDER, you have a great looking layout going there, the rocks look great and I like the addition to the station. Your dwarf signals are wonderful! Do you buy the heads or just the faceplates?
mike g. posted:Lee, I think the detail you put into your layout is above and beyond what I might ever get around to. But when the time comes I will be going back over your layout for inspiration!
DARLANDER, you have a great looking layout going there, the rocks look great and I like the addition to the station. Your dwarf signals are wonderful! Do you buy the heads or just the faceplates?
Thanks Mike for your kind words. I bought the faceplates on eBay. They are cheap and came with the LEDs. Check out my post: 6/30/16, page 221 for more info on how I constructed the dwarf signals. I did another post on 4/23/16, page 206 that gives additional detail. check out: JTD23 10 Sets Target Faces with LEDs for railway signals O scale on the internet.
Dave
darlander posted:It has been a productive couple of weeks ... added and painted some more landscape rock features and ...
Dave
That's some really good looking rock-face, right there, Dave. Congratulations on your success with it. You make me eager for more.
FrankM.
mike g. posted:Lee, I think the detail you put into your layout is above and beyond what I might ever get around to. But when the time comes I will be going back over your layout for inspiration!
Thanks, Mike. I really appreciate your support and kind words!
BTW, did you notice the 'family member in service' blue star flag in the window of the farm house? Check out that first photo again. Also, I'm going to be lightly weathering that (scratchbuilt) farm house soon as it just looks too clean to me...
I didn't notice it before, but very nice touch!
After getting back home and cutting the grass finally I got the control panel to the attic. Set it in place and Impressed myself because I was pretty well spot on with my measurements. Mark, I had to sit down after this one LOL. Anyways now that that is done I have to get to the Depot to get a long hinge for the back and some anchor plates to screw the panel down to the table. It looks longer then the table but I made the table top wider then the frame it is on. Also I tapered it. 4 1/2 inches back 3 1/2 inches in the front. A few pics.....Paul


Paul,
Fits like a glove!!
Almost does fit like a glove Mark. So with that project in limbo till I get the necessary hardware to secure it I went back down to the basement to clean up my mess from making that up. While down there I decided to try some track work, nothing definite. I took the Menards power plant and ran some track into it. I had my AC & Y hoppers down there. Wanted to sort of see how two bay hoppers would look. I have coal loads for them somewhere. This is not where the power plant will end up. I want to be able to camouflage one end with maybe warehouse flats or a building associated with power plant so I can push loaded hoppers in and down the table a ways to pull them out. Pic of the area...................Paul

p51 posted:I made a clothes line for the farm house, after seeing some 1930s photos of farms and realizing it needed one. I had a woman milking cow figure that'll work great once I make a clothes basket for her. Tonight, I'll print out a 30s quilt design onto paper in scale, fold it in half and hang it up there.
Hey Lee, Google "Ellen Culhane crazy quilt" . The wife of Con Culhane has a quilt preserved in a museum. She bought that 1st locomotive of his, sort of a win win, no? After his death she sort of vanished. Speculation is she headed west to Colorado or somewhere mid west, or north west.
I came across plans for and early playground at a school too. All wood, tetter- totter, merri- go round, and swing set. Just a thought, I know your shooting for local accuracy as well as era. It would likely be old even then, but even I got a few splinters in my butt before ,lol.
I missed the bit on weathering Lee, wouldn't pink be a fifties color? I.e. new paint? The roof and chimney do look a little too new. A contrast of new and old is very proto I'd think.
Edit: 30s-50s color.
Adriatic posted:I missed the bit on weathering Lee, wouldn't pink be a fifties color? I.e. new paint? The roof and chimney do look a little too new. A contrast of new and old is very proto I'd think.
The color of houses in that part of the country was (and in some places, still is) uniformly white. That said, a peach-ish color was also used to some small degree (as was alight yellow), I remember seeing badly faded houses in that area in that color that hadn't been painted in many years, when I was a kid going up there.
The Ensor farm house (yes, that's a real name, and a common one up there at the time, my Uncle married an Ensor gal right after WW2) is right next to a gas station that is already white and frankly, I wanted some other color than white and the Pullman Green/red of the ET&WNC company structures.
I haven't gotten to weathering but mostly it'll be on the roof as the Ensor farm is handled by women in 1943, and they keep a clean, prideful home. They aren't about the let the places they can reach look shabby if they can help it!
As for swings and such, nobody up there could afford such "store bought" frills during the depression. I'm going to put some trees around there eventually, and a board suspended by ropes is the limit to kid's toys you'll see. Not a chance are you going to see a tire swing, as gas/tire rationing is in effect and nobody's going to use a tire for something like that for now!
If you haven't already picked up on it, this layout is an extension of my driving interest in history. My goal is to have everything being historically accurate, or at least plausible, for 1943...
p51 posted:I made a clothes line for the farm house, after seeing some 1930s photos of farms and realizing it needed one. I had a woman milking cow figure that'll work great once I make a clothes basket for her. Tonight, I'll print out a 30s quilt design onto paper in scale, fold it in half and hang it up there.
That's a real nice touch. Are you going to put some clothes on it?
suzukovich posted:That's a real nice touch. Are you going to put some clothes on it?
Some socks, maybe, but a quilt for sure. I've already found some good 30s designs online I can print out to make one.
I'm going to make a basket for the old woman figure to show her getting ready to hang the rest.
BTW, I have some mailboxes done and they're going in soon...
suzukovich posted:This week I realigned the streetlights and extended my sons track on the layout and in the proccess I was able to increase the deep snow effect. This morning I weathered the track with snow so it will blend in with everything else. Then ran a couple of cars to give it the driving in snow look on the street. The more my son runs his cars, the ruts will blend in over time.
Before
Thanks for the likes. The more I looked at it. I didn't like how it turned out.. So I spent the last two days painting the slot and adjoining sides an off white to blend it in better. I think it looks better now. Have one section left, then apply a new coat of snow, and think that should do it.
After.


Nothing on the layout but spent the last two days watching and photographing the visiting warbirds. Today there were 4. Took almost 500 photos, on my feet 7 hours both days. Loved it , pooped and enough for awhile but I found out there is a LOT of interest among the war bird fan club for model trains, lots of Lionel fans. It was heart warming.
Over the past couple weeks I've made progress in turning the semi-finished basement room (about 40% of the basement) from dingy ex-kids play area (from previous owners) to a relaxing grown-ups area. The old carpet came up easily and the astro-turf wasn't much harder, though the adhesive from the turf is a bear. After chemicals failed miserably, I elected to go with the heat gun & scraper. It works pretty well, though it will be slow going. Got the walls primed & painted, and will do the same w/the floor once some residual rusty carpet nails are Dremmelled, cracks filled & sanded, & the adhesive's up.


I also think I'm getting close to a final version of my layout plans. Atlas track with Ross (and a few Atlas) switches. Minimum curve O-72 on the mains & sidings, with some O-52 switches in the industrial areas. It's designed to be expanded in stages, first becoming an around-the-room mainline, then tunneling through the interior wall and into the other half of the basement. There will be a 40" TV on the wall at the bottom above the small yard (hopefully a coal mine). The door to the room is in the lower right corner of the picture. However, I'll likely need to put an addition onto the house before the wife will give up her half of the space. Right now I'm hoping I can sell the invading industrial sidings to her as shelving that my trains just happen to run on top of.... The colored blocks in the open space represent pieces of her furniture.

All layout building will have to wait, though, as first the upstairs guest room must be turned into nursery. My wife and I are expecting our first (a little girl) in January.

suzukovich posted:suzukovich posted:This week I realigned the streetlights and extended my sons track on the layout and in the proccess I was able to increase the deep snow effect. This morning I weathered the track with snow so it will blend in with everything else. Then ran a couple of cars to give it the driving in snow look on the street. The more my son runs his cars, the ruts will blend in over time.
Before
Thanks for the likes. The more I looked at it. I didn't like how it turned out.. So I spent the last two days painting the slot and adjoining sides an off white to blend it in better. I think it looks better now. Have one section left, then apply a new coat of snow, and think that should do it.
After.
I think it looks great, reminds me of when I would be out at night plowing snow for 12 hours, then 12 hours off and back at it again. Very realistic!
Fridge56Vet posted:Over the past couple weeks I've made progress in turning the semi-finished basement room (about 40% of the basement) from dingy ex-kids play area (from previous owners) to a relaxing grown-ups area. The old carpet came up easily and the astro-turf wasn't much harder, though the adhesive from the turf is a bear. After chemicals failed miserably, I elected to go with the heat gun & scraper. It works pretty well, though it will be slow going. Got the walls primed & painted, and will do the same w/the floor once some residual rusty carpet nails are Dremmelled, cracks filled & sanded, & the adhesive's up.
I also think I'm getting close to a final version of my layout plans. Atlas track with Ross (and a few Atlas) switches. Minimum curve O-72 on the mains & sidings, with some O-52 switches in the industrial areas. It's designed to be expanded in stages, first becoming an around-the-room mainline, then tunneling through the interior wall and into the other half of the basement. There will be a 40" TV on the wall at the bottom above the small yard (hopefully a coal mine). The door to the room is in the lower right corner of the picture. However, I'll likely need to put an addition onto the house before the wife will give up her half of the space. Right now I'm hoping I can sell the invading industrial sidings to her as shelving that my trains just happen to run on top of.... The colored blocks in the open space represent pieces of her furniture.
All layout building will have to wait, though, as first the upstairs guest room must be turned into nursery. My wife and I are expecting our first (a little girl) in January.
Great start with the basement, Looks like a wonderful layout for the room size. Congrats on the baby coming! Take every second in that you can, cause they grow up so darn fast! Next thing you know your a grandpa! LOL
mike g. posted:suzukovich posted:suzukovich posted:This week I realigned the streetlights and extended my sons track on the layout and in the proccess I was able to increase the deep snow effect. This morning I weathered the track with snow so it will blend in with everything else. Then ran a couple of cars to give it the driving in snow look on the street. The more my son runs his cars, the ruts will blend in over time.
Before
Thanks for the likes. The more I looked at it. I didn't like how it turned out.. So I spent the last two days painting the slot and adjoining sides an off white to blend it in better. I think it looks better now. Have one section left, then apply a new coat of snow, and think that should do it.
After.
I think it looks great, reminds me of when I would be out at night plowing snow for 12 hours, then 12 hours off and back at it again. Very realistic!
It reminds me of learning how to drift, rather than removing them.
I started on a remote S turn in the winter. By summer I didn't need ice.
No e-brake, just V8 HP, and a set of brass ones. Cold brass ![]()
It does look great.
p51 posted:I put 1930s Appalachian quilts on the clothesline at the Ensor farm, printed in scale onto paper. They even weighed down the lines like they would in real life.
I really like the detail and the historic perspective of your layout. Great work!
Dave
darlander posted:p51 posted:
I really like the detail and the historic perspective of your layout. Great work!
Thanks, Dave. I don't think a day goes by where I don't go into the layout room and take a good look at everything, wondering what I could add to make it more representation of the Blue Ridge region during WW2...
The layout is as much a representation of my interest in history as it is my interest in trains. Maybe more so.
I don't see a star flag in the window ?? Saw a nice P51 yesterday too.
jim pastorius posted:I don't see a star flag in the window ??
Look again. It's in the window to the right of the front door, in the lower right pane.
Thanks, I missed it. People today don't realize how important that little flag in the window was. When we went anywhere you always looked at the widows for a flag. Multiple stars and a gold star always brought forth comments.
I started out today getting the hardware I needed to fasten down the control panel and run a full width hinge across the back. I was all set to start and found I forgot to get the L shape fasteners to hold it down to the table top. So I made a second run to the Depot. Everything got pushed back today so tomorrow I will start in early on it...........Paul
Love the detail! Oh and I see the Star flag!
Ran trains a bit. Here are a few photos.


p51 posted:2 years to the day since the first train all the way around the layout...
P51 - Congratulations!! I hope champagne was served!! LOL
A few pics.


Nice layout. I am looking forward to the write up. hope they don't take too long.
Last night I got the brackets attached to the control panel to hold it down to the table top. That ended the night. I found out the 48" hinge I bought will not work. It was not wide enough to catch the Luan board. So another trip back to the depot to get other hinges. I would of rather the long hinge worked. Sometimes working with more then one hinge if you don't get them lined up properly you have trouble with the panel opening............Paul
paul 2 posted:Last night I got the brackets attached to the control panel to hold it down to the table top. That ended the night. I found out the 48" hinge I bought will not work. It was not wide enough to catch the Luan board. So another trip back to the depot to get other hinges. I would of rather the long hinge worked. Sometimes working with more then one hinge if you don't get them lined up properly you have trouble with the panel opening............Paul
is it 1 1/2" wide? that would give you 3\4" to attach on each side. if you use hinged area use it to align all hinges to main layout that way hinge acts as a spacer you can drill pilot hole in each one reverse hinge and use only that 1 screw to attach to layout.
then clamp the control panel top or? and drill pilot hole and attach all hinges to it test and if it pivots freely attach the other screws.
StPaul, The piece of Luan board measures 48" by 16 7/8. That 48" hinge would of worked but there was not enough width on the side of the hinge. I was going to use brass screws with nuts to hold the Luan to the hinge but the lid would not be able to close because the nuts would be sitting right on the 1 by 4 frame and I did not want to get into cutting out spots for them. But I found what I needed and now or after dinner I can work on it........Thanks Paul
Not today, but over several months, with a bit of final tweaking this past week, I have been working on this area, making large and minuscule changes and refinements...
Essentially, the neighborhood, located at the final dead-end corner of the layout, has been changed from a place featuring several small businesses, including the horse-trader in the foreground, to what in my mind is a more rural neighborhood of homesteads:
Here is how it was....


Here is how it is now, in its final interpretation. I think. Sort of. Maybe.![]()
![]()
![]()


 ..
..
FrankM, Moon Township, USA.


Moonson posted:Not today, but over several months, with a bit of final tweaking this past week, I have been working on this area, making large and minuscule changes and refinements...
Essentially, the neighborhood, located at the final dead-end corner of the layout, has been changed from a place featuring several small businesses, including the horse-trader in the foreground, to what in my mind is a more rural neighborhood of homesteads:
Here is how it was....
Here is how it is now, in its final interpretation. I think. Sort of. Maybe.
..
FrankM, Moon Township, USA.
Nice pines in pic 4/55. Homemade?
joe
dobermann posted:Moonson posted:Not today, but over several months, with a bit of final tweaking this past week, I have been working on this area, making large and minuscule changes and refinements...
Essentially, the neighborhood, located at the final dead-end corner of the layout, has been changed from a place featuring several small businesses, including the horse-trader in the foreground, to what in my mind is a more rural neighborhood of homesteads:
Here is how it was....
Here is how it is now, in its final interpretation. I think. Sort of. Maybe.
..
FrankM, Moon Township, USA.
Nice pines in pic 4/55. Homemade?
joe
All foliage is from Jim Elster's Scenic Express.
Fantastic remake of the area. I think it is better then the first. Less congested and more detail to see. Great job....Paul
paul 2 posted:Fantastic remake of the area. I think it is better then the first. Less congested and more detail to see. Great job....Paul
Thanks a lot, Paul. I appreciate your perspective and conversation . I am happier with it as it has been changed, too, but it is especially pleasant and helpful to hear the view of others on something I have reinterpreted on the layout.
frankM
Today I finished gluing up one of two roadway support structures and determined the material I'll use to pave the roadway. Still very much struggling to decide on how to fabricate the guard rails as shown in photo 3. ANY suggestions will be most appreciated. One option I'm considering is to use thin metal with a Lincane pattern and set it in Plastruct U channel between uprights. While I believe it will look nice I'm thinking it may be a little too much Art Deco, but I haven't yet found anything better.
bd


Moonson posted:paul 2 posted:Fantastic remake of the area. I think it is better then the first. Less congested and more detail to see. Great job....Paul
Thanks a lot, Paul. I appreciate your perspective and conversation . I am happier with it as it has been changed, too, but it is especially pleasant and helpful to hear the view of others on something I have reinterpreted on the layout.
frankM
Frank,
I like the new more rural looking area as well. Those trees do contribute greatly to the overall effect.
Have you thought about using window screen?
Mark Boyce posted:Moonson posted:paul 2 posted:Fantastic remake of the area. I think it is better then the first. Less congested and more detail to see. Great job....Paul
Thanks a lot, Paul. I appreciate your perspective and conversation . I am happier with it as it has been changed, too, but it is especially pleasant and helpful to hear the view of others on something I have reinterpreted on the layout.
frankM
Frank,
I like the new more rural looking area as well. Those trees do contribute greatly to the overall effect.
I'm glad you feel that way, Mark, because foliage, especially trees, is something I have never skimped on. Trees are as important to me in layout scenes where they belong as they are in real-life verdant environments where they add immeasurably to the quality of life. Once I decided I could afford this hobby, I decided never to do anything on the cheap , frankly.
When I craft a scene, I have arrayed around my work-table a number of storage containers brim-full with the various ground covers and high and low foliage , with deciduous trees and conifers available within arm's reach, of various colors , textures, sizes, and shades, ready for spontaneous creative emplacement. Then, I really "pour it on," applying the various glues that are needed to keep each of the particulars in place. It takes days for all those various glues to set-up in their respective layers. I have great fun. And Scenic Express is my most valued resource for the whole creative adventure.
FrankM
mike g. posted:Have you thought about using window screen?
For?
(I ask that if you are addressing me.) FrankM
Hi Frank, I am sorry, that was for Barnun, and his idea for a guard rail.
But on a side note, I do love your improvements on your layout! Shows time and care at what you are doing!
Mike G., assuming the window screen one was for me ... yes sir ... several varieties including the heavier Pet Screen. I've also looked at wire mesh, Raschel Military fabric and chair caning materials. Can't seem to find the right pattern, right scale for the railings ... yet anyway. But I appreciate the thought! I also looked at it for the roadway but I'm going with 220 grit sanding screen (12" x 18" sheet) which is much stiffer than the window screen (fiberglass & metal) with a better thickness and tighter weave.
Thanks again,
bd
mike g. posted:Hi Frank,..., I do love your improvements on your layout! Shows time and care at what you are doing!
Thanks, Mike G, I appreciate the approval.
FrankM
Not what I did as much as what my WIFE did. I came home from work and she'd taken a couple of days off, today she made a full set of curtains for the lower edge of the layout! She even put the hardware in place to hang them. I had no idea she was going to do this.
All foliage is from Jim Elster's Scenic Express.
Frank..I'm especially interested in pic 4 and the 2 large drooping bough firs on the sides of the company house. I'm a frequent flyer at Scenic Express but I can't locate that particular tree in the catalog. This is probably a stretch but do you by any chance still have the bag they came in? they would be perfect in this scene.
Thanks
joe

dobermann posted:All foliage is from Jim Elster's Scenic Express.
Frank..I'm especially interested in pic 4 and the 2 large drooping bough firs on the sides of the company house. I'm a frequent flyer at Scenic Express but I can't locate that particular tree in the catalog. This is probably a stretch but do you by any chance still have the bag they came in? they would be perfect...
No bag remaining (I think they were boxed), but here's a closer-up view of them and some catalogue references I just now went searching for. The catalogue I use(d) when I prepared for the scene is #16. Those trees, listed on the page (52) entitled "Premier Scale Trees" are numbers: CA0538 Appalacian Green Spruce ($9.99); CA0539 Eastern Blue Spruce ($9.99); and Ponderosa Pines (which I sometimes use cut shorter), #'s: CA0544; 0545; 0546.
FrankM

Lee, Just like any great wife, they always make things look better! ![]()
Got all my stuff ready to go last night but decided at the last minute to head out to Stockyard Express's open house today, Saturday, in Oberlin Ohio. And to top it off the wife said she will go with me and I could pick out a Christmas present. Hmmmmm not quite sure how to take that. Maybe she is using some kind of mind game on me. It's working I even told her we could do lunch in that area. Later today I'll start working again.............Paul
Moonson posted:dobermann posted:All foliage is from Jim Elster's Scenic Express.
Frank..I'm especially interested in pic 4 and the 2 large drooping bough firs on the sides of the company house. I'm a frequent flyer at Scenic Express but I can't locate that particular tree in the catalog. This is probably a stretch but do you by any chance still have the bag they came in? they would be perfect...
No bag remaining (I think they were boxed), but here's a closer-up view of them and some catalogue references I just now went searching for. The catalogue I use(d) when I prepared for the scene is #16. Those trees, listed on the page (52) entitled "Premier Scale Trees" are numbers: CA0538 Appalacian Green Spruce ($9.99); CA0539 Eastern Blue Spruce ($9.99); and Ponderosa Pines (which I sometimes use cut shorter), #'s: CA0544; 0545; 0546.
FrankM
Thank you Frank
mike g. posted:Lee, Just like any great wife, they always make things look better!
Thanks, Mike.
She makes the room better every time she walks into it. I married well, and every day I wonder why she said, "yes" when I proposed...
I worked on my subway. I want to complete it soon so can start working on my upper level trackwork.
Hi All,
I'm new on this forum, I'm starting over, so first things first. I'm painting my new train room from wife pink to man green, lol then be installing an old PRR ceiling lamp.
NEC Runner posted:Hi All,
I'm new on this forum, I'm starting over, so first things first. I'm painting my new train room from wife pink to man green, lol then be installing an old PRR ceiling lamp.
Blank canvas. That's a great place to be. Welcome to the forum!
Going to Stockyard Express Saturday took up a good portion on my day. All enjoyable. Met a number of friends from the Tuesday night group there. I didn't think I was going to find something I wanted but, boy was I wrong. Just about ready to leave I started going through some Woodland Scenic buildings and there it was. The Morrison Door Factory. It was the only one and the more I looked at it and saw all the detail the more I wanted it. So I ended up buying it. I already have a spot for it on my up and coming basement layout. A pic of my buy. Later today I will put some time in on the attic layout seeing I ran into Bryan too and he said while we were standing with some of the Tuesday night group there I should host a night soon. Thanks a lot Bryan LOL...............Paul

NEC Runner posted:Hi All,
I'm new on this forum, I'm starting over, so first things first. I'm painting my new train room from wife pink to man green, lol then be installing an old PRR ceiling lamp.
Welcome! Do you have your layout designed? If you decide to start your own layout progress thread (highly recommended!) please post the link here. I enjoy learning from others while I work on mine.
dobermann posted:A month after starting my granddaughters 4x8 it's finally connected it to the TIU. Maybe now she'll stop driving cars and moving people around on mine.
But, IMHO, I'll bet it will be playing with the ones on your layout that she will remember the best.
FankM
No work on the layout this weekend, but that doesn't mean it was without trains. What fun would that be? We went to Milwaukee to see boxing Saturday night.
Friday evening we went over to the Lionel Railroad Club and met up with forum member Jim R where we talked trains of course, as well as boxing. Very fun evening, it was nice meeting him IRL.

Saturday morning we stopped at Sommerfelds where I picked up a couple cars that fit with my railroad's motif. But I really had my eye on a much bigger fish. Unfortunately, I was the second person interested in it, but just like eBay, I did out bid him. We'll see how this one shakes out later this week. Fingers crossed.

As for the boxing, it was a great card. We always have great seats, because my buddy knows the promoter.![]()
Sadly, I only ran trains again today and didn't work on the layout. Did decide to make and post a video of my railking NKP 765. https://youtu.be/Avhk_mDMxic
NEC Runner posted:Hi All,
I'm new on this forum, I'm starting over, so first things first. I'm painting my new train room from wife pink to man green, lol then be installing an old PRR ceiling lamp.
Welcome!
I identify! Our last daughter will be getting married in 3 weeks, and I'll be painting over her My Little Ponies Pink to sky blue and building my layout in my own room for the first time in 25 years.
NSRailfan100 posted:Sadly, I only ran trains again today and didn't work on the layout. Did decide to make and post a video of my railking NKP 765. https://youtu.be/Avhk_mDMxic
Well that was a very productive day! I like your 765! All I did was run trains a bit myself but no neat video like you did!
John D. posted:NEC Runner posted:Hi All,
I'm new on this forum, I'm starting over, so first things first. I'm painting my new train room from wife pink to man green, lol then be installing an old PRR ceiling lamp.
Welcome! Do you have your layout designed? If you decide to start your own layout progress thread (highly recommended!) please post the link here. I enjoy learning from others while I work on mine.
Nothing really planned this time, just a freelance style, could end up with all prewar stuff, and use a Legacy with a powerhouse to run it all, lol ![]()
Save the green for the PW benchwork; light blue walls are cheap backdrop ![]()
No work yet on the layout but the postman brought my latest purchase. I ordered this from Beth at Public Delivery Track last week. I have to do some yard work before retiring to the attic to do some layout work but couldn't wait till then to open the package. Always makes me feel like a little kid again getting a train for Christmas. I really have very little Bessemer so I thought this would make a good addition and it is a Weaver. A pic..........Paul

Spent all day Sunday and tonight getting my basement put back together in anticipation of Friday night's open house. Got a lot of accessories onto the layout so people can start to see my vision. Finally hit up Costco to buy food and drinks for Friday. still have to test run some areas but really getting excited about having people over for the first time since the "PROJECT " began last November. No pictures until Saturday as I want to see the reactions to people seeing it for the first time live.
I whittled a spout for my water tower.
Then this giraffe showed up to get some water.
Well someone needs to post a giraffe since someonelse is preoccupied ![]()
C.Sam, That's a sad sight. ![]() I hate to see a club dismantle. Hope you find another club to share your love of trains with.
I hate to see a club dismantle. Hope you find another club to share your love of trains with.
C.Sam, that is for sure a sad sight to see. I hope your club will find a new home to build a new layout. With one door closing, one will soon open. I hope yours opens soon!
Surely may not seem like a lot to some of you, but my 11 year old PS-2 F3 battery is getting weak, so put on the wall charger from MTH and hopefully that will take care of it in a few hours. If not, will have to check out the BCR.
George Harritos posted:Surely may not seem like a lot to some of you, but my 11 year old PS-2 F3 battery is getting weak, so put on the wall charger from MTH and hopefully that will take care of it in a few hours. If not, will have to check out the BCR.
We have BCR's in all of our MTH Proto Sound II engines. They are GREAT!
Things were going along pretty good yesterday until I put the top on and found that somehow when I was cutting the piece I was off at one end. The front and sides matched up but the back side was off, short. So today I went back to the depot and got another piece of Luan board but I had them cut it for me. Got it home and painted it so after dinner I hope to get it on. I can use my mistake somewhere else................Paul
Adriatic posted:Then this giraffe showed up to get some water.Well someone needs to post a giraffe since someonelse is preoccupied
Hee hee hee! ![]()
Been rehabbing a somewhat distressed Frisco spotlight caboose, as Frisco Festival is this weekend:

(excuse the lousy pic, my phone camera isn't all that great)
Added a second pickup to the other truck, ground 20 years worth of crud offa the wheels and fabricated a quick and dirty chimbley outta aluminum tubing. Now the lights work good! ![]()
Mitch
Randy Harrison posted:George Harritos posted:Surely may not seem like a lot to some of you, but my 11 year old PS-2 F3 battery is getting weak, so put on the wall charger from MTH and hopefully that will take care of it in a few hours. If not, will have to check out the BCR.
We have BCR's in all of our MTH Proto Sound II engines. They are GREAT!
Hello Randy
My very first J&W BCR-1 was defective so waiting for a replacement sometime next week. Its for a railking PS-1 NW-2 switcher.
Tiffany

We took the LCCA traveling boxcar for a Radio Flyer ride. Grandsons, Adam & Noah.
Gary

Randy, I have BCRs on all my PS1 & 2 engines and never had a problem with them. I have over 15 of them.
Tiffany posted:Randy Harrison posted:George Harritos posted:Surely may not seem like a lot to some of you, but my 11 year old PS-2 F3 battery is getting weak, so put on the wall charger from MTH and hopefully that will take care of it in a few hours. If not, will have to check out the BCR.
We have BCR's in all of our MTH Proto Sound II engines. They are GREAT!
Hello Randy
My very first J&W BCR-1 was defective so waiting for a replacement sometime next week. Its for a railking PS-1 NW-2 switcher.
Tiffany
Do you get your BCR's from Wayne Renga of J & W Electronics in Red Lion, Pennsylvania? Wayne is the inventor of the BCR and is a really good guy. Of there is a defective BCR, I am sure he will replace it for you.
Have been working on the 076 Standard gauge block signal given to me by a friend. The top section is suffering some zinc pest but still in one piece. The wire was totally bad and a faulty socket but getting it back together. Don't plan to have it function, just lit. Tedious work. Wanted a few buildings on my bedroom layout so have two Marx cabins and picked up a Marx ranch house yesterday. The ranch house moved to the first floor layout and the barracks building went up stairs where there is more open space. Have been running my trains every day.
This morning was a positive move forward. I got the top on the control panel and the frame of it screwed down to the table top. I ended up using three door hinges and brass bolts to hold the top to the hinges. Bad on me it took two pieces of Luan board but I figure I can use the Luan for sidewalks around buildings. Question for all that have a control panel...... what is the best thing to use to put your schematic of your layout down. I want to do that before I start putting in the switch and uncoupling controls. All ideas greatly appreciated. Two pics of the control panel. Still have to touch up some bare wood spots................Paul


I have used automotive pinstripe.. Available in different widths and colors to suit your needs..
The surface should be well sealed and preferably have a gloss for the tape to adhere to. Burnishing helps a lot.
It can also be used to mask though. Paint ( roughly) a second color, mask the center of the rough line with the tape, Repaint to clean the edges of the new lighter lines, pull the mask.
Adriatic posted:The surface should be well sealed and preferably have a gloss for the tape to adhere to. Burnishing helps a lot.
It can also be used to mask though. Paint ( roughly) a second color, mask the center of the rough line with the tape, Repaint to clean the edges of the new lighter lines, pull the mask.
You are correct as usual!!! He will need a gloss finish for the tape to stick to the wood surface.. My bad..
I use automotive pin striping tape as well.

modeltrainsparts posted:I use automotive pin striping tape as well.
Love the cup holders!! Great idea!!
Randy Harrison posted:Tiffany posted:Randy Harrison posted:George Harritos posted:Surely may not seem like a lot to some of you, but my 11 year old PS-2 F3 battery is getting weak, so put on the wall charger from MTH and hopefully that will take care of it in a few hours. If not, will have to check out the BCR.
We have BCR's in all of our MTH Proto Sound II engines. They are GREAT!
Hello Randy
My very first J&W BCR-1 was defective so waiting for a replacement sometime next week. Its for a railking PS-1 NW-2 switcher.
Tiffany
Do you get your BCR's from Wayne Renga of J & W Electronics in Red Lion, Pennsylvania? Wayne is the inventor of the BCR and is a really good guy. Of there is a defective BCR, I am sure he will replace it for you.
Hello RANDY..........
I bought it from modeltrainstuff.com and waiting for replacement one. I just shipped it (returned) back to them yesterday by UPS. I didn't know Wayne Renga as I would have ordered one from him. This whole thing cost me 35.28 ( for 1 BCR-1 and shipping cost) and been going on for almost 2 weeks now.
Tiffany
Panel looks great Pat, Like you have been doing it for years! The club should be very pleased!
Access to this requires an OGR Forum Supporting Membership


