paul 2 posted:

Next Wednesday I host my local small train group. That gives me a week to clean up the floor area again. Going through boxes to see what stays in the attic and what gets transferred to the basement. I hate cleaning up after myself so in order to force myself I ran trains. That seems to put me in cleanup mode. Pics.......Paul

Paul,

Excellent idea to run trains while you cleanup!!

I didn't do anything on the layout yesterday, but my wife and I did something for the layout. The locomotive roster is already large and getting larger. It was time to get organized. I give you the Loco Log...

My wife did most of the work using Excel, I just took the pictures and guided her with the formatting.

IMG_6901

Each engine has a page printed on heavy stock, with space for listing all maintenance and other notes.

IMG_6902

The record continues onto the back of each page for plenty of space.

IMG_6903

Matt's here, more later. Time to actually work on the layout.

Attachments

Images (3)
  • IMG_6901
  • IMG_6902
  • IMG_6903

Elliot,

I really like your idea on the "Engine Log Book" and the space for recording of maintenance.  With over 200 engines, myself, this is a good idea I should really consider, and make an effort to do.  I do have my motive power, and all pieces in my roster, on an Excel formatted inventory, with pics of each, already.  Now, just to separate, define and print.  Perhaps it may not be as difficult as I may believe.  Just to find the time in between all other endeavors........ and work more on the layout.... and the repairs to the CCII Niagara...... and upgrades to the K Line Hudson... and the 844....... put up more shelving....... run trains to relax from working on the property (more storms last night!)......  don't you all just love it!  But really, Elliot, a great way to maintain record and pass along the idea to others.  Many thanks.....

Jesse   TCA  12-68275

Big_Boy_4005 posted:

I didn't do anything on the layout yesterday, but my wife and I did something for the layout. The locomotive roster is already large and getting larger. It was time to get organized. I give you the Loco Log...

My wife did most of the work using Excel, I just took the pictures and guided her with the formatting.

IMG_6901

Each engine has a page printed on heavy stock, with space for listing all maintenance and other notes.

IMG_6902

The record continues onto the back of each page for plenty of space.

IMG_6903

Matt's here, more later. Time to actually work on the layout.

You could probably market that

imageimageimageimageimageimageimageimageI've been adding more scenery details (ground cover, trees, donkey engines, etc.) to our logging area, Soap Creek. It's getting closer to being complete. So I took some pictures today after adding some more trees and details. Then, later I was looking back at how the area looked and the progress. So I thought it might be fun to see how Soap Creek developed. 

The last three pictures are of Soap Creek  from today. Soon I'll work on filling in the river section on the other side of the layout. 

Attachments

Images (8)
  • image
  • image
  • image
  • image
  • image
  • image
  • image
  • image
ChessieMD posted:

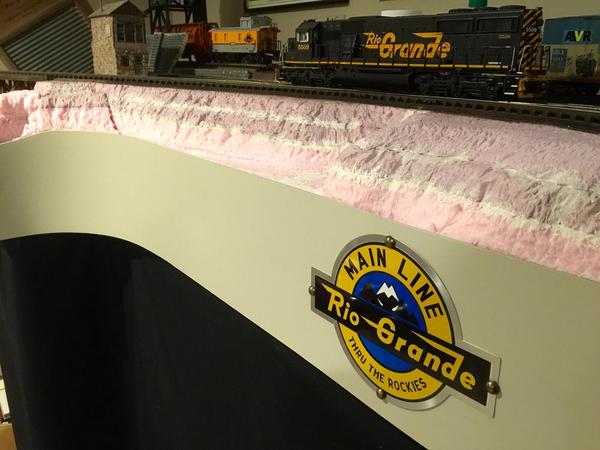
Painted the fascia board, installed my Rio Grande livery sign and the DCS remote holder.  All in all a very productive day!


IMG_1607IMG_1615IMG_1602

As an inspiration for those that are thinking of modeling O-Scale in a small area, below is  shot of the Rio Grande switching layout which is 7.5' by at it's greatest width 27.2" (at Crystal Lake-foreground) and most narrow 18" (near the smoke stack in the distance).  The layout consist of four switches , a run around track area and right now three industries, which might be expanded.  I also have enough room for two siding, near the Furniture plant and one over the lake.  Anyway, another angle of this emerging world.  Thanks.

IMG_1616

Attachments

Images (1)
  • IMG_1616
WP posted:

imageimageimageI've been adding more scenery details ...So I thought it might be fun to see how Soap Creek developed.

Hi WP/ John, You certainly  appear to be a master at making meaningful use of a narrow strip and a corner of real estate. That really looks good, and I esp. appreciate how you have used the premium trees up front, emphasizing depth and interest in the area. Congratulations on your continued success at the project.

FrankM.

WP posted:

I've been adding more scenery details (ground cover, trees, donkey engines, etc.) to our logging area, Soap Creek. It's getting closer to being complete. So I took some pictures today after adding some more trees and details. Then, later I was looking back at how the area looked and the progress. So I thought it might be fun to see how Soap Creek developed. 

The last three pictures are of Soap Creek  from today. Soon I'll work on filling in the river section on the other side of the layout. 

John,

Thank you for the photos showing added detail in time.  I really like what you are doing.

Anthony K posted:

Working on installing switch motors for the staging yard last night.

IMG_1963

I also worked on cross-bracing for my PRR-style signal bridge kit-bashed from two plasticville bridges spliced together.  I'll be mounting Custom Signals PRR-style interlocking signals for three tracks on the bridge.

IMG_1961


Anthony,

You have certainly made good progress since I last saw some photos.  You will have a few trains running with that staging yard!!

Running a little behind, Saturday was a very busy and long day. After my last post Matt came over and we worked all afternoon, then had dinner. When he left, I switched gears, had my sports buddy over and watched boxing for the rest of the evening, then Sunday was football.

Matt continued to work on the manual switch throws, and finished another 10. The work is rather unglamorous but very important to the functioning of the railroad.

Here's all we see when he's done.

IMG_6918

Knobs on the fascia.

IMG_6919

Here's what I see when he's working. He managed to cram himself into the hidden yard! A place I surely would not fit.

IMG_6912

It looks as if the layout ate him.

IMG_6913

While Matt was doing that, I finished the last 2 sections of the south wall backdrop.

IMG_6915IMG_6916

Another 20' and the entire backdrop will be done. It may take a while to get to that though, as there are some things in the way that will need to be relocated first.

IMG_6917

Going to head down in a little while to work on the fascia.

Attachments

Images (8)
  • IMG_6918
  • IMG_6919
  • IMG_6912
  • IMG_6919
  • IMG_6915
  • IMG_6916
  • IMG_6917
  • IMG_6913

No photos, but on Saturday, I went to Portland to hit the hobby shops and the engine house where SP4449 is housed (just because I love looking at all the neat stuff there). About halfway down, I ran over something on I-5 and got a flat and the puncture was too bad to be fixed. If I was lucky with this at all, it was that it happened right at the exit for what I think was the only tire place in the area. I wasn’t there for very long before I was on my way, but kicking myself for having it happen anyway even though I was just going down the highway and doing nothing wrong. I'd lost over $250 before I got to the first hobby shop!

When I finally got to Portland and the hobby shops, I found several good pre-made trees. All that is coming to the layout very soon. That’ll be the last major element for the layout itself, once the trees and bushes are in place. From then on, it’ll all be tweaking and changing the little things, and adding extra details here and there.

I also bought some minor detail stuff. For example, some pre-painted HO scale feed sacks were just about perfect in size/color for O scale sandbags, so I got them.

I also still need to pace all the rural mailboxes along the roads, too, now that they have numbers and names on them.

Big_Boy_4005 posted:

Running a little behind, Saturday was a very busy and long day. After my last post Matt came over and we worked all afternoon, then had dinner. When he left, I switched gears, had my sports buddy over and watched boxing for the rest of the evening, then Sunday was football.

Matt continued to work on the manual switch throws, and finished another 10. The work is rather unglamorous but very important to the functioning of the railroad.

Here's all we see when he's done.


Knobs on the fascia.


Here's what I see when he's working. He managed to cram himself into the hidden yard! A place I surely would not fit.

IMG_6912

It looks as if the layout ate him.

IMG_6913

While Matt was doing that, I finished the last 2 sections of the south wall backdrop.


Another 20' and the entire backdrop will be done. It may take a while to get to that though, as there are some things in the way that will need to be relocated first.


Going to head down in a little while to work on the fascia.

Matt laying down on the job again!!  LOL

Excellent work Elliot and Matt!!!

Big_Boy_4005 posted:

Running a little behind, Saturday was a very busy and long day. After my last post Matt came over and we worked all afternoon, then had dinner. When he left, I switched gears, had my sports buddy over and watched boxing for the rest of the evening, then Sunday was football.

Matt continued to work on the manual switch throws, and finished another 10. The work is rather unglamorous but very important to the functioning of the railroad.

Here's all we see when he's done.

IMG_6918

Knobs on the fascia.

IMG_6919

Here's what I see when he's working. He managed to cram himself into the hidden yard! A place I surely would not fit.

IMG_6912

It looks as if the layout ate him.

IMG_6913

While Matt was doing that, I finished the last 2 sections of the south wall backdrop.

IMG_6915IMG_6916

Another 20' and the entire backdrop will be done. It may take a while to get to that though, as there are some things in the way that will need to be relocated first.

IMG_6917

Going to head down in a little while to work on the fascia.

Elliot and Matt, Great looking work. Its a good thing Matt is a little skinny! LOL you have some truly good friend to help you!

p51 posted:

No photos, but on Saturday, I went to Portland to hit the hobby shops and the engine house where SP4449 is housed (just because I love looking at all the neat stuff there). About halfway down, I ran over something on I-5 and got a flat and the puncture was too bad to be fixed. If I was lucky with this at all, it was that it happened right at the exit for what I think was the only tire place in the area. I wasn’t there for very long before I was on my way, but kicking myself for having it happen anyway even though I was just going down the highway and doing nothing wrong. I'd lost over $250 before I got to the first hobby shop!

When I finally got to Portland and the hobby shops, I found several good pre-made trees. All that is coming to the layout very soon. That’ll be the last major element for the layout itself, once the trees and bushes are in place. From then on, it’ll all be tweaking and changing the little things, and adding extra details here and there.

I also bought some minor detail stuff. For example, some pre-painted HO scale feed sacks were just about perfect in size/color for O scale sandbags, so I got them.

I also still need to pace all the rural mailboxes along the roads, too, now that they have numbers and names on them.

Hey Lee, even with the flat tire, it still sounds like a fun day!

mike g. posted:

Hey Lee, even with the flat tire, it still sounds like a fun day!

Yep, any day you get to look into the cab of SP 4449 and stand next to a ALCO PA unit (well, the restored shell of one, anyway), as well as hitting multiple hobby shops (and finding something good at each of them) , it's a good day.

My tire situation weighed heavily on my mind until I first hit the massive Powells books main store downtown, and scored the parking space closest to the intersection right in front of the main entrance. I've never been that lucky before. I found some good books there, too.

And best of all, my wife didn't give me any grief about the flat tire, even though I felt bad about it the whole day (even though I didn't do anything but drive down the interstate).

Moonson posted:
WP posted:

imageimageimageI've been adding more scenery details ...So I thought it might be fun to see how Soap Creek developed.

Hi WP/ John, You certainly  appear to be a master at making meaningful use of a narrow strip and a corner of real estate. That really looks good, and I esp. appreciate how you have used the premium trees up front, emphasizing depth and interest in the area. Congratulations on your continued success at the project.

FrankM.

Thank you Frank M. 


Mark Boyce posted:
WP posted:

I've been adding more scenery details (ground cover, trees, donkey engines, etc.) to our logging area, Soap Creek. It's getting closer to being complete. So I took some pictures today after adding some more trees and details. Then, later I was looking back at how the area looked and the progress. So I thought it might be fun to see how Soap Creek developed. 

The last three pictures are of Soap Creek  from today. Soon I'll work on filling in the river section on the other side of the layout. 

John,

Thank you for the photos showing added detail in time.  I really like what you are doing.

Thank you Mark. 

As the signature implies I'm beginning to feel like Thomas Edison, after a couple of weeks of delving into 3D software for the first time I feel like I may be able to see the surface of the pool (not quite there yet, but getting closer).  With numerous attempts the attached is where I'm at currently.  After suggestions from some of the great forum members (Mike G. comes to mind for one) regarding some modeling supplies/techniques  I decided to take a different approach and try getting something 3D printed.  I'm not sure how it will turn out, but hopes are high.  The attached is not yet complete but thought I'd get any opinions/comments before proceeding.  The 3D is aimed at the Posts & Railing I think I've got the grated road bed covered (at least for now ... lol).  I appreciate any input, thanks, bd

Carbon fiber ... maybe that's the ticket!

Attachments

Images (2)
  • Road Bed Mod 1_0
  • KI Bridge 07_14_2007

As usual great work. Elliot What a better way to Keep track  of your engines and what maintenance performed.  Got the station back on the layout. Still need to do a few things more, but will do at a latter time when house isn't going crazy.  Station is now set up as plug and play which also makes easier to pull off the layout. At the same time I was able to add the trees to that section.  Now its at a point where I feel comfortable posting pics and video in Alan's thread. Editing should be finished by tomorrow. 

Before very old pics 2013 when station was first built. Don't laugh to hard.

1-DSCF10991-DSCF11031-DSCF11051-DSCF1109

After reconfiguration

1-DSCF52931-DSCF52941-DSCF52951-DSCF52961-DSCF5297


Attachments

Images (9)
  • 1-DSCF5293
  • 1-DSCF5294
  • 1-DSCF5295
  • 1-DSCF5296
  • 1-DSCF5297
  • 1-DSCF1099
  • 1-DSCF1103
  • 1-DSCF1105
  • 1-DSCF1109

I managed to get the floor area cleaned up in time for my turn to host the club. I wonder how long I will keep it clean. Anyways the get together went well. But the layout reared it ugly head for the first time.....curse it... gremlins. Couldn't get my legacy switchers to go they just sat there. Then I had to switch out an engine because I could not get it to go in reverse because a coupler opened up on the freight train so I had to switch that one out. Other then those happenings everyone enjoyed themselves. So tomorrow I start working on the layout again.........Paul

paul 2 posted:

I managed to get the floor area cleaned up in time for my turn to host the club. I wonder how long I will keep it clean. Anyways the get together went well. But the layout reared it ugly head for the first time.....curse it... gremlins. Couldn't get my legacy switchers to go they just sat there. Then I had to switch out an engine because I could not get it to go in reverse because a coupler opened up on the freight train so I had to switch that one out. Other then those happenings everyone enjoyed themselves. So tomorrow I start working on the layout again.........Paul

Paul,

Glad you got it cleaned up to host the group!!  Yes, those things will happen at the most in opportune time.  Glad everyone had a good time!

suzukovich posted:

As usual great work. Elliot What a better way to Keep track  of your engines and what maintenance performed.  Got the station back on the layout. Still need to do a few things more, but will do at a latter time when house isn't going crazy.  Station is now set up as plug and play which also makes easier to pull off the layout. At the same time I was able to add the trees to that section.  Now its at a point where I feel comfortable posting pics and video in Alan's thread. Editing should be finished by tomorrow. 

Before very old pics 2013 when station was first built. Don't laugh to hard.

1-DSCF10991-DSCF11031-DSCF11051-DSCF1109

After reconfiguration

1-DSCF52931-DSCF52941-DSCF52951-DSCF52961-DSCF5297


Your station and surrounding scenery look GREAT! I am a real sucker for a winter scene, Yours is outstanding!

I also like the use of the mirrors to double the size of the station and the layout. We put mirrors around our city scene with a union station scene against the mirror. The Union station is double track between the station and the mirror. So, to help the mirror image make sense to the viewer, we built a 1/2 wide platform against the mirror to make it look as if it is a whole platform serving both the the double tracks reflected in the mirror and the double tracks on our layout.

As I said, I really love your winter scene and have been following it as you post your GREAT photos.

Mark Boyce posted:

Suzukovich,

Randy is absolutely right!  Great winter scenes!!  This is the first I have seen the red double bus on the streets!  Looks great!

Randy, Frank, and Mark thanks for the comments and likes.

Mark the red articulated bus is a MAN Lion City 1:50 made by Siku    https://www.siku.de/en/sortime...html?___store=sor_en    I also have the Non articulated version in blue. Funny thing happened while I was making the video. My S gauge Berk threw a traction tire and I needed to replace it. Since it didn't come with spares like the MTH engines. On a whim I used Black liquid Tape that I had been using to insulate wiring.  It actually worked as a replacement fore the traction tires. I wonder if anybody else has tried this?

liquid tape


Attachments

Images (1)
  • liquid tape

After hosting last night and having a few gremlins pop up today started with a package from Beth at Public Delivery Track. "Oh Happy days"  Another Weaver flat with trailer and I think I got the last one in that road name. If so I am glad I did not wait to order it. Also I got a separate Yale Weaver trailer. My thinking on that is maybe at some train show I will find a flat car minus the trailer. So I added the new car to the others. Pics of my buys.........Paul

DSCN2523DSCN2527 

Attachments

Images (2)
  • DSCN2523
  • DSCN2527

Laughing about this now but when it happened I wasn't.  I back my truck in the garage. Apparently I moved the lawn mower backing in. Did not know that. So when I tried to drive out of the garage all of a sudden the truck stopped moving. Backed up tried again, same thing. I got out and looked but didn't see anything. So like all good ideas I gave it the gas. The truck moved forward with a bounce. Got out and saw I had run over the front wheel on the mower. Did a number on it. So went to the internet and Tractor Supply carried parts, I thought. Got up there and they don't. Could of been a bad day but while walking out I spotted these items and bought them. New loads for more of my flat cars. All and all a good day. As to the parts for the mower I found them on line. A pic of my buy...............Paul

DSCN2529

Attachments

Images (1)
  • DSCN2529

As long as we are on the subject of mishaps...

I was having a really good day. I was actually running trains, and starting to enjoy it again! I got a couple all the way around the circuit. The third train was just approaching the top of the big helix when

DISASTER STRUCK!!!

The dreaded "train rain". The last car of the intermodal train derailed and snagged the switch. It caused most of the train to string line, dumping cars and containers all over the place. A few cars went 6' to the concrete floor.

The snag was on the upper left, top level. These photos were taken seconds after. It took about 45 minutes to clean up the mess.

IMG_6932IMG_6933IMG_6934IMG_6935

One of the K-line die cast cars suffered the greatest damage. Both truck screws were sheared off and the threads are stuck in the holes. The ladders can be glued back on the other cars.

IMG_6938

Looks like I'll be installing a guard rail to prevent future falls. This could have been much worse. The total damage was under $100. This is why I don't run expensive stuff yet.

Attachments

Images (5)
  • IMG_6932
  • IMG_6933
  • IMG_6934
  • IMG_6935
  • IMG_6938
Al Galli posted:
Big_Boy_4005 posted:

As long as we are on the subject of mishaps...

I was having a really good day. I was actually running trains, and starting to enjoy it again! I got a couple all the way around the circuit. The third train was just approaching the top of the big helix when

DISASTER STRUCK!!!

Live by the helix  Die by the helix!  (Grin)

Al, I don't mind the little jab, I deserve it and I'm smiling. The sad part is, I think I had a chance to stop before gravity intervened, but I thought I could drag it around to where I could reach and fix it. Oops!

Big_Boy_4005 posted:

As long as we are on the subject of mishaps...

I was having a really good day. I was actually running trains, and starting to enjoy it again! I got a couple all the way around the circuit. The third train was just approaching the top of the big helix when

DISASTER STRUCK!!!

The dreaded "train rain". The last car of the intermodal train derailed and snagged the switch. It caused most of the train to string line, dumping cars and containers all over the place. A few cars went 6' to the concrete floor.

The snag was on the upper left, top level. These photos were taken seconds after. It took about 45 minutes to clean up the mess.

IMG_6932IMG_6933IMG_6934IMG_6935

One of the K-line die cast cars suffered the greatest damage. Both truck screws were sheared off and the threads are stuck in the holes. The ladders can be glued back on the other cars.

IMG_6938

Looks like I'll be installing a guard rail to prevent future falls. This could have been much worse. The total damage was under $100. This is why I don't run expensive stuff yet.

Elliot, sorry for your mishap! But I am glad you can fix most everything. On a side note do you know how to replay without all the pictures from the original poster?

mike g. posted:

Elliot, sorry for your mishap! But I am glad you can fix most everything. On a side note do you know how to replay without all the pictures from the original poster?

Thanks Mike.

All you do is highlight the part of the quote you want to remove, and hit delete. In this case I deleted all of my previous, and just left yours. You can use that technique to just remove the photos too. Glad you asked, good etiquette.

Last edited by Big_Boy_4005

Thanks Paul, I do feel like I mostly dodged one there.

Scenery will probably start early next year, as most of the track and electrical are very close to completion.

Hope your lawn mower gets better soon.

I did something similar in my younger days. My parents were out of town, and I needed to haul some stuff in the family station wagon. As I was backing out of the garage, I met with some resistance, but like you I gave it a little more gas, then BANG!!!

I had forgotten to close the back passenger side door. It bent the hinges backwards, and the window exploded. I was only 17, but I ended up paying for that one.

suzukovich posted:
Mark Boyce posted:

Suzukovich,

Randy is absolutely right!  Great winter scenes!!  This is the first I have seen the red double bus on the streets!  Looks great!

Randy, Frank, and Mark thanks for the comments and likes.

Mark the red articulated bus is a MAN Lion City 1:50 made by Siku    https://www.siku.de/en/sortime...html?___store=sor_en    I also have the Non articulated version in blue. Funny thing happened while I was making the video. My S gauge Berk threw a traction tire and I needed to replace it. Since it didn't come with spares like the MTH engines. On a whim I used Black liquid Tape that I had been using to insulate wiring.  It actually worked as a replacement fore the traction tires. I wonder if anybody else has tried this?

liquid tape


Mark, may I ask where it can be purchased ?

John

John Pignatelli JR. posted:
suzukovich posted:
Mark Boyce posted:

Suzukovich,

Randy is absolutely right!  Great winter scenes!!  This is the first I have seen the red double bus on the streets!  Looks great!

Randy, Frank, and Mark thanks for the comments and likes.

Mark the red articulated bus is a MAN Lion City 1:50 made by Siku    https://www.siku.de/en/sortime...html?___store=sor_en    I also have the Non articulated version in blue. Funny thing happened while I was making the video. My S gauge Berk threw a traction tire and I needed to replace it. Since it didn't come with spares like the MTH engines. On a whim I used Black liquid Tape that I had been using to insulate wiring.  It actually worked as a replacement fore the traction tires. I wonder if anybody else has tried this?

liquid tape


Mark, may I ask where it can be purchased ?

John

John,

That was Suzukovich's part of the message.  I'm sure he will get back to us.  :-)

For Christmas last year, my wife gave me a 1953 or 1954 Lionel O-gauge train set that was previously owned by the husband of a friend of hers, who had bought it new. It has been set up since Dec. 26 on our dining room table, where my 2 year old grandson and I thoroughly enjoy playing trains. I picked up a Lionel John Deere set in March and have that oval surrounding the tubular layout that is an oval with a couple sidings. We've been to a couple of train shows at DuPage county, a couple of local hobby shops, and have added to our roster.

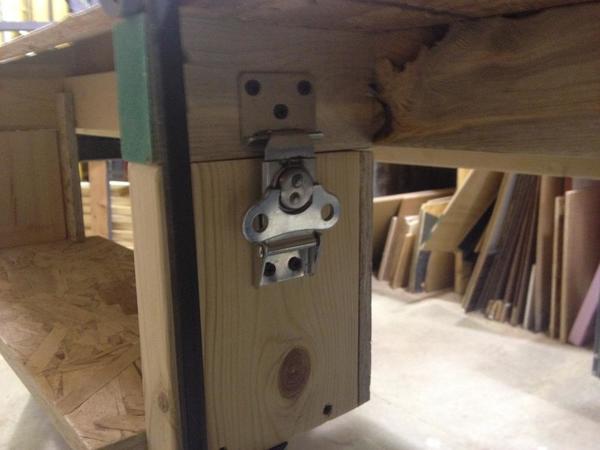
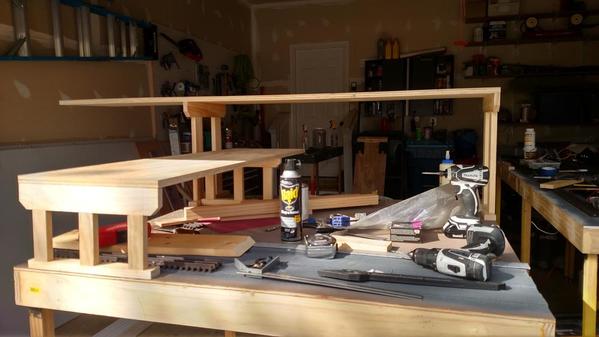
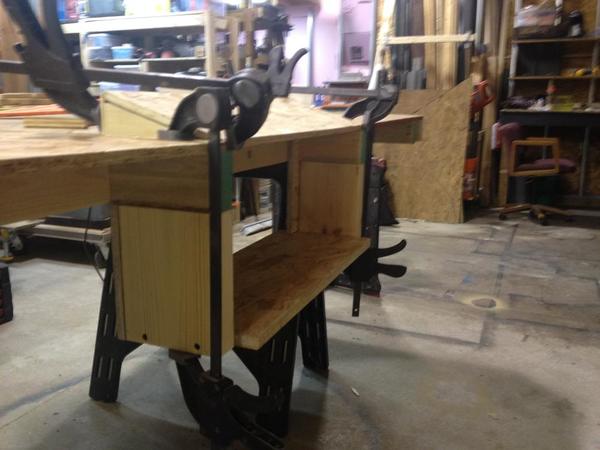
A couple of weeks ago, I started making a board to go over the table so that layout could be mounted more securely to something, and make it somewhat easily removable for something like Thanksgiving or Christmas dinner. Nearly all of the wood is scrap, left over from building or striking theatrical sets, rescued on the way to the dumpster or burn pile. I'm learning to use SCARM, have not finalized a track plan yet, however I feel that the framework and top can be done almost completely since I have limited real estate to work with. LostSOul's layout is definitely an inspiration, as are many others here.

The pictures are of the overall board, showing where the "console" for the switch and accessory controllers will go, and the 2 transformers are going to go on the removable shelf below that. I came up with a quick mount for the transformer shelf, so that when I'm not home the transformers can be put away so little hands won't be tempted. My grandson plays A LOT with the cars during the day, pushing them around on the tracks. His favorite book is the Greenberg Lionel Repair Guide :-)   Actually, it is one of my favorites as well, we've spent quite a bit of time together going through it, and he loves sitting on my lap and helping with cleaning and lubricating (he has his own little empty oiler.)

IMG_3428IMG_3514IMG_3515

Attachments

Images (3)
  • Overall Layout board
  • Center console area
  • latch for removable transformer shelf
John Pignatelli JR. posted:
suzukovich posted:
Mark Boyce posted:

Suzukovich,

Randy is absolutely right!  Great winter scenes!!  This is the first I have seen the red double bus on the streets!  Looks great!

Randy, Frank, and Mark thanks for the comments and likes.

Mark the red articulated bus is a MAN Lion City 1:50 made by Siku    https://www.siku.de/en/sortime...html?___store=sor_en    I also have the Non articulated version in blue. Funny thing happened while I was making the video. My S gauge Berk threw a traction tire and I needed to replace it. Since it didn't come with spares like the MTH engines. On a whim I used Black liquid Tape that I had been using to insulate wiring.  It actually worked as a replacement fore the traction tires. I wonder if anybody else has tried this?

liquid tape


Mark, may I ask where it can be purchased ?

John

John

You can find them at Lowes/Home Depot/Ace Hardware, and online. Three days of solid running and no issues as of now.

Over the last few days I received, weathered (somewhat) and installed a new MTH Dry Goods Transfer Warehouse (from OGR sponsor Mario's Trains) and added a gravel lot to my small industrial area.

I am waiting to wire these buildings until all of my planned remaining structures have been purchased and set in place.  This will take awhile based on my current monthly hobby budget.

Attachments

Images (3)
  • IMG_0254
  • IMG_0256
  • IMG_0261

Computer issues resolved.  Elliot to bad about the derailment. Its always the little things that get us.  Think of it this way. At least you will not have to deal with an NTSB investigation or stock holders.  I glad the financial loss was less then $150.00 and that there was not any loss of life.  

As usual some great work being done Finally was able to get the video done. So here it is


Last edited by suzukovich
suzukovich posted:

Elliot to bad about the derailment. Its always the little things that get us.  Think of it this way. At least you will not have to deal with an NTSB investigation or stock holders.  I glad the financial loss was less then $150.00 and that there was not any loss of life.  


Well played! I only have to answer to one person, and he was at fault. There will be no litigation.

Yesterday, there was a different derailment that I had to crawl back into the helix to clear. While I was in there I got up on the ladder, and discovered the cause of the "big one". It really was a little thing. There was an electrical gap going into the frog, meaning there was no track pin on that rail. The two rail segments were slightly out of alignment. Normally, our oversized flanges allow us to get away with some track imperfections, but not this time. The coupler tab snagged the switch, anchoring the back of the train, resulting in the string-lining event.

This concludes the investigation by the BBTSB.

suzukovich posted:

Computer issues resolved.  Elliot to bad about the derailment. Its always the little things that get us.  Think of it this way. At least you will not have to deal with an NTSB investigation or stock holders.  I glad the financial loss was less then $150.00 and that there was not any loss of life.  

As usual some great work being done Finally was able to get the video done. So here it is


Hello,

Love the winter scenes, excellent job.

What did you use for the snow?

Thanks, Ron

atlayank posted:
suzukovich posted:

Computer issues resolved.  Elliot to bad about the derailment. Its always the little things that get us.  Think of it this way. At least you will not have to deal with an NTSB investigation or stock holders.  I glad the financial loss was less then $150.00 and that there was not any loss of life.  

As usual some great work being done Finally was able to get the video done. So here it is


Hello,

Love the winter scenes, excellent job.

What did you use for the snow?

Thanks, Ron

 Thanks.   Bathroom rugs on wood base. Don't laugh too hard.  By the way V2 video replaced original video posted. Figure out how to edit sound and add music.

carpet

Attachments

Images (1)
  • carpet
Last edited by suzukovich
Hello,

Love the winter scenes, excellent job.

What did you use for the snow?

Thanks, Ron

 Thanks.   Bathroom rugs on wood base. Don't laugh too hard.  By the way V2 video replaced original video posted. Figure out how to edit sound and add music.

carpet

 That is awesome!  I will be visiting Wally World and pick out my snow!

Thanks, Ron.

Last edited by atlayank
suzukovich posted:
atlayank
Hello,

Love the winter scenes, excellent job.

What did you use for the snow?

Thanks, Ron

 Thanks.   Bathroom rugs on wood base...

carpet

That's precisely the kind of inventiveness and creativity we have all come to appreciate and celebrate throughout our fabulous hobby. Clever man.

FrankM.

Last edited by Moonson
Moonson posted:
suzukovich posted:
atlayank
Hello,

Love the winter scenes, excellent job.

What did you use for the snow?

Thanks, Ron

 Thanks.   Bathroom rugs on wood base...

carpet

That's precisely the kind of inventiveness and creativity we have all come to appreciate and celebrate throughout our fabulous hobby. Clever man.

FrankM.

Frank thanks it was more out of necessity, but also gave me the texture that I was looking for to create the look and feel of deep snow. Also go here you might like this.  https://ogrforum.ogaugerr.com/t...06#64499421575845506

Last edited by suzukovich
HMorgan125 posted:

Over the last few days I received, weathered (somewhat) and installed a new MTH Dry Goods Transfer Warehouse (from OGR sponsor Mario's Trains) and added a gravel lot to my small industrial area.

I am waiting to wire these buildings until all of my planned remaining structures have been purchased and set in place.  This will take awhile based on my current monthly hobby budget.

HMorgan125, what product did you use for the gravel on your lot?

Gene Dickerson posted:
HMorgan125 posted:

Over the last few days I received, weathered (somewhat) and installed a new MTH Dry Goods Transfer Warehouse (from OGR sponsor Mario's Trains) and added a gravel lot to my small industrial area.

I am waiting to wire these buildings until all of my planned remaining structures have been purchased and set in place.  This will take awhile based on my current monthly hobby budget.

HMorgan125, what product did you use for the gravel on your lot?

Gene,

Based on suggestions on OGR, I used "Chick Grit" from a local Tractor Supply store.  I took a small portion of the grit and put it in two separate quart size plastic bags and added burnt umber acrylic paint to one and gray acrylic paint to another.  Shook the two bags, allowed the paint to dry and then added these colored pieces to the remaining white grit.

In retrospect I wish that I had added a bit of light gray sand or dry concrete mix to the top of the grit as the pieces are still a bit large for what I had in mind.  I may still experiment with this in the future.


HMorgan125 posted:
Gene Dickerson posted:
HMorgan125 posted:

Over the last few days I received, weathered (somewhat) and installed a new MTH Dry Goods Transfer Warehouse (from OGR sponsor Mario's Trains) and added a gravel lot to my small industrial area.

I am waiting to wire these buildings until all of my planned remaining structures have been purchased and set in place.  This will take awhile based on my current monthly hobby budget.

HMorgan125, what product did you use for the gravel on your lot?

Gene,

Based on suggestions on OGR, I used "Chick Grit" from a local Tractor Supply store.  I took a small portion of the grit and put it in two separate quart size plastic bags and added burnt umber acrylic paint to one and gray acrylic paint to another.  Shook the two bags, allowed the paint to dry and then added these colored pieces to the remaining white grit.

In retrospect I wish that I had added a bit of light gray sand or dry concrete mix to the top of the grit as the pieces are still a bit large for what I had in mind.  I may still experiment with this in the future.


I did the same thing (chick grit) based on a suggestion here. I regret having glued it down without waiting for a few days to be sure I was happy with it. Eventually I'll either redo the space with HO ballast or cover it with joint compound paving. Chick grit seems more like bank rock size than gravel. Fortunately it's inexpensive so I don't have a problem covering it up.

joe

Last edited by dobermann

Today I got the area under the stairs to basement cleaned out. Stuff had been under there since we bought the house fourteen years ago. Now I can focus on taking down some of the walls in that area to open it up. I picked up an LED 4' shop light while shopping at Sam's Club replacing the old shop light that was only firing on one bulb. What a difference in light that made. Almost need sun glasses down there now. So the rest of the week it will be pulling down those walls.............Paul

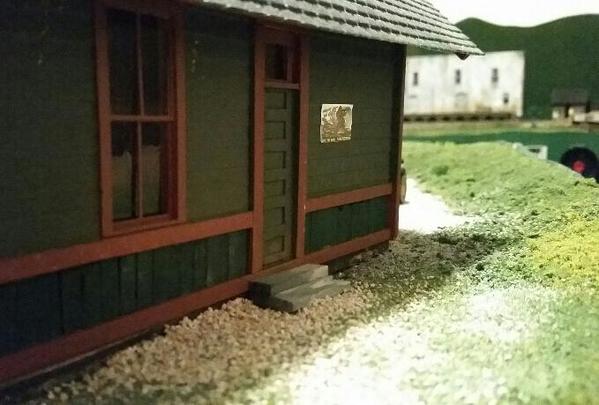
I just installed some back steps on one of my Depots, because as I looked at it I realized it was one heck of a drop from the threshold down to the gravel. That's what I'm doing with the layout now, I'm looking at things with an eye to determine whether they actually make any kind of real sense or not. If they don't, they get changed or corrected to what it would normally be like. So, there's no way a drop this high would still exist on the back door of the Depot like that.

I think it's little details like that, that makes a layout better...20160919_234014_resized-1

Attachments

Images (1)
  • 20160919_234014_resized-1

OK - Methinks you are over complicating the situation.  Go to your local sand and gravel supplier (NOT Home Depot or another one of the big box stores) where you will find they offer several varieties (in both color and size) of washed sand. Pick out one that replicates the area you are modeling. It can be applied using the traditional white glue and "wet" water method. If you have some yard or industrial areas that need a dirtier look just lightly spray those areas with some rattle can black (from WallyMart) held about a foot away from the sand. I paid $4 for an 80Lb. sack. After all what emulates real dirt better than real dirt?P1000163P1000152

Today with the floor area still clean from hosting my small club last week I got one of the bar stools I bought at Menards a little while back and put it together. It only took more then 12 years to get a chair up there. I must be getting older and need a place to rest my weary bones. I had some parts left over but I didn't panic. Looks like it was a universal parts package. Got one more to do for up there. A couple of pics..........Paul

DSCN2547DSCN2548

Attachments

Images (2)
  • DSCN2547
  • DSCN2548
paul 2 posted:

Today with the floor area still clean from hosting my small club last week I got one of the bar stools I bought at Menards a little while back and put it together.

DSCN2548

It's not the age, I think having a stool on a layout is good for several reasons:

  • It usually gets you more eye-level with the layout without stooping over
  • It keeps you from standing up all the time
  • They make for great temp tables for small projects around the layout

I'm in my 40s and I've noticed the difference between running trains from a standing v/s sitting position.

I bought two of these to use on the layout, as they look like tall Pullman passenger car steps to me:

paul 2 posted:

Bryan, good to finally see a post from you. I would of thought with October 4Th being a crucial day you would of been burning the midnight oil to complete more seeing you be will be put under the microscope and scrutiny of the Tuesday night group. So much pressure and so little time to be ready LOL...........Paul

If I would have been trying to get that upper level track laid then I would have been up many nights. Not going to kill myself getting that in when this will be the first viewing for the Tuesday night crew, so there will be plenty of new stuff for everyone to see.  Did want some more movement though besides the trains so that is why I'm trying to get the carnival attractions up and running.  

btw:  what time are you going to Dennis's on Saturday.


Add Reply

Post

OGR Publishing, Inc., 1310 Eastside Centre Ct, Suite 6, Mountain Home, AR 72653
800-980-OGRR (6477)
www.ogaugerr.com

×
×
×
×
Link copied to your clipboard.
×
×