Good day of work today. Still pounding away on the last of the fascia. I got two pieces hung last Thursday, and two more today, including a near full sheet which connects the upper and lower.
These are the ones from Thursday. The one on the right started at the duck under, and the second went under the bridges on the left.

Took a couple tries to get the notches right.

At the end of Thursday, I put in the angle support, and glued on a splice strip.


Today, I started by filling in the last piece on the upper deck, that's the entire layout!!!

Took a few tries to prop up the sheet, but I finally got it into place, and got a few screws in it. Then I marked out the cuts, and made the first one.

All the cuts are done. I've got a nice big blank canvas here, which I never really thought about. It never really existed until today. This plan was always in my mind though.

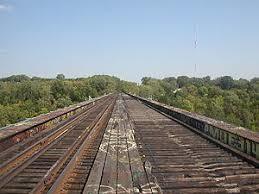
When complete, the Milwaukee Road Short Line bridge over the Mississippi should be rather dramatic.


 Ran them for my four year old second cousin!
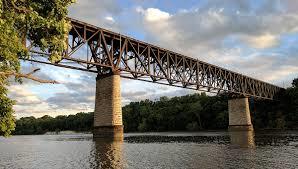


![IMG_20171231_095018[1]](https://ogrforum.ogaugerr.com/fileSendAction/fcType/0/fcOid/12129987997660671/filePointer/77030152716645401/fodoid/77030152716645395/imageType/LARGE/inlineImage/true/IMG_20171231_095018%255B1%255D.jpg "IMG_20171231_095018[1]")
![IMG_20171230_220754[1]](https://ogrforum.ogaugerr.com/fileSendAction/fcType/0/fcOid/12129987997660671/filePointer/77030152716645402/fodoid/77030152716645396/imageType/LARGE/inlineImage/true/IMG_20171230_220754%255B1%255D.jpg "IMG_20171230_220754[1]")
![IMG_20171230_220740[1]](https://ogrforum.ogaugerr.com/fileSendAction/fcType/0/fcOid/12129987997660671/filePointer/77030152716645403/fodoid/77030152716645397/imageType/LARGE/inlineImage/true/IMG_20171230_220740%255B1%255D.jpg "IMG_20171230_220740[1]")
![IMG_20171231_095018[1]](https://ogrforum.ogaugerr.com/fileSendAction/fcType/0/fcOid/12129987997660671/filePointer/77030152716645401/fodoid/77030152716645395/imageType/LARGE/inlineImage/true/IMG_20171231_095018%5B1%5D.jpg "IMG_20171231_095018[1]")
![IMG_20171230_220754[1]](https://ogrforum.ogaugerr.com/fileSendAction/fcType/0/fcOid/12129987997660671/filePointer/77030152716645402/fodoid/77030152716645396/imageType/LARGE/inlineImage/true/IMG_20171230_220754%5B1%5D.jpg "IMG_20171230_220754[1]")
![IMG_20171230_220740[1]](https://ogrforum.ogaugerr.com/fileSendAction/fcType/0/fcOid/12129987997660671/filePointer/77030152716645403/fodoid/77030152716645397/imageType/LARGE/inlineImage/true/IMG_20171230_220740%5B1%5D.jpg "IMG_20171230_220740[1]")


 lighted buildings (1)")
 lighted buildings (2)")
 lighted buildings (3)")
 lighted buildings (4)")
 lighted buildings (1)")
 lighted buildings (2)")
 lighted buildings (3)")
 lighted buildings (4)")


![IMG_20171231_232308[1]](https://ogrforum.ogaugerr.com/fileSendAction/fcType/0/fcOid/12129987997660671/filePointer/77171017920088857/fodoid/77171017920088851/imageType/LARGE/inlineImage/true/IMG_20171231_232308%255B1%255D.jpg "IMG_20171231_232308[1]")
![IMG_20171231_232321[1]](https://ogrforum.ogaugerr.com/fileSendAction/fcType/0/fcOid/12129987997660671/filePointer/77171017920088858/fodoid/77171017920088852/imageType/LARGE/inlineImage/true/IMG_20171231_232321%255B1%255D.jpg "IMG_20171231_232321[1]")
![IMG_20180101_082355[1]](https://ogrforum.ogaugerr.com/fileSendAction/fcType/0/fcOid/12129987997660671/filePointer/77171017920088859/fodoid/77171017920088853/imageType/LARGE/inlineImage/true/IMG_20180101_082355%255B1%255D.jpg "IMG_20180101_082355[1]")
![IMG_20171231_232308[1]](https://ogrforum.ogaugerr.com/fileSendAction/fcType/0/fcOid/12129987997660671/filePointer/77171017920088857/fodoid/77171017920088851/imageType/LARGE/inlineImage/true/IMG_20171231_232308%5B1%5D.jpg "IMG_20171231_232308[1]")
![IMG_20171231_232321[1]](https://ogrforum.ogaugerr.com/fileSendAction/fcType/0/fcOid/12129987997660671/filePointer/77171017920088858/fodoid/77171017920088852/imageType/LARGE/inlineImage/true/IMG_20171231_232321%5B1%5D.jpg "IMG_20171231_232321[1]")
![IMG_20180101_082355[1]](https://ogrforum.ogaugerr.com/fileSendAction/fcType/0/fcOid/12129987997660671/filePointer/77171017920088859/fodoid/77171017920088853/imageType/LARGE/inlineImage/true/IMG_20180101_082355%5B1%5D.jpg "IMG_20180101_082355[1]")


 That is a picture of me in a top hat!