


Mike G, it is like Vegas. What goes to the attic stays in the attic. The wood chips hoppers and the Weaver TOFC's are for the attic layout. I have more room in the basement to work on these projects. Also eventually there are engines and rolling stock that will be headed down to the basement. Later tonight I will try to take some different pictures of the attic layout.......Paul
Cool! Thanks Paul!![]()


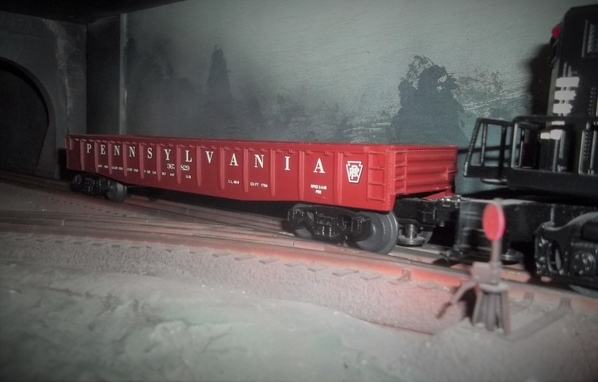
The unpacking of cars continued last week. That is so time consuming. I unpacked a brand new set of Atlas Maxi-IV well cars only to find the connector tongue missing from the "A" section, making the entire set useless Sent Atlas an email, but haven't heard back from them. I'll give it a few more days and try again if they don't respond.


Patrick came over Saturday, and we worked on a couple different things. First, we extended the 110V accessory circuit from an existing box under Red Wing over to...


a new box under the big helix.

From there, it went under the aisle. up a leg and across the bottom of the benchwork, to a box by my south turnout relay panel. Here Patrick cuts the conduit for the transition from flat on the concrete, to run up the leg.

After that we worked on getting the track laid over to the turntable as well as the garden tracks around it. This crazy little section, connects the diamond in the helix to the rest of the layout. Down a hill with a mild "S" curve. Even the challenger should be able to make it.

The center lines are draw all the way around the pit, but being that is a 4x8 sheet, a number of the lines are too short to be useful. If a switcher or piece of MOW equipment can fit, I'll put it in. This is primarily for looks anyway, as I already owned the pieces from enterTRAINment.

This is how we left it Saturday. It'll be a while before I bring power over here. Then I have to custom build the drive and control system. The original Bowser drive is useless.


Progress has been a little slow this month. I've been fighting a couple new nagging injuries, which I think I picked up at the gym last Thursday. Something is going on with my left calf, and lower back right side. I don't think these are train related.
Attachments
Images (13)
I can' tell you what I'm not doing... running op sessions. ![]()
Right now, it's the 75th anniversary of the timeframe in which my layout takes place (summer to early fall, 1943). I was hoping to do at least one op session for that reason.

Nope, I tried three session dates recently and only one person signed on for one (and said couldn't stay long). I know it's the time of year as here in the Pac NW, everyone looks forward to this time of year.
Maybe August?
Paul, Is there time enough in one visit to see all there is to see in the basement and the attic?? ![]()
NS6770Fan, That's a very nice engine! NS did a great job with the original First Responders engine, and so did Lionel!
Elliot, The look of modern railroading!!! That's a bummer the head car piece wasn't included! You look happy at the helix lead. Yes, I think anything can handle that minimal S curve. Patrick is doing a great job! You go to the gym to get healthy, and get hurt! Another bummer!
Lee, that cartoon is a classic! You can tell Lynn Johnson is married to a train enthusiast!!!
p51 posted:I can' tell you what I'm not doing... running op sessions.
Right now, it's the 75th anniversary of the timeframe in which my layout takes place (summer to early fall, 1943). I was hoping to do at least one op session for that reason.
Nope, I tried three session dates recently and only one person signed on for one (and said couldn't stay long). I know it's the time of year as here in the Pac NW, everyone looks forward to this time of year.
Maybe August?
I know too well what you're saying. A few years ago we adjusted our regular Thursday night meetings to whatever night most of us could make it in the summer months. Two weeks ago one of the guys as he was leaving said "Good night, see you in September." It's just that time of the year.
Mark Boyce posted:Lee, that cartoon is a classic! You can tell Lynn Johnson is married to a train enthusiast!!!
Was. He left her several years ago.
p51 posted:Mark Boyce posted:Lee, that cartoon is a classic! You can tell Lynn Johnson is married to a train enthusiast!!!
Was. He left her several years ago.
Oh no!! Did he get to keep his trains??? :-o
Mixed up a few batches of fresh, crunchy ballast and set them out to dry over the weekend.

Almost 2 gallons made. Enough to keep me busy for a while.
During that time I endeavored to clear away enough space in this corner so work could continue. Then the beginnings of a stone arch bridge were made of hardboard. Here's the second try, using smaller arches, as the first cutout made the bridge overpower the confined space.

On a slightly different angle the roadbed looks more interesting. A huge adaptation to the bridge to accommodate that lower single track will be tricky but I have a plan.

Bruce
Former Member
just a reminder guys, Mitch still needs our help, pay it forward
BRWEBSTER, your layout is looking good. I like the curved arch bridge. Elliot, starting to take shape with cars on the layout. I agree with you it is time consuming to take them out of the boxes. Mark, how much time would you have. It won't be too long to view both. However if you want to start looking under the tables that is a different story. That will be a quest. Right now other then around August the 9 TH I am pretty much open. Email me at pstackow@yahoo.com. And Mike G, I am sorry no pics yet. I'll take some tomorrow. Today a couple of more packages came. I got another Weaver TOFC I located in Canada and Mr Muffin sent two tank cars I ordered awhile back. Plus I got out to Menards to pick up some PVC pipe to do some silos for the brewery. Tonight I glued the tops to the wood chip hoppers. Tomorrow I'll finish the bottoms and get the trucks and couplers on and they will on their way to the attic. Pics................Paul


Attachments
Images (9)
The wood chip cars are looking good!
Finally got to the point where I can lay track on a novice's first layout and can actually contribute to this topic! With the table and swing out door completed it's ready for track.

Phase I (of 6 phases!) is an O31 tubular city loop with back-n-forth trolley line and reverse loop. Pretty packed, 8 switches in this one loop so I used (mostly) the 6-23010/11 switch which I had on hand. I cut the lantern housing off as well to give me much needed space (I plan on a panel and trackside lights).
I know about the required fix to these particular (mostly plastic) switches and will do that after I've fitted all the track. I'm hoping that when modified they will be fine. Issues may still occur with Williams engines or so I've read. I have a Williams Crown Edition brass PRR T1 locomotive that will pass through the straight parts of the switch pair shown in the crossover (top right). Since straight I hope it'll barrel on through without issue and glide around the rest of the mostly Ross track for faster running.
Phase II is a yard that attaches to this loop at the top right of the picture. Here I need to modify two 6-23010s to remove even more plastic than the lantern housing. It looks like I can do this with a band saw.
I've run a few engines in conventional mode... so far so good!!!
More to come.
Kirk
Attachments
Images (3)


No matter how the build is going now, keep a loop in running order to avoid "complicated" times resulting in boredom with it all or rushing it ![]() ...'cause it looks real good here
...'cause it looks real good here ![]()
brwebster posted:Mixed up a few batches of fresh, crunchy ballast and set them out to dry over the weekend.
Almost 2 gallons made. Enough to keep me busy for a while.

Wow, does it stay crunchy even in milk?
NS6770FAN, Nice looking engine there! The deck doesn't look bad either!![]()
Elliot, you car collection get's more impressive with every post! Sorry about the missing pin, I sure hope Atlas steps up to the plate and takes care of you! The new work is looking wonderful, sure must be nice to have such great help! Side note, I did notice that you still have to do the mud work over your upper deck where the heat duck is. This gives you a chance to try it one handed with a beer! LOL![]()
Lee, I wished I lived closer, one day I will make it down to see your layout in person. I am not really into ops right yet, but it would be fun to watch!![]()
BRWEBSTER, Looks like you have enough ballast to keep you busy for awhile! I think the arch bridge looks great!![]()
Paul, great work on the wood chip cars! Keep up the great work! Have you thought about installing a dumb waiter to take your stuff from the basement to the attic? LOL![]()
Kirk, you have a great start there! Keep up the good work and keep posting!![]()


Attachments
Images (7)


Brian, you sure your train room isn't on fire! LOL![]()
briansilvermustang posted:
Smoke looks awesome!!
" Smoke looks awesome!!" thanks JIM...
yes, that engine sure smokes pretty good... ![]()

Attachments
Images (1)

Fortescue and friend inspect a Sakai signal and a couple of Marx crossings I got from @Former Member (among a box of other goodies) which will be up for sale in the near future...

All three are in working order, though I'm still figuring out how the Sakai signal (which has a solenoid inside and is apparently a block control) operates... ![]()
Mitch
Attachments
Images (1)
p51 posted:brwebster posted:Mixed up a few batches of fresh, crunchy ballast and set them out to dry over the weekend.
Almost 2 gallons made. Enough to keep me busy for a while.
Wow, does it stay crunchy even in milk?
Sure does! It' s an important part of a nutritious breakfast. Tony says, " Thay'rrr Grrrrrreat! "
Bruce
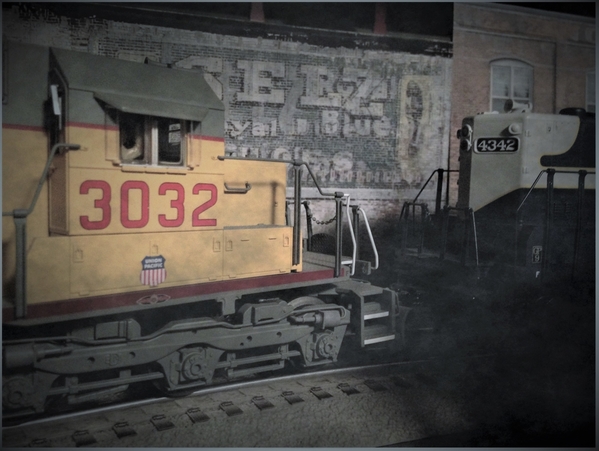
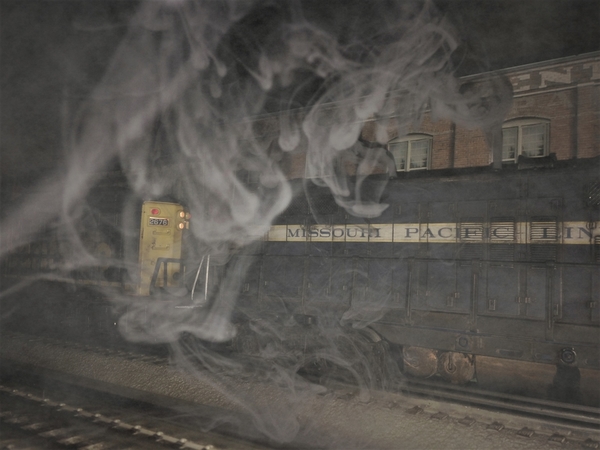
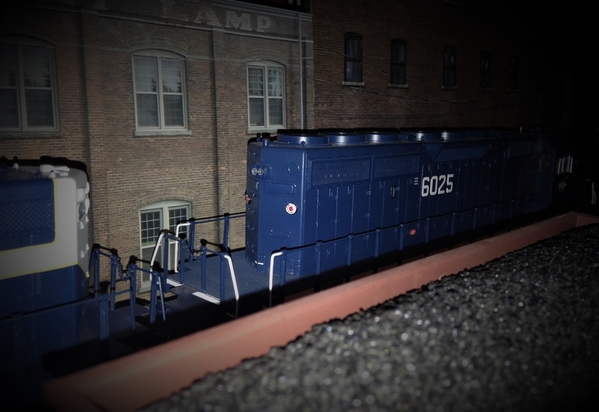
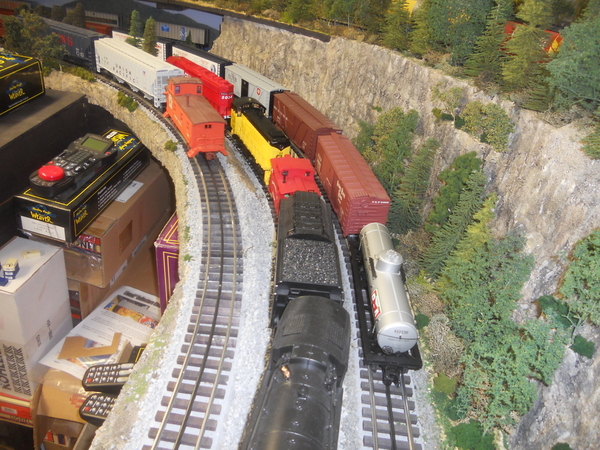
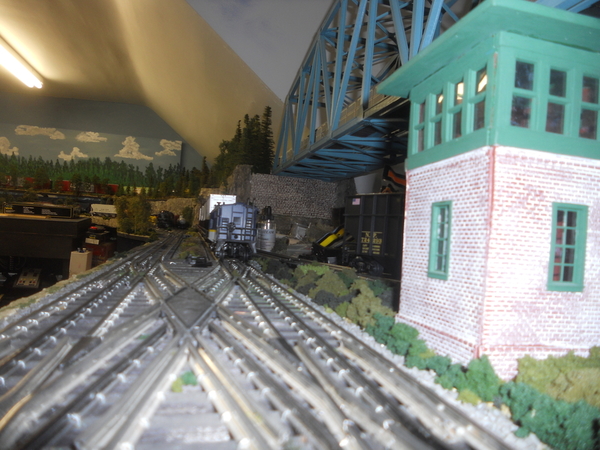
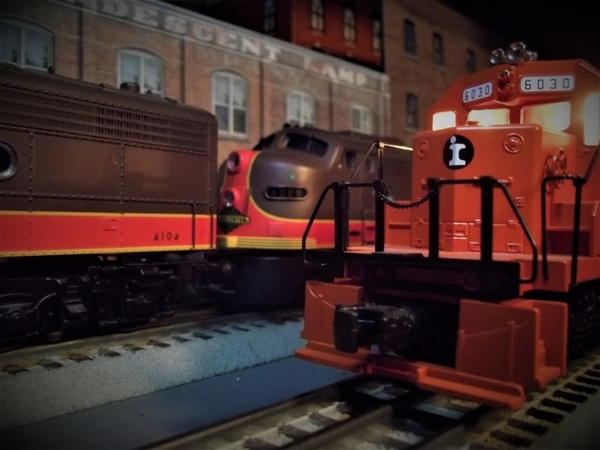
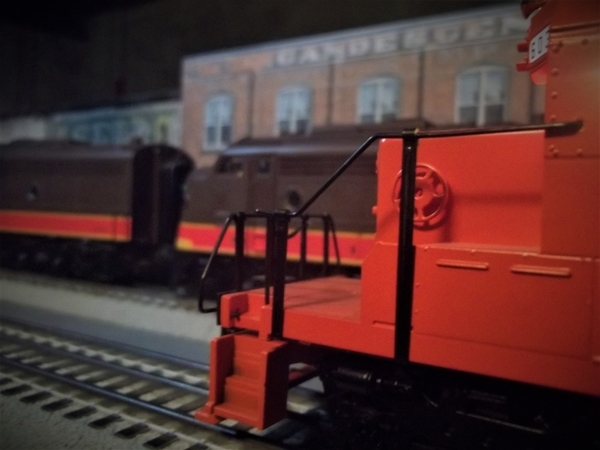
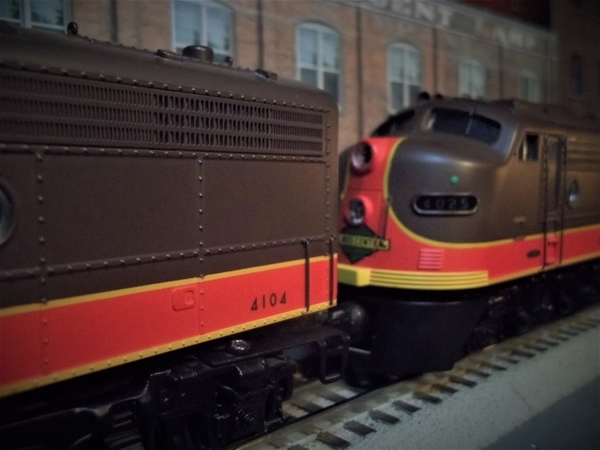
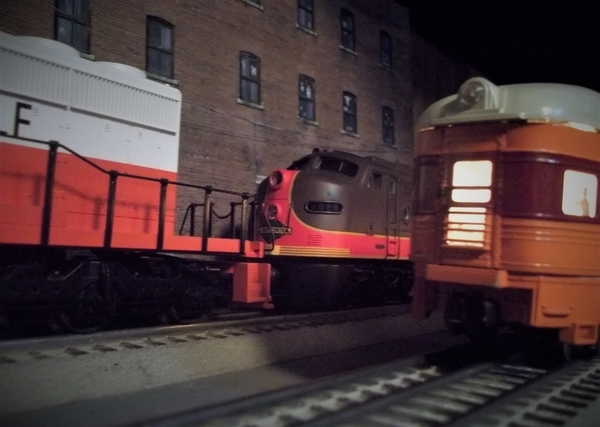
MIKE G, before I rolled up my sleeves to finish off my wood chip hoppers. I took new pics of the attic layout. I'll say it is beytween 85% and 90% complete. Two upper mainlines with a long sweeping curving grade going to the bottom joining the two lower mainlines. Pics.................Paul


Attachments
Images (26)
very NICE Paul !! thanks for the tour ! looks GREAT !!!
great rock work and scenery !!!
really like this shot !! now to connect to the basement ![]()
Attachments
Images (2)


Paul, I really think you made the most of the attic room with that layout! I like how you have the sweeping curves, lots of conifers, and lots of railroading action! I'm looking forward to getting with you next month. August, I mean! It's almost here. Yes, I'll be sending you an e-mail. I've had a bunch of work to do trying to get setup for the next while in my "semi-retired" state. ![]()
brwebster posted:p51 posted:Almost 2 gallons made. Enough to keep me busy for a while.
Wow, does it stay crunchy even in milk?
Sure does! It' s an important part of a nutritious breakfast. Tony says, " Thay'rrr Grrrrrreat! "
I now have this mental image of an exchange between Dennis Day and Jack Benny on Jack's show during wartime (when Jell-O was in short supply, so General Foods switched Jack to Grape-Nuts sponsorship):
Jack: So what did you do with the case of Grape-Nuts our sponsor sent you?
Dennis: I used it for ballast on my train layout! It worked great!
Jack: Dennis! Grape-Nuts are for eating, not for model trains!
Dennis: That's what my mother said, so I ate it instead. Boy, was that tough!
Jack: Oh? Why...No. No, I'm not going to ask. My blood pressure is high enough as it is.
Don Wilson: Well, SOMEONE has to ask why Dennis had a tough time eating delicious, nutritious Grape-Nuts! Part of a good breakfast!
Jack: Don. Donneleh. Donsy. (pause) Oh, go ahead and ask already.
Don: Dennis? Why did you have a tough time eating Grape-Nuts?
Dennis: The track kept getting caught in my teeth!
Jack: You HAD to ask!
Dennis: And the milk ran all over the layout!
Jack: Dennis!
Dennis: And you don't wanna know what happened to the sugar!
Jack: Sing, Dennis...
![]()
Mitch
This afternoon I completed three wood chip hopper kits. I also reworked a Souther chip car. Then I got out the two wood chip hoppers kits I got from the "B" and glued some of the parts together. After dinner I'll glue the top sections down and when they are dry put the cars together. Pics................Paul


Attachments
Images (8)
paul 2 posted:MIKE G, before I rolled up my sleeves to finish off my wood chip hoppers. I took new pics of the attic layout. I'll say it is beytween 85% and 90% complete. Two upper mainlines with a long sweeping curving grade going to the bottom joining the two lower mainlines. Pics.................Paul
Paul, you have a layout in the attic and you're in the process of taking over the entire basement. Well done! Both layouts are looking great, by the way, but your total train real estate is something for all of us to envy! You have a very understanding wife! Keep laying track you lucky man, Dave
Paul, the wood chip cars look mighty good!
On my layout today, I hung a powerstrip connected to a group of switched outlets connected so that one switch will turn on all 12 180 watt powerhouses. And I wired in 4 of the powerhouses. After that, I started mounting and wiring in the two MTH 500s and one 750 that will run my 3 TIUs though their aux power ports. The TIUs are already mounted (vertically, per the instructions in Barry's book). The TIUs are wired into a separate set of switched outlets so I can turn them and the AIUs on prior to applying 18V to the track.
I haven't done anything yet on a third circuit that will control lower voltages for switch machines, accessories, building lights and signals.
The amount of electrical work that it takes to run even a modest sized layout is non-trivial. And it's all behind the scenes. Anyone looking at the layout sees none of it. It's a distinctly unsexy aspect of the hobby. I'm tempted to rate it below even benchwork. But it's a close call.
Don
Unsexy indeed. When it all becomes too much, just remember to chant the electrcians mantra. OHM!
Bruce
Yes, I would rate it below benchwork. However, it sounds like you made great progress towards running some trains!!
After 4.5 years of layout construction and running conventionally, I finally implemented my DCS system. Before I started my construction, I read and followed guidelines outlined in “The DCS O Gauge Companion by Barry Broskowitz.. I Never tested the system before ballasting, scenery, etc., but when I turned it over to DCS, everything works just as planned!! Today, I am a happy camper and able to operate 3 trains on continues loops and two more in the yard.
The only DCS issue remaining is to get the WiFi installed and operational. I might have a cable issue or system set-up issue with my iPhone and iPad. I am unable to find engines with these devices. My DCS system was upgraded to system 5.0 when I had my MTH Yellowstone 2-8-8-4 upgraded to PS2 a couple years ago, and everything works great with the DCS Remote Control. I may need to install a newer version on my TIU. I‘m a Mac guy so it is not convenient to down load MTH files and updates from home.
An earlier problem upgraded: Early on during layout construction, I had issues running my articulated MTH Yellowstone, 2-8-8-4 through the diverting arm of a Gargraves 072 turnout. I received much help on the forum regarding the problem of center driver wheels, on large articulated engines, shorting out on the center (+) section while diverting through the switch. It was suggested I use electrical tape on the side for insulation. This weekend I removed the tape and glued a piece of .010 x .250” (StripSryrene 109) to the side of the center section. I even added a small piece over the top, at the bend, to prevent any chance of electrical contact of the flange-less driver as the engine makes the turn. After filing and trimming the insulated strip, I blacked the visible edges with a magic marker. Results: the engine will divert through the turnout at 1 mph, a big operational improvement. I also made the same modification to the 072 turnout under the summit with the same noticeable improvement of operation.
It has been a productive weekend. Dave


Attachments
Images (3)
paul 2 posted:MIKE G, before I rolled up my sleeves to finish off my wood chip hoppers. I took new pics of the attic layout. I'll say it is beytween 85% and 90% complete. Two upper mainlines with a long sweeping curving grade going to the bottom joining the two lower mainlines. Pics.................Paul
Paul, who would have thought that when you look up the stairs that it would be leading you into a great looking layout! What wonderful work you do and have done! Looking at all the cars you have on your layout and all the Weaver boxes stacked around, I would have to say your really trying to catch up to Elliot! I love all the car haulers sure makes a beautiful train! I want to take this moment and thank you so very much for sharing here! Now it will be here forever to look back at!![]()
![]()
paul 2 posted:MIKE G, before I rolled up my sleeves to finish off my wood chip hoppers. I took new pics of the attic layout. I'll say it is beytween 85% and 90% complete. Two upper mainlines with a long sweeping curving grade going to the bottom joining the two lower mainlines. Pics.................Paul
Was your house built in the 1950's? My 1956 built house has those same banisters/railings.
Paul, the wood chip cars are turning out great!![]()
Don, You sure have a lot of wire running! How big is your layout?![]()
LOU1985, our house was built in 1912. I put the railing in a few years back......Paul
.
Dave, as you know I am just getting started on my future layout and plan on running DCS! I too also plan on fallowing Barry's book as close as I can! I am just happy there is so much help here on the forum!![]()
Your work on the switch looks wonderful and I bet you like it a lot better then the electrical tape! LOL Great work!![]()
Nothing done in the train room the last couple days, but I have 4 walls up on the She Shed and 3 of them sided! WEEEEEE!![]()
paul 2 posted:LOU1985, our house was built in 1912. I put the railing in a few years back......Paul
.
Railing style hasn't changed much in years I see ![]() .
.
I painted more people for a CSX Executive Coach car. I painted two more boxes of 24 Preiser 65602 and some 68209 China blanks. Ordered two more packs of 48 P4802B #68209 tonight on Ebay. Only have five Preiser 65602 left from the 120 boxes I purchased over the past six years.
Tonight I am placing people in the CSX Executive "Tennessee" Coach which is similar to the green Penn Central Coach. The "Michigan" Coach is next.
Sincerely, John Rowlen
Attachments
Images (2)


![20180731_211817[1]](https://ogrforum.ogaugerr.com/fileSendAction/fcType/0/fcOid/12129987997660671/filePointer/80551019519218431/fodoid/80551019519218427/imageType/LARGE/inlineImage/true/20180731_211817%255B1%255D.jpg "20180731_211817[1]")
![20180731_211817[1]](https://ogrforum.ogaugerr.com/fileSendAction/fcType/0/fcOid/12129987997660671/filePointer/80551019519218431/fodoid/80551019519218427/imageType/LARGE/inlineImage/true/20180731_211817%5B1%5D.jpg "20180731_211817[1]")
Got the top sections glued to the hoppers tonight. Tomorrow I can get the frame and trucks on and pop in the wood loads. Then back to work on the brewery. """Question for you guys""". I bought 3" PVC pipe to make my silos.....can I cut them to length with my circular miter saw with a blade for wood on it or do I have to buy a blade for plastic. Thanks ahead of time. Pics.................Paul


Attachments
Images (4)
Hi Paul, I cut plastic pipe all the time with my chop saw! One trick to know is to get the blade up to speed before cutting, and if you have a high tooth count it really helps!![]()
The wood chip cars are coming right along! Nice work Paul!![]()
John, you sure have drive! I would probably stop after the first 100! LOL
Lou, the read is looking very nice! I sure hope you post pictures when done!![]()
Mike, thanks for the information on the saw..................Paul
paul 2 posted:Got the top sections glued to the hoppers tonight. Tomorrow I can get the frame and trucks on and pop in the wood loads. Then back to work on the brewery. """Question for you guys""". I bought 3" PVC pipe to make my silos.....can I cut them to length with my circular miter saw with a blade for wood on it or do I have to buy a blade for plastic. Thanks ahead of time. Pics.................Paul
I used my wood blade to cut all of my PVC pipe. Make sure the blade is square with the pipe, so the ends of the PVC is 90 degrees.
Attachments
Images (2)


CBS072 posted:paul 2 posted:Got the top sections glued to the hoppers tonight. Tomorrow I can get the frame and trucks on and pop in the wood loads. Then back to work on the brewery. """Question for you guys""". I bought 3" PVC pipe to make my silos.....can I cut them to length with my circular miter saw with a blade for wood on it or do I have to buy a blade for plastic. Thanks ahead of time. Pics.................Paul
I used my wood blade to cut all of my PVC pipe. Make sure the blade is square with the pipe, so the ends of the PVC is 90 degrees.
My local Ace Hardware sells PVC by the foot and will cut it to size at no extra charge.
Nice work Keith!![]()


getting a little dirty...


Attachments
Images (8)


I finished off the last of the hoppers this morning. I have 6 ready to go to the attic. Now out to the garage to cut PVC for my grain silos for the brewery. Pics............Paul


Attachments
Images (2)
WOW Paul- ![]() You are one busy guy. Love the attic layout pix. I guess we know where you learned to use every available square inch for trains. late to the party but when cutting PVC don't push the blade too hard, it will heat up the plastic and cause it to melt.
You are one busy guy. Love the attic layout pix. I guess we know where you learned to use every available square inch for trains. late to the party but when cutting PVC don't push the blade too hard, it will heat up the plastic and cause it to melt.
Bob
Thanks everyone for the tips on cutting PVC with a wood blade. I took my time cutting through each one. I thought the space I had would hold more silos but I was wrong. I cut 5 but looks like three will be the max. I have PVC pipe left over so I think tomorrow I'll cut the rest and use them where I have the grain elevator. Pics........Paul


Attachments
Images (2)
they look great there Paul !!!
Mike,
Bought another five sets of Preiser 65602 Unpainted Seated People from Frankart on Ebay. That will give me ten more packs of 24 to paint, for a total of 125 boxes, or 3,000 people when completed. I am getting ready for the Lionel 21" UP Challenger cars.
I finished the CSX "Tennessee" Coach Car last night … late. That gives me the seven CSX, PC, SP, UP and two 10-car PRR Broadway Limited and an Amtrak Dining car completed since February 25, 2018 (49 cars). Now I know why I am feeling tired in the morning. I have done 44 Atlas O California Zephyr and Amtrak cars and 35 Lionel C&O (14), NYC (14) and Wabash (7) cars a few years ago.
(I got to paint the people. Don't wake me, I'm painting.)
I am eagerly waiting for my 6-82461 CSX F40PH #9999 to return from Lionel Warranty Service. It was received by Lionel Service on June 22, 2018 at 9:32 A.M. Today is August 1, 2018.
I have a Vision Line GG1 #4935 waiting to go in for stiff gears and tripping my ZWL transformer. Dean said to "run the pants off it." last year, but it has not improved after extended use. It will not go forward from start-up, and gives Cab blinks, tripping my ZWL transformer. If I reset it, I can run it backwards slowly, but nor forward. My other VL GG1 #4913 went back twice for pants and stiff gears.
Sincerely, John Rowlen
Attachments
Images (12)


![20180801_173425[1]](https://ogrforum.ogaugerr.com/fileSendAction/fcType/0/fcOid/12129987997660671/primaryPicture/true/filePointer/80551019531882391/fodoid/80551019531890994/imageType/SQUARE_THUMBNAIL/inlineImage/true/frame/FIRST/thumbnail.jpg "20180801_173425[1]")
![20180801_173249[1]](https://ogrforum.ogaugerr.com/fileSendAction/fcType/0/fcOid/12129987997660671/primaryPicture/true/filePointer/80551019531882392/fodoid/80551019531893636/imageType/SQUARE_THUMBNAIL/inlineImage/true/frame/FIRST/thumbnail.jpg "20180801_173249[1]")
Added a background, some more trees, and replaced the Daylight AC9 with some thing new...![]()


Attachments
Images (3)
Just gorgeous!
HCSader73 posted:Just gorgeous!
Well, I don’t think I’d go quite that far, but thx. ![]()
Brian, nice pictures of your layout with all the smoke!![]()
Paul, the wood chip cars turned out looking wonderful! I was looking at your 3 PVC pipes and was thinking if you added 1 or 2 more that over hang the bench it would block the view of the washer! LOL Looks great!![]()
John, I don't know where you get the energy, I don't know 3000 people let alone want to paint that many! LOL But things are looking very nice I would have to say!![]()
Lou sounds nice! But question whats the clicking in the first video?![]()
Ted, You sure know how to put on a show with your display shelf! That is just wonderful looking, right out of a high class office or hotel! Very Nice!![]()
![]()
TedW posted:HCSader73 posted:Just gorgeous!
Well, I don’t think I’d go quite that far, but thx.
You are too modest Ted. Great work ![]()
Bob
brwebster posted:Unsexy indeed. When it all becomes too much, just remember to chant the electrcians mantra. OHM!
Bruce
Do you know why transformers HUM??????
CAUSE THEY DON'T KNOW THE WORDS.......![]()
![]()
![]()
![]()
![]()
![]()
Lou sounds nice! But question whats the clicking in the first video?
Lionel oil pump is what is clicking.
I thought it was the Cherubs that sing me to sleep, switching to a slow tap dance to finished the job ![]() . That click is embedded in my psyche under ''calm and soothing".
. That click is embedded in my psyche under ''calm and soothing".
I think I found the base of my next small layout today. Still need to meditate on the sight of it though ![]() ..Ohmmmmm
..Ohmmmmm ![]()
A small faux stone fireplace of fiberglass.
Christmas layout #2? A train entering the fire?(mirrors, track bending to 0-22 o.d.), Train in place of log and flames? (Mirror or size) Simple loop around the hearth?(needs spacing from wall) A train running in place with a scrolling background? .. maybe in G scale?... Ohmmm ![]()
Former Member
 makes me very, very afraid.......
beardog posted:
Oh, just add some gi-raffes and flamingos and it'll be fine! ![]()


Attachments
Images (7)


mike g. posted:Nothing done in the train room the last couple days, but I have 4 walls up on the She Shed and 3 of them sided! WEEEEEE!
here is an idea Mike, put the She Shed on wheels... ![]()

nmp...
Attachments
Images (1)

Paul, The wood chip cars, and the corner with the silos are really looking great!
John, Fantastic job on peopling your cars. They aren't just sitting there straight ahead, many are turned in conversation!! Looks great!
Ted, the diorama looks great as does the NKP pair!!!
Brian, Mobile she shed! looks great!
Brian, thanks for the idea, I just might have to build her one so she can see it on the tracks when it goes by her real shed!![]()
I have done a thing in 4 days now in the train room do to the shed, but I did order a 360 lazer level so I know my ledger boards along the walls will be right! Plus I know I will need it for more down the road!![]()
Finished the CSX Executive "Michigan" Coach. After doing so many cars, I found another Preiser people pairing that looks good: two sisters sitting next to each other.
When I am long gone, hopefully these people will still be cruising the rails on some O-gauge layout. My father and I liked working on our O-gauge Super-O layouts. I credit him for teaching me to do the job well so it will last a long time. He would love the new" Valley of Bridges" layout now under construction.
Sincerely, John Rowlen
Attachments
Images (13)


Sitting at workbench waiting for glue to dry. Don't like this pressed plastic stonework (you spray paint it, then paint individual stones by hand, then over spray with "mud") and it doesn't look as good as the Chooch "rubber" stone or the Ultimate Scenery System foam stone, both about twelve bucks per section. However, l am clamping a section of the plastic to the foundation of my model of Matter's Mill. To see one of these mills done as kit suggests, look it up on the Bay. Mine has been bashed and is getting a wooden flume for an overshot wheel. I am getting in some Chooch's for spillway, so progress will await that arrival. It needs flume built, wheel mounted, and the spillway.
I ran two trains on my Ceiling Central Railroad this evening. One was a freight pulled by my new Premier Western Maryland RSD5. The other was a passenger train pulled by one of my two Premier Western Maryland H9 Consolidations. Photography is bad in that area because of poor lighting. Also, standing in the middle trying to video, I can get dizzy. I need to fix up a way for my smartphone camera to video something. I had a good time.
Well, it wasn't today, but a couple days ago, I repainted my MTH Jupiter's tender to be more accurate and this was the end result. All by hand, I might add. The guys down at my LHS thought I was crazy and impressed for attempting it. Might have to bring it down to show them.


Attachments
Images (4)
Mark, Google "selfie stick", one may help keep the blood in your arms from rushing to your head...I get dizzy photographing the ceiling layout too ![]() Heck anymore I get dizzy just standing up,; more often than not too.
Heck anymore I get dizzy just standing up,; more often than not too.
S-sticks range from Dollar Store items to Pro. There are also Bluetooth keychain remote shutter controllers for a phones camera (Some better S-Sticks can do BT remote too, most use the USB port so note the size/type, mini USB do vary. The ones I tried worked either camera (fwd or selfie).(selfie cam has got to be the biggest waste of pennies... In three years I've never felt a twinge of desire for using one, mine have really only gotten used by curious tests of quality and button accidents)
Free apps exist that can steady-cam a badly shot video too. I've got about 8-10 image apps alone. Each with a good enough gimick to bother with so many vs one or two...
HOLD ON!
What's up with Mitch?
Former Member
Mitch has been on the verge of homelessness for a while now. Had his
power shut off a few days ago. He could use some help. It is time to pay it
forward. His paypal is marmelmm@gmail.com. I have been sending him a few
bucks when I can, plus extra stuff that he can perhaps repair and sell. He has
asked here before, but his requests keep getting removed from the forum.
Former Member
He is disabled and is trying, and trying to get SSD. So far no luck. Think he has another hearing
soon.
Former Member
Search gofundme and look for M Mitchell Marmel, a way to help.
Adriatic posted:Mark, Google "selfie stick", one may help keep the blood in your arms from rushing to your head...I get dizzy photographing the ceiling layout too
Heck anymore I get dizzy just standing up,; more often than not too.
S-sticks range from Dollar Store items to Pro. There are also Bluetooth keychain remote shutter controllers for a phones camera (Some better S-Sticks can do BT remote too, most use the USB port so note the size/type, mini USB do vary. The ones I tried worked either camera (fwd or selfie).(selfie cam has got to be the biggest waste of pennies... In three years I've never felt a twinge of desire for using one, mine have really only gotten used by curious tests of quality and button accidents)
Free apps exist that can steady-cam a badly shot video too. I've got about 8-10 image apps alone. Each with a good enough gimick to bother with so many vs one or two...
Adriatic, I can identify about getting dizzy just standing up now!! ![]()
I had not thought of a selfie stick. That's pretty good idea. I'm not into selfies, but if you can turn it around, that would get the camera lens up where you want it. Actually, the orthopedic told me to never work with my elbows over my head, since I have a small non-operable rotator cuff injury. It's no big deal, but it doesn't help when doing something on the Ceiling Central.
Thank you for the ideas!!!
beardog posted:Mitch has been on the verge of homelessness for a while now. Had his
power shut off a few days ago. He could use some help. It is time to pay it
forward. His paypal is marmelmm@gmail.com. I have been sending him a few
bucks when I can, plus extra stuff that he can perhaps repair and sell. He has
asked here before, but his requests keep getting removed from the forum.
I knew Mitch was having financial trouble. I've been out of work for over a month, though I do get a small pension from the company that pushed early "retirements". There is always someone worse off. My wife would not like it, but I will have to see if I can help Mitch with some of the money from my recent train sales. Just an encouragement to others to see if you can help Mitch in any way.
Futurerail, The Jupiter tender looks fantastic!! Does the engine need repainted also?
Many humble thanks for all the help and offers of help! ![]() Now, back to the trains, what say?
Now, back to the trains, what say? ![]()
Mitch
Watering the flowers took precedent today but this afternoon I got my painting table setup ( two resin sawhorses and a piece of plywood ) and brought the silos outside to paint them. I got the first coat on them. I might end up putting three coats of paint on them. Pics..................Paul


Attachments
Images (3)
Installed two Ross switches. Next is too wire them to the controlers.
Finally got the camera out a took some shots of the MTH 40 foot WM Boxcar I lowered and weathered... Put the next one "to do" in the photo as I didn't take a "before" photo.... Both of these cars are about 15 year old purchases from York, and were made with the same MTH tooling.... Lowering these cars really makes a difference in how good they look....
")
")

")
")
")
Attachments
Images (6)
")
")
")
")
")
Excellent job on the weathering and lowering, Chris!!
Great looking Job Chris! It looks so much better lower! Now the big question, How did you lower it? I have a lot of cars that could use that? LOL![]()
Chris, nice job on lowering the car. Makes a world of differences. So many cars ride too high on their trucks. I managed to get two more coats on the silos. I have them sitting next to the building. They were still a tad tacky sso inside for the night they should dry faster. Not sure what I am going to do on the tops of them yet. Pics........Paul


Attachments
Images (7)
Paul, the progress on the corner looks great, building flats came out really good !
Mike, I haven't screwed the body of that boxcar down yet, I'll take it apart tomorrow and shoot some photos so you can see what I did.... Its one of the older early model MTH O scale cars with the stamped steel floor with the "tophat"... I am glad I bought a bunch of them for short money they're pretty decent cars once lowered and weathered.
Paul, the silos look great! Slap a roof on them, and you’re good to go! What do I know? There aren’t any silos around here! I’m used to coal, oil, and natural gas facilities. LOL
Former Member
Paul, I think you need to model some ao smith silos, nice shade of blue, lots of details.
Pretty common in the midwest and even see them out here in the
Great Basin area where I live.
BEARDOG, I was trying to deciding on a color for the silos. Right now they are painted with aged concrete. The blue sounds interesting but I think that is a more modern color and I have decided that I am trying to stay with earlier colors. But you never know it may grow on me. Thanks............Paul
Paul The silos turned out very nice! Just trace the pattern on to some foam and glue it down! either way they look great!![]()
Thanks Chris it would be cool to see how you did that!![]()
As for me I got all the walls done on the She Shed along with all the windows installed, the sliding door! Tomorrow the roof starts, then its a She Shed and the rest is up to the wife! LOL![]()
Former Member
Paul, AO smith has been around since at least the 50's if not earlier. But they
were more individual farm silos. Yours are grain elevator silos and are better in
concrete color. Lots of ones I have seen in the midwest have small sheds on top
to house equipment, motors, etc.
A thought for detailing.
Some time was spent this week pondering the scenery to be built around the curved stone arch bridge. In the mean time I got busy at the work bench on a fantasy crummy.

An extended vision caboose was offered up as the canvas and the beginnings of NYC lightning stripes were added.

White stripe decals took a bit of maneuvering into position. In hindsight it might have been easier had I removed the body grab bars prior to painting.

Jump forward a few days and this is the end result. The body got a dusting of clear gloss lacquer, then glazing and yellow were applied. The entire frame and trucks were left as is, which is why the steps have the red risers from the original Soo paint scheme.


Enough playing around for now....back to the layout.
Bruce
I just placed a recent purchase, C&O #1601 Lionel Legacy Allegheny Locomotive from that came from a Forum friend....It runs fine....


Attachments
Images (4)
Paul, I like the aged concrete color on your silos... I'd think about a catwalk or platform on top of them, with a ladder going down to the adjacent building roof top. I am not really knowledgeable about silos, but seem like there should be some venting or at least access hatches up top... When I am trying to model structures, I inevitably end up doing a Google Image search looking for ideas...
Former Member
short bad video some recently acquired hornby, the 23-29 LMS 4-4-2 tank loco pulling
9 4 wheel pullman cars
Attachments
Videos (1)

Mostly detailed and touched up the Matter's Mill, and painted flume trestles and "concrete" posts for trestles to stand on...awaiting "stone" for spilleay before adding flume and finishing. Looked at plans for this grain elevator kit, musing over how l can bash it...."move the office over to the other side, and the unloading shed in it's place?"
Paul, I used 1/4" birch on top of mine (I had it left over from another project), and then took a router to it to even it up. I believe I used my Dremel for a few minor touch ups. I also used some silicone calk where the PVC was connected to the next piece. I was hoping to emulate an Anderson's silo.

Attachments
Images (1)
Bruce,
The caboose looks fantastic. The red steps kinda stand out. Not a NYC color. You might want to consider painting them yellow.
Bruce, I agree with Pat, the caboose turned Fantastic! I am no rivet counter so the red doesn't bother me, it could be purple and it would still look great!![]()
Larry, Nice engine there, I hope you had fun!![]()
Thanks Pat and Mike. I agree with you Pat. The red really didn't bother me much until I reviewed the photos. Even on a fantasy design, diverting from the NYC colors just doesn't work.
Bruce
Ok Guys, I need some input. I am going to be building my bench work with 1x4" and 2x2 legs, so I have 2 questions.
1) What would you suggest for spacing of the "L" girders ?
2) What thickness would you suggest for plywood top?
Thanks in advance!![]()
mike g. posted:2) What thickness would you suggest for plywood top?
Thanks in advance!
I went 5/8s plywood with acoustic ceiling tiles and 2x4 framing, cross members 12-16" apart. I can walk or and sit on mine with no issues.
Guess it depends if u will be on your layout or not?
chris a posted:Finally got the camera out a took some shots of the MTH 40 foot WM Boxcar I lowered and weathered... Put the next one "to do" in the photo as I didn't take a "before" photo.... Both of these cars are about 15 year old purchases from York, and were made with the same MTH tooling.... Lowering these cars really makes a difference in how good they look....
Chris, that is a work of art! DaVinci’s trains would look like that!
mike g. posted:Ok Guys, I need some input. I am going to be building my bench work with 1x4" and 2x2 legs, so I have 2 questions.
1) What would you suggest for spacing of the "L" girders ?
2) What thickness would you suggest for plywood top?
Thanks in advance!
Mike, I'd use 2x3's for legs -- get a local lumber yard to cut 2x6's down for you - very inexpensive and strong without being overkill that way - 2x2's can be a little flimsy . On L girders 1/2" ply should be more than adequate if you space the girders 16" or slightly less/more. Take the distance and divide by 16 to see how many girders and then adjust up to 2" in either direction accordingly. On a 6' wide span I've used 1x4 framing with 1x2 cross pieces 12" apart and 1/4" ply covered with 1/2" Homasote. It has supported my 200+LBS for over 20 years now. Without the Homasote i would have used 1/2" ply. As i read what some of the guys are using for home layouts, i laugh at what is overkill, but it's their nickel; money i'd rather spend on trains.
mike g. posted:Ok Guys, I need some input. I am going to be building my bench work with 1x4" and 2x2 legs, so I have 2 questions.
1) What would you suggest for spacing of the "L" girders ?
2) What thickness would you suggest for plywood top?
Thanks in advance!
Mike,
It is difficult to know the answers to these questions without knowing whether this is a table top layout or one constructed in the classic 'L' girder fashion. The other determining factor is whether it's an around the wall layout or island table. When the layout is attached to the wall then lighter construction methods are common. As noted, over-building is a waste of good trees. 
Bruce
We had a great overnight visit with our grandson & great-grandson. To begin with, our grandson is an IT guy and was able to get my MTH WiFi up and running. Having an excited almost 3 year old in the train room helped to, in lightning speed, readjust wall pictures and offset switch buttons, among other things. The misaligned switch caused only one minor derailment.
Controlling the trains on an iPad was quite intriguing to a young lad and, I must admit, also to an old adult. We quickly learned through trial and error the importance of setting some parameters early on, particularly with speed control. The screen of the iPad is quite sensitive to little fingers and before we knew it, we had a train racing around the layout at speeds approaching 90-100 scale mph. We quickly found that it is possible to reset each engine for a maximum speed. We chose 20 mph so little fingers could not cause too much trouble. He loved to blow the whistle, ring bells and occasionally run trains backwards. All in all it was great fun and I look forward to many more years of shared enjoyment.
Cheers, Dave

Note the iPad screen, maximum speed 120 mph. Touching the lower righthand +square will add incremental speed, but if you miss and hit the speed dial close to the 120, that is what you get!

Little fingers do not always hit the mark!

Important, reset maximum speed to 20 mph! What a great feature!!

He loved to blow the whistle and ring bells.

Great time had by all!!!

Attachments
Images (6)

very nice Chris, the boxcar turned out great, your scenery looks awesome !
hope you and your shoulder are doing well !!
Attachments
Images (1)

mike g. posted:Ok Guys, I need some input. I am going to be building my bench work with 1x4" and 2x2 legs, so I have 2 questions.
1) What would you suggest for spacing of the "L" girders ?
2) What thickness would you suggest for plywood top?
Thanks in advance!
Mike;
I used Mianne benchwork, so I can’t really address your first question, but the “spacing” on my layout is between 24” and 48”, depending on the area.
As for your second question, I used half inch plywood topped with half inch homosote. While I usually don’t crawl on top of the layout (mostly due to two very bad knees), I have been there with no issues. And I’m 6 foot and 240 pounds!!! Luckily, my benchwork has a max 30” width, so all areas are pretty accessible.
looking forward to see your benchwork in place.
Thanks for all the positive feedback on lowering and weathering the early MTH O scale boxcars.... Did another one today took some decent photos to show how I am doing it.... I remember someone saying they crushed the metal tophat in the floor flat a vice, I tried that today, and it didn't work out well, ended up deforming the floor and I had to flatten it... So I will keep drilling out the tophat, which acts a standoff.... I have 2 step drill bits which are perfect for this, I suppose there are other tools that would work, but the step drills work well. The wooden set up jig is essential for ensuring that I don't change the mounting hole point for the wheel trucks.... Its a simple jig, and I used the sheet metal floor as a "drill guide" before I modified the first one, then drove 1/4 x 20 machine screws through my holes the jig to act as the pegs that hold the new mounting washers in place. As I am putting the 3/16" x 1.25" fender washers on the interior side of boxcar, the car is dropping over 1/4 inch, so the coupler shank has to be relieved to clear the bottom of the car body...... It may be slightly lower than the prototype but I prefer the way it looks, personal taste....
")
")
")
")
")
")
")

")
")
Attachments
Images (10)
")
")
")
")
")
")
: Coupler shank has to be notched with dremel tool about 1/8 inch")
")
")
Some time ago I bought a set of 5 American Lightweight cars for the Powhatan Arrow for cheap ($100). Apparently, they had been dropped..maybe the whole set in a box. Anyway, they're hurt but repairable. Started with the diner today.
One of the neat things is that the builder daisy-chained the power source car-to-car from somewhere(?); the cars have the Am Std plastic trucks. Anyway, since I'll run them 3-rail (yes, Virginia, with a little work on the couplers they'll run through 36" radius curves on GarGraves track), I can put a rectifier in the tender of my 3-rail "J" and light them on track power with appropriate resistors, etc replacing the GOW bulbs with LED's. The ERR electronics have a 5V output so I can use that.
Hi Darlander, I really like your layout and especially the train wall behind you. Thanks for posting. I am glad to see your going for Hi Tech Operation, MTH, keep us posted with your thoughts on Operation. Happy Railroading...

Chris A, Wow, I love the aging process and lowering effects of your freight cars. Weathering really makes our trains and layouts look more realistic. Great work, great layout....Thanks for your pictures.

FL9TURBO2, Wow, very nice scene, and I like the crane....Looks really good. I see hinges, is that for easy access to the layout? Happy Railroading.
Thanks guys for the information on bench work, I started another thread just for it not to take away from here.
Chris your work on the box cars is amazing! They look so great! Its nice to see that now I have something else to do down the road after the layout is built! Thanks for all the information!![]()
Darlander, What a great time you had with the grandson and great grandson! I wish my grandkids would get into it and maybe they will once the layout is up and running I can only hope so! Its funny I was never into trains till my sons grandfather left him an HO train layout on a 4x8 sheet of plywood and he didn't want anything to do with it. I took it got it up and running and the next think you know I took over a spare bedroom and built a 12x10 layout and have been hooked from then on!![]()
Haven't got to the layout today. Outside comes first again. Last night I was thinking about what I want to do with the top of the silos. One thing for sure I have to make up some tops for them. I went to the Plastruct site last night and saw some things that would work for ladders and stairs. So maybe later this week I can order a few things from them. Does anyone know who may sell a unit that sits on the roof with a door to get onto the roof. Thanks Paul
chris a posted:tway it looks, personal taste....
Chris, how do you secure the fender washers to the metal frame? Thanks, Dave
paul 2 posted:Haven't got to the layout today. Outside comes first again. Last night I was thinking about what I want to do with the top of the silos. One thing for sure I have to make up some tops for them. I went to the Plastruct site last night and saw some things that would work for ladders and stairs. So maybe later this week I can order a few things from them. Does anyone know who may sell a unit that sits on the roof with a door to get onto the roof. Thanks Paul
Paul, you could use sheet styrene. It might be a little more difficult now that you have them attached to each other, but you could make it work and the texture would match. Make a template and rough cut pieces to the shape before attaching and then trim with a file and sandpaper. May need to fill any voids or cracks after instillation. I generally use sheet rock taping compound for fill because it is easy to clean up and blend. Once primed and painted, no one ever knows. Lids from large containers of cottages cheese, sour cream and yogurt would be the cheapest solution and they would provide a good material for gluing plus easy to trim. If you wanted a slight conical shape, you could cut out a small piece of pie to the center point of the lid and bring the surfaces together and reinforce seam with a styrene strip to form the desired shape.
As for the roof hatch, you should be able to fabricate that in wood and clad it in styrene.
Good Luck with your project. Dave

Attachments
Images (1)
paul 2 posted:Haven't got to the layout today. Outside comes first again. Last night I was thinking about what I want to do with the top of the silos. One thing for sure I have to make up some tops for them. I went to the Plastruct site last night and saw some things that would work for ladders and stairs. So maybe later this week I can order a few things from them. Does anyone know who may sell a unit that sits on the roof with a door to get onto the roof. Thanks Paul
YOU DO --It's called scratch building, and use the money saved to buy more trains!
Dave, Originally I used JB Weld, but it's overkill and takes overnight to cure.... The 2 cars I finished this week, I used Gorilla Super Glue GEL. I leave it clamped for about an hour.....
I think the last step in the drill I used to go through the floor was either 7/8" or 1 inch diameter and washers are 1.25 inches, so there's 1/8 inch overlap area all the way around the circumference.... I doubt I'll ever get them apart.
Forgive my ignorance on accuracy, I do know I'm close....
Isn't the "top hat" called the "bolster"? Or is the bolster the top portion and/or spanning beam(s) on a truck? I've been waiting on the the question to be randomly answered by chance for years... But "top hat" has finally expedited my desire to know exactly what is what.
paul 2 posted:Haven't got to the layout today. Outside comes first again. Last night I was thinking about what I want to do with the top of the silos. One thing for sure I have to make up some tops for them. I went to the Plastruct site last night and saw some things that would work for ladders and stairs. So maybe later this week I can order a few things from them. Does anyone know who may sell a unit that sits on the roof with a door to get onto the roof. Thanks Paul
Maybe a doll house small window gable converted to a door? I'm not sure what the smallest scale might be, or exactly how big or what shapes you are considering on top. I've seen domes, cones, flat and traditional flats to a peak*, some with a square room on top of the cylinder.
It's learning day! ![]()
What is a traditional inverted V roof called? Not with 4 angled flats, not Alpine roof, but one with less angle;" normal".
I boo-booed. While waiting for parts for the CCK Mill's spillway, l opened the box for a American Model Builder grain elevator kit. It looks like an easy assy. so l charged off. Decided to raise the tower and add a couple of windows, so l glued 1 3/4" of matching milled siding on the bottom of front and back tower panels. Wrong! Then four panels won't fit their pre-cut notches. Had to c-a-r-e-f-u-l-l-y, with a sharp exacto, separate glued panels and bracing, and insert the height additions at the top, after cutting kit panels above their notches. Do as l say; not as l do.
gandydancer1950 posted:
That's a terrific vista, GandyDancer, interesting everywhere one looks, and I especially like the old coal-tipple standing in command of it all, supervising the proceedings.
FrankM
Adriatic posted:What is a traditional inverted V roof called? Not with 4 angled flats, not Alpine roof, but one with less angle;" normal".
Gable roof.


Attachments
Images (5)


Moonson posted:gandydancer1950 posted:
That's a terrific vista, GandyDancer, interesting everywhere one looks, and I especially like the old coal-tipple standing in command of it all, supervising the proceedings.
FrankM
Thanks Frank, I appreciate your comments!
Second boo-boo...put 1/4" bracing bottom to top of wall with rear mounted hoist house, per kit. " Hey, l don't want this to look like the kit...I'll put hoist house in middle of roof". Uh-oh...more careful sawing to remove bracing and wall of hoist house from elevator wall, all better done before assembly.
Got a 3rd MTH premier car lowered and weathered with the help of my daughter.... It sure is more fun working with someone rather than the "lone ranger mode" !!!!
Decided to do this 2nd Western Maryland boxcar with lighter weathering, sun faded, very little rust and corrosion... think I am finding that on most cars, less is more ! On this one, we just airbrushed the whole car with a lighter shade of the boxcar red mixed with diluted craft paints, sealed it with dullcoat, then used PanPastels and sealed it again when done....
")
")
")
")
")
")
")
Attachments
Images (7)
")
")
")
")
")
")
")
they all look GREAT Chris ! awesome job !!
Has this ever happened to anyone......?
Attachments
Images (1)
I missed my school bus a lot growing up... ![]()
![]()
Chris the cars are looking great!![]()
Brian, we must have had the same school bus driver! I missed mine a few times! LOL![]()
Well, took a few pictures, one showing the Helix inside a mountain...


Attachments
Images (7)
Larry You the MAN! Looks great!
Ok everyone, I know its not really train related, but it really is! I was asked for an update on the She Shed, cause when its done I can get back to building a layout. So here is what is done sofar, all the walls are up, all the windows are in, and the slider is in. I have most of the roof rafters in and hope to get it sheeted tomorrow after a Dr. Appt. so here is a few pictures! ENJOY LOL!![]()


Attachments
Images (3)
mike g. posted:Ok everyone, I know its not really train related, but it really is! I was asked for an update on the She Shed, cause when its done I can get back to building a layout. So here is what is done sofar, all the walls are up, all the windows are in, and the slider is in. I have most of the roof rafters in and hope to get it sheeted tomorrow after a Dr. Appt. so here is a few pictures! ENJOY LOL!
Very NICE -- Your carpentry skills are impressive!
mike g. posted:Ok everyone, I know its not really train related, but it really is! I was asked for an update on the She Shed, cause when its done I can get back to building a layout. So here is what is done sofar, all the walls are up, all the windows are in, and the slider is in. I have most of the roof rafters in and hope to get it sheeted tomorrow after a Dr. Appt. so here is a few pictures! ENJOY LOL!
This is very much train related! Building a "She Shed" will greatly increase the opportunity and justification to add value to the "He Shed (train room). A happy CEO can help open many doors to the added growth and investment in a train room! Well done Mike! Dave
Mike, you are building one nice she shed. But I also see you made it big enough for future train storage........Paul


Mark Boyce posted:Futurerail, The Jupiter tender looks fantastic!! Does the engine need repainted also?
No, the engine is fine. The lettering behind the name on the cab needs to repainted, but it's too small of area for me to get my paintbrush in so I'm going to leave it alone. The paint behind the lettering on the tender bothered me more then that does.
Thanks Guys for the kind words, and you are right a happy CEO makes for a nice train room! Paul, I am so sorry to tell you that she has the same rule I do, Nothing but train stuff in my train room, and absolutely no train stuff in her She Shed! Fair deal from where I am sitting! LOL![]()
Warok, some nice additions to your layout! the Church looks very nice, but I really like the mobile crane! Nice work!![]()
Mike G: You have that She Shed going up like it's a prefab..... Excellent work, and lightning fast construction... I suspect your motivation level to complete it is 12 on scale of 1 to 10 !!! Just kidding "sort of", we all know layout bench-work is waiting patiently


Attachments
Images (4)


Chris you are right about being motivated, but its also spose to rain here this coming weekend so I really need to get the roof on this week!![]()
Wonderful shots of some of your engines Brian! I sure like the old Green& white BN!![]()
Former Member
Main line compleated for conventional and remote control. Next to find bridge to complete trolley line.
Attachments
Images (3)


here is a a couple more for you Mike... She Shed looks GREAT ![]()


Attachments
Images (8)


Mike, those are super neat pictures of a great she shed...I like the term, she said, and this building should be great storage. The windows are awesome, great lighting, great location. I wish I could build that type building, however, I save money hiring it done do to getting hurt, or making mistakes. Your the man. Keep up the excellent work. That’s going to be really nice. Congratulations.
Returned home from a business trip late last night. Ran trains for a bit before turning in. I wanted to try out my new MTH B&O bay window caboose I purchased at a train shop ( unfortunately not a forum sponsor ... so I won't mention the name here ) while on the trip. Of course the caboose looked great as it brought up the rear of a 16 car coal train headed off up by two B&O GP 9s!
I did call ahead to Mercer Junction, as I visited Dave's wonderful shop a year ago ... and loved the experience!![]() The recording said they were to be open that day between 12 - 4 p.m. Upon arrival I tried the entrance door which was unfortunately locked. I figured Dave closed the shop due to the biker festival that was going in the square outside the shop. ( Lots of cool looking bikes! ) That was this past Saturday. As I will travel that way next year, I'll try visiting Dave's shop again.
The recording said they were to be open that day between 12 - 4 p.m. Upon arrival I tried the entrance door which was unfortunately locked. I figured Dave closed the shop due to the biker festival that was going in the square outside the shop. ( Lots of cool looking bikes! ) That was this past Saturday. As I will travel that way next year, I'll try visiting Dave's shop again.
Yesterday I visited Horseshoe Curve, where I saw lots of NS freight train action! Good times!
Just received my long awaited Athearn SD38AC to complete my HO summit taconite plant display. I am amazed at the road specific detailing that is available in the HO world. The engine is fully powered and DCC/sound ready but its run time will have to wait until I no longer have need of it. This completes the HO taconite project for now. Next on to some more forestation and then some flats for the yard area. Cheers, Dave


Attachments
Images (6)
Weathered a coil car ( see photos 4 & 5 below ). Ran trains and took some photos. Enjoyed time with the layout!!![]()


Attachments
Images (6)
Brian, than you for more BN engines! They look great!![]()
Larry, thanks for the kind words about the She Shed! Today I got the rest of the rafters up and all the sheeting, tomorrow I will paper it. But thin I have to wait for the wife to paint the ceiling before putting down the 3 tab, cause she doesn't want to deal with the nails sticking threw! LOL![]()
I will just move on into the inside and finish trimming out the windows and doors! Fun work! LOL![]()
Trumptrain, amazing scenes, I like the Crane car scenes, the coil car looks cool. Wow. Mike, simply be careful....The wife’s right, nails can be an issue.... It’s fun to interact with each other as we progress in our individual ways, it’s simply a Interesting....Happy Railroading...


Attachments
Images (3)
Darlander, Great looking engine for your Taconite project it really adds to the layout! Nice work!![]()
Trumptrain, Nice work on the Coil car! Plus its always nice to get a different view of your wonderful layout!![]()
M. Mitchell Marmel posted:Adriatic posted:What is a traditional inverted V roof called? Not with 4 angled flats, not Alpine roof, but one with less angle;" normal".
Gable roof.
Ah, gable, gable dormer window, dormer,dormer loft, loft; I needed a less slang taught example to get the skewed info straigbter.
If I only had painted the gable outside as I was always told to, the dormer below would be bare. I thought a dormer had to be a large extention TO a floor, possibly raised from the actual floor level, but a deep extention. I.e. a small addition or deep bay-like, but,a single plane of windows. And a loft to be a floor edge forming a balcony. That was how the various crews I worked with for 5 years referred to things. (Crews changed near every new build too.)
Mike G, the thicker your top wood the less sound transfers to the air below. I wasn't quite happy with 1/2" green foam on 1/2" ply. I'm going at least 5/8-3/4 wood and 1"-3" of foam, or homasote/sound board if I do another. Gramps old living room layout had the homesote(?)( was it homesote, I compare the product used by him to "horsehair" padding in old car seats) He had that fine,dry, brown dust coming out of the edges. Constant sweeping up was an issue. It was quiet though, especially for the 60s.
Bought a new (to us) dry basement - with a decent house over it, in PA. Yes, it passed their 16 inches-of-rain-test with flying colors !
I am excited to get loose ends in OK cleaned up and get moved to PA for the winter layout building season. My wife said I should take the largest, nicest room in the basement for the trains, wow, is she a keeper ! I now have motivation to take down my old "test" layout ! Probably need to buy more trains, lol.
Adriatic posted:Gramps old living room layout had the homesote(?)( was it homesote, I compare the product used by him to "horsehair" padding in old car seats) He had that fine,dry, brown dust coming out of the edges. Constant sweeping up was an issue. It was quiet though, especially for the 60s.
That was ceiling board, if memory serves. Homasote is much denser and a grey color. ![]()
Mitch
Former Member
I have a suggestion. Use 1/2 plywood, cover that with with 1/2 carpet padding glued down,
Glue your homosote to the padding. Make sure no screws penetrate the padding to the plywood.
No sound tranference, no noise. I have built a couple of layouts with the track directly on the
padding, almost silent.
Thanks so much for your kind words Leapinlarry and Mike G! I greatly appreciate your input!![]()
![]()
Worked on windows on this AMB elevator kit. It comes with paper piece together windows, which l did not want to fool with. I am substituting plastic windows, and modifying openings to accommodate them. Am also moving office and unloading shed around, as l did the hoist house. Probably paint elevator, office and she'd tomorrow...having a lot of trouble with rattle can spray nozzles clogged up.
Thanks again Mitch. I recall grey within the edges, but I think that could have been grey paint in an attempt to seal the brown dust inside.
Adriatic posted:Thanks again Mitch. I recall grey within the edges, but I think that could have been grey paint in an attempt to seal the brown dust inside.
Back in the 80s, I bought an HO trolley layout with the tracks hand-laid on that stuff; I recall the crumbling brown dust well. ![]()
Mitch


Attachments
Images (3)


ADRIATIC, thanks for the information on the top thickness and noise reduction!![]()
TRESTLEKING, Congrats on the new house! Sounds like your going to have a great place for a future layout, Also I think your right, she sure sounds like a keeper!![]()
Brian, More good stuff! Thanks!![]()
Mike,
Cookie cutter, open frame bench construction helps reduce operation noise substantially. Without the drum effect of full plywood sheets a minimum of roadbed sound insulation is also needed. An exception to the rule, or course, is any track with built in plastic roadbed like Fastrack.
Bruce
Thanks Bruce! Yep no Fastrack here, I am going to use all Scaletrak!!![]()
I just found your last email Mike G.
Google hid it within the "great new options" even though I thought I opted out, lol. Just like predictive text, they ask; then do what they want anyhow.
Short version.... Yes the power strip button should do the trick to shut things off. A GFI to plug the strip into would be a step up. Ill send the long version soon. Heck, I've been so behind on catching up and keeping up, that I just found the She Shed pictures.. But at least now I know what the heck you guys are talking about.. She shed ![]()
Hey, buy her a humming bird feeder with the next Menards order ![]() and keep it full. Red with yellow ones seem best. Hang near the windows but away from where you walk most. Looks like a perfect spot for it. Usually, they find you within about a month. The have very regular routes, but look around too in case a source vanishes. Once they find it they will keep checking back in "X" amount of time daily and become more regular visitors the next season. Skip filling and they may move on or become less frequent) Very cool to watch when they are so close. Aerial acrobatics, male dogfights, courtships, etc. I bet she loves it; and you might too. And more importantly, Menards carries them $2-$19 plastic or glass
and keep it full. Red with yellow ones seem best. Hang near the windows but away from where you walk most. Looks like a perfect spot for it. Usually, they find you within about a month. The have very regular routes, but look around too in case a source vanishes. Once they find it they will keep checking back in "X" amount of time daily and become more regular visitors the next season. Skip filling and they may move on or become less frequent) Very cool to watch when they are so close. Aerial acrobatics, male dogfights, courtships, etc. I bet she loves it; and you might too. And more importantly, Menards carries them $2-$19 plastic or glass ![]()
I walked past a house that went up for sale in the last week. There was an obviously ancient "built in" layout about 6x12. For AF S gauge I'm pretty sure. But it was chopped up into 3ft squares at the curb; no hope. I looked it over sadly vs excitedly; wondered if Gramps ever knew him; if he ran AF for himself or his kids, what the old guy was like, etc.. I passed on the throttles once home. A day of silence for a passing of an unknown friend and his best friend both.
Adriatic posted:I just found your last email Mike G.
Google hid it within the "great new options" even though I thought I opted out, lol. Just like predictive text, they ask; then do what they want anyhow.
Short version.... Yes the power strip button should do the trick to shut things off. A GFI to plug the strip into would be a step up. Ill send the long version soon. Heck, I've been so behind on catching up and keeping up, that I just found the She Shed pictures.. But at least now I know what the heck you guys are talking about.. She shed

Hey, buy her a humming bird feeder with the next Menards order
and keep it full. Red with yellow ones seem best. Hang near the windows but away from where you walk most. Looks like a perfect spot for it. Usually, they find you within about a month. The have very regular routes, but look around too in case a source vanishes. Once they find it they will keep checking back in "X" amount of time daily and become more regular visitors the next season. Skip filling and they may move on or become less frequent) Very cool to watch when they are so close. Aerial acrobatics, male dogfights, courtships, etc. I bet she loves it; and you might too. And more importantly, Menards carries them $2-$19 plastic or glass
I walked past a house that went up for sale in the last week. There was an obviously ancient "built in" layout about 6x12. For AF S gauge I'm pretty sure. But it was chopped up into 3ft squares at the curb; no hope. I looked it over sadly vs excitedly; wondered if Gramps ever knew him; if he ran AF for himself or his kids, what the old guy was like, etc.. I passed on the throttles once home. A day of silence for a passing of an unknown friend and his best friend both.
Thanks for the nice post! I have all the electrical figured out. All the outlets are hooked to a light switch and I just turn the room off when I leave. They all go threw a surge protector with a battery back up system built in it.
Its so sad to hear layout being dumped at the curb, I bet the old timer never thought it would end up that way!
Mike, amazing how far we have come in table construction. So many choices to decide on. Maybe you will end up using a few of them in different parts of the layout. I am done for a bit. Heading to Michigan to celebrate some birthdays. I'll still be working on what I will do to the silos in my head for when I get home. I have pretty much got the idea of what. Now it is getting the stuff and doing it. Mark, as to when you might come here I am away from the 8TH to the 12TH and I have to add one more day I'll be gone. Thanks to VISTADOME SCOTT I have someone to do my fantasy paint scheme on some passenger cars I bought years ago. I am having them done in the L&N freight paint scheme. So I will be doing a day trip to drop them off on the 18TH of this month....................Paul
trestleking posted:Bought a new (to us) dry basement - with a decent house over it, in PA. Yes, it passed their 16 inches-of-rain-test with flying colors !
I am excited to get loose ends in OK cleaned up and get moved to PA for the winter layout building season. My wife said I should take the largest, nicest room in the basement for the trains, wow, is she a keeper ! I now have motivation to take down my old "test" layout ! Probably need to buy more trains, lol.
Dry basements are a very good thing!! We have one also here in Pennsylvania. Where in Pennsylvania is this new to you basement with a house over it? We are in Butler, about 40 miles north of Pittsburgh.
Mark Boyce posted:trestleking posted:Bought a new (to us) dry basement - with a decent house over it, in PA. Yes, it passed their 16 inches-of-rain-test with flying colors !
I am excited to get loose ends in OK cleaned up and get moved to PA for the winter layout building season. My wife said I should take the largest, nicest room in the basement for the trains, wow, is she a keeper ! I now have motivation to take down my old "test" layout ! Probably need to buy more trains, lol.
Dry basements are a very good thing!! We have one also here in Pennsylvania. Where in Pennsylvania is this new to you basement with a house over it? We are in Butler, about 40 miles north of Pittsburgh.
Don't know why, but I imagined you as living in eastern PA, Mark. It makes sense now why visiting all the neat train venues in the east isn't just a couple of hours travel time. Been the length and breadth of your fine state and most trips ate up a lot of time. If driving as the crow flies were possible we would only be about 3 hours apart.
Bruce
Bruce,
You are not the first to say you thought I lived in the East. Yes, it can be a haul! York is almost 4 1/2 hours, and Philadelphia is 6 hours away. I've only been in Philly once, back in the late '80s.
Mark Boyce posted:trestleking posted:Bought a new (to us) dry basement - with a decent house over it, in PA. Yes, it passed their 16 inches-of-rain-test with flying colors !
I am excited to get loose ends in OK cleaned up and get moved to PA for the winter layout building season. My wife said I should take the largest, nicest room in the basement for the trains, wow, is she a keeper ! I now have motivation to take down my old "test" layout ! Probably need to buy more trains, lol.
Dry basements are a very good thing!! We have one also here in Pennsylvania. Where in Pennsylvania is this new to you basement with a house over it? We are in Butler, about 40 miles north of Pittsburgh.
Snyder County (Central Susquehanna Valley)
That’s great! You are not that far from Strasburg and York!


Attachments
Images (8)


delivered and iced up the reefers.....


Attachments
Images (3)
I painted more Preiser 65602 Seated People for my CSX Executive Technical Research Classroom car and spare people for the Theater car when it arrives. Pictured are some 68209 8402B China Blanks.
The Technical Research car has a classroom/coach section and three large sleeping rooms. I already detailed the interior with paint, but needed people for the classroom.
Five more boxes of 65602 arrived from Germany today.
My CSX F40PH #9999 is in limbo at Lionel Service. They had to set it aside for parts to arrive. Lionel received the engine on June 22, 2018 at 9:32 A.M. They said it would only be two more weeks over two weeks ago. Yesterday I was told it will be another two or more weeks. This engine I was told by Lionel Service was manufactured by Affatech.
Sincerely, John Rowlen
Attachments
Images (5)


John Rowlen posted:I painted more Preiser 65602 Seated People for my CSX Executive Technical Research Classroom car and spare people for the Theater car when it arrives. Pictured are some 68209 8402B China Blanks.
The Technical Research car has a classroom/coach section and three large sleeping rooms. I already detailed the interior with paint, but needed people for the classroom.
Five more boxes of 65602 arrived from Germany today.
My CSX F40PH #9999 is in limbo at Lionel Service. They had to set it aside for parts to arrive. Lionel received the engine on June 22, 2018 at 9:32 A.M. They said it would only be two more weeks over two weeks ago. Yesterday I was told it will be another two or more weeks. This engine I was told by Lionel Service was manufactured by Affatech.
Sincerely, John Rowlen
John, when you paint your people, what is the process? I could only guess assembly line style doing many of same color hair then a dress same color... any hints for us? Thx in advance.
Looking good John! I think for me this would have to be a winter project!![]()
They look great, John! Not just a winter project, but a retirement project! I’m close enough now, by the time the layout is far enough along, I will be retired.
Former Member
Hmm, no one seems to be buying into my carpet padding sound deadening. I'm telling
you guys, it works.
This morning I ran a 20 car coal train, a small work train, and a short logging train. Brief as it was, I did greatly enjoy the time!![]()
beardog posted:Hmm, no one seems to be buying into my carpet padding sound deadening. I'm telling
you guys, it works.
Yes, I do know it works. ![]()
beardog posted:Hmm, no one seems to be buying into my carpet padding sound deadening. I'm telling
you guys, it works.
It works, and physics tells us it does, especially if it has a rubberish or foam backing, (closed cell would be best). For me personally, being in a climate where temps swing greatly and humidity can reach 85% I would be concerned that it may start to smell. Fyi, carpet also works great underneath an outdoor pond liner.
For me, acoustic ceiling tiles work great and don't off gas like homosote does.
Marc
How to Paint Preiser 65602 and 68209/8402B(China) figures
1. Paint the flesh on the figure. Check for missed spots. You may have rubbed the brush over the figure, but oils or dirt could cause the paint not to stick.
2. Paint the men's ties.
3. Paint the shirt along either side of the tie.
4. Paint the suit coat and pants. If the figure is off the sprue, do top first and bottom next.
5. Paint the hair on the figure. There are very fine lines on the Preiser figures that act as guides that are not on the China knock-offs.
6. Paint the shoes on the figure.
The white plastic of Preiser Figures accepts paint easily, often one coat. The flesh-colored plastic from China requires two coats of paint to get the same effect. It means more painting.
I work in color groups: Women have dresses that are pastel pink, blue, green, yellow and violet. I use two colors of clothes on female figures to add interest and greater visibility. The men's suits are gray, brown, sand, light gray, and navy. The navy tends to shine even when I use flat paint. I have not used navy or black which always appears glossy lately. Not all flat paints dry a flat or a matte color.
Some figures are bigger than others in the Preiser 65602 24 Seated People set. There is a 1/48 man with a hat that I rarely use. Two larger women usually end up in the bathroom talking and smoking. The other 21 figures work nicely together.
Placement: I try to make conversation or family groups that look realistic in the passenger cars. There are no forward-looking Zombies on my trains. The work takes extra time, but it will last forever. The passenger car cost me some money. I want my investment to be of interest and create visual realism on my railroad.
Sincerely, John Rowlen
To see many of my previous Atlas O and Lionel 21" passengers cars done over the past five years, search "Preiser 65602", then click on the photos and scroll through many of my cars. I did not post these pictures. They were taken from OGR Forum and posted by others,
Attachments
Images (3)


mike g. posted:Thanks Bruce! Yep no Fastrack here, I am going to use all Scaletrak!!
Yeah, sorry, Mike. I've had nothing but problems with Scaletrax. Fastrack will always be my number one choice of track. Until I hand-lay my track for my Civil War themed layout I got running in my head, along with my Promontory Summit 1869 display with interchangeable eras. I'll use Lionel's old tubular track and cut it with a hacksaw, and use my own ties. Tricky part will be keeping it in gauge as I'm going to remove the original clip ties.
Hey, I know exactly where Butler is. It is the county seat.
I used to go to the Butler County fairgrounds yearly on Father's Day weekend for a HUGE swap meet. It would take all day at a brisk pace to look it all over. We went for vintage car parts and bulk supplies of all kinds. The savings and rarities made the trip very worthwhile. We would pack every vehicle taken, seldom really having enough room (or cash) for every thing considered for purchase. There was usually one or two train specific venders if I recall. They were in the buildings with more scattered throughout the outdoor tables and blankets; but I was still just a Holiday Runner of,my old stuff at that point. My last visit, I was trailer hitch shy of a new trailer from one fellow and an Argo from another.
I went to see a few band festivals and concerts in the area as well (zydico, bluegrass, metal, and a string quartet that does metal cover tunes comes to mind among others)
I loved driving those hilly roads.
With all those hills to climb and valleys to decend through, I'd bet you might even make it to Detroit faster than to Philly if you had light traffic going west. Especially with the better highway speeds of today. My first trip east I couldn't believe how long it took compared to a map's point to point comparison of flat land time.
Finished CSX Executive Research Car
After painting more people, I did the final placement of people in my CSX Executive "Technical Research" passenger car. The car has a classroom of 10 seats with dry erase board and television at the front of the classroom. The three staterooms are used by the technical group, a room for accounting and office, and a room for the president and executive secretary.
This car was set aside for a couple months while I came up with my final plan to detail the car. I have done the other six cars and completed 49 passenger cars since February 26, 2018. My 50th car is on its way: a NYC ESE Dining Car #2, "John Jay". I will probably follow the layout used on my Penn Central Dining Car.
Sincerely, John Rowlen
Attachments
Images (9)


FutureRail Productions posted:mike g. posted:Thanks Bruce! Yep no Fastrack here, I am going to use all Scaletrak!!
Yeah, sorry, Mike. I've had nothing but problems with Scaletrax. Fastrack will always be my number one choice of track. Until I hand-lay my track for my Civil War themed layout I got running in my head, along with my Promontory Summit 1869 display with interchangeable eras. I'll use Lionel's old tubular track and cut it with a hacksaw, and use my own ties. Trickerery part will be keeping it in gauge as I'm going to remove the original clip ties.
Just wonderind what problems you have with scaletrak?
Former Member
Actually I just went to the carpet store and got the cheapest, which was usually
made of recycled carpet padding from what I could tell. I painted mine white and
overlaid it with quilt batting for a christmas themed layout. Never had a problem with
smell, I figure if it does not smell under your living room carpet, why would it smell on
your layout.
Hints: Don't even try to drill thru it for wiring, etc. Get a thin awl or icepick, heat
it red hot and force it thru the padding and the plywood. Works fine, I have done it
hundreds of times. To fasten track without screws, and avoid the subsequent noise
transference, punch holes as above where you need, then thread a thin zip tie thru
the hole and slide another on it underneath. Pull snug and your good.
John
While I might approach the situation similar to the Beardog, I'd add water and some monitor time for smoldering padding, more than than the wood even. Ive seen that stuff smolder under carpet after a cigarette was dropped and quickly retrieved. (Matresses are the same way too ![]() )
)
A partial drilling then a round chisel tip leather hole puch set to remove padding, then drill fully through it. I think I got these at Harbor Freight (cheap) back when there wasn't a store everywhere and it was all catalog mail order (they have/had a nice thick one if you don't have a store nearby; ask. Never looked for a website as the company has a quite a few local now)
The cut disc is 5/8"x 1/8" reinforced rubber, they cut wood just as well. I grind on them often to taylor my cuts if you notice the bevel angles. (just a few of a set in 1/16" increments to 3/4")
To the right is a homemade one. Just bevel a tube. (steel here, but Ive made them from copper, brass, and aluminum while working away from tool access in the field.) That is ground sharp while leaving a step to control depth.

Attachments
Images (1)

Ottawa_Marc posted:beardog posted:Hmm, no one seems to be buying into my carpet padding sound deadening. I'm telling
you guys, it works.
It works, and physics tells us it does, especially if it has a rubberish or foam backing, (closed cell would be best). For me personally, being in a climate where temps swing greatly and humidity can reach 85% I would be concerned that it may start to smell. Fyi, carpet also works great underneath an outdoor pond liner.
For me, acoustic ceiling tiles work great and don't off gas like homosote does.
Marc
I also went the acoustic tile route, knowing that I'd be super-e!evating the curves. The tile doesn't give under the irregular pressures needed to attach the track firmly to the roadbed. When angled as such with no firm support the curve tends to kink at the track jointsjoints. Tried this with Atlas track and the commercial foam underlay with horrible results. Rather than banking with wire, which can eventually dig into the tile, I use strips of cork under the outer rail.
Aside from this, I just can't source Homasote in my area.
Bruce

switching some ore cars...
Attachments
Images (1)

Add Reply
Sign In To Reply
