
I'm rather new to this and i think I am trying to fit to much in a small space. But I would like to have 3 trains running at once, with room to stage others. I would like reversing loops if possible. Are there any layout designs out there already. I keep building and taking down because I'm not satisfied. Is this normal. HELP and thanks in advance.
Original Post

Replies sorted oldest to newest

Lots of people here are willing to help, but it would help if you supplied more info about what your goals and priorities are, such as:


1) Are you set on a 8x12 rectangle or would you be better served with an around-the-room layout?  The latter often gets you more bang for the buck using the same amount (or less) of total space used.


2) Radius.  The bigger the radius, the better your trains will look.  Tight radius turns take up less space but can limit the size of the engines that you can run.  And just because that nice articulated loco CAN make tight curves doesn't automatically mean that it can look good while doing it.


3) You have a method of operation in mind? Some are happy with a few concentric loops, others look for point-to-point operations, or some combination of both.


4) Pick the key features that you want, such as yards, passenger stations,

freight car sources/destinations, Engine facilities such as the ubiquitous turntable.


Other considerations:


-Steep grades will limit how long a train you can pull.

-Make sure there's room for "enough" scenery.

-Looking for a "toy train" vs. scale model layout?

-Only you can judge what your priorities are, but with this limited amount of

 space, you definitely can't have everything.


-Mark

Mark,
 
First thanks for your quick response. And yes I do believe people on here are will to help and help ALLOT.
As far as being set on a 8X12 rectangle. No not really I can go somewhat different, however I can't stray to far off my space is somewhat limited. In the phot I am using Lionel O Gage, different radius, 042,054 and 072. I just purchased though allot of GarGraves 37" flex track because it looks more realistic. I do understand about the bigger radius so I will go with that, and maybe go smaller with the yards. I know I am asking allot but I would like to try to incorperate a passenger station and a frieght yard, I can do grades, levels and yes although small I know still would like to try, if possible. Concentric loops is what I would like with reversing loops. I will add scenery, so yes scale not toy.

Lots of people here are willing to help, but it would help if you supplied more info about what your goals and priorities are, such as:


1) Are you set on a 8x12 rectangle or would you be better served with an around-the-room layout?  The latter often gets you more bang for the buck using the same amount (or less) of total space used.


2) Radius.  The bigger the radius, the better your trains will look.  Tight radius turns take up less space but can limit the size of the engines that you can run.  And just because that nice articulated loco CAN make tight curves doesn't automatically mean that it can look good while doing it.


3) You have a method of operation in mind? Some are happy with a few concentric loops, others look for point-to-point operations, or some combination of both.


4) Pick the key features that you want, such as yards, passenger stations,

freight car sources/destinations, Engine facilities such as the ubiquitous turntable.


Other considerations:


-Steep grades will limit how long a train you can pull.

-Make sure there's room for "enough" scenery.

-Looking for a "toy train" vs. scale model layout?

-Only you can judge what your priorities are, but with this limited amount of

 space, you definitely can't have everything.


-Mark


Attachments

Images (1)
  • Train

From the pic you posted, it looks like you are well on your way!


And the concentric loops look like the main thematic idea. cool.


It looks like you can use a wider radius around the outer corners.


First I'd see about crossovers between the loops.  Then, see if you can squish in passing tracks along one or both long sides that could double for passenger train platforms (if you like).  Adding a reverse loop into the inner track looks doable too.  Then consider sidings for industries and/or a small yard.


-Mark

My suggestion would be to install some track design software.  SCARM and XTrackCAD are both free. They might not have the exact track libraries for the different track you have, but you should be able to find something close enough to give you some ideas of layout possibilities. I realize design software is not for everyone, but I've had my fill of designing on the fly.
Looks like you could run 4-5 trains and 2 unattended, so it meets that requirement.

It has the figure 8 for reversing loops, another requirement met.

There are some staging tracks, so I guess that requirement is met too.

I'm not one to completely redesign someone's layout, I try to modify what they present. That said, I'd try moving the blue turnouts to meet the green turnouts. That should increase the amount of staging track in the Storage Yard. I'm not sure what turnouts you are using or what are available in SCARM, but there might be room to add a 3rd staging track in that space using different turnouts since yard tracks can be closer than the current turnouts allow. I'd try 2 turnouts off the green turnouts with a curve track at the top to complete a 3-ladder yard.

A similar change could be made to the Double Depot setup, while keeping it 2 tracks. However, since the purple track is right there, I'd be inclined to limit the Depot to a single track with depot between to purple and yellow tracks. That way you could shrink the purple oval enough to allow for 3 tracks in the blue Yard. You can still have a train parked at the depot while another rubs the purple oval. It also gives you some room for a few buildings, like the depot, etc. While I like just running trains, there doesn't seem to be much room for buildings and other scenery. That doesn't bother me, but I'm sure it will others.

One final thought for now is when using design software, be careful of having too many tracks that don't join up. While section track has some give, you seem to have quite a few that don't connect and that might cause more of a challenge than you care to deal with. That's one reason I want to switch to a track brand that has flextrack. That way I know things will line up without excessive cutting or frustration.
Last edited by DoubleDAZ

Here is a quick sketch I made on Paint.  It probably would have to be tweaked a little bit (more likely a lot).  A person can actually do a lot in 8 X 12.  I personally prefer less track than more, it is quite possible to have three trains operating at once in this space as well as a yard and reverse loops.


If interested, try replicating the plan on a software program.  


Green is O72 curves for large locomotives.  This is just a simple loop.  

Red is another loop, but with O54, maybe O63.  The exception to this is the yard tail track, which is O42 curves.  A four track yard with a access hatch is located near.  Blue is a loop to loop with one connection to Red track. 


Here is the plan in the attachments:

O scale track plan

Attachments

Images (1)
  • O scale track plan
I like it and plan to play with it some myself for my 11x11 space. I like that it includes a raised section and can run 3 trains unattended. For me, all these layout designs to think about are a lot if fun. Makes me think I'd get me money's worth out of RR-Track if I upgrade. AFAIK, it's the only software that includes RealTrax and ScaleTrax.

Okay Guys. After a few comments, which I greatly appreciate I have made some changes. This is my second shot at it. I like it just not exactly sure it can be done. I used SCARM software and they did not have the track I have. Which is GarGraves track and Ross Switches.

I look forward to some resonse. And also Im trying to do some research on blocks any ideas of where to go?


Thanks and Happy New Year.

Attachments

Images (1)
  • lionel track 9

FYI, AnyRail and its free evaluation version includes Atlas, KBscale, GarGraves , Lionel, Peco and Ross track libraries (and others).


Lots train-runnin action in that layout.  You have enough room to make the yellow

line a complete loop by eliminating the orange line top passing track.  You've

got some "S" curves that could be problematic with some equipment.


-Mark

Originally Posted by dgoodwin:

I have a question about foam. Most the video's I have seen have a foam padding. And they do not use cork.They make the track bed on top the foam. So when using foam do you use cork or not. My thoughts it would make the track to high. Can someone comment on this please.


Thanks

There are several things you can use to lay track on.  Generally, if it reduces noise, is durable, and raises the track to a more realistic elevation, then it can be used as track bed.  


The foam version, depending on manufacturer, is soft.  I personally don't like to use the foam track bed on its own.  Instead, I lay cork, then add a layer of foam track bed on top of that.  The cork provides stability, and the foam reduces noise.  Should you sue track bed in O scale?  Yes, as we all know that generally, O scale trains are noisy enough when on track, let alone when placed directly on a plywood and 2X4 frame.  And with the gargraves track, it will look way more realistic when on a raised bed.

Okay, now I'm confused. I thought the plywood was to provide a stable base, then foam (or homasote) for sound deadening (except for Fastrack and RealTrax where foam can resonate), then cork covered with ballast for a realistic look. The pink foam I'm using is softer than wood for sure, but it's harder than cork. I suppose it's more durable than cork and together in either sequence serve to deaden the sound. Perhaps using cork and foam together also deaden the sound for Fastrack and RealTrax more than just cork alone.
Originally Posted by dgoodwin:

AS of right now I have a half in thick plywood base, then cork, then track. Am I hearing I should lay foam down first then cork then track.

I lay down the foam on top of the cork, not underneath.  The foam provides dampened sounds, so that goes on top in direct contact with the track.


The foam is, however, unnecessary unless you want to have quieter trains.  If you are fine with it the way it is, then by all means proceed, this is your layout, not mine, so you do what is okay with you.

Originally Posted by DoubleDAZ:
Okay, now I'm confused. I thought the plywood was to provide a stable base, then foam (or homasote) for sound deadening (except for Fastrack and RealTrax where foam can resonate), then cork covered with ballast for a realistic look. The pink foam I'm using is softer than wood for sure, but it's harder than cork. I suppose it's more durable than cork and together in either sequence serve to deaden the sound. Perhaps using cork and foam together also deaden the sound for Fastrack and RealTrax more than just cork alone.

I think we're talking about two different kinds of foam.  For a track base, I use cork, and then on top of that I have Woodland Scenics foam track bed.  The plywood provides a stable base for everything to be built on, but in my set up the track needs to have cork underneath the foam track bed otherwise the track moves up and down as trains run on the layout.  Here's the link to the stuff I use: http://woodlandscenics.woodlan...w/Item/ST1476/page/1


What I think you and dgoodwin are talking about is insulation foam board correct?  In that case, yes, that goes between the cork and the plywood.  


Sorry for me creating the confusion.

Thanks for clarifying James. Being new, I figured you were talking about a different foam and thanks for the link. I tried adding cloth between the RealTrax and the insulation type foam and that deadened the sound a lot, so maybe I need to heck out this foam roadbed with ScaleTrax. I'm surprised it's so soft that the train moves the track like on carpet and I'm more surprised the cork reduces it.
Originally Posted by dgoodwin:
AS of right now I have a half in thick plywood base, then cork, then track. Am I hearing I should lay foam down first then cork then track.

Just to clarify the confusion I caused with my novice question. There is insulation foam and roadbed foam. These are 2 very different materials. Many add insulation foam on top of the plywood base to deaden sound.  Others use homasote. Then they add roadbed of cork or roadbed foam to further deaden sound and raise the track to a more realistic height. James tried roadbed foam and found it too soft for trains to ride smoothly, so he added a layer of cork.

The old method was plywood, homasote and cork. Many have moved to plywood, insulation foam, and cork, presumably for cost. Some forget the cork and just use the insulation foam, depending on what degree of realism they want. Basically, you should use a base layer, a sound deadening layer, and a roadbed layer depending on your goals and financial resources. Track on plywood works, but can be loud, especially when you get 2-4 trains going. If you invest in new equipment with sound capabilities, track noise becomes a big consideration.


Originally Posted by dgoodwin:
 
I'm rather new to this and i think I am trying to fit to much in a small space. But I would like to have 3 trains running at once, with room to stage others. I would like reversing loops if possible. Are there any layout designs out there already. I keep building and taking down because I'm not satisfied. Is this normal. HELP and thanks in advance.


Our layout is 8'x12' and allows for running four trains at same time, more if you want to run the same mainline.  I can turn the trains around ith revering loops.  With the 8x12 the upper level incline has to be well thought.  Anyway was reading this post and there were also discussions of blocks (using DCS) and foam for track bed.  I used blocks w/DCS and used HVAC adhesion foam tape (first plywood and homosote) under Realtrax and made huge difference with sound.


Ill attach my 8x12 track plan and link to foam tape (picture) used during construction.


https://ogrforum.ogaugerr.com/f...ge/true/Homosote.jpg


8x12 track plan


Here is a video, http://s36.beta.photobucket.co...zpsd2f3f53c.mp4.html

Last edited by litegide
Originally Posted by mike.caruso:

Litegide, just watched your vide.  Very nice!  May I ask what size curves are your outer loops?

- Mike

Thanks Mike and William.  The track is 054 / 042, the inner upper level loop is 031.  


Yes there is quite a bit of track in the footprint but with the large mountains the trains always leave your site, which I think is the coolest part about it. I'm pretty happy with the track plan, the mountains are wide open inside and are about 5' tall so little people can stand up inside and watch the trains come through.  The kids enjoy the inner mountains more than the outside.  I built it to be busybusy, after all its a toy train layout.  I've had it setup for a while and it's still not boaring, I always know its time for bed when I crash the trains 

I'm electronically challenged so I don't know how to send you a "drawing" of the best inexpensive o-guage layout I ever built within the 8' x 12' limits but I'll try to describe it and then you can try to adapt it if you wish.  Imagine drawing this layout on chalkboard that is eight feet high and twelve feet long.  On the upper right corner of the chalkboard, imagine a horizontal 4' x 8' area with a switch (turnout) at the lower left corner (of that 4' X 8' quadrant).  The switch is situated so the curved portion is pointing to your right.  Now draw a curved track off of the other track on that side (upper right) of the switch so the curved track is also pointing to your right.  Extend the lower of those two tracks along the lower edge of that 4' x 8' quadrant but when the upper of those two tracks approaches the right end of that 4' x 8' quadrant, curve the track up along the right end of the quadrant.  Use a large-radius curve or some straight track until you need to use curves again to continue the track to your left along the top of that 4' x 8' quadrant and right on to the upper left of the chalkboard where another curve (90 degrees) will bring the track down the left side of the chalkboard.


Now begin drawing a line to represent the track from the end of the switch that has only one track.  This will be the direction of travel of the train (or trains) on the outer loop of track.  Extend that line at 45 degrees downward and to the left from the switch until you need to use a 135 degree curve to meet up with the line (track) coming down the left side of the chalkboard.


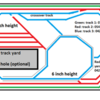
If you put a block signal in the upper right hand corner of the chalkboard, it can face the track that runs along the top of the chalkboard and if two trains are run on the outer loop at the same time, the block signal can be utilized to stop the faster train occasionally.


On the upper-right-hand 4' x 8' quadrant, the inner loop of track runs just far enough inside the outer loop to prevent sideswiping trains on the other track but, in this quadrant, the (passenger?)  train runs in the opposite direction (counterclockwise).  At the left end of that upper-right 4' x 8' quadrant, bring the track down to a point near the switch and then down and to your left alongside the outer loop.  The train on the inner loop will be running in the same direction alongside the train(s) on this portion of the outer loop.  Draw a 135 degree curve just inside the other 135 degree curve but as you draw the line up the left side of the chalkboard, curve the track 90 degrees to the right at such a point that, after the curve, the track will be aligned with the inner loop of track on the upper-right-hand 4' x 8' quadrant.  If you are doing this all on one level, that will require a crossover.


Now what you have is a layout that requires only one switch and one crossover and one block signal.  It allows trains to pass near each other on opposite directions on part of the layout.  The switch can be utilized for your miniature "classification yard" (to rearrange your freight cars) and, because the only curves used in that yard are 45 degree curves, you will experience a minimum of derailing, even when children are coupling and uncoupling the cars. 


An additional pair of switches can be utilized to connect the inner and outer loops of track near the switch already mentioned.  (We installed those switches on the layout but found that we seldom ran the trains from the inner to the outer loop or vice versa.)


Another place you might want to install a switch is on the right side of the outer loop, placed in such a way as to allow a track from that switch to run between the outer loop of track and the existing (already mentioned) siding.  Theoretically, that extra siding would allow switching the freight cars while running a train counterclockwise on the outer loop (but we never invested in uncoupling tracks to allow that to be done hands-off).  If this second siding is seperated from the main line by a fibre pin and wired through an electric switch, surplus engines can be stored/displayed on this second siding.


Our "secenery" consisted of using roofing material to simulate ballast and making wood ties dyed black to supplement the three ties per track section.  Add a few plastic buildings (or and scratch-built buildings such as my dad made) and maybe a Christmas tree (in season).


We had a paper mountain on one of our previous layouts but never got around to building one for this layout.  If you were to put a mountain on the upper left corner of the layout, you should make a cutout inside the curve on that corner so you can reach any derailments that occur under the mountain.  

Post
The Track Planning and Layout Design Forum is sponsored by

AN OGR FORUM CHARTER SPONSOR

OGR Publishing, Inc., 1310 Eastside Centre Ct, Suite 6, Mountain Home, AR 72653
800-980-OGRR (6477)
www.ogaugerr.com

×
×
×
×
Link copied to your clipboard.
×
×