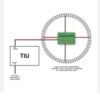
Any valid reason why I CAN'T use the same gauge wire for both Bus and Feeder? If I have enough wire of the same gauge why couldn't I use it?
Replies sorted oldest to newest
Well, the reason typically for using a smaller gauge wire for feeders is trying to bend and flex that wire between where you connect to the track, pass through the table. Again, a bigger stiffer larger wire makes this harder to handle and harder to conceal. Because this wire distance is short, the effective resistance and current handling is not an issue with smaller wire.
For long Bus wires that carry the current over distance, you want heaver wire- that then becomes more impractical for feeder wire usage. Again the main driver here in choice is biggest wire you can afford to then have the lowest possible resistance to the furthest point on your layout. Edit- the longer the maximum distance requires heavier wire to reduce the resistance. Also- semi confusing- wire gauge or size- smaller number is larger wire. Example 12 gauge wire is larger and heavier than 14 gauge, 16 is smaller yet, 24 is really small.
If you use thinner wire for bus wiring- you incur penalty on resistance and will likely see more sag or voltage drop at your furthest distance point on the layout with heavy current drawing trains.
No reason at all, just what Vernon stated. I used #14 for my long runs and #18 for the track drops, typically around a foot or less. My 24 x 12 layout experiences very minimal voltage drops anywhere on the layout.
@SilverChief posted:Any valid reason why I CAN'T use the same gauge wire for both Bus and Feeder? If I have enough wire of the same gauge why couldn't I use it?
Alway remember when running wire. resistance is your enemy, John uses number 14 wire I use the 14 or 12 stranded speaker wire. I use the lighter speaker wire for different items. The speaker wire I find the easiest because it’s color-coded it has a clear coating and one is copper, and one is silver.
No reason, just what Vernon & GRJ stated. I would suggest using 16 gauge stranded wire for your power drops as these can be less than 12 inches long and will have minimal impact on voltage drop. The smaller gauge wire will be easier to bend(I use stranded for my power drops) and 12 gauge solid for my bus wire.
I know that all conventional wisdom favors using heavy bus wires, but personally, I am "anti-bussing." :-)
So you have heavy bus wires running around underneath the layout, and you have light gauge drop wires coming down through holes to attach to them. So far, so good, lots of power to the tracks.
But, now you decide you want to have 6 different power blocks in your tracks, and to be able to turn them on and off with toggle switches at your distant control box.
So, now what? In order to place an "on/off" break in each of the drop power wires carrying a hot current, you have to cut the hot drop wire, and splice one end to a new wire, and run that wire all of the way back to your control board to connect to the switch, and then connect another new wire to the other side of the switch, and run it all of the way back to splice it to the other end of the cut drop wire.
Unless I am wrong, you are not going to run a heavy wire all of the way out and back to the switch, you would run a lighter gauge wire, that will, yes, not carry the current as well as the bus wire.
So, what was the point of running the heavy gauge bus wire all around the underneath of the layout?
Just use a set of medium gauge, long, drop wires, drop them through the holes in the top of the layout, and run them straight back to your control panel. Hook the neutral to a bolt that is wired to the neutral pole of the transformer, hook the hot wire to the on/off switch, and then connect a really short run of wire from the other side of the switch to a bolt that is wired to the hot pole of the transformer. Done! In 15 minutes. No bus wire needed.
Want more power to the block? Just add another set of medium gauge wires to the track section 5 feet away, run them straight back to the control board, and wire the hot wire through the same switch as the existing hot wire is hooked to, and the neutral wire to the same neutral bolt.
Rinse and repeat.
For a really long track run, I have easily added a third set of drop wires, and have easily hooked up the three hot wires to a single toggle switch.
I have found that 18 gauge two conductor flex wire works great for this. My layout can power three engines running at one time, without any problem. And I only have a little Z-1000 transformer.
Perhaps 16 gauge stranded would be better, but I find it more difficult to work with.
Using my method, I only have one long upright bolt wired to the hot pole, and one long upright bolt wire to the neutral pole. Those wires and all of the ends of the drop wires are attached to each bolt using ring connectors, with all of the rings sliding down flat on top of each other, but with a flat metal washer placed between each set of rings, and a large nut on the top which screws down tight and "crunches" them all together. In other words, two distribution blocks, created by drilling two holes in the bottom of my control box and pushing the bolts up through them, so that they sit upright. Before any ring connectors are slid down on the bolts, a flat washer followed by a nut are screwed down on the bolt, so that when that nut is tightened, it really holds the bolt in place upright.
Maybe this idea will help the OP. Maybe not?
Thanks, (Let the screaming commence!)
Mannyrock
To the OP, I would say, it depends what gauge the wire you have on hand is. If it's all 24 AWG phone wire, for example, that's okay for drops, but will have much resistance over long runs, and not be a very effective bus. If it's all 12 AWG, that's great for the bus, but will be hard to hide when soldering to the rail for the drops. If it's somewhere in between, you're still compromising on both: resistance in the bus versus size and difficulty working with the drops. I buy 12/2 Romex and split it into 3 separate conductors for the bus wires, and 20 AWG dog fence wire for the drops and most everything else on the layout. Best of both worlds. Not sure what advantage you are seeing in using one gauge for all?
As I use Gargraves stainless rail track I use wires soldered to the track connecting pins for my connections. So I need smaller wire there so that the gap between the rails is minimized.
Regarding the writer who doesn't use a bus system in your example of wanting to install blocks I'd just insert a relay, not run the wires all the way back to the panel.
Solid 18ga, or 20 ga, thermostat wire is available in cable 2 conductor to 10 or 12 conductor, color coded. Available at electrical supplies, and the big box stores.
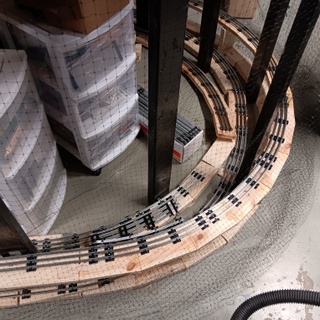
Thanks for all the reply's. Some may recall my plans for an on-purpose exposed 7x11 helix raising 4-5 levels with an inner return path so I'll have continuous running of four western passenger KLine 15-inch cars with ABA TMCC locomotives. Two going up two going down. I've actually built something. Taking a building break for holiday preparations. Looking to get my supplies for wiring for when I'm ready. My situation is different because I want to see the operation of the helix. I don't want an octopus of wires. I'll be able to going inside the interior of the helix and watch the show. TV, bookcase with train related books, a spot to contemplate life![]() Doing my search for answers I'm leaning towards using T-tap wire connectors off the bus and male spade connectors used for the feeders. Same gauge wire for both. I'll prepare ahead of time attaching the feeders before. Drill a hole in the roadbed to accept the short feed. From there my thoughts are to have one continuous run of bus wire under the whole of the roadbed, top to bottom. Stretched out its one big oval, right? What I'm envisioning is even short drops under the roadbed attached to the bus as it follows the underneath....
Doing my search for answers I'm leaning towards using T-tap wire connectors off the bus and male spade connectors used for the feeders. Same gauge wire for both. I'll prepare ahead of time attaching the feeders before. Drill a hole in the roadbed to accept the short feed. From there my thoughts are to have one continuous run of bus wire under the whole of the roadbed, top to bottom. Stretched out its one big oval, right? What I'm envisioning is even short drops under the roadbed attached to the bus as it follows the underneath....
On top is another layout. Two ovals running the outer perimeter with a city in the middle. 20th Century Limited and the Broadway Limited.
Future question will be - I'll need to have easier access to get inside the helix. Right now I'm test fitting the roadbed. I'll take it all apart to start the wiring. As I build up it will be more difficult to climb over the track to get in and out. I've looked into lift out sections. I would need several. Ideally a swing out section like a door would be nice. That's a way off....
Attachments
I use 12 gauge wire for buses and the 16 gauge GarGraves pigtails as track feeders.
George
I'm not using DCS. Lionel TMCC. I could do away with that and set up blocks.
@SilverChief posted:...If I have enough wire of the same gauge why couldn't I use it?
YOU CAN.
We're all done here.
![]()
It's a toy. Get on with it. :-)
At this rate, it will take you 3 years to get a train running.
Use either 16 gauge for all of it and you will be fine.
Mannyrock
Now I remember why I stopped posting questions here.


