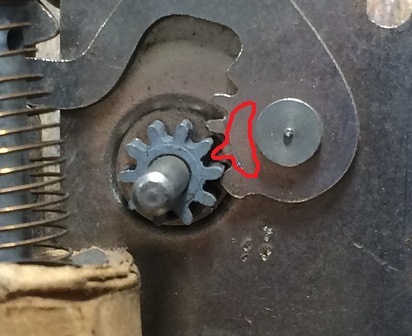
I am restoring a 3659 dump car and it needs a new segment gear. It has one tooth broken and will probably still work, but won't lock in the normal position. Since servo motors are really inexpensive, I was thinking of replacing the solenoid with a motor. These motors are controlled by a PWM signal, but I think they could be modified to run on application of DC power (not using the internal electronics) and without the position stop. I like how the MTH modern dump cars work and was thinking of a linkage that would be similar in operation - you stop it manually when back to the normal position. I know an AC to DC convertor of some sort would be required. The problem is that the servo motor only fits with the shaft in the wrong orientation, so the whole thing may be to much trouble. Anyone tried something similar yet?
Replies sorted oldest to newest
After a little more thought, the motor output arm could be connected directly to the dump hopper. An arduino nano could be mounted to the bottom of the car. If using an operating track, the arduino could run a non-looped program of the dump cycle when power is applied. The variable speed servo library would give any dump speed desired. Any advice?
Depending on where you got the servo, the seller may offer a "continuous rotation" version which does what you want - 2-wires (instead of 3) go directly to the DC motor bypassing the electronics...and the position stop has been removed to allow 360 degree rotation. Or, there are youtube videos and many online DIY instructions on how to modify a generic servo to be "continuous rotation"; I've done this many times with many different servos.
Right. If you apply the nominal servo 5V DC to the motor it will lift the load almost as fast as a solenoid! So you'll need to adjust the DC voltage - probably around 2-3V DC. I'm not familiar with the Lionel mechanism so I'm having a hard time picturing the orientation issue. But it seems that you want some kind of eccentric cam that translates to 1 full rotation equivalent to one normal-dump cycle. In other words, no need to reverse the polarity of the DC motor to change direction, and no danger of the gearmotor stalling at some mechanical stop.
Thanks for the information, you sure are right about the servo being as fast as the solenoid. You understand my first idea perfectly. I am starting to think the single unmodified servo with an arduino would be the simplest route. Here is an original dump car and the mechanism.
Attachments
Even if servo is unmodified, I don't see how you solve the "orientation" problem without, say, crown-gears or something to translate the motion if the servo is to fit in the confines of the black box.
Ignoring the broken segment gear tooth, as a complete aside I was going to suggest a really ambitious DIY'er could use an Arduino to convert the mechanism to a linear-solenoid. That is, you "instrument" the output shaft with a potentiometer (just like a servo does). An Arduino analog-input pin reads the angle and the Arduino calculates the correct PWM to drive the solenoid to the desired angle. Of course this would burn much more DC power than a gearmotor but it would be a neat project!
As for the broken tooth, it seems the segment gear is reasonably thinner than the depth of the gear on the output shaft. Is it possible to glue on a thin piece of metal like this? I'm assuming the segment gear is unavailable or uneconomical to replace.
Attachments
The segment gear is available for $5 plus shipping, and replacing it is the most sensible course of action, but I want to explore alternatives first. Part of the appeal of using a servo motor is smooth, slow action and low current draw. Those solenoids take a lot of current! If I add up what I pay for the servo motor, the arduino and other required parts, it's less than $5 including shipping. So, other than the ridiculous amount of time required for modifications, it is slightly less expensive.
The orientation problem could be solved by making a larger hole in the metal backing plate and attaching the dump to the servo gearbox output shaft. There is enough room that way and it simplifies (theoretically) the modification.
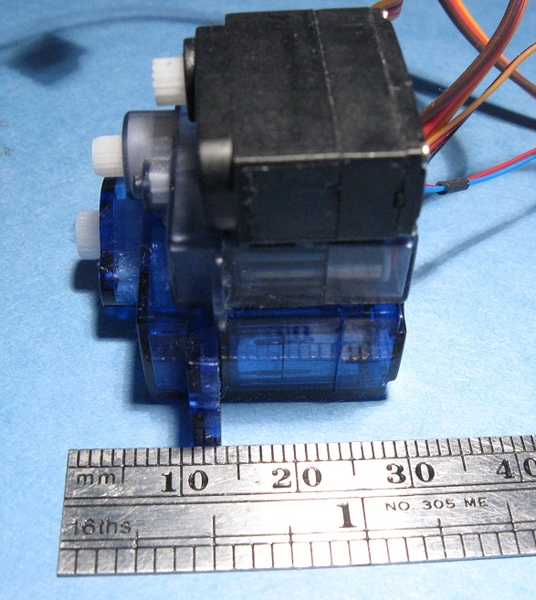
OK. So if you assume an Arduino is in the mix, then seems to me the brute force solution is direct drive of the output shaft. It looks like you'd have to whack off the mounting post inside the box that stabilizes the output shaft. Or, leave the mounting post and mount the servo as in your first picture so that the axis of rotation is parallel to the output shaft. Then, assuming it's unlikely you'll find mating gears, perhaps use one of the press-on servo arms to control the existing segment gear piece. This coupling may need to be on the outside of the box (between the box and the dump bed) given the height of your servo. It looks like that's the "standard" 6g 99-cent servo also shown on bottom of my photo above; obviously there are shorter servos that have sufficient torque and possibly even mount completely inside the box.
If you do go with direct drive, it appears the arc of motion is something less than 90 degrees whereas the servo angle will be more than 180 degrees. Obviously you would constrain the PWM command range to the legal range. One advantage of offsetting the servo axis is you can map the full servo angle to the limited bed arc. Thus if the Arduino code hangs up or whatever you will never stall the motor which might snap something in the mechanism.
If staying with the Arduino servo library functions using the 3-wire PWM interface, note that some inexpensive servos have the annoying behavior of jerking to some "random" position when you first apply 5V power to the 2 power wires. This jerking behavior is irrespective of the PWM control signal. The servo then quickly positions to the commanded angle. But in the case of a coal car with load, how annoying would it be to have the bed momentarily jerk ejecting some coal everytime you activate it? Anyway, just a BOLO and YMMV.
Attachments
My current thought is something similar to this. No gears, nothing but the servo motor and an arduino to go through the dump cycle when powered up. It will just barely fit, with a bigger hole cut in the original actuator mounting plate. I haven't had problems YET with servo motors starting in an unanticipated position.
Attachments
Oh good - already at the implementation stage!
So does it turn out that the servo's 2 mounting ears can be used to hold the servo to the existing metal plate?
As you're mounting the Nano under the car I'm guessing you might be able to fit the AC-to-DC power conversion components in the black box. I'd think a 1/2 Amp 5V supply would be sufficient.
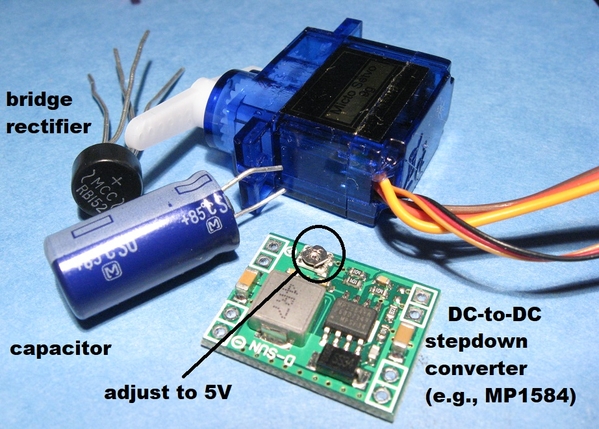
Somehow I get the impression you've got this all figured out already so I'll be brief. I'd look at a mini DC-to-DC stepdown converter module ($1 on eBay, free shipping from Asia). If you can power the UCS operating track from 14-16V Accessory AC, I suggest a module based on the MP1584 as it can handle up to 28V DC. Add a 10-cent bridge rectifier for AC-to-DC conversion, and a 25-cent capacitor for smoothing, and I'd think you're good to go.
I anxiously await the video. ![]()
Attachments
Remember my project with servo actuators?
I think a lot of cool stuff can be done with these servos.
GRJ, in the linked thread there is some discussion about a PCB design to generate the PWM to a standard servo. Was this ever done? While there are some guys on OGR who are comfortable with the Arduino, I think there are more guys that think Arduino is a character in the Pacman or Super Mario Brother video game. ![]()
That said, I can imagine a simple PCB, perhaps using the 555 as you show, that takes a single on/off command-control output wire in an engine...and uses that to control the PWM to one of two positions (settable with 2 trimpots).
The board was never done, but that doesn't mean it couldn't be. If we come up with something that might be somewhat universal, I'm sure at some point in the near future I could knock out a PCB for it. If you want to start a thread in the Electrical section, I'll jump in and maybe we can come up with a handy board.
While the Arduino is neat, it runs up the size, even using the NANO version after creating a power supply and the like. Putting it into smaller spaces cries out for a smaller solution. The size of the Ardunio is why I didn't use one for my Super-Chuffer and instead went with the PIC.
I remember your tie ejector servo project! I copied it for a crossing gate. I was thinking about the arduino because I could slow the servo down to any speed, and I could have more than two positions in a cycle. Right now, I am using 12v DC for all my accessory power, including the operating tracks. I already have some DC to DC step down convertors, so all components are on hand. I'm still really at the brainstorming stage and don't want to modify the dump car permanently until I know it will work. The main reason I know anything about all this is due to all of your shared knowledge on this forum.
I would mount the arduino under the car, but it might fit in the actuator compartment - probably easier to mount underneath. The mounting ears of the servo probably would fasten to the actuator bracket, but I have glued them in for other applications. I bought three rusty O gauge tinplate cars (caboose, dump and tank car), so all will progress together. This makes it take a little longer to figure the dump car out, but saves time in the long run. All the rusty wheels and small steel parts are going through the rock tumbler.
Neat thread and very informative. Thanks for all the details.
Two questions.
1. If you slowly rotate the bed, does it successfully dump the coal? That is, I'd think one benefit of violently snapping the coal bed is to impart some momentum to the load.
2. If I understand the design of this particular coal car, you don't really need to be all that accurate on the normal and dumping angle? In other words the total range of motion for direct-drive looks like about 45 degrees (vs. the >180 degree range of a servo). So if there are angle resolution issues (not saying there are) in the servo mechanism, it's OK to be off by a degree or two on either side? In other words nothing would be stalling the servo motor in the normal or dump angles if the servo angle is slightly off.
gunrunnerjohn posted:The board was never done, but that doesn't mean it couldn't be...
While the Arduino is neat, it runs up the size, even using the NANO version after creating a power supply and the like. Putting it into smaller spaces cries out for a smaller solution. The size of the Ardunio is why I didn't use one for my Super-Chuffer and instead went with the PIC.
Roger that. The Nano is 43.18 mm × 18.54 mm [ 1.70 in × 0.73 in ]. And for any rolling stock application you need the AC-to-DC conversion.
I've always thought a simple board with 3 tiny trimpots could set 1) starting angle, 2) ending angle, and 3) speed of traversing from one to the other. A 555 timer chip or two would be sufficient. A couple bucks in parts, a $1-2 OGR PCB special from Oshpark or wherever, a 99-cent servo from eBay, and off to the races! Again, this is for the majority of OGR'ers who aren't ready to dive into the Arduino pool.
Not sure if there's any interest in such an animation widget though. ![]()
Attachments
To answer Stans questions (I am also a Stan),
1. I'm not sure if slowly dumping the coal would work. It works well on the modern MTH dump cars, they dump, then go down a little, return to full dump position and then back to normal horizontal. This keeps anything from sticking. I was thinking of copying that behavior. The speeds could be adjusted as needed. If dumping slowly did not work, the servo could just run at full speed.
2. The dump and normal angles are not exact and therefore not critical. There is no danger of stalling the motor (if installed properly) since the range of angles required (about 45 degrees as you mentioned) is much less than the servo range of 180.
In a few days, I might try the idea out with just the servo and arduino on the workbench and see if it works.
You can get a little smaller than the Arduino Nano with the Pro Mini or something like the A-Star micro (25 x 15 mm), but if you're thinking about a 555 then, then you can get an 8-pin ATtiny 85 in the same footprint and program it with the Arduino IDE. (of course if you go SMD you can get really tiny!)
You do need a DC power supply, but wouldn't you need that for any servo application anyways?
stan2004 posted:gunrunnerjohn posted:The board was never done, but that doesn't mean it couldn't be...
While the Arduino is neat, it runs up the size, even using the NANO version after creating a power supply and the like. Putting it into smaller spaces cries out for a smaller solution. The size of the Ardunio is why I didn't use one for my Super-Chuffer and instead went with the PIC.
Roger that. The Nano is 43.18 mm × 18.54 mm [ 1.70 in × 0.73 in ]. And for any rolling stock application you need the AC-to-DC conversion.
I've always thought a simple board with 3 tiny trimpots could set 1) starting angle, 2) ending angle, and 3) speed of traversing from one to the other. A 555 timer chip or two would be sufficient. A couple bucks in parts, a $1-2 OGR PCB special from Oshpark or wherever, a 99-cent servo from eBay, and off to the races! Again, this is for the majority of OGR'ers who aren't ready to dive into the Arduino pool.
Not sure if there's any interest in such an animation widget though.

I can't point, but I've seen some "simple" freq. based servo control board plans on RC sites from time to time. And mostly 555 based if I recall right.
(I think those are in a dead phones memory, waiting for me to jump the usb usb and charge it again.... I'll look at them though (I now have about 6 new phones as storage / backup.... I don't get service at my home anymore and buying is the only way to even test... no refunds by anyone ![]()
The trick here is coming up with a board that is universal enough that it would have appeal to a diverse audience. Obviously, if you can program it, that's great.
Professor Chaos posted:You can get a little smaller than the Arduino Nano with the Pro Mini or something like the A-Star micro (25 x 15 mm), but if you're thinking about a 555 then, then you can get an 8-pin ATtiny 85 in the same footprint and program it with the Arduino IDE. (of course if you go SMD you can get really tiny!)
I'd probably go with a chip I'm already using if I did that, the 8-pin PIC processor. I use the thru-hole one on my Super-Chuffer, that was so I could replace the programming by just replacing the chip and not having to have to board back. On my Chuff-Generator, I use the same chip, but it's the SMT version.


However, there's still the matter of adjustments, so we still need provisions for variable resistors.
Attachments
The arduino nano clones I have are small enough, don't need anything smaller for this application. Your are correct, I would need some sort of DC power supply for the motor in any case. Since my accessory power is DC, I could use a dropping resistor or the DC to DC convertor if the motor were the only component. My current plan for the actuator has three parts: arduino nano, servo motor and DC to DC power supply.
Does your 12V DC power reverse polarity if you change direction of the Operating Car? If so, you may want to put a 10-cent bridge rectifier between the track DC voltage and your DC-to-DC converter module.
For anyone at a similar "proof-of-concept" stage, I recommend a servo exerciser - about $1 on eBay. For example, in this case one could manually turn the servo exerciser control knob and go thru the motions of the coal car dumping, simulating the little hiccup that MTH apparently does to shake the coal loose, then slowly return the bed to the normal position. All this without writing a single line of Arduino code. Just apply 5V DC! Here's a short video I made demonstrating the servo exerciser in action in this related OGR thread about Arduino & servos & animation.
I love topics like these because it certainly stirs up my creative juices; especially with animating layout scenes and rail cars themselves.
I was doing an internet search on servos and came across these little beauties....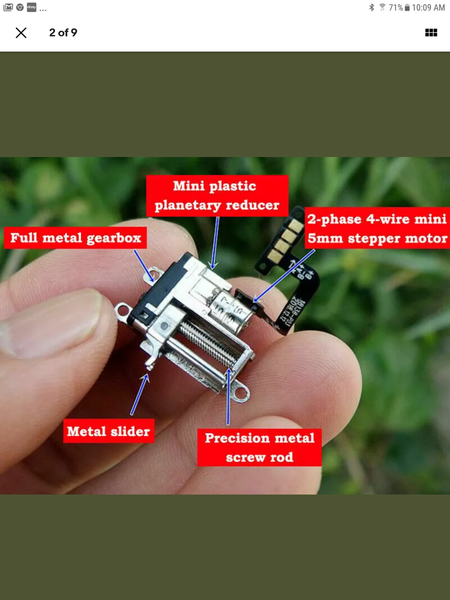
It's called a Micro Mini 5mm Precision Planetary Gearbox Gear Stepper Motor Screw Slider Nut and found it on eBay. These are 5V devices which might work well with Arduino.
It appears to be much smaller than a small servo and thought the linear movement would work just as well as a servo.
BTW, there are also versions of these where the motor and gearbox are "in line" with the drive screw (vs. "next to" as seen in the picture).
Anyway.....just thought I'd mention it and stir up more creative juicing ![]() .
.
Attachments
Junior, did you notice those are stepper motors?
Hey John....
Mmmm.....no....must've glossed over that in my excited re. this find ![]() .
.
Attachments
Yep, just figured I'd point out that little wiggle. ![]()
Glad you did!
In my experience, the hard part of a custom animation is finding a suitable actuator mechanism that has suitable form-fit-function. The electronics is the "easy" part. If it turned out that one of those stepper motor assemblies like Junior found was the only mechanism that would fit in the coal car and function as intended, I'm confident we could concoct suitable electronics to drive it - no doubt requiring an Arduino if it's a stepper.
Separately, one more question for Mr. Fixit,
3. What is the strategy for handling the admittedly rare situation where power was lost with the coal bed in the dump position? Unlike the spring-loaded solenoid that automatically returns the bed to the normal position, the servo motor will hold its angle. I suppose you can back-drive it mechanically against the gear ratio to raise the bed to normal.
Another easily overlooked aspect of servo animations is the mechanical memory of the actuator. In other words back when spring-loaded solenoid actuator were the only mechanism, you could rest assured the mechanism would reset when removing power or releasing the control lever.
In the case of the coal car, it's certainly not the end of the world if the bed "snaps back" from the dump to the normal position when actuated. There should be no coal in the bed anyway so nothing will go flying.
OTOH, there was a discussion a while back about the maiden-on-the-track animation where the Mountie saves the day from the oncoming train. Can't quite remember the details of the discussion but IIRC there was discussion of using a servo to make a more realistic rescue. In this case if power was lost or interrupted with the servo holding the maiden on the track, I'm imagining dire consequences. ![]()
An simple and inexpensive way to do this is a battery powered R/C receiver feeding a DIP relay which controls one of those $5.00 servo drivers which in turn controls a servo linked to the coal dump bed. I've done this setup several times with a number of operating accessories.
Wow, this is making my head spin. So many really great ideas!! I don't have a servo tester (or exerciser), but I really need to get one. I agree that it would be really useful in the proof of concept stage. That stepper motor/gearbox with the linear actuator is really interesting - I had not seen those yet.
I totally forgot about what happens if the dump car were on the track in the other direction. For this particular type of dump car on my layout, it will probably only be used at one location, but it's something to take into consideration.
Stan, to answer question 3:
I am not concerned about the dump bin ending up in the wrong position if power were lost. The dump bin isn't big enough to cause a problem on the layout if it stays in the dump position. If I couldn't move it back by hand, it would just have to be back on the operating track to return to the normal position. You are correct about snapping back to the original position when unloaded, it should not be a problem.
I hate to think what would happen if the maiden were trapped on the tracks.... bent and scratched trains and maybe even broken scenery!
The battery powered RC receiver is a really good idea! Who knows, in 15 years (if we are still around) we may be running our three rail layouts without power on the tracks.
Here is the test video. The DC to DC convertors I had did not work. They have an output of 5.0v, but the servo motor wants 5.1v minimum. The test was done using a 5v power supply. I ordered some adjustable convertors - set me back 50 cents each.
I was delayed on this project yesterday by making a temporary rock tumbler (for rusty train parts) out of two old roomba drive wheel assemblies. I have a fan on each motor to keep them cool. I expect something will eventually break if only the wheel drive belts.
Attachments
It turns out that most likely all my servo motors go to some random position when powered up. Since my other train related servos are only powered up when the layout is turned on, I have not noticed. In this case, the servo wanted to start at 70 degrees. I solved the problem by making that the initial position - a solution that would not work in other cases.
Mr Fix what are you using for media in the tumbler and how much of it ?
Where's the video of the rock tumbler in action?! 
I've never heard of a servo that works at 5.1V but does not work at 5.0V. Are you sure the 5.0V converter you used had enough output current capability and was not sagging under the load? A typical hobby servo as in your video has a motor coil resistance of, say 5 Ohms. So the current draw can be 100's of mA.
I am sure you are correct about the servo voltage. The convertor is supposed to have plenty of power, one or two amps, but I think the two I have left are probably just defective.
The "media" in the tumbler is usually small nuts, bolt and washers with some water and detergent, but I added some aquarium gravel and took out some of the hardware. Some people use stainless pieces made just for that purpose. I'm not expert, possibly doing it wrong, but usually it works. There is a lot of good information on the web concerning tumblers, most for ammunition reloading. I have a dual tumbler Harbor Freight unit that I have been using - every single part (except the barrels) is beyond worn out. The rubber belts break on every use, I found that pony tail ties work better and are much cheaper. I don't recommend that unit or any of the same design. Some people have done ok by getting the one year warranty, someone said they were on their fourth unit for the year. I use bits of shoe sole leather for dry tumbling brass bits. My temporary tumbler has run for six hours (broke one motor drive belt and replaced with a hair tie), so at least it is has worked some. I will build a proper one at some point. The harbor freight one was ready for the trash a couple of years ago.
The servo is mounted - fits perfectly. Now I have to wait for the other electronic parts to arrive. I may try to put all the electronics in the actuator housing.
Attachments
I assume that the servo driver will be in the same housing as the servo. How are you planning to signal the driver to activate the servo?
Here is the housing with the old shaft support removed so that the servo motor will fit. The servo will operate when it is on an operating track and power is supplied. The arduino runs through a non-looped program when powered up.


