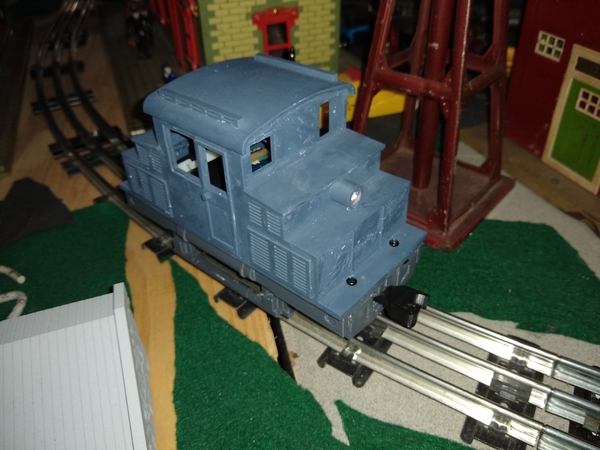
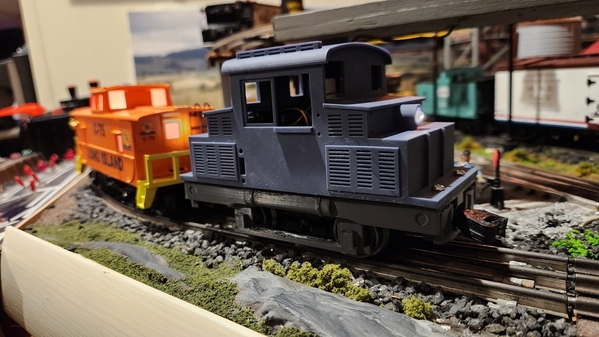
Last week @Trainguy Ken posted this cool build he did with an old powered hand car chassis and a 3D printed body. The Pennsy Street Tractor was born.

I had commented on Ken's thread and followed it up with an email about another little critter that would be fun to build. Being a host/ regular on Switcher Saturday made this a natural fit. I never thought I'd be seeing it in reality but here we go.....

Ken and I have been trading emails for the past few days with ideas for my engine. We talked about the ideal chassis to use, the K-line Plymouth was an obvious choice. But Ken suggested a Lionel LionChief chassis from a few of their small RTR sets, in particular, the Dinosaur Freight Set. The biggest advantage being that it has LC control and sound.

Ken went to work based only on some old photos I had sent him from Trains Are Fun LIRR web site. The engine we have been developing (I'm merely a spectator here), was a small electric switcher that the LIRR used at the Morris Park Engine Shops, in Queens, NY. The details that he added are amazing.

The A1 #320 was built by Baldwin Locomotive Works, and powered by Westinghouse (all electric). It was used to move equipment around the shops, on and off the turntable and transfer table, and in and out of various service bays. The A1 was built in 1927 and was in service well into the 1950's. Here's the prototype.

After a few prototype prints, Ken came back to me with the finished product. I can't thank Ken enough for taking the time to develop this for me. I had thought about modifying a small engine, like an old Army Switcher to create this critter but after seeing what he can do with resin, there's no going back to cutting and shaping styrene.

So the body is on it's way to me, less the chassis which I've sourced from the Bay. I'll handle final assembly and wiring, and will post progress pix as I go. I'll add details like foot boards, hand rails and coupler releases with brass. Painting will likely wait until the Spring but a few warm January days might help the process along.

Gotta love this Forum!

Bob

20171030_19134109 coupler and frame mounts.06 Mounting electronics into second version

Test run on Ken's layout.

Stay tuned,

Bob

Attachments

Images (3)
  • 20171030_191341
  • 09 coupler and frame mounts.
  • 06 Mounting electronics into second version
Last edited by RSJB18
Original Post

Replies sorted oldest to newest

Outstanding, Bob and Ken!  What a great project. Look forward to seeing more posts as your build progresses.  I’ve also had my eye on the LIRR General Electric 25T shown on the trains are fun site and thought I’d convert an old post war lionel  us army engine to it as part of some future project. However, maybe printing out a more prototypical scale shell and fitting it over a Kline Plymouth frame is the way to go.  I guess I’ll decide after seeing how your build goes.

Outstanding, Bob and Ken!  What a great project. Look forward to seeing more posts as your build progresses.  I’ve also had my eye on the LIRR General Electric 25T shown on the trains are fun site and thought I’d convert an old post war lionel  us army engine to it as part of some future project. However, maybe printing out a more prototypical scale shell and fitting it over a Kline Plymouth frame is the way to go.  I guess I’ll decide after seeing how your build goes.

That 25T is on my list too. I'm gonna repaint a Plymouth for that one and add TMCC and sound.

Thanks for the comments guys. I'll certainly keep this thread updated.

Bob

@coach joe posted:

Looks like a big difference between the green chassis and what's under the switcher.  Did you cut the donor up?

First of all, Merry Christmas to you and to Bob, @RSJB18, as well! I'm half-awake with my post Christmas dinner food coma, but I'll try to answer some questions here.

The dark gray chassis piece is another 3D printed section, the original green frame piece is not used. The Lionchief motor has some little wings on it that we are using to mount the new frame and body. Here's a photo showing the guts of the Dino Junction switcher that are reused.

02 Lionchief frame and boardset

Here's another photo showing all of the pieces in the conversion kit. The body is a resin printed part while the frame and end buffers are filament printed parts. This gives the best balance of surface quality and mechanical strength.

10 Finished production kit

Attachments

Images (2)
  • 10 Finished production kit
  • 02 Lionchief frame and boardset

Happy New Year!

It finally stopped raining today, and the temps were in the 40's so I decided to prime the body of the switcher. A few spots needed some light sanding which was done with 400 grit SC paper.
I ordered all of the detail parts I need (I hope), from Precision Scale Co. They should show up this week.

2024-01-01 12.14.092024-01-01 12.34.45

2024-01-01 16.09.24

It was pepperoni pizza BTW......

Bob

Attachments

Images (3)
  • 2024-01-01 12.14.09
  • 2024-01-01 12.34.45
  • 2024-01-01 16.09.24
Last edited by RSJB18
@RSJB18 posted:

Happy New Year!

It finally stopped raining today, and the temps were in the 40's so I decided to prime the body of the switcher. A few spots needed some light sanding which was done with 400 grit SC paper.
I ordered all of the detail parts I need (I hope), from Precision Scale Co. They should show up this week.

2024-01-01 12.14.092024-01-01 12.34.45

2024-01-01 16.09.24

It was pepperoni pizza BTW......

Bob

Bob, looking good!…now I’m hungry for pizza!…….400 paper for model work is kind of steep!….think finer!….the coarsest paper I use on any of this stuff is 800,…..usually I use 1000 or 1500, …..now that you’ve applied primer, before you apply your favorite color, a trick I like to do for a smooth finish, get some fine scotchbrite, gray or red, (green is to rough)  and lightly scuff your primer till it’s slick & shiny in look. This will smooth down your primer, plus the light scuffs will give a perfect bite for your color. Practice on some scrap shell for perfecting the art. Removing that fine primer build up that always happens is key to achieving that perfect sheen,…..you don’t have to be aggressive, you’re just doing what’s called a knock down. Scuff every nook & cranny for a flawless finish, afterwards, wash the primered parts in warm soapy water, and allow to dry thoroughly & completely before color …..

Pat

@harmonyards posted:

Bob, looking good!…now I’m hungry for pizza!…….400 paper for model work is kind of steep!….think finer!….the coarsest paper I use on any of this stuff is 800,…..usually I use 1000 or 1500, …..now that you’ve applied primer, before you apply your favorite color, a trick I like to do for a smooth finish, get some fine scotchbrite, gray or red, (green is to rough)  and lightly scuff your primer till it’s slick & shiny in look. This will smooth down your primer, plus the light scuffs will give a perfect bite for your color. Practice on some scrap shell for perfecting the art. Removing that fine primer build up that always happens is key to achieving that perfect sheen,…..you don’t have to be aggressive, you’re just doing what’s called a knock down. Scuff every nook & cranny for a flawless finish, afterwards, wash the primered parts in warm soapy water, and allow to dry thoroughly & completely before color …..

Pat

Sound advice for sure Pat.

I planned to use this primer coat to show any glitches that need work. Hadn't considered scotchbrite pads but that's a good idea.

I have 600 SC paper. I guess I'll need to go finer.  I'm an old school wood worker, 400 was about as high as we ever needed to go....🤪🤪🤪

Thanks,

Bob

I agree with Pat on the grit size for metal, styrene, ABS, etc (he coaches me on my finishing questions).

I have found that the 3D prints that I have bought are rock hard and the material just laughs at fine grit paper.  I have used body putty to completely cover and then sand down using progressively finer paper/ time consuming, but that is the only way I can get a relatively good surface without print marks.

I did a B-train set of flatbed trailers and had to use a belt sander to get an acceptable surface, I didn't worry about the undersides.  Same with cutting, Atlas Snap Saws get laughed at, have to use a Dremel with a cutting blade (note an abrasive cut off wheel).

Maybe need a new thread, but all you guys that do 3D work or work with bought prints, what are your experiences?

@NHVRYGray posted:

I agree with Pat on the grit size for metal, styrene, ABS, etc (he coaches me on my finishing questions).

I have found that the 3D prints that I have bought are rock hard and the material just laughs at fine grit paper.  I have used body putty to completely cover and then sand down using progressively finer paper/ time consuming, but that is the only way I can get a relatively good surface without print marks.

I did a B-train set of flatbed trailers and had to use a belt sander to get an acceptable surface, I didn't worry about the undersides.  Same with cutting, Atlas Snap Saws get laughed at, have to use a Dremel with a cutting blade (note an abrasive cut off wheel).

Maybe need a new thread, but all you guys that do 3D work or work with bought prints, what are your experiences?

Terrific collaboration, guys. Talk about thinking outside the box! 3d printing and Deadrail will change the future of model railroading.

Thanks guys. I'm constantly amazed at what can be produced from these machines. I've see videos of whole houses being printed with concrete. The military is working with the technology to build structures on forward bases quick and cheap.

Back to the trains, the body of the engine came out pretty good right off the printer. I had to smooth down some small bumps on one end but otherwise its good. The material is very strong, I'd say stronger and less flexible than the ABS bodies on our Lionel and MTH locos.

There are some very talented people on this Forum. We are all lucky and thankful for their help and collaboration.

There is a 3D sub-forum but I figured this was more about a 3-rail train than 3D printers.

Bob

@Mark Boyce posted:

It looks very nice to me, Bob!  I get it that you just wanted to highlight any imperfections.  I’m sure those above who know are giving good advice for smooth finishing.

I'm not going for a Dryfuss Hudson here Mark. I figure a critter that bounces around an engine facility will have some bumps and bruises.....

I will probably do some weathering on it too.

Starting the next phase of the build. I received the detail parts I ordered from Precision Scale last week. I bought way more than I need but when shipping is $15.00, the rest will go into stock for future use.
I realized that the brass wire I ordered was too small. Found a local Blick Art store that has a decent selection of larger diameters.

I also wanted to add volume control since the LC boards don't include it. I ordered a Lionel 8 ohm L-pad control and wired in in today as well. Not great range but it does just enough to tame the sound.

2024-01-13 13.43.43

Then I turned my attention to detailing the engine. I made several grab bars, and fit a set of steps in below the door. I need to get a set of small drill bits so I can add the necessary holes. Also did a few other pieces but I didn't take pix.
I'm up to the pilots- trying to figure out how to add the foot boards....to be continued.

2024-01-13 17.36.01

Bob

Attachments

Images (2)
  • 2024-01-13 13.43.43
  • 2024-01-13 17.36.01
Videos (1)
2024-01-13 11.56.39
@RSJB18 posted:

Starting the next phase of the build. I received the detail parts I ordered from Precision Scale last week. I bought way more than I need but when shipping is $15.00, the rest will go into stock for future use.
I realized that the brass wire I ordered was too small. Found a local Blick Art store that has a decent selection of larger diameters.

I also wanted to add volume control since the LC boards don't include it. I ordered a Lionel 8 ohm L-pad control and wired in in today as well. Not great range but it does just enough to tame the sound.

Then I turned my attention to detailing the engine. I made several grab bars, and fit a set of steps in below the door. I need to get a set of small drill bits so I can add the necessary holes. Also did a few other pieces but I didn't take pix.
I'm up to the pilots- trying to figure out how to add the foot boards....to be continued.

Bob

Looking good Bob and the sounds seem to be right on. I admire anyone who understands and works on the electronic side of our hobby.

Gene

Add Reply

Post

OGR Publishing, Inc., 1310 Eastside Centre Ct, Suite 6, Mountain Home, AR 72653
800-980-OGRR (6477)
www.ogaugerr.com

×
×
×
×
Link copied to your clipboard.
×
×