The forklift looks great. Definitely an improvement to an already nice model. I love the stonework.
I can always rely on you guys to say nice things!
I hacked out the relief slots to accommodate the cylinder supports. I used a combination of the Dremel with a 1/16" carbide router. That scared me a bit since this baby can get out of hand really quickly. I was judicious in its use and left a lot of stock to be cut away with the micro saw and #11 blade. I then attempted to fill the slot with some styrene so it appeared to be there by design, not accident. I trimmed the excess with a knife. Being styrene, the front panel and the filler pieces were easily glued with solvent cement.
The below image was taken before the paint dried. After this picture I attempted to epoxy the mast into position. It took a lot of trial and error to get the relief slots in the correct size and position. When trying to find a way to hold the chassis so the mast would be balanced and not fall out while the epoxy cured, it fell out, hit the floor and one of the lift cylinders detached at yesterday's epoxy joint. I cleaned off all the wet epoxy and regaled the cylinder which is now curing again. Meanwhile I glued on the wheels and axles. And of course, the dual set fell and hit the floor fracturing off both wheel sets. I glued them back together with medium CA. It was a clean break and went back together nicely. I then glued them on the chassis with the epoxy I mixed earlier.
I needed to add a couple more red lines to the cab and decided to go "old-school". I used a ruling pen from my old college-days drafting set. Y'all remember drafting??? You know, where you tape a piece of paper to a drawing board and, using T-square and triangles, draw stuff. I do. I had 8 years of drafting (3 in Jr. High, 3 in High School, and 2 more at Michigan State in my Industrial Arts training program). I don't miss it. Anyway, I mixed up some Vallejo red and thinned it a bit with acrylic thinner and, using the edge as a guide drew the lines. They are actually better than the decals. I don't know about using actual prepared striping decals, but the home made variety ain't so hot.
Here's a close up of the new lines.
I used this method years ago to do model striping. It does work. The paint has to be more of an ink consistency to flow properly. You can adjust the nibs to any line width you want. You realize that these pens were in drafting sets because after drawing the object in pencil, you would go back and ink the drawing using on vellum. It was a royal pain the *** since correcting mistakes in India Ink were next to impossible. Like my dad used to say, "The only thing good about the "Good old days" is they were old". I don't miss hand drawing one bit. Not a single bit. After dinner I glued the mast on… again. Tomorrow it should be all set.
Tonight I'm going to draw some decals for the instrument panel. Instead of wrestling with trimming little circles from the white background sheet, I'm going to make the entire background Armor Yellow so trimming will be easy. I did the same thing with the tiny tail decals on the Essex Carrier project. Instead of trying to cut these tiny white triangles for the tail insignia, I matched the gloss sea blue for the background and was able to make a decal for the entire tail. Much easier to cut out and definitely easier to install.
THC: I put on a coat of DullCoat to seat the colors and open plaster. I will then be able to put on a wash that will fill all the grout lines. That's tomorrow also.
On another topic: I'm now up to a full hour on the elliptical and recumbent bike (30/30). I've been working up to this since I got the AFIb, and it does make exercising a little different. I'm doing it twice a week and will up it to every two days shortly. On some days, I get this strange chest discomfort that starts in about five minutes on the bike, but then disappears after about 15 minutes and doesn't recur. The doc had me do a full treadmill stress test to see if he could pinpoint it, but I passed with no problem and showed no blood flow blockages. He also said it's not angina pain since that starts with exertion and doesn't go away until you stop. You don't "work through it." My AFib is all the time, but I don't know it unless I feel my pulse. Otherwise, I feel nothing. And I don't get skipped beats of pre-ventrical contractions like I did for the 45 years prior to its onset. Very strange...
Attachments
The hand drawn lines look great! I remember drafting class. I loved it and took as much as they would allow. It was interesting that our older daughter, the artist, started talking about nibs one day and then showed me the set she bought. She does great with them, all different colors, not just black.
I'm glad you are progressing with the exercise. We have a recumbent bike. It is the only thing for bad knees and replaced knees, so out orthopedic doctor says. I'm still at the point I go until the thigh muscle starts hurting. It is the one that was damaged on the manipulation to help the therapists bending my belligerent replaced knee.
The stripe looks great. Better than the decals. I took mechanical drafting in high school and in college. I still have my T square. I think it's stored with my slide rule.
Pat, I still have mine and my uncle's T-square, triangles, templates, compass, etc, and slide rules. I took a slide rule in to work once a few years ago to show a younger coworker, and learned I had forgotten how to use it. ![]()
Mark, glad you were able to get a bionic knee. Half of my contemporaries have some bionic parts in them. Modern meds again. As I said, I don't miss doing drawings by hand. I was good at it, and in addition to being certified to teach metal and power technology, I was also certified to teach drafting, but never did. Doing graphics by computers for me is as game-changing as being able to create typed documents on computer. I was unable to successfully type on a standard typewriter. My finger can hit the back space key with the same speed as I can hit the letter "A".
Today was spent entirely fiddling with the forklift. The mast is solidly glued and I finished detailed the cab. The mast's glued location was more vertical than it was when I sized the tilt piston rods, so they needed to be longer. I remade them. I tested the machine in the engine house yard with a Baldwin Primer Mover on it and it held it without tipping forward, so I don't have to added any ballast in the tail.
I made instrument decals in CorelDraw using gauges that I found on Google and then removed them individually in CorelPhotoPaint. Both products are very good, but not available and never will be available for MAC. I drew the rectangle, colored it with a yellow similar to Armor Yellow and then drew circles for the gauges. I then combined the circles with the rectangle which created blank holes in the shape. I then pasted each gauge, sized and put on the black layer so the gauge was perfectly framed.
I built a control stand with a tilt and lift control lever and found a perfect forklift operator in my "people box". It's an Artista figure I bought for a diesel engineer. The knob handles are Bondic, and the levers are 0.010" guitar string.
The decals went on okay. I did need one of the extras. When i put the MicroSet on it, I accidentally causes one of the edges to fold under and I needed to replace it. I always print lots of extras. I'm killing a whole 5 X 7 piece of decal paper so I might as well print enough to cover any mishaps. The yellow background worked perfectly as all I was cutting out was a plain old rectangle. I had outlined the panels with a black hairline, but used the #11 to trim just inside. I cut through just the decal, and then cut a much wider rectangle to separated the decal from the sheet. After soaking I slide away all the remaining white background leaving just the part I want to apply. This gives me a lot of open space to hold it with tweezers.
As I noted in the preamble, I needed to make new piston rods for the tilt actuators since the mast geometry was different then when I did the first measure. I cut new pieces, forged the flattened end (literally) and center-punched it for the 0.032" holes. When I was center punching the second one, it flipped off my little anvil and I was certain that it hit the floor. I swept and searched for 15 minutes and declared it lost and made another. Then I find the first one sitting right on the work bench. It had never hit the floor. It was a better part than the remake so I finished center-punching it and drilling. I soldered the wires into the holes. Tomorrow, I'll put the lift cylinders in place, do some more touch up and weathering and then install the glazing. I'm predicting that tomorrow the forklift project will be ready to go onto the railroad.
For my 75th birthday, my splendid wife has suggested that I get the new Elegoo Saturn 3D Printer. They're out of stock now, but I will get one eventually. Meanwhile, I'm waiting for my new touch pad for the Mars. The Saturn is 2.5 area on the build plate and probably 6X the volume. With it I will be able to print an entire O'scale Prime Mover in one cycle. Now I'll have to think up more projects to build with it. Problems, Problems...
Attachments
Myles, you always seem to come up with solutions when you come across problem. The forklift is turning out terrific as expected. Wish you the best on your 75th. Hope you enjoy the Saturn printer and continue creating great projects.
I think it is turning out great! Yes, typing on a manual typewriter was hard and slow! I shudder to think about typing term papers with footnotes at the bottom! I had more paper in the waste paper basket than what I handed in.
That was my experience too. I had to get term papers typed by other people in college. I wish keyboarding was a think in the 1960s. I didn't learn to type until I was forced to work on a VM terminal at ARCO Chemical in 1984. The IT department was giving employees the ability to have part of the main frame's data storage and gave us log on permission using IBM's VM facility. As the training manager, the IT dept wanted me to audit their classes for the introduction so they could do it better. I made a deal. I'll coach you, but you give me a password. HR wasn't slated to get access until the end of the line. It was on the old "Green Screen" monitors, but it freed me up from waiting on my shared secretary. She primarily worked for my boss. I got what time she had left. I taught myself to touch type using Mavis Bacon's training program. I haven't looked back. I was the first manager at Engelhard to have his own PC. It was "Secretary's Work" or so they thought.
I simply can't believe that it's Friday again. My weeks go by so fast it's scary. It literally feels like 3 days. It's basically, the creative work is some much fun that I get into a zone and time no longer matters. My wife's experience is not the same as mine. She doesn't have the outlet that I do. Time never went this fast when I was actually working. In those days I looked forward to TGIF, not any more.
Today was a big day. The forklift is done and is doing work at the engine house. I got the tilt cylinders finished, put "weather stripping" on the cab windows and installed said windows, did some more minor weathering and called it done.
I used some Chartpak 1/16" flat black graphic tape to create faux weather stripping for the windows. The 1/16" was too wide so I put the tape on halfway and trimmed it to the window's edge. This worked out nicely. I glued the front window in with the Testor's Canopy Cement, put the side glass in with the 3M Transfer Adhesive Tape just on the part that was below the window level, and the rear glass was solvent cement to the styrene strips that were previously glued to the side glass. By using clear styrene enables you to use solvent cement, whereas acetate does not. I toyed with the idea to use the ruling pen to drawn the black lines, but then remembered that I have some really old Chartpak stuff in the "tape drawer". That tape is at least 20 years old. Still works.
Here are it's builder's photos.
The driver was stuck to his seat using a Contact Cement Dot. It's the easiest way to glue stuff that not really very smooth or tightly fitted since the cement dot fills the gaps.
I installed the exhaust with gel CA and finished it up with Vallejo Dark Flesh overrated with rust-colored weathering powder for the muffler top. I added black powder around the stack exit. I dry brushed steel to all the step areas and then use black powder smeared on indiscriminately around the body, especially below the belt line. I used Tamiya Black Panel Accent to age the wheel centers, and basically called it done.
And then put this baby to work. It looks pretty nifty supporting a 35,000 lb. Baldwin VO-1500 prime mover.
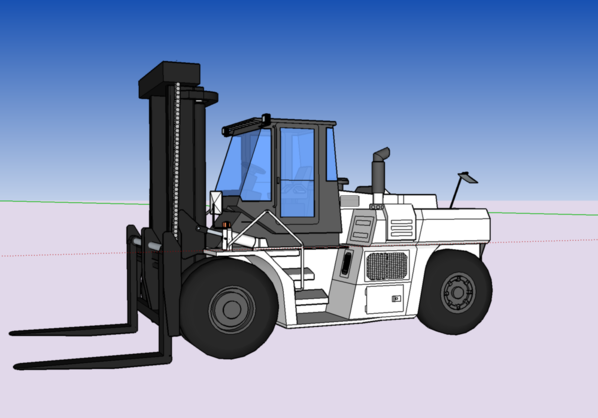
Just to refresh (again), here's the imagery that I used to start this project. Remember, while this was a great drawing, none of it was capable of creating a 3D print. All the surfaces had to be made substantial, the body needed to be hollowed out to reduce resin usage. And then I had to separate it into subassemblies so it would have a chance to print successfully. So thanks for hanging in there!
But wait, dear readers, there's more!
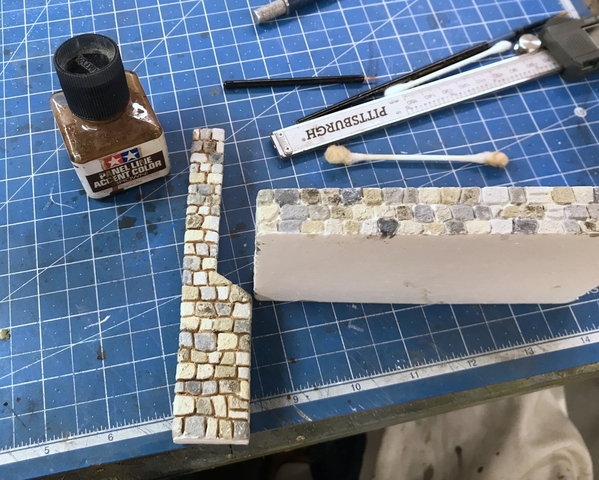
I didn't just build a forklift today, I also got the Cabin's plaster stone work finished and started painting all the resin details. Last time I sealed the plaster with Dullcoat in prep for applying the Tamiya Brown Accent color to fill all the mortar lines. If I didn't seal it, it would have absorbed into the plaster instead of flowing down all the grooves.
It doesn't matter if you get this stuff on the stone faces. You let it set up a bit and then with a Q-tip, lightly dampened with low-odor mineral spirits, you lightly blot off the excess. It served a dual purposed since it helped tone down the paint a bit.
Here is after all the mortar lines are in place.
After mortar lines were done I added various weathering powders. At the ground level I added a darker brown to show mud being splashed on the stone. At the summit I used black to simulate soot. On the slope I used a tan power. The end result works! I then glued the chimney to the foundation at the blank area meant for the joint. I used Aleen's for this job. It's not brittle and fills any inconsistencies.
There is a flue that goes into the hole in the stack. I have to find and paint that part.
I mixed a gray/brown color as the base color for all the shed wood work. I will then go back and again, panel line accent it, lighten and darken in places and then hand paint all the little details that cover the benches. This was supposed to be a woodworker's cabin who basically made railroad ties, but the tools are sort of ambiguous with pipe wrenches, pipe parts, blacksmith tools, etc. I guess Walt Gillespie at Rusty Stumps through everything in except the kitchen sink.
All you guys that are fathers have a terrific Father's Day. And have a good weekend if you're not one!
Attachments
@Trainman2001 posted:
For my 75th birthday, my splendid wife has suggested that I get the new Elegoo Saturn 3D Printer. They're out of stock now, but I will get one eventually.
I poked around looking for an update on the Saturn. I found this interesting review:
https://all3dp.com/1/elegoo-saturn-review-the-specs/
You may already know this, but there were two claims in this article that hadn't heard about:
1) Contrary to what was expected from the pre-release announcements, the Saturn has a resolution that is essentially identical to the Mars. Previous rumors had claimed that it was going to have significantly larger minimum feature size.
2) Even more exciting, the article claims that it is going to print MUCH faster--with a claimed 1-2 second/layer cure time!
Both of these improvements are apparently due to a last-minute upgrade to a new monochrome 4K screen has a resolution of 3840 x 2400 pixels.
I hope my Mars breaks soon! ![]()
I did my own typing, but it took forever!
The fork lift truck is great! Even detailed to the point of weather stripping!
The stone work looks great
I took typing in high school. Never was able to master not looking at the keyboard. I'm still just a so so typist.
The forklift looks fantastic. Nice job on the brickwork.
@Pat Kn posted:I took typing in high school. Never was able to master not looking at the keyboard. I'm still just a so so typist.
The forklift looks fantastic. Nice job on the brickwork.
I had the same problem as you with typing, Pat.
Thanks folks! I read that review and salivated the whole time. It does do all the good things that the Mars does and seems to take away the few bad ones. The 4K screen was necessary to keep the pixel size comparable to the Mars, but the monochrome change enables more UV power handling and speeds up print cycles greatly. That's a big change. I didn't realize that the speed limit was imposed by the LCD screen's capability of handling the UV intensity and not some innate limitation of the resin.
So while I'm writing this, I thought it would be interesting (to me at least) to review the lessons learned in creating the fork lift.
1. Further skill in modifying SketchUp Warehouse drawings for 3D printing. Can't overestimate this. There are thousands of objects drawn by people all over the world populating the warehouse, but almost none of them are 3D printable as they are when downloaded.
2. Up the learning curve of 3D printing and learning how to explode the object to make it more printable.
3. Scratch-building hydraulic components that couldn't print well
4. More experience creating realistic glazing
5. More experience with home made decals.
6. More confidence in coming up with an idea and then making it a reality
Very well done both the forklift and stone foundation as well as great tutorials, thank you
You're welcome… keep reading...
Happy Monday!
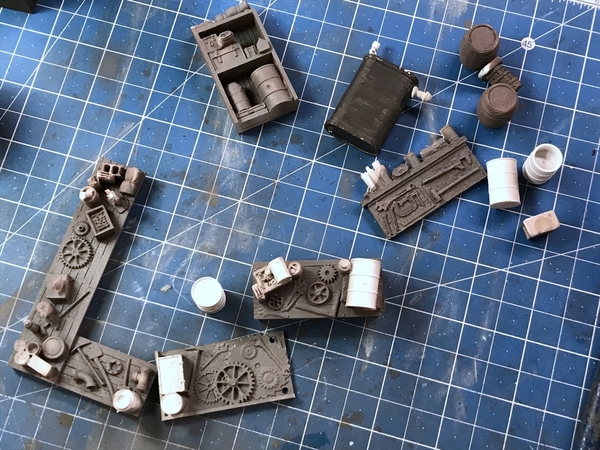
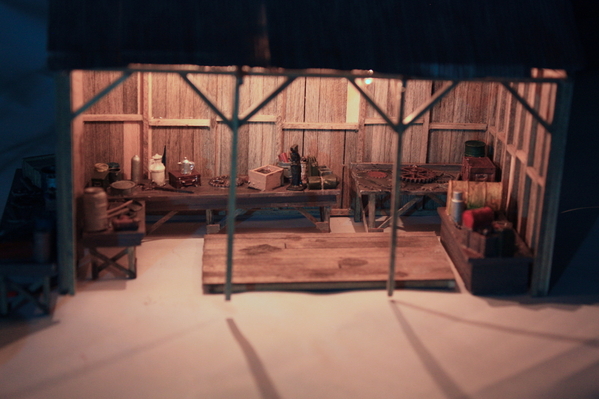
Short session that was entirely painting all the stuff on the resin work tables of the cabin shed. Finicky painting. I'm using those very pointy makeup application brushes that I bought last year from Amazon. They're 100 for a little over $8.00, so their about eight cents each. They have a very fine point and when they get a little worn, I toss them out. I'm still a little perplexed at the nature of all the junk on the tables. Rusty Stumps threw in the kitchen sink with pipe fitters tools as well as a lot of big gear wheels. There is one very large circular saw blade which does fit the nature of the work to be done. The rest is just a hodge podge.
I'm using my "Press-n-Seal-as a palette" technique with lets me dip out just a little bit of paint, mix it on the fly and not have to keep the bottle open. I'm using all kinds of color to add variety as well as realism to the coloration. Here's what I've done so far. After all the color is on, I will shoot it with matte lacquer, and then use washes and powders to give it more character. Stay tuned. Anything's that dark beige or white is not yet painted. The rectangular top in the center is fully painted. There are two loose big pulleys too, but there are no large machines that all these parts would go to. I would think there'd be some kind of large band saw or saw mill. Almost all the paints are Tamiya plus a little Vallejo. You can't mix them. Alcohol causes the Vallejo to become lumpy, and I thin Tamiya with 99% IPA. I suspect all this stuff will just look interesting when situated in the shed with the lights on. You'll not be able to get too close or look straight down on the benches. There is a Bookcase with stuff (not in image) and one wall panel (far right) where you'll see the stuff head on. Also not shown is the oil tank which I used dark iron as under-color and galvanized as top coat. I will selectively remove the top coat bringing out the rust.
Attachments
I agree, it looks like there is so much stuff on the tables, there would be no place for someone to work on anything.
@Mark Boyce posted:I agree, it looks like there is so much stuff on the tables, there would be no place for someone to work on anything.
You obviously have never seen my workbench. ![]()
Myles, First of all outstanding job on the forklift. On the cabin (which looks great) you used panel line accent color, do you find this is better than a brown wash? Also curious if you got the drill bit piece removed from your thumb.
Steve
![]() You are an outstanding modeler and craftsman'.. Excellent work and as noted, tutorials also'. Thank you'. for sharing your expertise on the this forum'... 😀
You are an outstanding modeler and craftsman'.. Excellent work and as noted, tutorials also'. Thank you'. for sharing your expertise on the this forum'... 😀
Some of those benches would look at home in the engine shed. I guess one design fits all at RS. Nice job with the detailed painting.
Regardless of the amount of stuff on the workbenches, you gave a great tip about brushes and painting little details. Thinking about it, when I clear off some space, I come home and my dear wife has seen there is a place to put stuff, not necessarily fix-it stuff- just stuff. ![]()
Thank you all! I will answer the panel line question. I'm going to do a wash too once the detail painting is done, but the panel line was just to really darken the wood joints. As it was, the accent product works best on a gloss surface since matte surfaces grab the liquid and spread it to places I don't want it.
First some good news. The new Mars touch panel arrived yesterday and I installed it today. It works perfectly. Of course I had to redo something I did. What's wrong with this picture??
There were two ways of fastening the new screen onto the front panel. The right way, and this way. If I would have just contained my exuberance just for five more seconds after a successful test before I installed it, I would have realized that I had it backwards. The bolt holes are asymmetrical for a reasons: to prevent you from putting it in backwards like I did.
The only twist is the ribbon cable. It rotates 180 degrees from it's motherboard attachment. At the motherboard, the lettering is facing out. On the touch screen the blank side is facing out. Otherwise it's not a difficult job. As long as you note the orientation before you remove any cables, you'll be alright. I obviously didn't… DOH!
I quickly took the cover off and put it on correctly. The new panel is responsive and the registration is perfect. I'll be printing on it tomorrow.
I am going to get the bigger Saturn for my 75th birthday, but that will be probably much later in the year. They're all out of stock, so I will have to be happy with my now-working Elegoo Mars.
I continued painting the details. Here is my Press-n-Seal palette at work. I didn't want to keep repeating Tamiya colors and the palette lets me constantly create new shades so it looks more natural. Press-n-Seal is good, but it's a bit fragile. You can't mix stuff too aggressively or you'll cut through the film and leak to the surface below, which negates the whole exercise.
Here is today's progress. I exercised today and go into the shop a little before 3:00. All of this will be Dullcoated and then alcohol washed to dull it all down. I noticed that the Crescent Wrenches on the benches say "Pittsburgh" which is one of Harbor Freights knockoff brands. Interesting.
I'm about 75% through the detail painting. When all this is done I still have to install the legs.
I was also asked the other day about my drill bit splinter. It's still there. My orthopedic surgeon son in law said unless it gets infected (and there's a particularly nasty, but rare, infection that can occur with foreign body inclusions) or it's very painful, leave it alone. Tungsten Carbide is very tough and inert and won't degrade, nor poison me. He said that digging for something that small would be difficult and probably cause as much harm as good. Right now, the only way I know about it is when I put pressure directly on the area. It then has a deep kind of hurt like it's pressing on a nerve. It probably will show up well on an Xray since Tungsten Carbide is so dense, so if surgery is necessary, they'll be able to see it. Thanks for asking.
Here's the Amazon listing for the makeup brushes that I'm using for all these details. They're very precise and great for this kind of work. The price has dropped. Now they're only 7 cents apiece. Here's the link:
https://www.amazon.com/dp/B00D...dt_b_product_details.
Until tomorrow...
Attachments
Yay Pittsburgh!! Not the knock off tools, I mean. ![]()
You know every time I see Mars, it reminds me of where I grew up, outside a sleepy rural town that is being sucked into suburbia now. Yes, I graduated from Mars High School. What's more, I graduated from College in Moon! Enough of the corny references. I'm glad you got it working with the new touchpad.
Those brushes are tiny. Thank you for the Amazon link!!
Yes, the brushes are great! And you can't beat the price. The short shafts are very good for precise control too. I finished all the detail painting today and then sprayed it with Dullcoat in prep for the weathering wash. You can use and IPA wash on Tamiya paints without sealing them or you risk washing them all away. They remain alcohol soluble forever. In fact, I mixed one of the table base colors in my plastic-egg-crate method. I needed to touch up the table color but had no "liquid" paint left. The paint in the egg crate was totally dry. I added some IPA and lo and behold I had paint again.
Here are some closer shots of the same.
Somehow I lost the resin piece that would serve as the flue pipe. It was my first 3D print with the repaired machine. I measured the hole in the plaster chimney and came up with 19/64". I drew a pipe in SketchUp and to make it easier to draw, I multiplied the size by 100. This enables SU to draw the curves faster and easier. After getting it like I wanted it, I reduced it by a factor of .01 to create the O'scale version. Actually this was the 1:1 size. I set it up in the slicer and then scaled the length for two more to 1.25X and 1.5X, and then doubled them so I was printing them 6 up. I'm glad I did. I printed them with no bases right on the platen, AND didn't precoat said platen. Out of 6 I got 2 good ones, and one of them was the correct length; the shortest one.
Notice: to hold the oil drums and barrels for painting I drilled them 1/16" and held them with some brass.
After painting (no weathering) and not gluing in yet, here's how it looks on the building. I painted the flue's exterior dark iron and the inside flat black, but maybe the outside should be terra-cotta. Although with years of soot, the terra-cotta would be pretty dark, I presume. It needs more black soot powder...
Tomorrow I'll do the weathering. Meanwhile, the printer is dutifully working away printing some night stands and a bed including linens for the Cabin's bedroom. It will be done around 8:30 (an hour from now) and from what I can see it looks like all is well. The night stands, being short, are already completed.
Attachments
Looks great!
Beautiful job on painting the details, Myles.
Thank you!
The bed print worked out pretty well. I had the usual repairs to make due to removing a solid forest of supports. There were too many supports and I could have printed it with less. The supports were so close together that they fused to solid walls that I had to grind through. Whenever they're this thick, it's very easy to cut into some of the model's "meat" which you can't see buried in the support wall. I needed to rebuild the legs a bit using some 0.020" phos-bronze wire as a backing to hold the Bondic that rebuilt the legs that needed it. I also filled some of the careless grinding marks. But, the top looks great! The pillows actually lie above the surface for the most part as do the folds in the covers. It was a very fragile little job, but it works.
The cover folds are very realistic and much better than using real materials to simulate fabric at 1:48. In the SU drawing, the folds had no depth and were not solids. I had to drawn in shapes underneath to create a solid with some dimensional depth and was completely solid. Same went for the pillows. The frame was pretty good, but all the members needed to be thicker so they would hold together. Remember, 1 scale inch is 0.021" and at that thickness, the head board slats would have been to fine to support themselves. The two nightstands were printed directly on the platen with no supports sticking straight up (or down as it actually is). They're hollow so they took less resin to complete.
The bed's undersides are a mess since this is where all those supports were. None of this is visible. There were actually bed slats, but the supports lined each of them and cleaning was a real challenge. You can see how I rebuilt the legs. One leg was correct and I used that to set the depth of the rest. You can see how I thickened the covers in this view. All this was done in SU.
I created the leg system for the benches just like I did for my L-Girder layout, and this required many miniature gussets that I cut out of some 1/64" plywood. I was considering Bristol Board, but the thin ply worked okay.
Here is all the furniture ready for installation. I made the bench worktop 3 scale feet off the floor. Because the benches themselves were all different thicknesses, I had to individually measure and cut the legs out of the scale 4 X 4 lumber. (1/16" sq.). After all the glue was set I sanded the legs so they would all be even.
I attached the benches to the Shed's walls using the transfer adhesive. Of course the one on the right foreground is backwards and should have the box facing the wall not the aisle. This picture was shot with the Canon EOS Rebel.
This was shot with my iPhone 7. Kind of hard to tell the difference.
All that's left to do is the base support timbers, attaching the foundation to the building and finishing the oil tank-to-stand mounting. Then it's building and fitting the site. We're almost done. The rest of the model work should be done tomorrow or Monday. Base prep will probably take a week so my forecast is The Hacker's Cabin will be on the railroad in a little over a week.
Attachments
Myles, The bed came out great!! I agree the covers and pillows look comfy enough to take a nap! Who cares about the underside.
The work tables look superb in the work shed! Wow!! The iPhone 7 takes a great photograph. I'm still using the iPhone 6s, the only camera I use nowdays. So much for the old Canon AE1 I bought back in '79. I haven't had it out of the carying case in years.
In fact I would say the iphone photo is better. More depth of field. Amazing, right?
Everything looks great, Myles, but I am chomping at the bit to see the house by the railroad completed. Is that next up?
Thank you all!
I too am champing at the bitt to work on the HOUSE. I'm now in the queue at Rail Scale Models to have the flat parts laser cut. Stephen Miley has a day job (and I am quite envious). He's a consulting manufacturing engineer and spent the last two weeks at the plant that's going to make my daughter's next car, the Tesla Model Y. I am envious of him and more so of Elon Musk. I've waxed on about Musk in past posts and will not bore you today. If I was a younger man, I would have loved to work for Musk.
Lots of progress today.
The oil tank is effectively finished. I built a couple of timbers to keep the tank in position as shown in the pictures in the instruction book, and stained it after gluing. I was careful with the Aleen's to keep it off the outer surfaces so the stain would work. I then added a mixture of gloss black and Tamiya Clear Smoke to make some staining on this tank and others in the resin castings. There's still a hose that goes into the hole in the valve. The kit came with a piece of vinyl tubing, but I seemed to have lost it. So I will find a substitute.
I wanted to make a fireplace hearth to be on the other side of the wall from the chimney. I used white Sculpey. The project consisted of four steps. I've found in research that the secret with Sculpey is to form the object in stages and harden each stage as you go along. The steps were:
- formed the bulk of the fireplace using the chimney as a guide for width, shaped it by cutting the heath space and fired it in an old Black & Decker Toaster Oven at 275°F for 15 minutes. This gives you a stable backing that won't keep changing shape as un-cured Sculpey will. When we replaced that toaster with a new Breville, I said it would be useful in the shop. It was!
- Added another layer that would form the stone facing and engrave the stone lines into it. I glued this layer to the base using Sculpey Curable Liquid Clay Cement, instead of just relying on the Sculpey to stick to cured clay. It really doesn't. Fired this.
- Rolled out some thin stuff and applied it to the bottom as the hearth base and engraved some lines into it also. Fired it again.
- Added another soft layer to the back and pushed this into the cabin wall where it's eventually going to go. This embossed the framing lines into the clay. Cleaned this up and retried several times until it was right and then fired for the last time.
As you can see, Sculpey can be heated over and over again without ill effects. This technique is essential when using Sculpey to make figures. You build a basic shape and fire giving you a solid surface to sculpt additional details. As you add more details in layers you keep firing to preserve all the work. Before I learned this, I was continually fighting the clay to try and keep the geometry straight.
All that's left is painting it like the outside chimney and installing it. I'm going to make a mantle using real wood.
I painted the bed by first priming the sheet area with Tamiya white surfacer, then Tamiya flat white. I then painted the frame and finally the bedding. This print exceeded my expectations.
I placed it in the Cabin's bedroom, but not yet glued in position.
It was time to install the legs. I used the 6 X 6 stocks since I think a 4 X 4 is too small to hold up a building. I thought I got the length dead on and made three versions until I thought I nailed it. The word, "Thought" is the operative word in that sentence. It turns out that the legs were almost a 1/16" too long and held the foundation off the surface.
I glued them on with Aleen's and then medium CA to ensure they stayed put. I do know that all the legs were exactly the same length.
I used Aleen's to glue the plaster foundation to the building. I had to clamp it to ensure it stayed put while curing.
The plans included a sheet that had the outline of the flat area under the cabin to use as a pattern when cutting out the foam. I cut this out with a scissors and traced the outline on a big chunk of green foam I had leftover from some railroad project or another. I used a Tippy foam cutter. It's slow, but works and makes no mess. This picture shows a lot of stuff. Besides the Tippy (turquoise), you can see my TopFlite hot air gun that, although intended to apply mylar coatings to RC models, I use to force dry paints and dry 3D prints after washing. And on the right is my purpose-built hot air gun to heat silicone shrink tubing. I bought that at Radio Shack and it's a terrific tool to do a specific job.
After cutting out the slab, I pressed the building into the foam to get impressions of where the slightly long legs were and then cut out the foam so the legs sunk in. This is how the building will be installed and the legs will be realistically embedded in the ground beneath the building. It was that or try and cut the legs down and that would have ended in disaster. In manhandling the building some of the porch timber broke loose and I re-installed them with medium CA.
And with that we reach the end of another week. Have a nice weekend.
I've said this before, but in my perception, weeks seem to be about four days long. It's weird! The time I spend in the shot literally makes time fly. When I was working, weeks seemed to have taken much longer and Fridays were hard to come by. Now, it seems like every other day it's already Friday. My wife is not experiencing time as I am so it not just because we're getting older. It's directly related to how engaged I am in my chosen avocation. I simply don't have enough time. I hope times flies for all of you too.
The difficulty in making a very large model railroad is being able to be healthy enough long enough to finish it. So far so good. But I do feel the time pressure. I know that I will not be able to do the work I do forever and have a sense of urgency to keep going . My wife periodically asks me why I'm pushing so hard since it's just "my hobby." It's the aging challenge.
In the 80s, I found that a retired school superintendent in my district who also used to be a shop teacher. In his retirement he was building live steam locomotives. I was very envious. He said that I needed to start now (when I was in my 30s) since if I waited until retirement I probably wouldn't live long enough to complete it. He said many widows were selling their husband's half-completed live steam locomotives. It generally took a decade to build one from scratch. The same can be said for big model railroads. So if you're thinking about building something, GET CRACKING!
Attachments
Myles, Everything looks great! My artist daughter loves Sculpey Clay. That's god advice on using it.
Also it is good advice on building something before you aren't able to.
Thanks Mark!
I've been watching a new Netflix show, "Locke & Key". Sort of a magical, "Goonies" kind of affair, somewhat silly, and predictable, but the sets and treatment are very, very good. I was interested in the superb Victorian mansion, Key House, that's sort of a main character. I first just took some pictures of it while pausing it on the TV. (Below) This was when I was exercising. I watch this when on the equipment since after the first episode, my wife wasn't too interested in it. She's not big into magic and fantasy. Picture came out decently and could be used to model in SketchUp.
Then I decided to Google it, and found full floor plans of all five stories (including basement) and a great article from the fellow who designed it and drew it in, none other, then SketchUp. In 1:48, the building would be huge and there's really no where on my railroad that could probably support it. But it could be a fun exercise and some of the architectural details could be scaled down a bit. It would also encompass probably double (or more) 3D printings of all the architectural stuff.
Here's a link to the article:
https://adg.org/perspective/92...e-for-locke-and-key/
I told you all before that an occupational survey I took years ago said I should be a model maker for the movie industry. That's still one of those, "What ifs" kind of things we all face in our lives. The article appears in the Art Directors Guild journal. I didn't know there was an art directors guild.
If you don't want to read the article, here's the executive summary. The house didn't exist. The show is based on a comic novel. The facade of the first two floors, plus green screen above were constructed on a vacant property outside of Toronto. The 3rd story and Mansard roof details were added digitally in post process. The interior of 1st, 2nd floors and basement were constructed on individual sound stages. Plaster lath walls were created and all the moldings and wainscoting is wood. No lighting is natural, but it was artificially lit to simulate daylight. All rooms have ceilings and they are ornate.
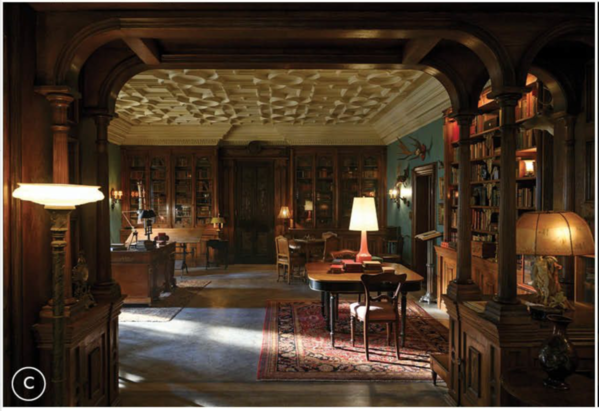
Here's a screen print of the library I captured from the article. Check out the ceiling. This is an actual set photo. Get a load of that crown molding!
Having a set of all the floor plans and some decent elevations, I could possibly draw it myself if I am so inclined. I checked the SketchUp 3D Warehouse and it's not there and, frankly, my House by the RR drawing (which is there) is one of the most elaborate Victorians on the Warehouse.
Movies are the art of illusion and this is a terrific example of that. Clearly, the budget for this Netflix movie was high. It cost a ton of money to create those sets. And it's a fortune to do the digital work too.
Enjoy!
Attachments
Myles,
My wife and I just finished watching all 10 episodes (to date) of Locke and Key on our musician daughter's recommendation. Yes, the artist daughter likes the show as do both their husbands. I'm a bit like your wife, in that I don't appreciate the fantasy as much as the others, but I do really like the architecture and landscapes in programs like Locke and Key, Harry Potter, Lord of the Rings, Etc. I was fascinated by the Keyhouse from the beginning. It would be a tremendous building to model, however you are right, it would be a massive model. It would definitely call for scaling down.
I read the ADG article, and was quite interested in all of it. It is interesting to note how they made the walls in the set look like they were water damaged with cracked and broken plaster. I am quite familiar with that construction from helping my dad since I was about 10 make repairs on the 1888 family homestead we just had to sell before last Christmas. We have repaired lots of plaster lathe walls. Funny, both daughters bought houses of similar vintage, although all three are very modest affairs.
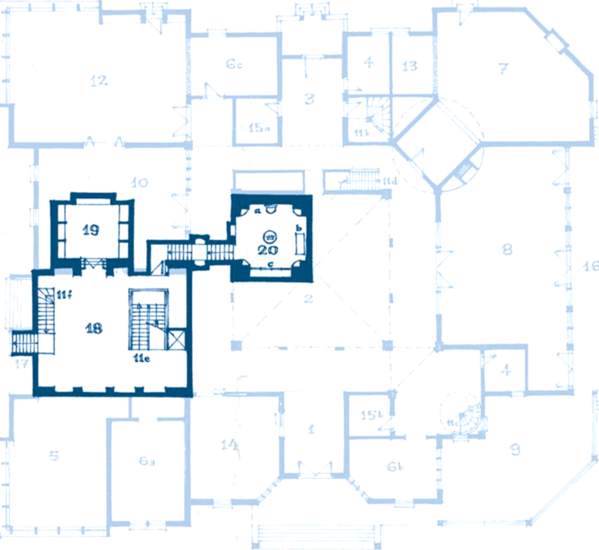
The details in the Keyhouse are tremendous. For some reason, I especially like the second floor walkway that all the rooms are off of that has the opening to the floor below. I never did figure out how the big open staircase connected to the second floor however.
It is neat they used SketchUp extensively on the project. I can see where you would have loved to have had the opportunity Rory had in working on this project!
Myles, that house is really striking. It would make one beautiful model. I have to look into Locke and Key. I am a fantasy fan. I've read Lord of the Rings and Harry Potter multiple times and seen the movies. I'm going to have to give it a try.
Pat, Yes you should check out Locke and Key. There are 10 episodes so far, but it is obvious they plan more with the unexpected ending of episode 10. It definitely makes you want more like “Who shot JR?”
I thought you guys would dig it! Here's the floor plans that were used in building the key house. Perhaps, Mark, you can figure out the stairway layout. Speaking of stairs, they look about 6 feet wide. The house is huge!
Level 1
Level 2
Level 3
Level 4
Basement
Today I'm going to print out the walls of the House and stick them to some cardboard and see how and where it will actually fit on the railroad. This was a very helpful exercise for the Woodbourne Gallery and I believe it will do the same for this project. There are several spots where it would fit and I want to be sure before the build proceeds (when I get the laser cut walls).
I'll post again later today when I have some work to show you.
Attachments
Those floorplans would make the Winchester Mystery House blush.
Back to the Cabin… I found this figure on Shapeways. It's by "Printle" and they had a bunch of men playing guitar. This one was not sitting on a stool. I wrote to the company and asked could they make one with the player sitting cross-legged with a flat-top guitar. The Johnny B. Goode lyrics say he was "sitting by the RR tracks" not "standing". They can do it and apparently for the same modest price listed.
We discussed leaving the solid-body guitar (Strat?) or going with a flat top. We settled on the flat top since a 1950s kid living in a shack near New Orleans would not have a Strat. Furthermore, without an amp, a Strat is just a block of wood. Like the insulators and fans on the Substation, sometimes finding the perfect accessory makes the model.
Shapeways also has a ton of beautiful 1:48 furnishing including some Victorian and earlier era subjects. The only problem is furnishing a model the size of the House would cost a small fortune, exceeding the cost of the rest of the model. I will continue to see what I can design and print myself. Shapeways for their small stuff uses very expensive laser systems that don't require supports and all the damage that they can cause on the small model.
Attachments
I love the fact that you found a Johnny B Goode figure. I was just playing that song a little while ago before I read your post.


