


Looking good! Those folks look great in the house!
Myles, the interiors look fantastic. Very realistic.
The fascia boards are on and I closed up the gaps around the chimneys where I had to enlarge the slots to get the roof on. I used basswood pieces shaped to conform to the roof edge profile. I filled any remaining gaps with Bondic.

I painted all the Fascia.

I then went back and flashed the chimneys with my last pieces of treated copper. Didn't want to mess around with treating any more so I'm glad I had enough.

So NOW the upper works are 100% complete!

I was able to carefully disassemble the front door and reverse it so it's now opening correctly inward. Luckily, I detailed both sides of the door so it didn't take much work getting it ready. Interestingly, when I separated the door, the Bondic that was in the middle of the joint was NOT cured since the UV light didn't reach it. And of course the two folks standing in the foyer were now right where the opening door was. So I had to rip them off and will re-glue them when the walls are in place so they'll be in the right spot. The standing man in the living room also had to be detached since he was where the fireplace hearth base was going. The room is NARROW.

I painted the smaller doors with mahogany like the main door. I then test fit them in their openings and realized I hadn't paid too much attention to these since they didn't fit the holes. They're almost 1/8" too long and slightly too wide. Easy fix... make the openings fit the door. They needed to be lower on the wall anyway.

I painted all the other trim and corner posts on the walls in anticipation of them being joined. There's just a couple of spots where the blue leaked under the masking. I'll touch this up tomorrow.

Next up is glazing all the remaining windows and installing them. I don't have much of the trim blue left and I'm hoping that it will hold out for the porch and porch steps painting. If it does, I'll classify it as another "Hanukkah Miracle." I'm going to install 1/16" brass pins in the porch columns to hold them for painting and then to provide a solid attachment points for installation.
Attachments
Images (7)


Everything looks great, but I really want to comment on the mahogany doors. Very nice effect!
Thanks Mark… it surprised me how nice that Vallejo color works. It's a tough color to mix using tamiya paints.
Exercise and work day... can't get much better than that!
Got the touchup painting done on the building trim. Piece of cake.

Did a lot of painting. I did have another "Hanukkah Miracle" since my trim blue, not only lasted for all the painting, but I actually have some left for any accidents that may occur. I painted the edge boards of the porch, the entire edge and framing of the balcony, and the front steps, including the gray stair treads. I used MicroScale Liquid Mask to mask the LEDs before the airbrushing began.

After airbrushing the steps blue, I hand-brushed the gray treads.

I also painted the under-porch lattice the trim color. I didn't care if it was perfectly covered since these things are generally exposed to the elements and don't get much attention.

I drilled the bottom of the columns 1/16" with the drill in the Dremel Flexi-shaft after drilling a small starter hole with a pin vise. Unlike styrene, UV resin doesn't melt and you can power drill it without creating a gooey mess. The pins facilitated sticking them in foam to repaint all the repairs I did on them. I airbrushed them Tamiya flat white.

I finished opening up the small door openings and got them fitted without binding. When they were binding it was causing the thin wall to warp a bit so they needed to be a slip fit.

Last thing I did was start glazing all those windows. The task started with the doors. My laser cut demi-lune window acetate needed so triming since it was a little oversized. I never did laser cut the side lights for the front door. I just cut some scrap acetate from the fret for them. I had been toying with the idea of making some stain glass, but it's really not going to show up very well. I did put stain glass on the transom lights on the distillery and you really don't know they're there.

I got eight main windows glazed and have about 10 more to do tomorrow. Notice the windows with the open sashes. I printed four of these that I'll strategically locate around the building. The frames with the open sashes had to be a bit different. The back frame is flat so the sash could be positioned at any position. On the fixed windows, the back of the lower sash is offset backwards to simulate the double hung nature of this kind of printer.

And with that, the final assembly will begin. My estimate of early January was too conservative for the main building. I find with modeling, once all the subassemblies are finally complete, the main assembly goes pretty quickly. However; I have not started working on the site itself and that will take some time. I know what it looks like in my head.
I'm doing some minor rearranging of the work shop. I need more table top space. I have a 7 foot table in the train room where I build some of the bigger projects (Engine house) and done sloppy stuff like all the massive plaster jobs. I bought another LED shop light at Costco on Saturday since they're again on sale at $20.00. The new light let me move my Grandmother's old card table down about 5 feet making room for more workspace. My new belt sander is on that table in the train room as is the old Black & Decker Toaster Oven that I use to cure Sculpey parts. At least one of those work surfaces is going to come into the shop so the sander is where I need it, along with my new mini-chop saw.

I'm also going to further evolve my current work table by scraping those cardboard "Parts Catchers" and substituting honest-to-goodness peg board. I'm then going to fasten my newly created pliers/Tweezers/Jeweler's Files racks to the peg board thereby freeing up more work surface area which I desparately need.
Attachments
Images (9)


Love it when all the pieces start coming together. Good progress, Myles.
Thanks Pat and today was another huge progress day. I have a ton of images today. I had a long work session and covered a lot of varied ground resulting in pictures, pictures, pictures.
I started the session completing the porch: locating columns, gluing them in and installing all the lattice.
After deciding the setback, I marked it with the digital caliper used as a marking gauge. I then figured out the spacing using a metric ruler, calculator on my phone, and a pair of dividers (old school sort of). I then drilled a pilot hole to keep the 1/16" drill in place and drilled the seven holes with the drill in the Dremel. Because of the different lengths of the two sides, the spacing differed on each side.

I glued the columns in place with Gel CA.

Two columns were a tad short so I shimmed them with some Bristol Board.
I glued the steps in place with Gel CA and then reinforced the joint from behind with a piece of 3/32" square basswood. I then installed the lattice starting with the steps left side. When I had to joint two pieces of lattice I glued it to a small backing piece cut from the lattice's fret.

Not only did I reinforce the step joint, I also added some square stock to all the lattice corners.

I set this aside and used a cosmetic sponge to highlight the foundation stones. I used Nato Black, Flat Aluminum and White to add some interest to the field stone foundation. This is a common foundation material in Philadelphia where I grew up.

It was time to start getting serious. I glued the balcony to the front/right side of the building. It needed clamping and it helped bring that critical subassembly into square. I used Aleen's and then backfilled the joint with Med CA. The two red leads that are coming up through the turret floor feed the grain-of-wheat bulb that will light the cupola. I will have to splice these two leads to the two coming down from the roof assembly.

I set this aside and got lunch. When I got back to work I glued in the first floor to the front and right walls. Again it needed some strategic clamping to put it together and again I used a combination of Aleen's and Med CA.

I set this aside to dry and decided to attack the site situation. It took six trips under the layout and as many climbing around on top. Luckily, even at 75, due to my regular use of the bike and elliptical, I still limber/strong enough to do this. Frankly, when I started rebuilding this layout in 2012, I didn't know how many years I would be able to do it, but since I am, I'm still doing it. I can only reach this site by scooting under the platform and coming up in the gap at the back of the town between the gulchs. So each time I had to get onto the platform I first had to go underneath.
I'm moving the Gravely Building out of its position and putting it at the layout front facing away from the viewer. I had to disconnect it's power leads and, of course, the first two wires I disconnected were not the correct ones and had to get underneath again to do it right.
This is what the site looks like.

I took a piece of Strathmore Paper and measured this space and again, it took several climbs onto the layout to get it correct. I use a piece of packing dunnage which resembles a paper honeycomb to protect the track and my knees when crawling on top.

It's a tight fit! The picture distorts the fit since the black balcony floor is above the paper by 3 inches so it's not really overlapping as it appears. There is a nice space in the back for a garage, and Rail Scale Models has a nice old style garage that would work nicely.
Here's Gravely tried out it its new location. Another reason to NOT GLUE you buildings in place.

And here's the view from the layout's edge. I'm going to add some details in the back. I have a nice Tichy fire escape kit that I'm going to use. I think I'll add a window or two in the rear with the fire escape and then have some trash/junk piles to roughen it up a bit. Adding a 3rd floor window is going to destroy that nice add mural. I have to plan the sight lines carefully so you can still look into Nighthawks. I'll give this area that "vacant lot" ambience.

With the wall and floor dried I tried it with the newly completed porch. The gaps you see at the column tops will be closed when it's put up into the final position.

I went to put in the front door so I could correctly re-locate the two folks that would be posed there. I found that putting the door opening inward now made it impossible to get the door assembly in. I broke the joint, put in the door frame and then re-glued the door in place. With that done, I was able to put the folks back in position. You're not going to see hardly anything of that wonderful staircase. You can't see it through the open doors from the side rooms, and you can't see a whole lot looking in the front door. I spent a whole lot of hours on that foyer. One saving grace will be the illumination. Whatever you can see will be well lit.

I had to do more surgery on the 2nd floor plate. The changes I made to the wiring bundle caused some of it to interfere with the hall closet's ceiling. It was forcing the 2nd floor upwards. I took the Dremel and router and drastically cut away most of it. I kept checking to see if the wiring cleared. I had to sacrifice some crown molding that you'll never see. In fact, I didn't even have to have the closet hiding the wiring.

Gratifyingly, the staircase was not difficult to glue in by simply running a bead of med CA down the seams that connected it to the 2nd floor. My plan to attach the stairs to the 2nd floor and then drop it over the first floor with no first floor gluing. The reverse would have been impossible since you had to contort the stairs to get them to nestle into the 2nd floor. You'll see much more of the staircase through the turret windows in the 2nd floor since there's that big wall opening into the stairwell.

Here's looking straight down at 2nd floor as I'm attempting to get the left and back walls in place. There are some pinch points that will have to be massaged to get it into place, but that will wait until tomorrow.

Whew! Big day finished.
Attachments
Images (16)


Boy, you really did get a lot accomplished today.
You did accomplish a lot! The window and fire escape will be a great addition to the Gravely Building.
I have one question, When you mention "I used Aleen's and then backfilled the joint with Med CA", how are you doing that. I mean do you leave the Aleen's dry completely before applying the Med CA? What is the purpose? For more strength, or something else? Thank you!
I put the CA on almost immediately. It strengthens the joint definitely, but it also acts as an instant clamp so I can un-clamp the physical clamps and keep moving along. It's all part of my inherent impatience. Since the Aleen's doesn't cover every bit of the surface, the CA creeps in an fills the gaps.
I see. Thank you! I was wondering if you did it right away, but thought the two wouldn't dry right. I know, I am impatient too with slow drying glues.
Since CA cures by H2-0 moisture, the Aleen's actually acts like an accelerator. BTW: did you get a lot of snow? My son in State College is finally happy. They got about 13" and he closed the practice for the day. He was a PSU student in the 90s and remembers some prodigious snow falls. Since they lived there for the past 13 years, they've barely had any. They keep going up on the east side or west side of the Appalachians and missing Centre County completely. Not this time.
@Trainman2001 posted:They keep going up on the east side or west side of the Appalachians and missing Centre County completely. Not this time.
More than once, when driving on the Pennsylvania Turnpike, I have entered on one side of a tunnel in bright sunshine and exited the other side of the mountain in a raging storm.
Even more off-topic: I once took a class from a sociology professor who studied historical patterns along those ridges. He demonstrated that the same folkways would prevail for hundreds of miles in one valley, but were very different in adjacent valleys--just a few miles apart. What works for storms works for cultures.
But I digress...
I did not know CA cures by H2O moisture! Now it makes total sense!!
I just came in from outside. I measured 8 inches On top of my car. We keep my wife’s car in the garage. I ran the snow blower and shoveled about 5 inches last evening while it was still snowing and need to get the rest today.
Keep away from snow shoveling. It's a widow maker!
Another milestone day... The four walls are all connected, the foundation is on, and I got the porch swing installed.
The Walls:
I've learned a long time ago "when something is supposed to fit and it doesn't, don't force it!" I had been putting the wall sets next to their respective floor edges for quite a while, but that's not the same as actually gluing it up so the corners meet properly. I had tried to fit it on Wednesday and saw that it was trickier than I thought so I left it alone until today. Again, I tried to get it together, but it was being resisted in a couple of spots. I went after them one by one. Some of the culprits were baseboards and crown moldings that were interfering with the same on the new walls. Others were getting the partitions to nestle next to the fireplaces. I had to remove a little slice of the 2nd floor as it was interfering with the fireplace. After trial and error, I did get the corners to mate cleanly. I glued the floor edges and the corners and didn't worry if the partitiions were glued. They're not holding any loads. Still to go on are the corner trim strips that are already painted.
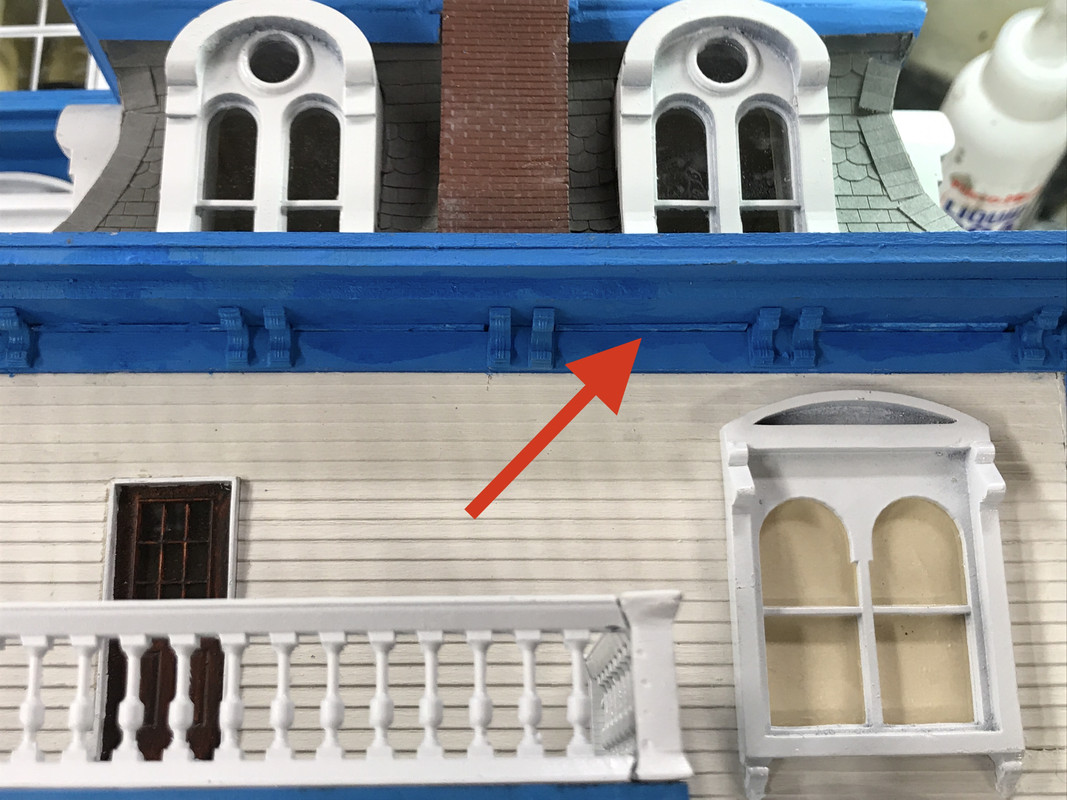
The arrow denotes a 1/32" gap resulting from incorrectly cutting the side fascia board one thickness too short. I left the other long, but that was the wrong one. One of these days I figure out how this is supposed to go.

I needed to get the back door in place, but was faced with a dilemma. The door extended to the bottom of the first floor plate. This pushed the door further out of the building. I had three choices: extend the door opening higher, cut off the door bottom, or let it protrude a bit and trim it. I chose number three. You can see in this image that the door is at the bottom of the plate.

And here it is with the trim wrapped around. It may still need another coat of white. I toyed with using styrene, but ended up using stripwood.

All the walls are now installed. Still need the corner trim.


While this was drying I got working on the porch swing. It needed to be installed before the porch was installed since it would block access. I bought some 27 link chain that was bright copper colored and soaked it in the chemical blackening agent to age it.

The Porch Swing:
I drilled the swing seat to receive 0.022" wire eye bolts. These are pre-bent ship parts that I bought years and years ago. I can make my own eyes too, but it's easier when they're already done. I measured the spread and drilled the balcony joists and installed eyebolts with some med CA.

I'd been thinking about the sequence on how to do this. I made short segments that would be the spreaders mounted on the seat. It was just an eyeball job based on the aglarity that looked right. I thought that the eyebolts were a little thick to directly connect to the chain links, so I used some 0.010" brass wire twisted to hold the chain to the eyebolts. I didn't like it.
Then I opened one of the eyebolts eyes and found that the eyebolt wire threaded right through the chain link. I scrapped all of the twisted wire connections and redid them all with the direct connection.

This worked great. I then cut the long chains to connect to the joists. I found that unlike the end chain links which only have one link taking up space in the loop, the middle chain link openings were too tight to let the eyebolt ring pass. I had to resort to the twisted wire method. But this this was only two connections instead of six.
This whole exercise took quite a while, but it was well worth it.

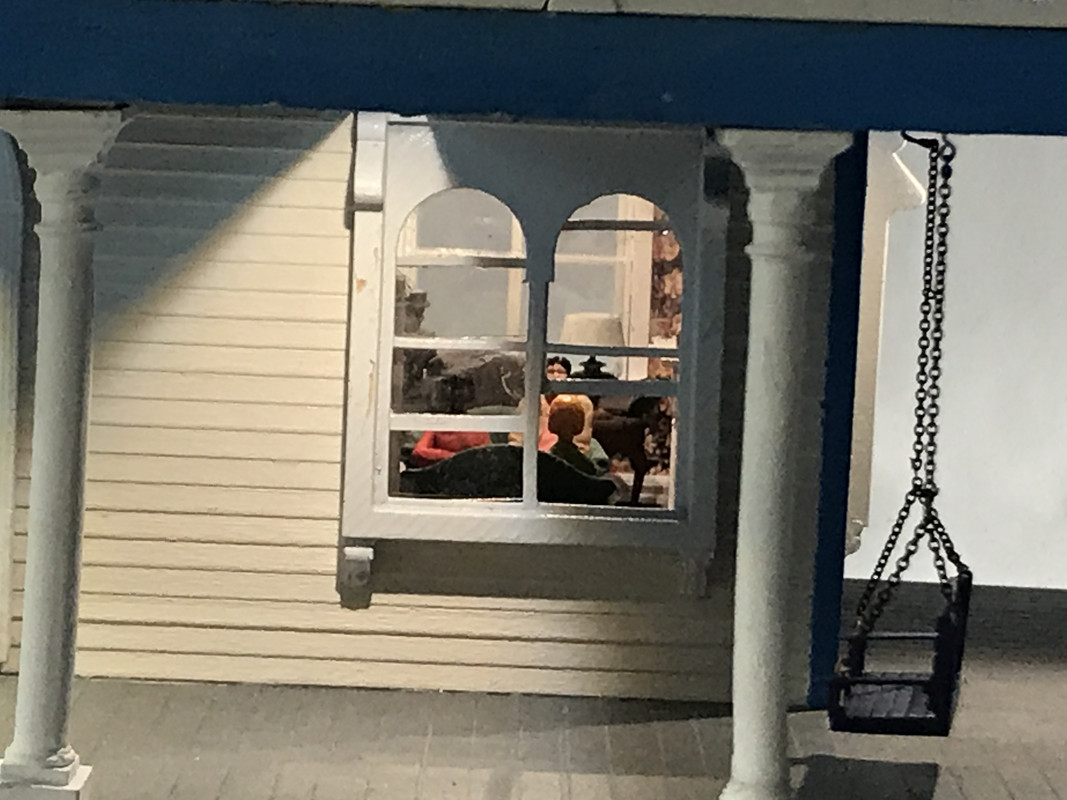
And here it is fully mounted on under the balcony. As careful as I was trying to be in getting the chains equal, I had to do some adjustment to get it to hang reasonably straight. It was also hanging too low even though I originally measured the overall height and the height I wanted the porch to sit to figure out the chain lengths, but I still had to fuss with it to get it right.

With the swing in place I installed the house proper on its foundation. I used Aleen's for this and it will dry over the weekend.

The house is now ready to receive all the windows, have the roof assembly installed and have the porch connected. My storage area is basically empty. Whew!
On another topic I want to have a dumpster behind one of my buildngs (the appliance store) and saw one of DHS Die Cast Construction Equipment site. It was $7 plus shipping, but that was a lot of money for one not-very-significant detail. Heck! I can print my own.
I went online, found some pictures and specs for a Waste Management 2 yard dumpster and drew it up on SketchUp in about an hour. I printed the bin and lid as two parts. The bin printed this afternoon. I did it 3-up figuring they all wouldn't be pefect. I was right, on one the supports broke free and the top rim warped.

Here's the drawing that I produced.

The lids just came off the Machine while I'm writing this. I set the lids up four ways on the printer to see which one was most successful. Guess what? They all printed perfectly. Go figure? I will print the decals on white-background decal paper and the inkjet.
I got the lids. You can see that regardless of their orientation, they all came out pretty good. I should get two nice dumpsters out of this run. You can see layer lines pretty clearly on the one that I printed flat on the plate. The reason? The lid had a peak... a slight taper to the middle. Even at layers of 40 microns, a slight taper causes the aliasing, just like a shallow angle line on a bitmap drawing. The more angular the placement on the platen, the greater the number of layers to cover the same distance and the less obvious each one is. It's another reason to print on an angle.

I've put this drawing up on SketchUp's 3D Warehosue. It's pay-it-forward. I've downloaded a lot of stuff on that facility and put stuff up there whenever I have a model that's worth sharing. I had to thicken the walls on the lifting lugs. They're just think plate steel, but that woud be too thin in scale to be a functional model.
This little project will be all finished on Monday and I'll show it to you. With a 3D printer, SketchUp and an inkjet printer, the capabilities are almost limitless.
Attachments
Images (14)


Have no fear! I only shovel the 4 steps and a short sidewalk. The rest is done with the snow blower. I bought one of those ergonmic shovels last year, that are bent and have several handles to lift better. I discover it is easiest to just push it into some snow, then back away and slide it where I want to dump the snow. It slides like a sled. I use the snow blower exclusively at my mother-in-law's since her driveway and sidewalk are flat. Yes, that is rare around here. I always wear a scarf around my face to keep from breathing in too much cold air. I learned that lesson almost 20 years ago. Thank you for your concern.
The little porch swing and chain is just one more example of the little details you come up with. So is the dumpster. Excellent!
The house is looking great, Myles.
Mark, take it slow and rest often. I lost a good friend a few years ago, who was using a snowblower and had a heart attack.
stay safe all.
@Pat Kn posted:The house is looking great, Myles.
Mark, take it slow and rest often. I lost a good friend a few years ago, who was using a snowblower and had a heart attack.
stay safe all.
Thank you, Pat and Myles!! ![]()
Thank you!
I just edited my page 1 to update it and include some House pics to entice new readers. I periodically update any volatile data on the intro page to reflect the time passing. It's now 21 years since the railroad was started in Germany and more than seven years since I started this Saga. Hard to believe.
I've always said that my journaling efforts benefit me too. I woke up realizing that I hadn't put in the window shades in the second floor and needed to do so before I glue the roof on. It was not an item on my checklist, which, BTW is almost complete. I'm also going to design and scratch-build a carriage house for the side street.
It's also interesting that as I get near completion of one project I automatically start thinking of the next things to build. Some of those things are:
- work platforms for the engine house interior
- our PA house
- our Louisville house
- installing all those street lights, parking meters, street signs and utility poles that have been hanging around waiting for the right time
- And that doesn't include more buildings to fill any blank spaces around the railroad.
Still have a few years of work left.
Here's my rendering of our Louisville house. Most of the drawings are done for this project, but there's fine tuning and editing to still be done. It's not a small house being 45' on a side so that's almost a foot square in O. I may not have room for it either.

Attachments
Images (1)

Happy Monday! A ton of pictures today with more milestones
WINDOW INSTALLATION DAY:
As I noted on Friday, I needed to install the window shades on the 2nd floor windows before gluing them in and installing the roof works. I used manila file folder stock to make them. I cut the strips on the paper cutter, but had to adjust them as I installed them. I used PSA to hold the shades to the window sash. I glued the shades onto the windows BEFORE installing them. I held the windows in place with Gel CA. I did the 2nd floor first.

Left Side: I also put a step up to the balcony door out of one of the large bedrooms.

Rear:

Right side:

I installed the remaining corner trim and filled those corner fascia board gaps. I then touched up the blue and any vanilla that was needed.
Of special concern was getting the windows to slip under the porch framing. While I thought I had boxed out the framing with enough clearance for them to slip in. I was wrong! I had to trim away some of the timbers, and then actually start chopping the curved top off the windows. In hindsight, that was the correct thing to do; just not have a curved top on those windows.
This one fit with just the framing trim and some minor arch reduction.
This was the trim job:

And here it is installed.

In this one, I just ground off the entire arch when I realized how much framing was going to be sacrificed.

With the windows in place I was ready to glue down the entire top works. I fed the lighting leads through their respective places. The attic wires came down through the tubular chase in the back room. The cupola light's leads came down through the turret rooms.
I was unable to center the roof over the building. The attic stair was forcing the building to the right by almost a 1/4". I was unable to detect this in all my trial fittings as a result of not having the walls tightly glued in place. You simply can't see that stair emerge in the attic from almost any view, so I sacrificed the top steps and rail allowing the roof to slide to the left and get centered. Being centered took priority over having and unseen stair.
This is the scrificical part.

I glued the entire roof in place with Aleen's and put a weight on top to hold it under it set. It's really starting to look like something.

I had to splice the cupola light leads that were sticking out of the turret window. Notice: I remembered to put the shrink tube pieces on the leads BEFORE I soldered them. Pretty sloppy splice job... not up to my standards.

I then folded the leads unto themselves and stuffed them into the front left turret corner. I then covered them with a slip of balsa to hide them forever.
You can barely see this cover through the side turret window.

After getting the cupola wiring complete I was able to finally glue in those last turret winodws. And with that, all the windows are installed. Some of the gloss white on the windows will need some touchup.

Here's the underneath showing the various lighting leads.

I figured it was time to see if all the lights still worked... not that if the inside lighting didn't work could I do anything about it. All of the interior lights worked perfectly. And the cupola Grain of Wheat light worked too. But the porch lights did NOT. Of all the lighting problems I could have had, this was the only one that I could actually fix. I tested the circuit at various points and found that one LED seemed to work and two did not.

I used some MEK to remove the dried acrylic paint from the copper foil and broke out the joists to give me access. I will make this repair tomorrow. Don't know why the circuit failed. I may have to use surface wiring and put new ones in if I can't get newly soldered LEDs to work. But it's accessible. So in this case, Murphy's Law did not pertain. The worse thing would have been if the circuit feeding the chandelier would have failed. That would have been a bummer.
To bring the porch wiring down into the foundation, I'm going to run it in a simulated drain pipe. Once it goes into the porch plate I'll make a right turn and penetrate the foundation wall. Before installation I will age that brass.

Tomorrow I'll get these lights working and put in all the corbels. Then I install the porch and the balustade railing. Lastly, I will tie the circuits together under the foundation with a single point of contact to connect to layout power. I'm also going to craft a small wooden staircase from the ground to the back door. (about 4 scale feet).
Attachments
Images (15)


The house looks great, Myles. Final assembly is always fun.
It is really looking good, Myles! No matter how precise someone is, there are always things that just don't fit right. Making adjustments look good is the key.
Myles thanks so much for showing your creations over the years. You are a real inspiration. This house is fabulous.
Fun? Yes! But also a little bit scary. Some of the odd fits didn't show up during all the subassembly stages. I don't like surprises.
Short session due to a couple of things. My oldest grandson came over today to pick up my Meade EXT-125 computerized Maksutov-Cassegrain telescope kit. He wanted to look at the "Great Conjunction". It hadn't been out of the closet in at least 11 years since we moved to Louisville from Bucks County, PA. It's just too bright around here to use it without loading it in the car and going out where it's dark. I just didn't have the motivation to do that. He's young. He has a nice AWD Subaru so he'll get some use out of it. It's a wonderful instrument.
We also moved one of my temporary work tables from the train room into the shop to bring the new mini chop saw and my big belt sander into the workshop. I was annoying walking 50 feet every time I needed to sand something. I really need to do some major workshop improvements.
I gave my grandson a couple of unbuilt models. He's itching to build something. Every in-person meeting of our Military Modeler's Club of Louisville has a raffle where folks bring in un-built kits. It's a nice money maker for the club. I won a couple of these, but wasn't going to build them. They were both Soviet-era aircraft, but Alex was keen on them.
It's funny… I re-discovered building models in my sophomore year also. I found out how much I missed it and then built kits throughout my college experience. It was a bit unusual, but not unheard of. When I was student teaching in Flint, MI, I was boarding at a nice lady's house and asked her if she minded if I built models on this desk she had. It was a very modest shotgun house and I was boarding along with another fellow who worked at AT&T. She agreed. I was engaged to my now-wife who was back in PA, and I was separated from all my friends on campus so, I really needed something to keep me sane. I built a kit a week and it was wonderful. I survived.
I also had a nice phone conversation with Nick Morris, a structural engineer with Buzick Construction, Inc. Buzick is the company that builds almost all of the Bourbon Rick Houses. Through my Heaven Hill contact, I was introduced to Nick. I sent him some background information and he was able to give me the critical specs for my model rick house. I overbuilt it which will save me some cost in lumber. For example, there are no header boards running cross-wise on top of the individual rick compartment. The only headers run length wise through the building. The foundation structure is only 3' high and each rib is only 9" wide. The vertical columns are 5" X 6", while mine will be 8" X 10" if I continue to use those Northeastern RR ties. It was very informative. I explained that I was going to create a building fixture on the 3D printer. He says they do the same thing. They have patented fixtures to build and align the ricks.
I fixed the lighting problem. I de-soldered the LEDs and on the bench they worked. So I soldered them on again, and they didn't. I did this one more time and the left one worked, but the right one didn't. Again, it tested okay on the bench. I surmised that the foil to LED solder joint was causing a problem. I soldered leads to the LED, tested it. It worked. Then I soldered the leads to the foil and tested it and Eureka! It worked. It also moved the LED closer to the front door which is what I wanted anyway.

After taking the picture, I replaced all the joists and repainted the blue. It looks fine again.
With the lighting working I aged that brass tube, drilled a 3/16" hole in the porch to accept the tube and a corresponding hole in the foundation at right angles to the tube to pass the wires into the foundation space with the other wiring. The ground wire had detach from the foil so that was fixed also.
It was time to glue the porch on and I held it with a gravity clamp. I think I glued it about a 1/32 too low since the lattice is sticking out below the foundation. I may not fret this too bad since it gives a little lip up to the front door which is better. I may trim the lattice or... What I'm thinking is to put a thin coat of Scuptamold on the base and sink the building into it a bit. It would accommodate this slight misalignment and make it look like the building is actually anchored in the ground. Arrow shows the alignment. The building is heavy and it's getting quite unwieldy. I have to be careful not to put my finger through the window glazing. Ask me how I know this.

Tomorrow, I'll put on the corbels and create the wiring connection under the foundation. I will then turn it rightsize up and put on the balustrade. That will actually finish the model. What's not finished is all the work on the site. That will take a couple of days also. But I am ahead of my project plan schedule which had me completing the just the building around the first week in January.
I have two kinds of fencing for the property: picket and hairpin. I'm leaning towards the hairpin fencing, since it won't obscure too much of the building, but will entertain other opinions. Both of these are laser-cut affairs. I'm also going to build a three-car garage for the back. I'm getting ready to buy the materials for that. I want the site completely finished before moving to any other projects.
Attachments
Images (2)


It's looking good Myles. What a lot of work! Usually when I work many many hours, days. months even on a project, I am disappointed in it when I finish. Just have no perspective at all. This feeling can last for quite a while, but eventually I forget all the little mistakes and see the whole thing. This comes with being a perfectionist and I expect applies to you as well.
Hairpin fencing seems a bit more Victorian than picket fencing. This house is pretty grand and really calls for fencing to match. I would consider tall wrought iron fencing.
Thank you everyone!
I'm not that bad, but I do find myself rushing near the very end to get it done. I've said it many times that I do my worst when I'm rushing. It's that last five minutes before I have to quit for the day where it usually hits the fan. I remember in the old days when I was working an actual job that the worst thing I could do was attempt to get something off the printer after quitting time on Friday night. I've had the worst paper jams at that time. All kinds of crap would happen when the office was basically empty and all the "normal" people had left. This project was so engrossing in all its aspects that I didn't get bored. There was a ton of problem solving exercises. I've read that doing creative work keeps away dementia. So far it's working. And I read where doing creative stuff keeps away dementia. So far it's working. Oh wait… did I just write that...![]()
As promised, today almost saw the end of the house building part of the job. I got the wiring harness finished. I got the corbels in place and then got the balustrade installed. All that's left is to do some white paint touch up, make the downspouts and possibly do a little roof weathering. The house was recently re-habbed so the paint and trim is all spiffy. I think this is where the owner of the distillery lives.
I initially was going to use copper foil tape as a positive and negative bus bar to tie the three circuits together and then jumper that to the power connector. I affixed the foil tape and then realized it was silly. I simply twisted the plus and minus leads together (separately, not as a one gigantic short-circuit) and then used ferrules to lock them all together. I use Euro-style connectors for two reasons. They really slick and I came back from Germany with a ton of them which is where the model railroad was first created. You can buy ferrules State-side from Ferrules Direct. The long red-black zip cord is long enough to reach under the layout and tie into the DC power distribution.

Carefully I rotated the model to each side and applied the corbels. I put the end ones in first, found the mid-point and put in that one and then divided the space again and put in the intermediate ones.

I carefully put the model upright and then started installing the balustrade. My first piece was glued using Testor's Transparent Parts glue. It was too slow. I then switched to med CA. I put in the two longest pieces and then started working the pieces that needed cutting. Luckily, I printed way more than required, because I almost used all of them. I printed these in the days when I was using straight Elegoo standard resin and it's quite brittle. In the process of cutting and fitting I blew up three of them. Yes! You read that right. They basically exploded.
I also had to grind a cope cut on the fitting end so each section would nestle into the end post of its neighbor. I was cutting the parts with my razor saw and it was putting way too much stress on the parts which was one of the failure modes. I then tried my brand-new mini-chop saw and it was a dream. I cut the resin like butter and made perfectly square cuts without over-stressing the rest of the part.
Here's the cope cut.

The front gap took me three tries. Try #1: I was using an end post and a small section of the rail. It looked ridiculous. Try #2: I just used a rail section. In the process of doing the final fit, I pushed down too hard and it exploded. Try #3: I used the mini-chop saw and was able to finesse the sizing using my 1" belt sander and careful pressure and got a nice fit.

I filled the little remaining gap with Bondic and sanded it off with my MicroMark power precision sander. I will touch up the white paint tomorrow. Notice: I was able to notch under the spindle so I could maintain the spindle spacing.

I got the remaining pieces on the right side and then need a short piece for the back right end. It needed a corner post on both ends. I was able to slice off a post on the chop saw and then splice it to the properly lengthed side piece. The glued in nicely and the balustrade was installed.

While the house is not "Completely" finished, it's close enough to show off. All that's missing is the downspouts and some weathering.


Just as a reminder, here's where it started.

And here was my final drawing used to create the model.

Being that all the 3D and laser cut parts were created directly from this SketchUp drawing, it is not a surprise that the model looks so much like the drawing. They are essentially the same thing. Every single thing you see was drawn by me before creating the model. No commercial parts were used except the laser-cut shingles. We're living in a marvelous age for model makers with the ability to say, "Gee... I wonder if I can build that?" and then doing it. If I can draw it, I can build it.
There are some differences between my model and Hopper's painting, mostly due to the inability to define what's going on in the unseen areas. But the flavor of the house is unmistakable. And we know that Hopper took license with the Haverstraw, NY house on which his painting was based.
When it's 100% finished I will take some more serious pictures will all the lights on, on the site, and then on the layout.
Attachments
Images (10)


Bravo, Myles!!!!!!!!!!!!!!!
Incredible work Myles, just incredible.
It's another Dandy!! I think Hopper would be pleased!!
Wow Myles! That’s phenomenal!
The house looks fantastic. Congratulations Myles.
A few years ago, we started replacing the lights on my club's layout wit LEDs. At that time, we added connectors to the lead from the houses to the understand wire bus. That makes it easy to move buildings to change the scene or to clean. Just a suggestion. You've adjusted buildings from time to time.
Incredible as always, Myles! Congrats!
Just spectacular Miles. Can't wait to see it on the layout.
Bob
Thank all of you and Merry Christmas!
Punchlist Thursday:
While not 100% done, I did want to take some pics with the lights on.
You'll notice a couple of things. The porch lights are too bright so I coated them with some Tamiya Clear Yellow to see if I can dull them down a bit. And you see that the roof to house seam is showing some light leaks. On the front of the house I used Bondic to fill the gaps and then painted them with blue. For the sides I found it more effective to use some Bristol Board slips to fill the gaps and then paint them. After taking the image I put some more blue on the right side piece.
I filled the few gaps in the balustrade with Tamiya White Fine Filler, then sanded and painted gloss white when the filler was dry.
I took some other closeup pics to show the interior. Dining room through the front window. Too bad the chandelier arms are so tall, you have to look up into the room to see the bulbs… which are on as they should be.
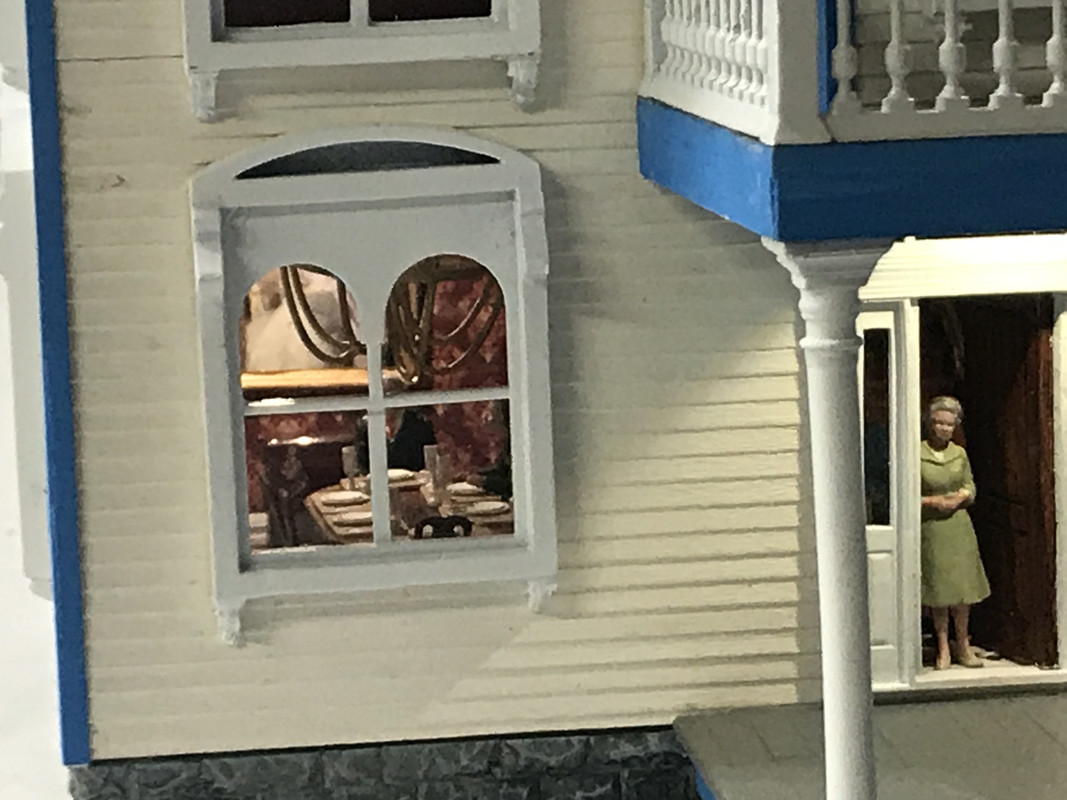
Dining room through the side window.

And the living room through the front window. It's hard to focus the iPhone 7 so it focuses on the room and not on the window's surface. I'll be taking more pictures with my Canon when it's 100% complete
I reattached the wiring harness below with Bondic when I found the servo tape was letting go.
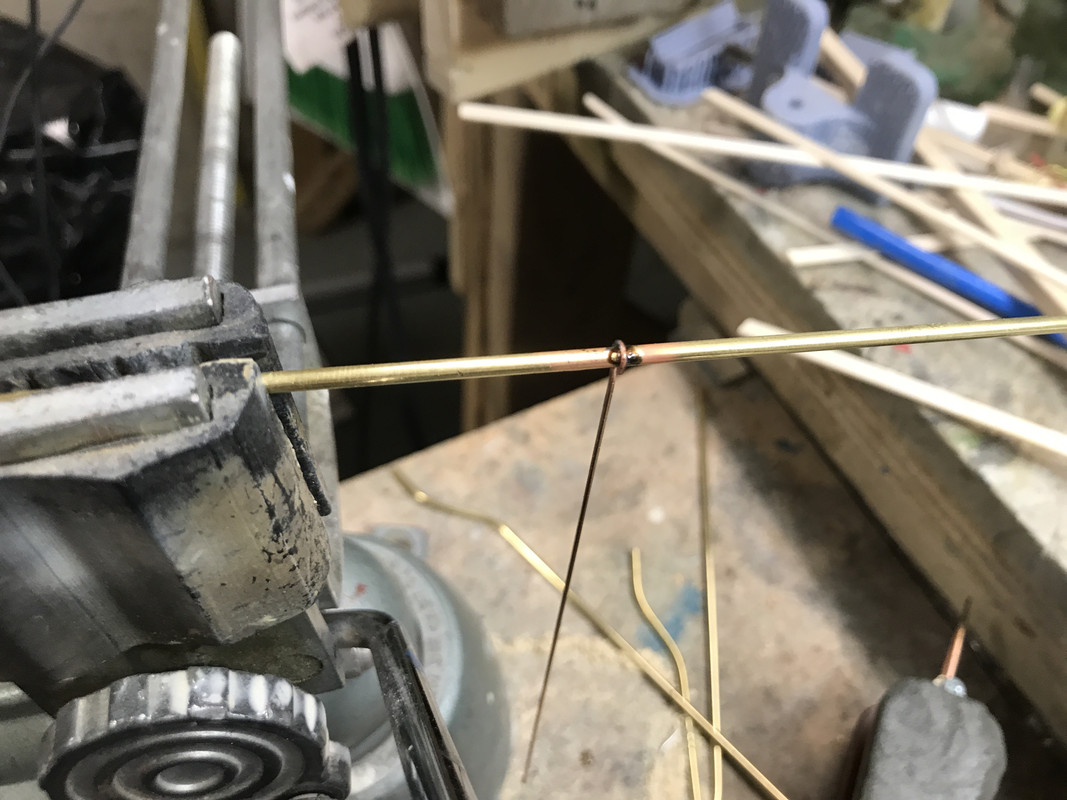
And then I created the downspouts. I used 3/32 K-S brass tubing. I bend it with the K-S spring coil tube bending tools. Funny... Something plugged up the middle of my 3/32 bender. It was something plastic or epoxy that hardened right in the middle and I couldn't get it out. I tried driving it out with a piece of 3/32 drill rod, but all I succeeded in doing was spreading the spring's coil. I had enough of the tool on either end to make the bends I needed. JUST ENOUGH. If the bends were any further along on the tube, I couldn't have done it.
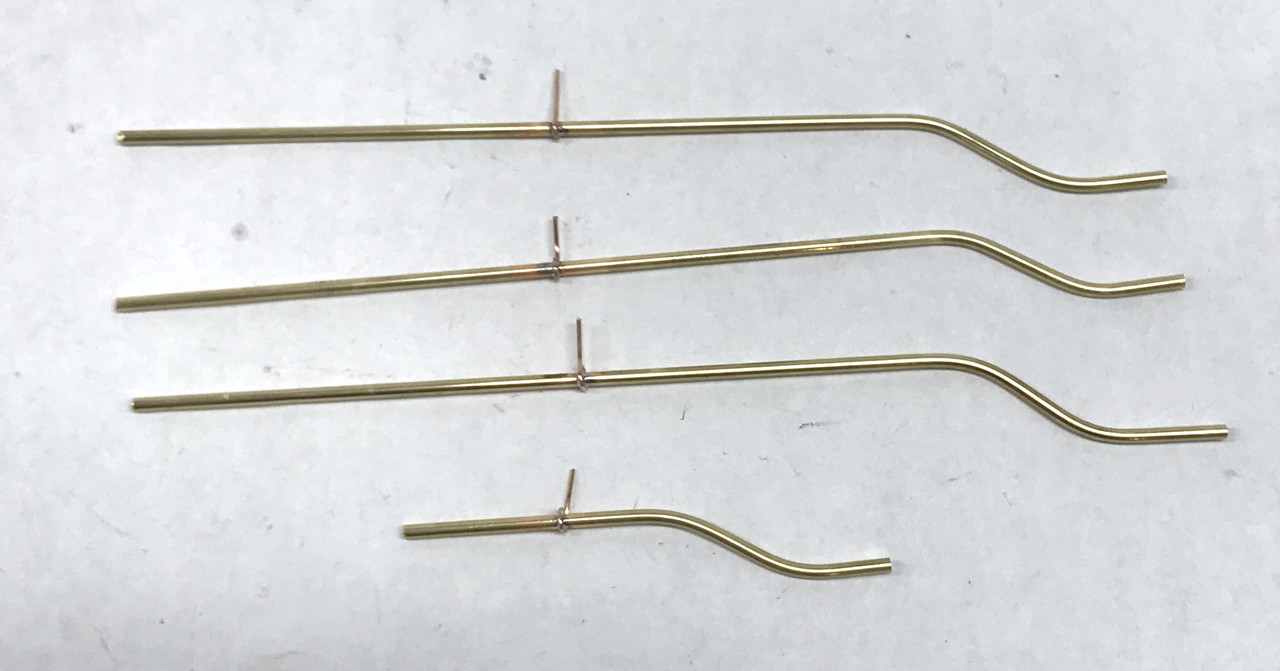
After the success I had with the mini-chop saw yesterday cutting the resin rails, I decided to change the blade to the non-ferrous cutoff wheel I bought along with the tool and used it to cut the brass. It was sweet! Perfectly straight almost burr free cuts. I was very pleased. It doesn't have much horsepower so you have baby the saw through the cut, but that's okay. After bending and cutting to length, I shaped some loops using MicroMark Parallel Jaw Loop Making Pliers and bent loops that needed soldering onto the brass. I used 1/32" phos-bronze wire for this.
I used the Resistance Soldering Unit for this since it really is effective in working on parts needing good solder flow.
I cleaned the excess flux in MEK and then popped them in the ultrasonice cleaner. Here are the four downspouts ready for chemical treatment.
I soaked the pipes in a bath of JAX Metal Browning soulution, rinsed them and then put them in a bath of JAX Patina treatment.
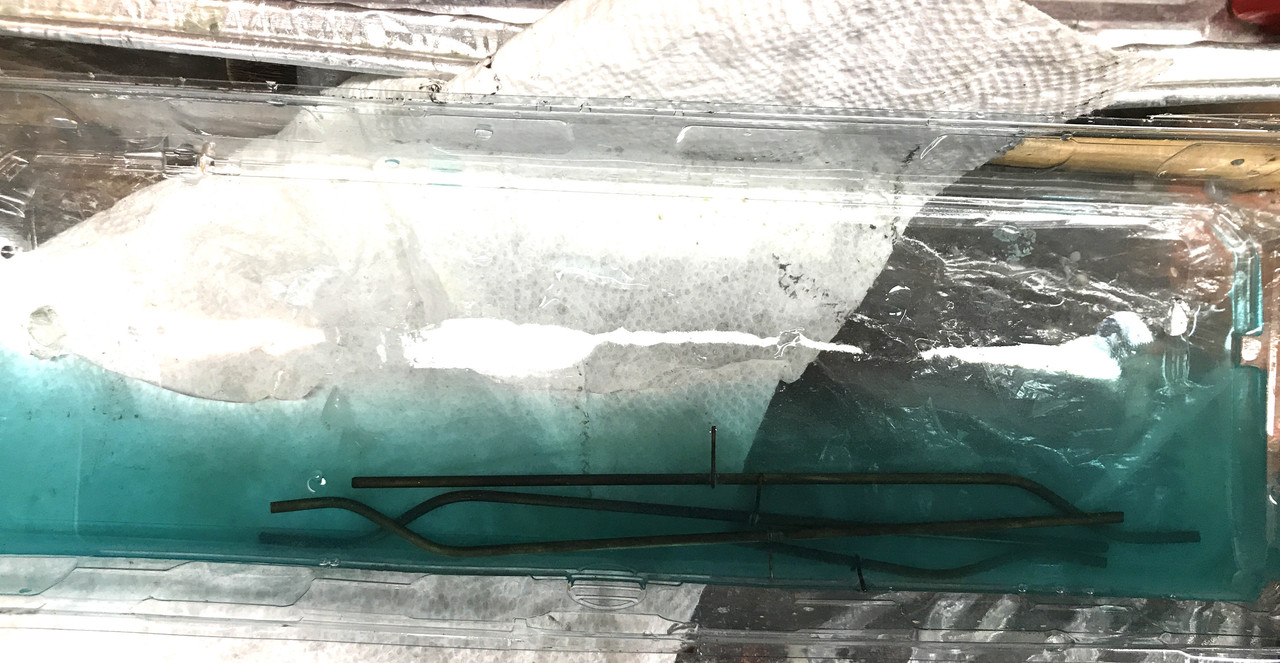
I'll pull them out this bath tomorrow and they'll be ready to install. I still have to the roof weathering. I was going to make a TV antenna for the House, but decided, based on some input from readers, to not do it. I still have some more touchup painting to do tomorrow. And then it WILL BE DONE.
Merry Christmas to ALL and you're forgiven if you're not reading this on Christmas Eve or Day.
A separate note:
After some terrific conversations with Nick Morris of Buzick Construction, the outfit that builds all the wood Bourbon aging rick houses, I not only got the specs for the model, but had Nick proof my drawings and make corrections. While what I end up building will be selectively compressed, it will be structurally accurate. I have the lumber sizes and spacing. I also have the specs for the foundation. The distance between foundation ribs that support the vertical columns is 6'7". Why that you ask? Well… it because that the minimum distance needed to drive a skip loader down the rows to bring lumber for the construction start. That's why. Sort of like why our railroads are 4'8-1/2" based on carriage wheel spacing which was based on Roman Chariot spacing which was based on the width of two horses asses side-by-side.
I also found out about how and where the sway bracing goes in. Every fourth bay has cross-bracing all the way up which blocks that bays from barrel storage. With the foundation spacing being wider than I originally thought, it does make the footprint wider. I will have to make sure it still fits. O'scale stuff is big! This project will start sometime in early 2021 after the House site is fully done and I build another plastic kit for a break.

Attachments
Images (1)

Myles, the photographs look great. I hope you are able to position it close enough that folks can look in the windows and see the great people enjoying the interior.
That is great Nick gave you all that great information about the Rick house! It will be another wonderful structure!!
The house looks great with the lights on. Merry Christmas to all!
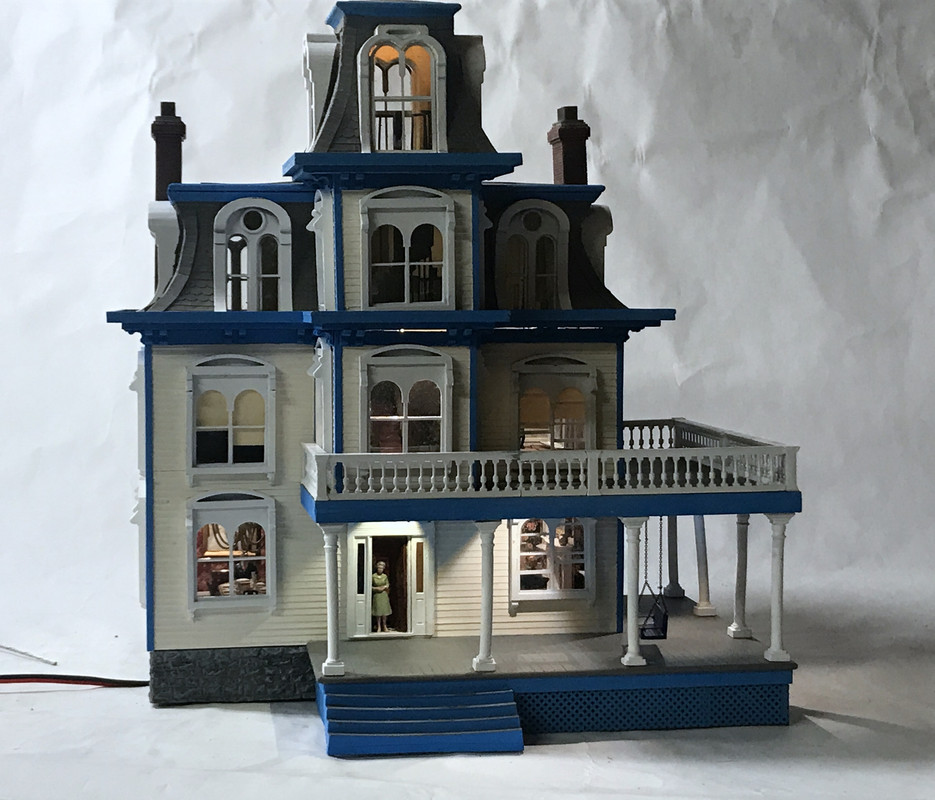
Hope everyone is having a nice Christmas. Yesterday was the official completion of the House by the Railroad part of the project. There's still more work to do, but not on this part. For starters, I took more pictures with my Canon EOS Rebel. The first is a composite of Edward Hopper's painting and my version. There are some differences which I described throughout the build, but the similarities are quite obvious. His appears taller and narrower, but if I were to build it to that spec, the rooms would have been very small or it would have been very large and very tall. As it is, the ceiling heights on the first floor are about 12 feet.
My perspective is a little off and I'm going to try and match it more perfectly next picture I take. His sight lines look to be at the center of the first floor window frames. I was centered on the balcony.

As you can see the downspouts are installed and I also got the plumbing stack vent located approximately where the kitchen and upstairs bath are. I never did detail a bath since there are no windows in that space and it's a collection point for all the electronics for the 2nd floor LEDs. I added some tar strips on the roof and did some minor weathering with pastels.

The only thing I didn't do was touch up the white on the window frames where they've been abraded by laying the building down on its various sides to work on it. I took
I also set the building on the site template and I'm, frankly, worried. It really doesn't fit, or... if it fits it's really tight like right up to the next property lines and almost no space for a four foot pavement. The front steps will be right at the pavement. I may have to rethink this whole thing. The red lines are the template edges.

Angling the building did not help. Here are some more images of the total building.


And then I did some focus stacking closeups to try and show the interior. Notice that I did tone down the porch lighting quite a bit. Dining room:

Living room two views:


The kitchen:

And finally the front door area. It's pretty dark in that hallway and I wish I would have not attenuated that light. Image stacking with Zerene Stacker lets you get infinited depth-of-field to do shots like this. For closeups, depth-of-field is very short. Good model photography needs large DoFs to look more realistic. It's time consuming so I save it for the final shots of my models. You can just glimpse that staircase. Too bad. There were tons of hours of work on that.

So dear readers, stay tuned for the rest of the job with the site work and the carriage house. Again, hope you holidays have been good so far and have a Happy, Healthy, Safe and Socially Distanced New Year.
Attachments
Images (13)


@Trainman2001
Myles:
Your house is stunning, a true work of art! You are an inspiration to us all.
Myles, It is a wonderful model! It may be my favorite of all the ones you have taken us through building, though I am sure I am forgetting some. Thank you so much for documenting all your plans, modeling, mistakes, and corrections!! I just can't say enough!!
Add Reply
Sign In To Reply
