@GeoPeg posted:

Pat, why remask after the overnight cure? I would normally not go to the extra effort

George

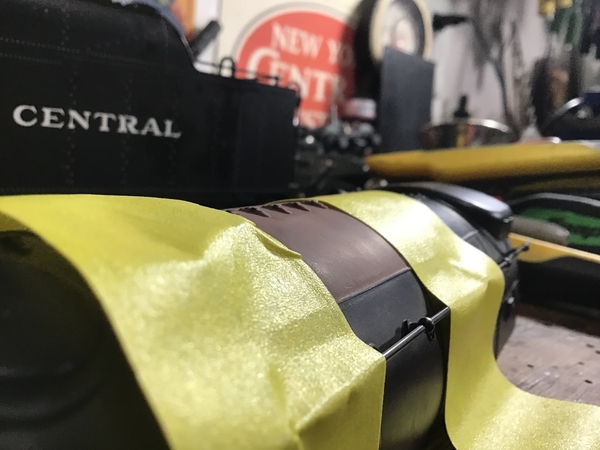
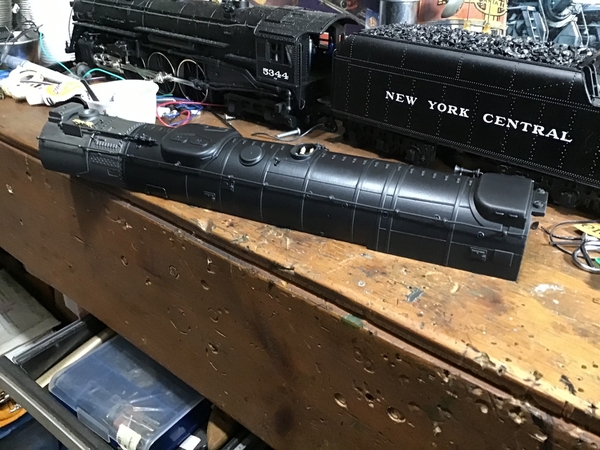
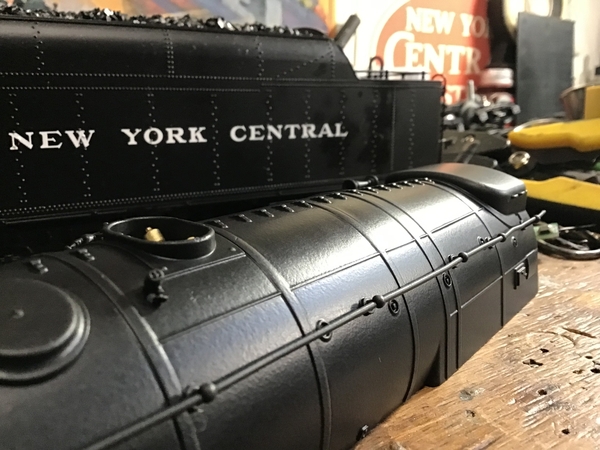
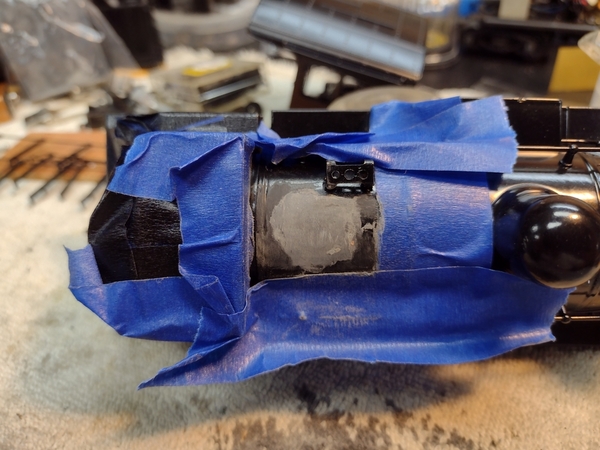
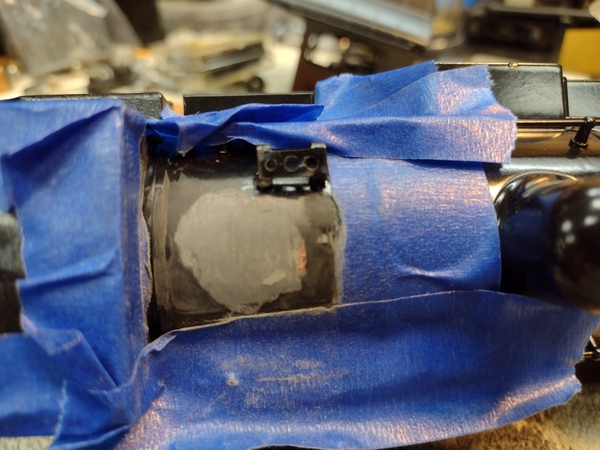
George, masking tape is cheap, …we’ll be working around fine details we don’t want to accidentally hit with the sanding blocks and potentially damage them…..masking tape is one of those cheap tools I can’t get enough of,….😁….a couple of layers is our first line of defense …

Pat

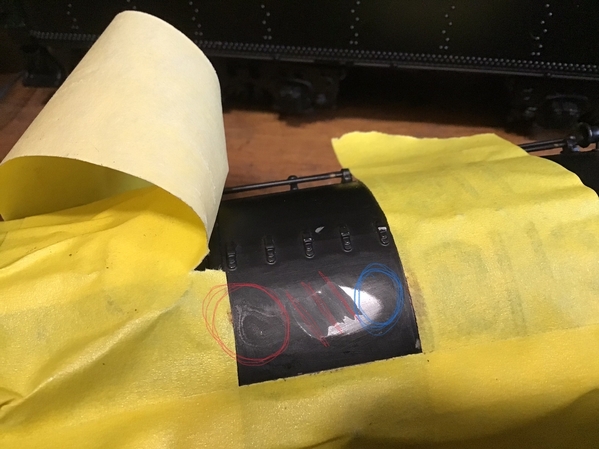
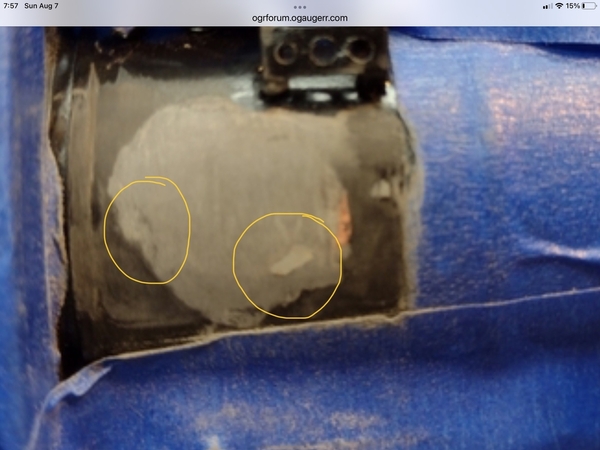
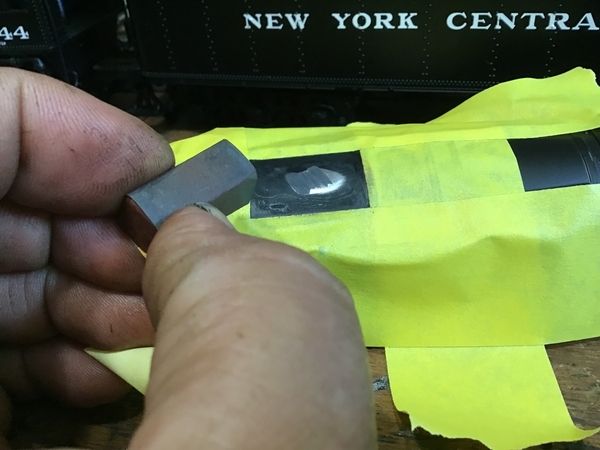
Ok, let’s look at the blocking process,…..I’ve fashioned some blocks from scrap hardwoods that I had lying around….they’re perfect for this kind of work. It doesn’t matter the material, it matters that it’s a.hard, & b. Square …beings I mudded this thing up, I started with 600, then switch to 800….but I wanted to dig into it so you guys see the common mistakes, and can learn to read your own work …..so let’s the examine our work area from left to right, and define what’s going on, and how to know what’s what,….so when we look at the far left thin red circled area, we see what looks like layers,….so we’re too far over in the blocking process,….those islands can get worse, and show up in your finish,….it’s faint enough right now to fill in with primer, and re-level, so don’t go any further when you get islands forming ….if you do, use different angles to look at it and see if your islands will turn into puddles…..so now in the middle area, you see I’ve red lined my lows ….these lines are over low spots in the filler,….we need to jump right over to the blue circled area, and see we’ve already gotten down to bare metal, so we can’t go any further or you’ll make a new divot trying to chase out the low spots outlined with the red lines…..so the moral of the story, and again, I’ve done this on purpose, it needs to be wiped again with filler,….when the spot is correct, we should see the filler blending in with the surrounding black,…since we’re working ON TOP of existing paint,…..so we’re not done,…..and George, notice how I’ve pulled the tape away from those precious details we don’t want to disturb,…I’ve worked the HE-double toothpicks out of this area already, and those hinge details are still perfect!….that’s the idea of tape, tape, and retape !…😁

Pat E6784F0A-2201-4574-BE7B-30BD2233A5F7C6A8DD81-33B8-42F7-9425-62A2D5574AE6
Attachments

Images (2)
  • E6784F0A-2201-4574-BE7B-30BD2233A5F7
  • C6A8DD81-33B8-42F7-9425-62A2D5574AE6

Pat

How do you secure the sandpaper to the square block?  At this point it looks like everything is being worked dry.  I've always wet sanded as the fines flush out and don't clog the paper.

My mediocre skills passed form my grandad through my dad whose garage did minor body work as well in the fifties.  He didn't work on Corvettes and dispised European cars of any sort (He was a GM man). 

@NHVRYGray posted:

Pat

How do you secure the sandpaper to the square block?  At this point it looks like everything is being worked dry.  I've always wet sanded as the fines flush out and don't clog the paper.

My mediocre skills passed form my grandad through my dad whose garage did minor body work as well in the fifties.  He didn't work on Corvettes and dispised European cars of any sort (He was a GM man).

Gray, …we haven’t got to the wet sand part yet, this is all done dry till the finishing steps…I just wrap the paper around the block. To prevent clogging, occasionally tap the block with the flat edge of a screwdriver….doing the initial blocking dry let’s you find highs and lows faster. Doing wet sanding right off the bat obscures those spots and may mislead you ….but, if your methods work for you, that’s fine,…this is just a demo on how I do it, and maybe y’all can pick up a trick or two?..

Pat

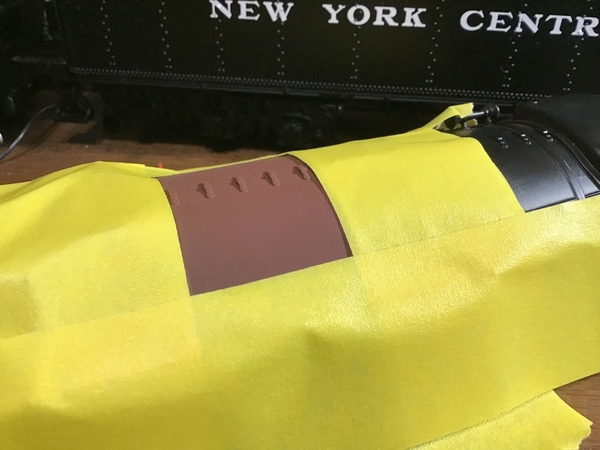
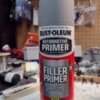
So after my second wipe, I’m starting to like what I see, ….but we’re far from done!…..another trick in blocking is the use of primers as blocking fillers,…now, I don’t use ( in fact I despise ) rattle can products, and I’m not going out to buy some for this exercise, so luckily I found a can of red oxide….this is sandable primer!!….looking good!!….right!!….well, no,…this is part where you don’t let the primer fool you!!….we’ll let this cure, and dry block this ….this will tell the story!…if it’s right, when I pass the block over it one time, all of the mini scratches left behind should be perfect lines, with no divots, or scratches missing, etc, etc,…if it looks really good, which I don’t think it does,….THEN we can begin wet sanding,….but I think there’s still some blocking to do …

Pat CA60B271-FFCD-46C3-B979-DA62CE35CC8D

Attachments

Images (1)
  • CA60B271-FFCD-46C3-B979-DA62CE35CC8D

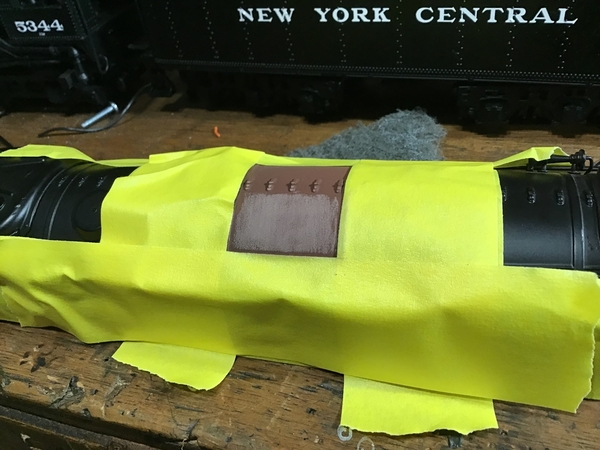
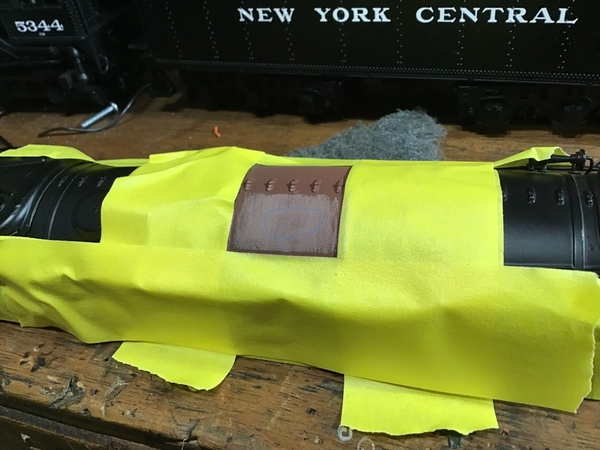
So now with 1000 grit, I’ve taken one slow pass with my block, to show the reveal,…again, this is where primer can bamboozle you into thinking everything is good,….the second picture I’ve circled the low spot, ….it’s faint, but it could show up in our finish top coat, ….so let’s perfect it,….as faint as it is, the best course is to simply shoot a second coat of primer…..according to the can instructions, Im well within the recoat window without having to scuff everything……we’re getting close to wet sanding Gray!…😁 BLOW UP THE SECOND PHOTO!…the blue circle is faint as all get out,…sorry

Pat 9C21CA9C-FD12-42C0-9B86-54600DF824A6B68E357C-54FF-470F-9858-7DE6A87BFB9E

Attachments

Images (2)
  • 9C21CA9C-FD12-42C0-9B86-54600DF824A6
  • B68E357C-54FF-470F-9858-7DE6A87BFB9E
Last edited by harmonyards

After a second coat, and expedited drying thanks to a heat gun, I was very satisfied with the one swipe from the block with 1000 grit. On to wet sanding the area to clean up the horrible pebbling left by the yucky rattle can primer….now you can see the repair area is slick, but scuffed, at this point, the repair area is actually ready for top coat, ….but let’s look at the surrounding edges carefully!…blow this pic up,…look at the edges not cleaned up by wet sanding yet!…that pebbling, if left alone, will cause your top coat to ramp up in that area, and cause bunching of the top coat,…so you have to look at every square inch or in this case, every square mm to insure a slick, but scuffed finish,….I’ll finish blending this red into the black, and then we’ll prep for top coat….In the second pic, you can see in the angle of the picture how the shape is perfect ….

Pat D9783E31-058B-493C-8DE5-AF9490F363CF2607B61F-2906-4614-8620-CDE26FD11392

Attachments

Images (2)
  • D9783E31-058B-493C-8DE5-AF9490F363CF
  • 2607B61F-2906-4614-8620-CDE26FD11392
@harmonyards posted:

So now with 1000 grit, I’ve taken one slow pass with my block, to show the reveal,…again, this is where primer can bamboozle you into thinking everything is good,….the second picture I’ve circled the low spot, ….it’s faint, but it could show up in our finish top coat, ….so let’s perfect it,….as faint as it is, the best course is to simply shoot a second coat of primer…..according to the can instructions, Im well within the recoat window with having to scuff everything……we’re getting close to wet sanding Gray!…😁 BLOW UP THE SECOND PHOTO!…the blue circle is faint as all get out,…sorry

Pat B68E357C-54FF-470F-9858-7DE6A87BFB9E

OK, I totally get the rationale behind masking, remasking and remasking again. Save the details!

Now in the picture above, it appears your blocking strokes are vertical and I'm guessing your block is horizontal? I'm also guessing that you applied very little pressure on the block.

I have to confess, I don't really see the low spot you have circled. What tells you that is, in fact, a low spot?

George

George, it don’t matter which way you run the block, as long as it’s flat,…never use the edge, as that will dig in like a knife …..as for the low spot, it’s very faint, like I mentioned above, but as you might can see in the picture, you’ll notice the primer is lighter in color on the outsides, but darker towards the middle, that tells me the block isn’t touching that area because the block is bridging the areas where there wasn’t any repairs done,….so we don’t want to dig down further, right?….the areas where there was no repair is perfect, so we want to fill up the slight void, and block it to the sides where the primer is lighter …….

Pat

So here’s our subject matter after top coating, and very little blending ….for the top coat, again, I’ve used rattle cans so you DIY guys can duplicate this at your own shops, …to match the black on modern Lionel, and MTH there is nothing better than SEM’s automotive trim black, available in rattle can and qt. can form. Now, this was a junker shell, but I did pick up a few nicks and scratches in the process to show y’all what’s possible ….but I did not spray out the entire shell, ..I’ll show you how to do a spot area repair to hide your work, make it last and seamlessly blend into the surroundings…( as best as can be with rattle cans ) …had I used my gun, y’all’s jaws would hit the ground, as there’s no substitute for compressed air pushing product, but this does look real good,…so where’s the blend??…can y’all find it?..I’ll post up pics of the paint I used as well, so those of you that want it can get it,….

Pat 8F0E6EC9-1A34-43C5-BB3B-9131A00A8E01B24F5B91-C64A-4FC1-B212-75FC501B3BE1

Attachments

Images (2)
  • 8F0E6EC9-1A34-43C5-BB3B-9131A00A8E01
  • B24F5B91-C64A-4FC1-B212-75FC501B3BE1

OK it's time to submit a progress report to the teacher on the students progress

mogul1

This is the JB Kwik after I gouged out the spot putty.  I know it's too high, just takes more work.  Cured for three days before I touched it.

mogul2

This is after several passes with dry 600 paper.  The generator bracket makes for a real PITA in working this area.

mogul3

This after 800 grit paper.  Kind of hard to tell the contours with finess.  It seems to feel pretty good - but that's to my uncalibrated touch.  You can see the shell and a little left over putty in the lower right of the fill.  Is the next step to retape and shoot primer?  I think another pass of e[oxy would be too much.

mogul4

This is the rattle can primer I have (I know Pat hates rattle cans).


Comments?  (not on the rattle can).


Two other questions.

I would like to use the SEM interior paint, but seeing as how this is a reletter job I don't think that would work with new decals on a semi gloss surface.  True False Ideas.

What is the difference between black and blue sandpaper (both 3M)  what little knowledge I have is real old school and I don't trust a lot of the new fangled things unless I converse with someone first.  (like the non MC aircraft stripper that I have no choice in using now).

Gray Lackey

Attachments

Images (4)
  • mogul1
  • mogul2
  • mogul3
  • mogul4

Gray, …nice work so far, ….so sure, a light coat of primer KNOWING you’re going to work on top of it is totally fine, …..as I’ve mentioned, don’t let the primer lull you into a false sense of completion….instead, block the cured primer to do a reveal,…you can repeat the primer/reveal process as much as you’d like, knowing that whatever layers you’ve built up, must be leveled to to the black base finish that you are working on top of from the start,…….may I copy and edit your work just to point out some ideas/brainstorming points ?…

Now onto your top coat, …if you are planning on water slide decals, then yes, a gloss finish will be your best friend, …then you can do your decal work, and top coat that with your choice of satin, flat, or gloss again clear coats ….SEM does have a rattle can gloss black trim finish too,….available in rattle can form….the SEM product line costs more than cheap rattle cans, but you get what you pay for IMO, ….

so, if it’s ok with you, let’s dive in for a closer look at your repair area…

Pat

I’ve circled and squared off areas of interest ….I’m not picking on your work Gray, I’m helping you perfect it…..so the green squared in area, I see what looks like polyester putty, …if this is the old repair, is it lower than the JB product?…..the red circled area,……is this area of JB bunched up and still too high?…also, your blue painter’s tape you are using is a low release tape, in other words, it don’t stick all that well,…I see where it looks like your blocking process is pushing some of this tape and rolling it and shoving it back, …if there are precious details you’re trying to protect, we need something a little more aggressive..if you are danger close to details we don’t want lost, and masking tape is being loosened up, shoved or eroding away, use duct tape, foil tape for HVAC work, etc,..…..also, don’t be afraid to constantly change directions in blocking ……seeing a cross pattern helps in the reveal process,….in the second pic, the yellow circles appear to me to be low spots where the block isn’t touching them,….if you look at the pics I did of that Niagara shell, I took photos at angles into the light to show the reveal, …is that generator bracket cast into the shell?…is there a screw from the other side,….I do agree that’s some close quarters combat …I also see sand scratches invading the boiler bands, careful on those high resolution details, as your blocking could “fade” the band on one side only leaving the resolution not as crisp, …I see you haven’t broken through the black yet, so that’s a good thing …if you start to see bare metal exposed,….stop!…it’s time to change direction or protect that area from losing its feature lines….

Pat FAD1F537-B889-4324-9985-31B6DDD60CA3D0F1DAEA-6BDF-4A34-B08F-A013FE888DA6

Attachments

Images (2)
  • FAD1F537-B889-4324-9985-31B6DDD60CA3
  • D0F1DAEA-6BDF-4A34-B08F-A013FE888DA6
@NHVRYGray posted:

The right yellow circled area is metal showing.  Will have to check on the left circled one.  Luckily the boiler band on the left is immediately in front of the cab, so not as noticeable.

My biggest concern is the red circled area in the first pic Gray, …if that is lumped up, and over a detail, it will show up badly,…..look at that area with a fine tooth comb,….( or a fine toothed block…😉)

Pat

@NHVRYGray posted:

I wish the generator bracket was screwed in, it would be gone.  It is pressed steel, with the legs bent over and glue inside.

I doubt it’s steel, usually pinned in details like that are brass,…if it gets in your way, use sharp pics to pick away at the glue. It will pop away in chunks, and then you can straighten out the pins, and wiggle wiggle that bracket out…..but only if really hampers your work..

Pat

Add Reply

Post

OGR Publishing, Inc., 1310 Eastside Centre Ct, Suite 6, Mountain Home, AR 72653
800-980-OGRR (6477)
www.ogaugerr.com

×
×
×
×
Link copied to your clipboard.
×
×