Quite a puzzle to get to maximum capacity John. Looks good!
No worries about the weight....probably no worse than a wall of fully loaded kitchen cabinets.


|
|
Quite a puzzle to get to maximum capacity John. Looks good!
No worries about the weight....probably no worse than a wall of fully loaded kitchen cabinets.
Thanks guys, it's really fun to actually see some of the stuff out now. I'm hoping that we see Alex's new layout soon, I really miss his great summer parties! ![]()
Looks great, John, and every inch filled up.
Must have taken a fair amount of time and trial and error to get everything to fit so precisely !
Not really, I when it got close, I just eyeballed it. I had a bunch of stuff out, and I'd check what was closest to fitting and stick that in. ![]() The stuff that didn't make the cut went back into the closet or a box for now.
The stuff that didn't make the cut went back into the closet or a box for now.
This morning was "rip-out day", all the stuff that's in the way for more shelves was zapped. The fake window... GONE! A couple of low voltage boxes for some unknown function... GONE! A couple more things, including a silly wall sconce... GONE!
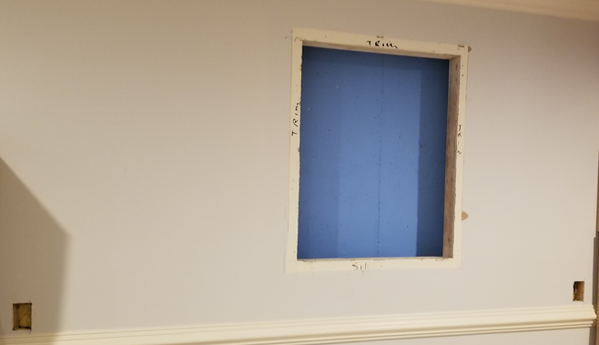

Next I have to start cutting wallboard to fix all these. ![]()


Blow - out patch time. Looking great John.
John, are you going to close that fake window out completely with a piece of sheetrock or you're going to make it " shelf Queen of the month" area. Or " next tmcc/docs upgrade" shelf?
John,
I used 1x4x8foot strips at Lowes. Costs about $1.30 each. Staining them makes them look nicer or painting them white does the same.
I know the feeling when you have to build more shelving. My wife and I unpacked all the boxed trains and as we were going, I said to her that we are going to need more shelving. She k ew what I had, just did not realize the space needed!
Wow... you have a lot there!
Ohhh... sell something? (A suggestion from my wife last year).
E-UNIT-79 posted:John, are you going to close that fake window out completely with a piece of sheetrock or you're going to make it " shelf Queen of the month" area. Or " next tmcc/docs upgrade" shelf?
I'm just going to cover it and run the shelves all along that wall.
Ted Bertiger posted:I used 1x4x8foot strips at Lowes. Costs about $1.30 each. Staining them makes them look nicer or painting them white does the same.
You get 8 foot 1x4 for $1.30? How do you support them?
Wow... you have a lot there!
Exactly what my wife said when she saw the first set of shelves. I don't think she realized quite what was in all those boxes. Wait until I unpack 80+ passenger cars and hundreds of freight cars! ![]()
I have enjoyed and laughed with you guys tonight.
I've missed the space between the shelves. Horizontal. With and without Gargrave rails.
My rails are Gargrave.
What, I'm guessing 5" between the boards....
Thanks, John d.
A hidden cubby for pistols, gold chains, and rubys? 
Let me guess; We"ll never know? ![]()
![]()
Just watch for the pistols. ![]()
gunrunnerjohn posted:Just watch for the pistols.
When folks were giving you grief over the Silver Bullet train I was going to post "do you really think it's smart to insult someone with 'gunrunner' in their handle"? ![]()
-Greg
I guess it's not that understated. ![]()
John, It does get a bit overwhelming as unpack and realize how much "Stuff" you have, and each and every accomplished task to get them unpacked, displayed or under layout on the storage tracks feels good. We are 4 years in from the move and I have gotten down to about 6 large cartons of trains and track I'm still pondering on whether to display, sell, donate or keep storing until score that lottery dream house.
I am envious of an entire lower level though, I thought I had scored with the loft at 25x25.
Ron
GRJ, looking good!
I suppose I should take some measurements and put in an order for some shelves to pickup at York... been thinking about that for a while!
Ron_S posted:I am envious of an entire lower level though, I thought I had scored with the loft at 25x25.
I think a 25x25 space is about what I have, mine is just broken up into sections. I must admit, I was happy with the arrangement. ![]()
eddiem posted:GRJ, looking good!
I suppose I should take some measurements and put in an order for some shelves to pickup at York... been thinking about that for a while!
Thanks Eddie, I've covered all the holes in the other walls, and I'm just digging out the wallboard stuff to start the final fix. ![]()
You get 8 foot 1x4 for $1.30? How do you support them?
The 1x3 that go up and down that are located where the studs are have screws going through the rear into the back of each 1x4 board plus at the ends are 1x4 that are screwed into each shelf at the end. Also, put elmer's wood glue at each joint for added support.
JOhn'Well Done!! now on to the layout
Great display @gunrunnerjohn - you've inspired me to do the same - the wife has been kindly asking for her linen closet back and I still have a few locomotives and cars in boxes - here's the "display" of the ones I run regularly:
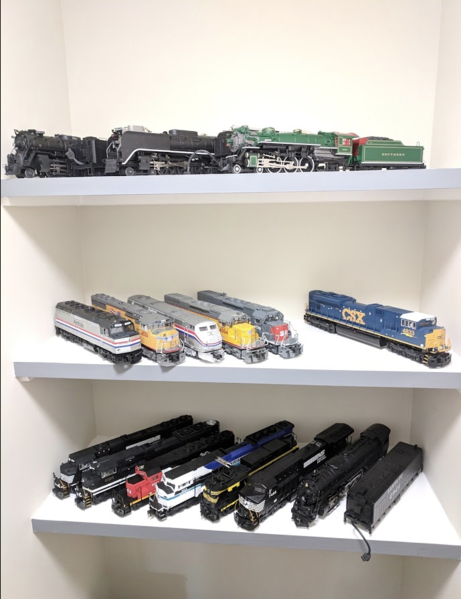
A few questions:
1. Did you go with Glenn Snyder's shelving system or a different vendor?
2. Did you have to cut down the length at all or did you order custom lengths?
3. What is the vertical distance spacing? I saw someone hedge a guess of 5" which makes sense
4. Any recommendations or tips based on your experience hanging the shelves?

Ted Bertiger posted:You get 8 foot 1x4 for $1.30? How do you support them?
The 1x3 that go up and down that are located where the studs are have screws going through the rear into the back of each 1x4 board plus at the ends are 1x4 that are screwed into each shelf at the end. Also, put elmer's wood glue at each joint for added support.
First off, where do you get 8 feet of 1x4 for $1.30?
I'm still not visualizing how the shelves are held up and can support the weight. It sounds like you have the 1X4 just screwed by the edge to the stringers behind it. I have a little trouble with that holding up 50-60 pounds of locomotive for one 8 foot run without sag.
mattrain posted:Great display @gunrunnerjohn - you've inspired me to do the same - the wife has been kindly asking for her linen closet back and I still have a few locomotives and cars in boxes - here's the "display" of the ones I run regularly:
A few questions:
1. Did you go with Glenn Snyder's shelving system or a different vendor?
2. Did you have to cut down the length at all or did you order custom lengths?
3. What is the vertical distance spacing? I saw someone hedge a guess of 5" which makes sense
4. Any recommendations or tips based on your experience hanging the shelves?
I was not allowed to store trains on any other floor, although I get to keep boxes and track in the attic for now. ![]() The closet previously illustrated is mine to use.
The closet previously illustrated is mine to use.
My technique was fairly simple.
Repeat for the next shelf.
gunrunnerjohn posted:mattrain posted:Great display @gunrunnerjohn - you've inspired me to do the same - the wife has been kindly asking for her linen closet back and I still have a few locomotives and cars in boxes - here's the "display" of the ones I run regularly:
A few questions:
1. Did you go with Glenn Snyder's shelving system or a different vendor?
2. Did you have to cut down the length at all or did you order custom lengths?
3. What is the vertical distance spacing? I saw someone hedge a guess of 5" which makes sense
4. Any recommendations or tips based on your experience hanging the shelves?I was not allowed to store trains on any other floor, although I get to keep boxes and track in the attic for now.
The closet previously illustrated is mine to use.
- I did indeed go with the Glenn Snyder shelving.
- I ordered custom lengths, they did a very clean cut, so I'm glad I did it that way.
- The total spacing is 5.5", I used 5.25" blocks to space each shelf from the one below. After measuring the spacing, I would also insure the next one was perfectly level and shim my blocks to make it that way if not before running the screws in.
My technique was fairly simple.
- I assembled the 7 foot length with the GS provided shims first and worked with them as a unit. For really long shelves, this probably isn't practical, you'll have to do them as multiple units.
- I located all the studs and snapped a chalk line for each stud. (Yes, some of us still have a chalk line.
- Position the shelf and mark the drilling locations for each stud.
- Take the shelf to my drill press and drill the holes.
- Check wall leveling and plan any required washers to space the shelves. The shelves will NOT bend to the waves in the walls!
- Run a screw at one end into the stud.
- Check leveling, and shim as necessary still using the blocks.
- Run in the remaining screws, using the above mentioned washers as necessary.
Repeat for the next shelf.
My shelving procedure was a little different in two ways.
1. Since I had many shelves to cut (about 80) I cut my own. I used a non-ferrous blade and a 10in chop saw. Went pretty quickly.
2. I have metal studs so I had to pre-drill a .5in hole into the studs and a .25in hole into the shelves. I used .25in Togglers to hang them. About 400 of them in total!
I stick to wood Chris, it was pretty easy. ![]()
gunrunnerjohn posted:Chris Lord posted:Whew! For a second I didn't see the Wiener Mobile but there it is. Fourth shelf from the bottom.
Of course I made room for that one.
John,
A group of us were playing golf the other day and one of the guys wife called telling him that the Weiner Mobile was in town and making rounds at the local Food Lions. On the way home from work I spotted it maybe 5 cars ahead of me as I neared my turn off by my local Food Lion.
My cars are severely weathered right now. After my wife passed I was going to toss a bunch of her stuff and came across some of her makeup brushes, all new. They make for excellent "de-weathering" tools!!!
In terms of keeping dust off, I did something a little different. I did not use glass; I used light weight clear plastic sheeting. I ordered a few 4X4 sheets from Amazon. They came rolled up (I don't recall the thickness) and were about $20 each. They can be cut with a good pair of scissors. I built several large, picture-type frames cut to the size of my shelves from oak molding and stapled the plastic onto the back of the frame; much like glass is used in a picture frame. I then used Velcro to attach the frames onto the casing of the shelves. The design allows access, keeps dust off, and displays the trains nicely. I built these shelves about three years ago and have had no problems.
I must confess that my shelves are not mounted on the wall. I built the shelves to hide the underside of my table. The bottom edge rests upon the ground. I imagine this technique would work just as well for a wall-mounted display, though.
One other thing, as a semi-practicing luddite, I am unable to transfer pictures from my flip phone to my computer. When my frau returns this weekend (with her smart phone), I'll try to post some pictures to show what I did.
I hope this helps.
gunrunnerjohn posted:I stick to wood Chris, it was pretty easy.
I wish that had been my situation. Man did I drill a lot of holes!
Jim Brenner posted:One other thing, as a semi-practicing luddite, I am unable to transfer pictures from my flip phone to my computer. When my frau returns this weekend (with her smart phone), I'll try to post some pictures to show what I did.
Easy way, just mail the pictures to yourself on your computer, job done.
I do my picture transfers an easier way, I use DropBox. Just share the photos with DropBox and they magically appear on my computer, my laptop, any they're also available anywhere on-line by logging into DropBox.
Chris Lord posted:gunrunnerjohn posted:I stick to wood Chris, it was pretty easy.
I wish that had been my situation. Man did I drill a lot of holes!
I'm glad I avoided that. I just drilled five holes in each 7 foot shelf, and my impact driver solved the problem of the wall, no drilling required there.
For the 22 foot wall, I'll be doing more drilling I expect. ![]() I'm working on the wallboard fixes now, then I'll paint it and order the shelves.
I'm working on the wallboard fixes now, then I'll paint it and order the shelves.
I probably don't have 1/2 the trains you do and I'm out of places to put shelves for the other 1/2 of my trains lol
Part of the mission for the new house was a place to put the trains. ![]() Once I get the walls patched and painted, I'll be able to unpack a lot more.
Once I get the walls patched and painted, I'll be able to unpack a lot more.
First off, where do you get 8 feet of 1x4 for $1.30? At Lowes by the furring strips. They are not the best quality pieces so I picked through to get the best ones.
I'm still not visualizing how the shelves are held up and can support the weight. It sounds like you have the 1X4 just screwed by the edge to the stringers behind it. I have a little trouble with that holding up 50-60 pounds of locomotive for one 8 foot run without sag.
Sag? Reason why I added wood glue. Should have put more 1x3's vertically to each shelf screwed together. Call me on my cell (732) 688-1184. I am home on Thursday during the day and we can talk some more.
Looks great, John!! Keep it up!
John
Ted, your signature line link looks a little suspicious! I clicked on it and got this.

Needless to say, I am NOT going to click on the setup link!
@Ted Bertiger

John,
I looked at my profile and updated personal stuff there. As for the club website, Zenphoto is what our webmaster/company uses for our site. He was a club member at one time. Why it comes up, good question.
Jim Brenner posted:In terms of keeping dust off, I did something a little different. I did not use glass; I used light weight clear plastic sheeting. I ordered a few 4X4 sheets from Amazon. They came rolled up (I don't recall the thickness) and were about $20 each. They can be cut with a good pair of scissors. I built several large, picture-type frames cut to the size of my shelves from oak molding and stapled the plastic onto the back of the frame; much like glass is used in a picture frame. I then used Velcro to attach the frames onto the casing of the shelves. The design allows access, keeps dust off, and displays the trains nicely. I built these shelves about three years ago and have had no problems.
I must confess that my shelves are not mounted on the wall. I built the shelves to hide the underside of my table. The bottom edge rests upon the ground. I imagine this technique would work just as well for a wall-mounted display, though.
One other thing, as a semi-practicing luddite, I am unable to transfer pictures from my flip phone to my computer. When my frau returns this weekend (with her smart phone), I'll try to post some pictures to show what I did.
I hope this helps.
Sounds like a great idea, but a couple questions:
1. Do you remember what the thickness (mils) was of the sheets you used ?
2. Must have had to pull it pretty tight to get the wrinkles out - I am thinking of using the hairdryer/heat shrink window insulation sheets they sell at the box stores.
3. Do changes in temp and/or humidity cause any issues with the sheets ?
Ted Bertiger posted:Back wall of my garage.
Inside the house almost completed. Side wall has 15- 18 inch shelves behind me.
All shelves are 1x4 that are 7 feet in length and stained. Floor to ceiling is 19 shelves since we have 9 foot ceilings here. I used 1x3 strips that are attached to all the shelves and were placed where the wall studs are. Missing is the MTH scale big boy that is on the floor now. Too heavy to put on shelving!!
Hi, can you share some larger pics of your garage train storage? I may have to do something similar up high for empty boxes. Thanks!
I was going to stay out of this discussion because my situation is a little different. We live in a building built in the 40's. The walls are plaster on hollow tile. We do not have any windows so dust is not a big problem. My wife gave me some kind of makeup brush that I use to dust the trains occasionally.
I very securely mount 1x4's into the plaster walls. They run from the floor to the height I need. I use the metal u shaped slotted verticals with 6" brackets upon which to rest the 1x4's I use for shelving. The verticals are mounted to the wall every 24 - 30 inches. There is a lot of weight so I try to do overkill. The track is Gargraves for the first 1000'. After that I decided to run the 1x4's through the table saw and cut two groves for the trucks. So far nothing has come crashing down.


Too many trans Bill, I've sent you my shipping address so we can "balance" that collection! ![]()
![]()
I was going to ask if Bill could post his hours...it looks like a great hobby shop in there! ![]()
Tuscan Jim posted:I was going to ask if Bill could post his hours...it looks like a great hobby shop in there!
I'm open anytime you happen to be in deep south Texas. We aren't at the end of the world but you can see it from here.
gunrunnerjohn posted:Too many trans Bill, I've sent you my shipping address so we can "balance" that collection!
You guys have all the trains up in the northeast. We are lucky to get any down here in south Texas.
Access to this requires an OGR Forum Supporting Membership


