Are there any concerns when gluing the kitty litter vs. the other materials mentioned. Just wondering with regard to the kitty litter being absorbant.
I have great luck using 'Chick Grit' - NOT poultry / chicken grit. Chick grit is actually the same thing just much smaller pieces. Chick grit is decomposed granite and is a medium gray color. It is available at most feed stores and comes in 5lb and 25lb bags. Russ

Russ....great suggestion! AND...it is probably easier to find in our part of the country than the roofing granules...
Alan
The 5 gal buckets of ballast from the model shops go for close to $90 plus shipping, the chick grit in 25 pound sacks locally here is $29. Most feed stores will carry it or certainly can order it for you. I used to use roofing granules but it is just not available anywhere in Southern Oregon. Also the roofing granules are almost twice as big of particles as the chick grit. Chicken grit and roofing granules are close to the same size. The little bags are only $8 each so it's cheap enough to give it a test. Another side bar, in all of the chick grit I've bought there has been very little dust, unlike kitty litter. Just my 2 cents worth. ![]() Russ
Russ
If things go well, I'm only 3 years from being able to ballast track. How am I going to remember this is a hot-button item? Memo to me: Stay off the Ballast, you may not see the train coming.
I ordered and received a ballast sample for Scenic express and have settled on their #20 Lightweight Dark Gray. They will be at the next train show I'm going to in three weeks so I'll pick it up then. Thanks for all the suggestion and sorry there's no kitty litter in store for me other than in the cat box![]()
Question on gluing. What's the ratio to white glue, water and that drop or two of dish liquid soap?
I've never actually measured the glue and water. I just eyeball it. Something like milk. I've used a spray bottle, but I really like a turkey baster for an applicator. You just have to be a little gentle so you don't have any washouts.
Just be sure to have a drop cloth under where you're working. That stuff will find the smallest holes, and start raining down.
Gary
What has worked well for me over time and ballasting track on 4 layouts has been application of the time tested 50/50 white glue/wet water.[ For me "wet water" is 3-4 drops of Palmolive dish detergent in a gallon jug of tap water]. I have tried matte medium instead of wet water with no better results.
After I have laid and dressed the ballast, I saturate it by dribbling on wet water and follow up by dribbling on the 50/50 mix. I use $1 mustard and ketchup plastic squeeze bottles from Dollar Stores to dribble the liquid. Spraying is not as effective for me. Drop cloth below is essential--caulk your wire holes helps..Careful around the switches---keep glue away from the moving rails and ties at the switch points.
Photo below shows my ballasting machine:
Attachments
I too would go with Brennen's ballast, it is the best on the market!!!
Dewey...I like your spreader. Did you make it or is it a commercially available product?
Alan
Alan
I bought the spreader during the late 1980s at a small train show in Winston-Salem but unfortunately do not recall from whom. Perhaps someone else will have one and recall the source.
I can make a pattern and send it if interested.
Thanks for the offer Dewey! Perhaps you can scan it with measurements if that would be easier...?? It looks like it would work quite well and be easy to use. Let me know what you need me to do....
Thanks,
Alan
Will try it later today after MD appointment and a few "honey dos"![]() .
.
I agree, Brennan's ballast is nice, but I found the price per 5lb bag with shipping to be quite prohibitive. So one of the members of my club, suggested I do what he did on his layout.
He recommended a local roofing supply shop. they all have a wide selection of chrushed granite in many colors.
So to achieve the look I wanted I bought a 50lb bag of dark grey, a 25 lb bag of light grey, a 10lb bag of black and 10lbs of white. They also had varying sizes, similar to Woodland scenic sizes of fine, medium and coarse. I went with course.
Long story short I mixed up a batch by simply adding more and less of one or the other until I achieved the look I wanted. The 50lb bag was $21, the 25 lb bag was $14 and the 10lb bags were $8 each. So total, $51 and I had plenty to ballast my layout which fills a 12x14 space with 3 main lines and a yard and I have lots left over. Was a much more affordable option and a great deal more rewarding.
Hello everyone.I'd like to thank everyone for your input. I'm not quite ready to put down any ballast yet but I know that I'm not going to put down any kitty litter due to the fact that I have two cats, and I don't want any problems with them.I like that what Russ said about the Chick Grit.But I will also look into the Brennan's better ballast,Brennan's Yard ballast, And the Woodlands scenics cinders.Well I still have to get the bench work done and then lay some track untill then have a great day every one. I also forgot to say I'll Look into the roofing supplys I have a local company in the next town. Scot
Alan
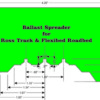
I cannot access your listed E-mail. Hopefully the photo below is legible. If not I can try something else. Hope you have a magnifying glass. I am not computer literate and don't gee haw too well with it. Dimensions listed from top to bottom:
3-15/32"W, 2-23/32"L, 3/16"w.x 1/4"d.rail Slots,1"o.c. from left edge, 1-23/32"o.c.,2-15/32"o.c. 2-3/8",2-31/32"
Thanks again. Opened jpg in Paint.
Resized and printed on paper .
then cut out of 1/16" polycarb.
Attachments
Scenic Express
I'd like to see some replies from ONLY the folks that have USED cat litter for ballast.What brands are good to use?
Thanks
Rich
LIONEL6457
I told my wife I wouldn't mind if she got a cat. But she can't get it till after my funeral.
I acknowledge what Dewey and others said about wet wate,r but I went with a spray of alcohol as described in a video tyutorial and it worked well. I was concerned about the detergent interferring with the glue - apparently that's not a valid concern but the alcohol spray worked well for me.
I also just went with Woodland Scenics ballast, I got a bit of a discount at the LHS for the volume I bought and did not entire trust any "non-railroad item" because there might be other unintended consequences/factors, like the water absobancy of kitty litter but perhaps different in some way if stillundesireable, associated with chick grit, roofing particles, etc.
What DID surprise me a lot was how much better white glue works on ballast compared to yellow glue. I had lots of the latter and initialy tried to use it in a 50/50, etc. But it quickly proved not nearly up to the task and I had to get more white.
In looking at the work done with Kitty, roofing and chick materials as opposed to Woodland's or Brennen's granite scale ballast, there is not a big difference in presentations.
I had issues with the Kitty stuff and never tried the roofing and chick stuff. After all the ballasting is another of many visual features of a layout. We tend to focus on the latest additions to the layouts and ballasting is usually a background feature.
I did about 75% of my layout with kitty litter ballast. I originaly had some commercial product leftover from a previous layout and I used that. When I ran out, we still had a cat, so I had access to the bags of litter.
I was quite happy with the results and the price was very right. I would buy a 25 lb bag of Krogers cheapest basic kitty litter and screen it with a window screen size screener. I got about 8 pounds of ballast out a bag and the cat got the rest and it cost about $3.00 at the time plus about 1/2 hour of my time. In O, you use a lot of ballast so I liked the deal. The cat was OK with it too.
Kitty litter is just clay. Nothing fancy about that. Some brands have chunks of deodorizer and stuff in them. I avoided that. the cheap stuff was just clay.
The disadvantage is that when it gets wet, it gets mushy and sticky. I would brush and form it into place and then wet it down with "wet water" and then apply diluted white glue. but I would not touch it again until after it dried.
I have used the cinders thrown down on the roads here in northeast PA for ballast. They collect around storm drains. Filled a 5 gallon bucket, sifted twice, and got 3 sizes of material. Talus, ballast, and fine stuff that looks like scale stones for roads. FREE. It is a little dark however, so I plan on using it only in my yard on my new layout.
Just my 2 cents,
Ben
Dewey.....finally got around to coming back on here and formally thanking you for the ballast spreader info!!!
Alan
That ballast spreader is a great idea. I've redrawn it for use with Ross Track and Flexibed roadbed from Hobby Innovations. It's fully dimensioned and is 1:1 scale. I tested it with a mockup and it works.
I've not yet decided which ballast to use, but with over 300' of track, cost is a consideration. The chick Grit is something I've not heard of, but looks like a possibility. Kitty litter is often attapulgite clay and is friable, so I'm leaning away from that. I've budgeted for Brennen's ballast, but if I can substitute something less expensive I'm not adverse to that. I'm doing consulting right now for a commercial roofing company so getting some roof gravel might not be too difficult. It would be nice to set up a little trial with each type before deciding.
I've also attached the file as a pdf if you want to download it.
Attachments
Brennan's Better Ballast.
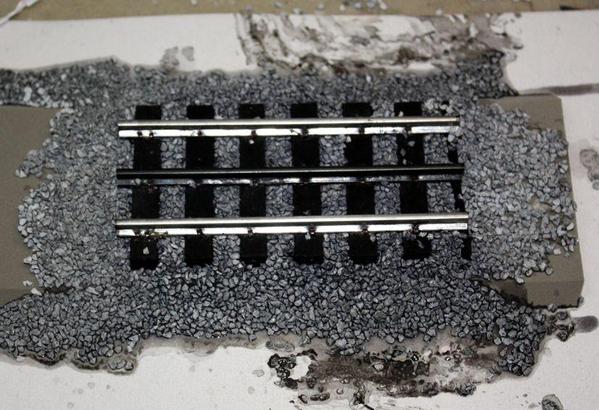
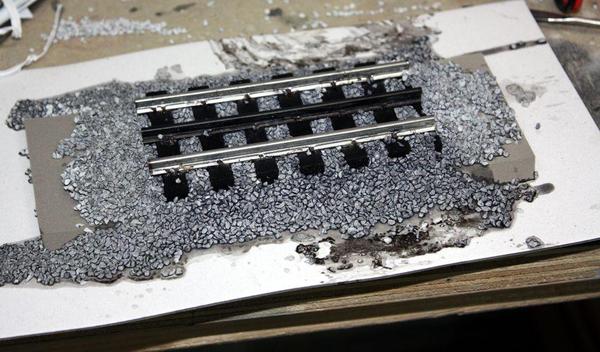
I chose the roofing granules and here is a sample what it looks like. I did use wet water with a mix of glue and water with a couple of drops of soap mixed in (this mixture comes in handy when doing all sorts of scenery). Without the soap as a surfactant, the surface tension of the water is not broken and the glue does not penetrate throughout whatever material you are using as ballast. Lee's alcohol will form the same function. The only thing negative ever said about the roofing granules is that some of the material can be attracted by a magnet. I have never had a problem and that is either because the wet water mixture as solidified the ballast enough or my engines, even with magnetraction, do not attract the particles.
Rick
Attachments
that stuff looks pretty good. I may be able to get it for little or zero cost. I'm going to pick up some real CSX ballast and actually measure it and then compare it to the various things we O'gaugers use for it. I tend to find most O'gauge ballast stones to large. To me, the roofing gravel looks about the right size. Having grey, black and white stones to chose from, I could mix my own with the lighter materials on the mainline and the darker stuff for the yards and sidings.
I got a pail of roofing granules today from a local wholesaler. It's very inexpensive compared to products identified as "model railroad ballast", by a factor of six. 45 pounds cost me $23.00. That price is probably lower than retail since I was given the discount of the roofing company where I'm consulting.
The particle size is just about right for the ballast on the Norfolk-Southern mainline here in Louisville. The real rocks seem nominally about 3". I know this since I stopped at the tracks and picked up some of it and measured it. That would make O'gauge stuff about a 1/16" or 2mm. This granule is just about that size.
I ran a test today using an Isopropyl Alcohol/India Ink mixture as the wetting agent and then used diluted Matte Medium as the binder. The native rock is pretty light so I darkened it. But I'm thinking that I will maybe just stain a batch and then remix it with the original. In fact, I may use some other colors as well since the N-S rocks are also yellowy, brownish, etc.
Here's the test piece. This Flexibed is glued to cardboard which doesn't like all this wet stuff on top of it, but it gives you the idea. Once it all cures, I'm going to also use this piece as my painting experimental device. I've never painted track and have several hundred feet of it so the method I choose has to be repeatable, easy(ish), and look good. I'm leaning towards airbrushing since the over-spray on the rocks will look very realistic since the rail rust washes onto the ballast, as does all the lubes and dirt from engines and rolling stock. Since I'm modeling the early 50s, things leaked more then.
I used my homemade ballast shaper to form the pile, then brushed it off the ties. The contour seems about right and buries the ties about the right depth.
For yard tracks I'll increase the amount of dye to make the ballast grimier than the mainline. Roofing granules are available in lots of colors, but at this supplier the light gray was the only one they stock.
Ballast and painting will make that Ross track look great!
Attachments
Trainman2001...here are some pictures of roofing granule ballast that I am currently installing....
Alan
Attachments
That looks very good to me. Did you adhere the ballast?
Trainman....I have not glued it down and am considering only putting a small amount of glue along the outside edges. The reason for this is my past experience of the ease of making any changes. I know that it is universal to glue it down for fear of it getting into the gears of the locomotives but I had a layout with loose ballast and ran trains on it that way for 10 years without a hitch. Sure went a lot faster putting it down and if any strayed away from the track, a soft 1 inch paint brush put it right back in place. By the way, in the pictures above, I used a funnel and just poured the ballast along the ties either side of the center rail...
Alan
Scenic Express has high quality ballast in 5 gallon buckets
I got a big gallon of this at a train show for 13.00 I believe. light gray. The company is about 10 min from my house also in Delmont, PA. I like their stuff alot
I can see where not gluing makes sense. In my case, the 25 foot elevated section in the back probably doesn't need gluing since it's a) straight and b) has no switches, and c) is out of reach and won't be touched. On the other hand all the stuff in the front should be glued and glued down good. Also since I'm thinking of possibly airbrushing the rail color, loose ballast would be a disaster. On that back section I can paint before ballasting solving the loose ballast blowing around problem.
Scenic express wants $68 for 25 pounds, whereas Roof Granules came out at 45 pounds for $23. ($2.70/pound vs. $0.51/pound). Meanwhile I completely wrecked my back getting that 45 pound pail and down into the basement. Nothing major, just very tired muscles that will need some time to feel better. I'm not moving it again!
Trainman....you may want to consider painting the rail color on before ballasting regardless of whether you glue it down or not....just a suggestion![]()
Alan
It's a valid suggestion. I'm going to try to do it after ballasting on that test piece to see how the paint works with the ballast. Often ballast under the rail takes on a similar rust/dirt color of the rail unless it was recently cleaned. If it's too much, I'll paint first. But no painting's going to be at all until all the wiring is done and checked out.
Hi ALAN,
The roofing granules look great. Where did you purchase them and for how much. I have used crushed English walnuts, get at pet stores used for bird litter, for dirt (light brown), in between my fasttrack but now I want to cover the plastic on the fasttrack. Thanks for your time and keep up the good work.
Hi laz....
I purchased the 50lb bucket of roofing granules from a local roofing contractor. Usually you can find them in bulk from commercial roofers. Also, I believe they are available at large home improvement stores. My buckets cost about $25.00 tax included.
Alan
Hi, All;
One thing I haven't seen mentioned, regardless of material used, is how many pounds. Just looking for a rule of thumb. As an example, I have a 4 x 6' layout with two main lines and 3 sidings. I'm sure I need more than 5 lbs, but 50? 15? I realize the weight will vary with the material used, but if we're talking granite or chick grit, what's the ballpark? Thanks!
I have about 350 feet of track and used about 125 pounds of ballast. That's about 1/3 pound per foot. (5 ounces or so). Hope that helps.


