Jim, the panels are extremely handsome!!
Jim, Great looking work, you and your dad are 2 of a kind! You both do such great work I bet its nice to work with eachother!
Chugman posted:
Hi Art, How did you decide on the overall dimensions of the layout? Did you just go ahead and occupy every square foot available?
That's what I did for Moon Township's "acreage," allowing only an aisle from the bottom of the cellar stairs to the garage entrance. Well, now, that's not entirely true - we do have a place provided for the furnace, etc. and the laundry "room", and a "lounge-sort-of space".![]() FrankM
FrankM
Thanks alot guys, I really appreciate the comments. I have been building layouts for about 30 years and professionally for about the last twelve years. It really started because of my father and his love of trains. The most memorable gift I received for Christmas was an N scale Southern Pacific Daylight passenger set, when I was about seven years old. That's where it started for me, and from there it was history. I owe it all to my Father and his passion for trains, whether it was real or model trains. We've spent alot of time together enjoying the hobby of trains. I have two sons that I hope still enjoy the trains, but only time will tell. They are young men and have other priorities in there lives right now. I still have a great time with my father working on his layout.
Jim
ibew701 posted:
Nice work Jim. Can I assume by your user name that you are a union electrician? Would explain the neat job that you did.
Bob
Art, it's great to see your progress accelerating. I don't mind the grid/plaster part of layout building once get into it. It's been the kind of project that I need to be in the mood because it does involve some mess and so much time goes into masking and clean up. Your work looks clean and precise.
Jim, those are nice panels. What a neat project. Well done.
Moonson posted:Chugman posted:Hi Art, How did you decide on the overall dimensions of the layout? Did you just go ahead and occupy every square foot available?
That's what I did for Moon Township's "acreage," allowing only an aisle from the bottom of the cellar stairs to the garage entrance. Well, now, that's not entirely true - we do have a place provided for the furnace, etc. and the laundry "room", and a "lounge-sort-of space".
FrankM
Frank, that's pretty close. When we were designing the house, my wife said "you can do whatever you want to with the basement." So, I decided where the best place would be for the furnace, water heater, sump pumps, and etc. and then allocated most of what was left for the layout. I did leave about a 20' by 12' area for a social area where we could visit, watch videos, and etc. And I planned for an additional stairway to the basement from the garage, which I couldn't live without. The next step was to compile a list of "want to haves" for the layout. Examples were: minimum of 30" wide aisles, no duck unders, 2-track mainline, minimum 072 radius curves, passenger terminal, major freight yard, Intermodal yard, long enough yard leads to allow switching without fouling the mainline, and etc. Most benchwork was 30" deep to allow easy access except in turn around areas where access hatches were required. Then maximum train length was determined to facilitate length of passing sidings and length of yard tracks. Maximum grades were set at 2% to allow all trains to navigate anywhere and look as prototypical as possible.
Some things were decided to be non-negotiable items such as min 072 curves, aisle widths, and no duck unders. As always I would change a few things but overall I'm pretty happy with the way things turned out. Biggest regret is not planning enough industries for switching in operating sessions. As usually happens our interests evolve and I have acquired a keen interest in prototypical operating sessions.
Love your layout and fabulous scenery. It has the look and feel of the Pittsburgh area which we loved when we lived there. Your scenery is very inspiring and helps keep me going.
Art
Art blurted out..." And I planned for an additional stairway to the basement from the garage, which I couldn't live without. " before realizing he had just told us all how he sneaks in new purchases without SWMBO knowing. ![]()
You should be commended on your wonderful progress, Art. I could never work under such brutally tidy conditions. ![]()
Bruce
The dynamic duo is at it again! Great update. Those control panels are works of art.
Chugman posted:Moonson postedHi Art, How did you decide on the overall dimensions of the layout? Did you just go ahead and occupy every square foot available?
Frank, that's pretty close. When we were designing the house,...
Love your layout and fabulous scenery. It has the look and feel of the Pittsburgh area which we loved when we lived there. Your scenery is very inspiring and helps keep me going.
Art
Hi Art, Really very nice to hear from you, and Thank You, especially, for the positive regard. I had no idea you felt so strongly about my work, even though you have posted many laudatory comments and "likes" when I have posted photos of my layout work. Thanks again for saying such a nice thing and for doing so publicly.
I finished putting cardboard lattice behind my curved stone arch bridge this afternoon. I was going to keep going and start on another section, but one of my friends is having an operating session tonight. I need to cut more cardboard strips in order to continue anyway. I hope to try adding some plaster to this tomorrow and see how that goes.
Art
Attachments
Chugman posted:I finished putting cardboard lattice behind my curved stone arch bridge this afternoon. I was going to keep going and start on another section, but one of my friends is having an operating session tonight. I need to cut more cardboard strips in order to continue anyway. I hope to try adding some plaster to this tomorrow and see how that goes.
Art
Why do I suddenly have a craving for apple pie ![]()
Looks good Art!
Art, looks like it will work wonderful, what kind of face are you going to be putting on it?
mike g. posted:Art, looks like it will work wonderful, what kind of face are you going to be putting on it?
Thanks, Mike. I want to put some rock castings in and a few trees and then just grass or vegetation over everything. I don't want a Western mountains look, but rather a hilly, Midwestern bluffs along the river look if possible.
Art
keep up the good work Art it looks great. Jim the panel's look fantastic!
Art:
As usual, it all looks great.
When you're all done with the layout, would you consider posting the little fairy who flies around and keeps your train room absolutely dust- and debris-free on the For Sale forum? I sure could use whatever it is you're using... ![]()
Steven J. Serenska
Great work so far!
Hi Art
Looks good on the lattice. If you put 2 layers of mesh drywall tape over it the plaster will stick . The tape comes about 8 inches wide and self adhesive. Might need two costs but dries fast. Then you can put any kind of scenery on it. Just my 2 cents.
Rsy
Great layout! For the lattice I would use plaster cloth by scenic express or other. It's the same as what is used for medical use for casts etc. Easy -- wet and set
Art,
Yours is a layout I have to see. Of course, I will bring my photo equipment and do it right !! Amazing is a word I would use for the layout you and your son are building. I would offer one piece of advice. If you ever wake up in the middle of the night and decide to tear it down and build another, lay back down until the feeling passes.
Scrappy
Scrapiron Scher posted:Art,
Yours is a layout I have to see. Of course, I will bring my photo equipment and do it right !! Amazing is a word I would use for the layout you and your son are building. I would offer one piece of advice. If you ever wake up in the middle of the night and decide to tear it down and build another, lay back down until the feeling passes.
Scrappy
Elliot, thanks for your kind words. If you are ever in my area, you are welcome to visit.
Art
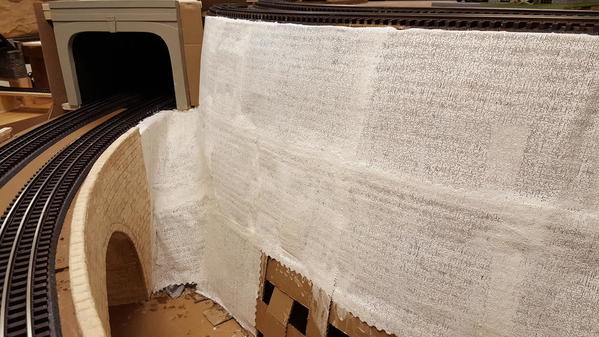
Finally started applying some plaster. I haven't done this since I was a young man at home and things have changed a little since then. We didn't have plaster cloths then. Maybe doctors did for casts on broken bones, but I was unaware of them. I am going to let this dry before I proceed, but it looks O.K. so far.
Attachments
This is getting exciting Art. Just the plaster cloth makes a huge difference.![]()
Unfortunately, I had that plaster put on me way back when I was very young. I had it on so long that my skin turned to mush. I believe back then, they didn't understand fully what was going on. They used a saw to cut it off that left a burn mark down threw my skin. They said "HUH, that shouldn't have happened?"
So I normally don't like to see that stuff. However for progress on your layout, I can look past what you're using!
Well Art, the start of the plaster is looking just fine! You can tell your skills are at the top of there game, but that's with everything you do it seams like. Even thought you haven't done this since you were a young man, you can tell your still young at heart!![]()
Art you really are a neat and tiddy plaster man. I really got my hands involved smoothing out the plaster cloth or paper towels. I can't see splash or smudge even on the newspaper masking. Looking great.
Engineer-Joe posted:Unfortunately, I had that plaster put on me way back when I was very young. I had it on so long that my skin turned to mush. I believe back then, they didn't understand fully what was going on. They used a saw to cut it off that left a burn mark down threw my skin. They said "HUH, that shouldn't have happened?"
So I normally don't like to see that stuff. However for progress on your layout, I can look past what you're using!
Yikes, Joe!! I can see why you have an aversion!
Art, Looks great! Very exciting to getting to this part! Scenery is my favorite part of building a layout.
ART ITS LOOKIN GREAT, YOUR CONTROL PANELS ARE WORKS OF ART!![]()
Art,
All of the updates are really exciting. The panels look great and your work is excellent.
Maybe sometime you could be a tour stop for the March Meet folks. I would love to see your layout in person. The pictures are great and enjoy following the progress.
You certainly have the layout and skills I hope to aspire to. I learn so much from your posts and the comments.
Looking forward to the next update.
Thank you!
Tom
Very nice job, Art. Look forward to when you have those Spence Refeers on your layout.
That's looking very nice Art, I love the creative process....it all brings a layout to life. ![]()
At one time I checked OGR forums 3-4 times a day, currently I'm down to about once a week. Art since I found you started this thread I'm going to be here daily again. Personally watching members post layout progress is my favorite part of OGR.
I like the recent progress. Hopefully this warm weather will go away so you can stay focused! Jim your boards look superb.
I think I asked this before Art but can't remember, what were you planning on using for water?
Thanks, Zett. I am going to try EnviroTex Lite and see how it goes. Woodland Scenics new water material looks interesting also.
Art
Excellent and neat work. That carved stone arch bridge is really a work of art.
When I did the hills on my layout, I started with wood struts, wire screen, then newspaper and plaster of Paris. Right after the first one, I discovered foamboard for carving, then used plaster cloth over cardboard strips, finally finishing with Sculptamold and Hydocal for cover detail and rock formations. The materials that we have to work with these days is incredible. They save time and give great results. Can't wait to see the finished product.
A small progress report. My son, Jim, has two of my new control panels done, one tested and ready to install and the other ready for final testing. We are hoping that he can finish the third one and install them this next week. He is still off work after having an emergency gall bladder operation last Sunday, which put the brakes on everything for him.
I have been wrestling with my plaster job which has been going very slowly. Today I made some rock molds for the first time and they look like they turned pretty good. I am going to let them dry overnight before I place them on the layout. I added some crumpled-up newspapers and more plaster cloth where my bridge ends meet the new back plaster wall.
I have a couple dumb questions: What is the best way to attach the plaster castings? Elmer's White Glue, hot glue gun, or wait and put them in fresh plaster? Do I need to add another layer of plaster cloth before I add the final surface plaster? I have one layer there so far.
Art
Attachments
Art, I did this many years ago. Not sure if it was the best way. Dry plaster really absorbs water. I wet the back of the rock face as well as where they were to be attached. I then mixed up some plaster. I placed the rock mold where it was to be placed and then tilted it forward. I then spooned the mixed plaster behind the mold and just pressed it in place. Some plaster will ooze out. I would use that to blend the rock mold into the surrounding terrain using a cheap wet paint brush. Keep a spray mister handy to keep everything damp. The already dried plaster really soaks up the water from the freshly poured plaster.
Thick silicon adhesive may hold them in place. Still you will need to mix something like Scultamold to blend them into the terrain.
I used brown grocery bags cut up and dipped in plaster for my base coat. I did apply a skim coat about a 1/8 to 1/4" thick over it. I used throwaway foam brushes to smooth it out.
mike g. posted:Art, looks like it will work wonderful, what kind of face are you going to be putting on it?
Happy!
Art, to attach the rock molds get some Hydrocal (either regular which is best bought in 50 lb. bags from a drywall supplier or by the box from Woodlands Scenics) and mix up a small batch and use it as a bridge between your plaster rolls and the rock mold. Smear the Hydrocal on with a cheap two inch paint brush (synthetic bristle). Cover the track and floor and anything else because it can get messy. But, it's way fun to do and once you get the hang of it you will love doing it.
Art,
I've always used good old, plain old, joint compound. It's not expensive, goes a long way, makes no mess, soft but firm, allows for easy fill ins between gaps, doesn't require any water, sets those hydrocal/sculptamold rocks in perfectly, allows for easy adjustments/moves, sets up solid, paints easily. I've been using the same bucket since the 80's, on three different layouts, in two houses.
Just my opinion...
Jerry
I just started looking at this thread a few days ago. I must say, I am extremely impressed. The control panels are top notch, the arched viaduct, the buildings, the bridges, the yards…well they’re just amazing.
There are many options to stiffen the plaster cloth structure and to adhere rock castings to the structure. You could add a second layer of plaster cloth if you want to make a more rigid structure. You could also stiffen it up using a thin coat of plaster or dry wall compound. At various times, I have used Mold-A-Scene, Structolite and Sculptamold over rigid foam, crumpled newspaper, and plaster cloth to add shape and stiffness. I have used hydrocal and dry wall compound as a between the rocks patch and they would probably work well for holding rocks in place. For me, the hydrocal sets up too fast. You don’t get much done before the batch sets up and you have to mix another batch. I have also pushed rock castings into wet structolite which seemed to work well. I've also tested Mold-A-Scene and Sculptamold for adhesion by putting them on a piece of plywood. They both held tight to the plywood when dry so you could also use them (push the casting into them when they are still wet) to hold the rocks in place. Mold-A-Scene, Structolite, Sculptamold and dry wall compound will take a day or more to fully harden. On my last terrain project, I used both hot melt glue and construction adhesive (Loctite power grab) to secure rock castings to rigid foam. That also worked well...you just need to have a dust free surface. The hot melt glue gives immediate adhesion and the Loctite gives a strong bond.


