After doing some extensive reading on this forum, I think I'm ready to order components. Before I do so, I would appreciate some advice from the pros. Attached is a schematic and component list. Before I order anything, I'm hoping someone will tell me if I'm on the right path. In summary, I want to light a BTS cabin with 3 LEDs. Two of the LEDs will be internal and one external. Hopefully, I can expand on the circuit in to other structures. Thank you for your time!
Replies sorted oldest to newest
That looks fine if the supply to the LED lighting is 12VDC. It's not clear from your diagram that's what you have.
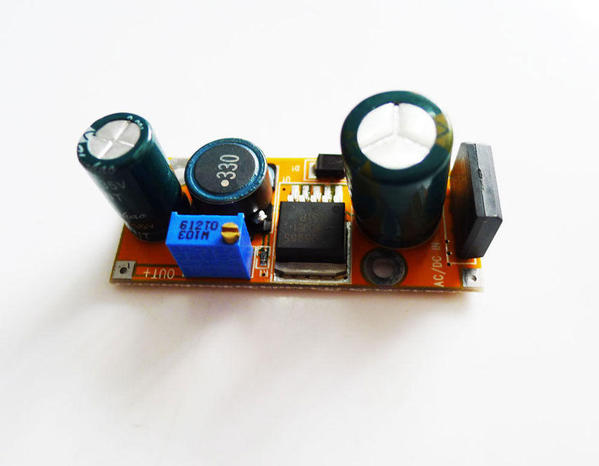
Note that you need a power supply with AC input if you're feeding it directly from a transformer. This AC/DC to DC Buck Converter is an example of the power supply you'll need feeding it with AC.
The LM2596 is an adjustable regulated supply that requires DC on its input. You need to add a full-wave bridge rectifier (make one yourself of $0.40) between the transformer and the regulated supply.
I am no expert, but everything I learned was from right here on the forum. I used the ones GRJ linked to..
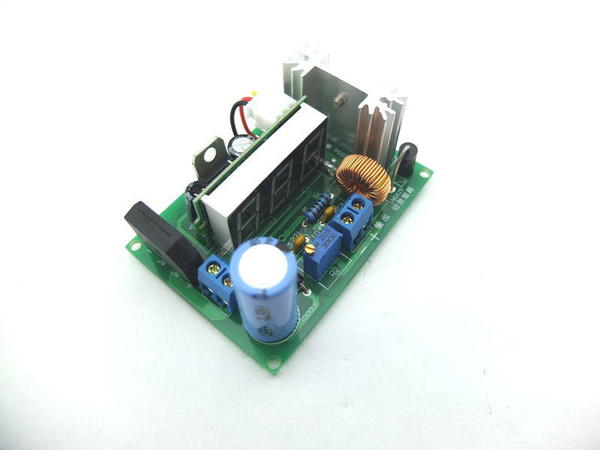
In the future, I will spend a few extra bucks to get the ones with a built in voltage meter. It is difficult to hold your volt/amp meter probes on the output leads while adjusting the pot with a small screw driver. Of course this could be done at the work bench before hand, but now that I have some with a meter.... I like those much better. You can always see what the output is without having to go get your meter and check it.
That's just my opinion of course, but spend a couple more bucks and get the ones with a meter.
Attachments
I used a few of these for another application. They have a higher output rating and the built in meter. You can find many different variations on Ebay. I love these things.
Attachments
That looks fine if the supply to the LED lighting is 12VDC. It's not clear from your diagram that's what you have.
Note that you need a power supply with AC input if you're feeding it directly from a transformer. This AC/DC to DC Buck Converter is an example of the power supply you'll need feeding it with AC.
Dear gunrunnerjohn,
I intend on using my MTH Z-4000 14 volt terminals. I thought the buck converter listed on my drawing would do that. Should I replace it with the you listed or add it to the circuit?
Also, I like what laidoffsick suggested about the digital readout on buck converter. Where would that go or replace?
I will not be offended it my approach is all wrong. This is new ground for me, but want to learn.
Thank you!
... I'm hoping someone will tell me if I'm on the right path...
Uhh, this is a train forum. The idea is to be on the right track. ![]()
Your parts list says AC/DC for the LM2596 so I think you did your homework for selecting a module that takes accessory AC voltage. So it seems you are configuring your light circuits for 12V DC operation. As you've been reading the LED threads here, you probably picked up on the 12V LED strips which have 3 white LEDs plus a 150 ohm resistor. I'm not familiar with your particular structure, but here are a couple ideas regarding choice of LEDs. Since you will be doing close-quarters soldering, one idea is use the LEDs from a 12 LED strip. For the same power they will project a wider, brighter beam for illuminating interior rooms. But they are also much shorter and hence easier to mount to surfaces. If you are handy with a soldering iron it is fairly easy to remove each surface-mounted LED then attach fine wires. Or, as illustrated below, I "copied" the internal wiring of each strip section using added wires, then snipped apart the strip to create 3 individual "short" LEDs. The 150 ohm resistor built-in to the strip was also kept so this is really your 12V LED circuit.
It's hard to describe the flexibility in mounting you get from a shorter, flatter LED until you see it yourself but it's something to consider. Note that with the 3mm LEDs you would probably be clipping the leads as short as possible then running thin wires - this adds to the height whereas on the surface-mounted LEDs you can run wires sideways not adding to the height. Here's a recycled photo from above project adding marker/dome lights to a passenger car - note that I didn't use the adhesive backing from the strip since these LEDs weren't mounted to the ceiling.
Also, if doing structural lighting for modeling, sometimes it's hard to find an LED small enough for 1/48 scale. For example a standard 2" diameter lightbulb (50.8mm) to scale would be only 1mm. Or stated differently a 3mm LED would scale up to a 6" bulb which is one ginormous bulb! I don't know what you're modeling for your exterior lamps, but you can use a regular 3mm LED (not flat-top) that shoots a narrow beam and use some black heat-shrink to make a collar to hold narrow flexible acrylic fiber rod. This will project one or more beams to the point of use and generally makes for a better scale representation. This recycled photo illustrates the concept. Of course you can mix/match the LEDs so in your 3-LED 12V circuit you can have 1 flat-top, 1 regular 3mm, 1 surface-mount, plus the 150 ohm resistor.
Attachments
I am no expert, but everything I learned was from right here on the forum. I used the ones GRJ linked to..
In the future, I will spend a few extra bucks to get the ones with a built in voltage meter. It is difficult to hold your volt/amp meter probes on the output leads while adjusting the pot with a small screw driver. Of course this could be done at the work bench before hand, but now that I have some with a meter.... I like those much better. You can always see what the output is without having to go get your meter and check it.
That's just my opinion of course, but spend a couple more bucks and get the ones with a meter.
Dear laidoffsick,
I have been following your roundhouse build. That's what got me started on LEDs. The outside light on the BTS cabin will be using one of your suggestions. The plasticstruct lamp shade! I appreciate you sharing!
Thank you!
... I'm hoping someone will tell me if I'm on the right path...
Uhh, this is a train forum. The idea is to be on the right track. ![]()
Your parts list says AC/DC for the LM2596 so I think you did your homework for selecting a module that takes accessory AC voltage. So it seems you are configuring your light circuits for 12V DC operation. As you've been reading the LED threads here, you probably picked up on the 12V LED strips which have 3 white LEDs plus a 150 ohm resistor. I'm not familiar with your particular structure, but here are a couple ideas regarding choice of LEDs. Since you will be doing close-quarters soldering, one idea is use the LEDs from a 12 LED strip. For the same power they will project a wider, brighter beam for illuminating interior rooms. But they are also much shorter and hence easier to mount to surfaces. If you are handy with a soldering iron it is fairly easy to remove each surface-mounted LED then attach fine wires. Or, as illustrated below, I "copied" the internal wiring of each strip section using added wires, then snipped apart the strip to create 3 individual "short" LEDs. The 150 ohm resistor built-in to the strip was also kept so this is really your 12V LED circuit.
It's hard to describe the flexibility in mounting you get from a shorter, flatter LED until you see it yourself but it's something to consider. Note that with the 3mm LEDs you would probably be clipping the leads as short as possible then running thin wires - this adds to the height whereas on the surface-mounted LEDs you can run wires sideways not adding to the height. Here's a recycled photo from above project adding marker/dome lights to a passenger car - note that I didn't use the adhesive backing from the strip since these LEDs weren't mounted to the ceiling.
Also, if doing structural lighting for modeling, sometimes it's hard to find an LED small enough for 1/48 scale. For example a standard 2" diameter lightbulb (50.8mm) to scale would be only 1mm. Or stated differently a 3mm LED would scale up to a 6" bulb which is one ginormous bulb! I don't know what you're modeling for your exterior lamps, but you can use a regular 3mm LED (not flat-top) that shoots a narrow beam and use some black heat-shrink to make a collar to hold narrow flexible acrylic fiber rod. This will project one or more beams to the point of use and generally makes for a better scale representation. This recycled photo illustrates the concept. Of course you can mix/match the LEDs so in your 3-LED 12V circuit you can have 1 flat-top, 1 regular 3mm, 1 surface-mount, plus the 150 ohm resistor.
Dear Stan2004,
I have considered the flat mount LEDs for two inside the BTS cabin. The outside LED will mounted in a placticstruct lamp shade. An idea I got from laidoffsick. Thank you for responding!
The LM2596 is an adjustable regulated supply that requires DC on its input. You need to add a full-wave bridge rectifier (make one yourself of $0.40) between the transformer and the regulated supply.
Dear Arthur,
I'm not very savvy with electronics. What is a full-wave bridge rectifier? thanks for your input!
It shows on the link AC?DC input
Ken M
The link shows a module that accepts either AC or DC at its input. And then puts out a regulated DC voltage to the LEDs which is adjustable (via small screwdriver). It has an integrated (on-board) bridge rectifier as labeled below; the bridge rectifier accepts either AC or DC and converts it to DC to be regulated by the module.
For a few dollars less per module, you can get a LM2596 that only accepts DC at its input. So for AC input operation you need to add your own bridge rectifier as shown below. Bridge rectifiers run maybe $1-2 and the net price (bridge plus DC-only module) is probably cheaper than the AC/DC module with integrated bridge.
And here's what Arthur is referring to. You can assemble your own bridge-rectifier using 4 diodes. In general 4 diodes will be cheaper than a bridge-rectifier but again requires more assembly/soldering effort. Those 4 black things on the left are the diodes.
Attachments
Your parts list says AC/DC for the LM2596 so I think you did your homework for selecting a module that takes accessory AC voltage.
Stan, given the other questions, I felt it was important to make sure of this "fact". ![]()
Your parts list says AC/DC for the LM2596 so I think you did your homework for selecting a module that takes accessory AC voltage.
Stan, given the other questions, I felt it was important to make sure of this "fact". ![]()
Agreed. The inputs into the module on the original diagram are labeled "+" and "-" from transformer so always best to get them ducks in order...![]()
The +/- was specifically why I asked, that got my attention. ![]()
In the future, I will spend a few extra bucks to get the ones with a built in voltage meter. It is difficult to hold your volt/amp meter probes on the output leads while adjusting the pot with a small screw driver. Of course this could be done at the work bench before hand, but now that I have some with a meter.... I like those much better. You can always see what the output is without having to go get your meter and check it.
That's just my opinion of course, but spend a couple more bucks and get the ones with a meter.
Voltage to LEDs is not that critical. Usually its the current into the LEDs that needs to be watched. Most LEDs nominally are about 20-25mA rating (white and blues are higher usually). So you adjust the voltage until you get this current value (or lower for dimmer lighting). You can put your meter (set for voltage mode) across the resistor and measure the voltage drop ( E=desired I/ installed R) or put meter (set for current mode) leads in series with one feed wire and measure current. Either way works.
LEDs are pretty forgiving up to a point. More current=shorter life.
Don't lose sleep over current and/or voltage values. Most times the eye cannot perceive light changes with small voltage or current changes.
Sam, there is obviously a direct correlation between the voltage and the current for an LED. ![]() If you don't have current limiting, a very small voltage change can result in a very large change in the current through an LED. This is why my LED circuits usually use current limiting as a means of intensity control.
If you don't have current limiting, a very small voltage change can result in a very large change in the current through an LED. This is why my LED circuits usually use current limiting as a means of intensity control.
John, absolutely correct. However the OP is showing a current limit resistor in his circuit, so that is why I made my comments. I was just trying to make the point that the OP didn't have to be overly concerned if current was +/- 1-2 mA or voltage wasn't exactly 12V.
I used a few of these for another application. They have a higher output rating and the built in meter. You can find many different variations on Ebay. I love these things.
I like the addition of the readout. Do you have a link to this item on eBay? Also, will it work on the 14 V output from my MTH Z4000 transformer? Thank you!
They definitely cost more, but I need more than the 1amp standard output rating for my high output yard lights. These are rated at 3 amps, but I didn't push them to the limit. I like them a lot more than the cheaper versions w/o the meter. They will work just fine connected to your Z4000
They definitely cost more, but I need more than the 1amp standard output rating for my high output yard lights. These are rated at 3 amps, but I didn't push them to the limit. I like them a lot more than the cheaper versions w/o the meter. They will work just fine connected to your Z4000
Just ordered 2 of these converters. After I finish building and lighting the BTS cabin, my next project is to add two MTH yard light towers. I will convert them to LED too. Thanks for the help!
And from the peanut-gallery, if you're a cheap-skate (like me!) and don't mind some extra soldering, I see you can get a DC-input LM2596 with meter for the absolutely insane price of $2.94 (free shipping):
http://www.ebay.com/itm/1P-DC-...;hash=item2a46a3c3dc
It has 15 Watts output capability (enough to drive a couple hundred LEDs)...you need to be careful about blindly using "Amps" output specification from these modules. And the dog-gone thing has screw-terminals to boot!
The "first generation" of these modules didn't have the screw-terminals so I'd add my own. Plus they were more expensive to boot; photo stolen from previous thread:
So the cheap-skate concept for AC operation (from transformer accessory output) is to use one suitably sized bridge-rectifier to feed two (or more) cheaper DC-input modules. For example, in yet another stolen photo from a previous thread the idea was to use a switch that selects from 2 different LM2596 voltages to light up the layout...one voltage for "daytime" and one for "night-time". When modules are only about $1, it simply upsets the apple cart of logic!
I fully realize ARC has reached a solution and he's good to go. This is simply in the spirit of a community discussion about using these insanely priced modules for LED train lighting!
Attachments
I really appreciate everyone's input. Hopefully I will be able to post my cabin fully lit very soon!
I agree about the current specifications of these modules. I've actually tried pushing them on the bench to close to their ratings, they don't do well anywhere close to the maximum power specification. Most will get hotter than a pistol at 1/2-2/3 of the max current ratings.
Grj
thanks for the link to those converters.
They look nice and compact, plus you can't build them that cheap!
Rod
You certainly can't even buy the parts for most of the little Chinese modules for the price of the finished product, that's for sure! If they ever start making Super-Chuffers, they'll probably be about $3! ![]()
![]()
Rather than use a DC to DC converter with an added rectifier, I googled around and found Chinese AC to DC units for about the same price. If you use DCS, be sure to add a choke on input side, to any converter.
Why not post a link for those modules?
The item is a LM2596 AC DC Buck converter step down module power supply. Priced at 5 for $15. Input voltage 2.5-27VAC or 3-40 VDC, 3 amp max. Output adjustable, 1.5-27VDC, 3 amp max. INput voltage must be at least 2 volts higher than desired output. Size 54mm x 24mm.
RJR;
Those sound exactly like the units grj originally linked to; except the unit price is $1.99 instead of 5 for $15.
Rod
Data I posted is from my 5/30/14 printout. Also includes shipping. Aliexpress is a subsidiary of Alibaba, which to me gives a tad more protection than e-bay.
Cheapest I find them there is the same as I posted earlier, $15.11 for five. Of course, posting the actual link is way more helpful than just a vague reference to the product and the source. ![]()
LM2596 module AC 2.5-27V DC12v(3-40V) to DC 5V(1.5-27V)step down Buck Converter
GRJ, I wouldn't call posting the model number "vague."
Just out of curiosity, does anyone know why these are referred to as "buck" converters?
Rod
Thanks to all, I am about to hook up 30 LED lights for yard buildings and this post really answers all my questions/concerns.
Just out of curiosity, does anyone know why these are referred to as "buck" converters?
Rod
They convert American bucks to Chinese Yuan....
Just out of curiosity, does anyone know why these are referred to as "buck" converters?
Rod
They "buck" the voltage, or reduce it. The buck/boost convertors are capable of outputting more voltage than they get in, that requires a different and slightly more complicated design.
Just out of curiosity, does anyone know why these are referred to as "buck" converters?
Rod
They "buck" the voltage, or reduce it. The buck/boost convertors are capable of outputting more voltage than they get in, that requires a different and slightly more complicated design.
That's as good an explanations as I have heard John. We'll go with that.
The little ATSF 4-4-2 Atlantic is running great BTW!
Rod
I'm a very creative explainer. ![]()
Just out of curiosity, does anyone know why these are referred to as "buck" converters?
Rod
They convert American bucks to Chinese Yuan....
This is a good explanation too!
Rod


