gunrunnerjohn posted:

I use some generic warm white LED's, email me your address and I'll put a few into an envelope and send them to you.  You will have to solder to them, and I use Liquid Tape to insulate the connections, then put it inside the headlight housing and glue it to the rear.  I typically use fine #28 or #30 wire to wire them.  To light them, the components required are dependent on what electronics you're driving them with.

I received your LEDs today. Thank You Very Much!


Good Morning All and Happy Thanksgiving.

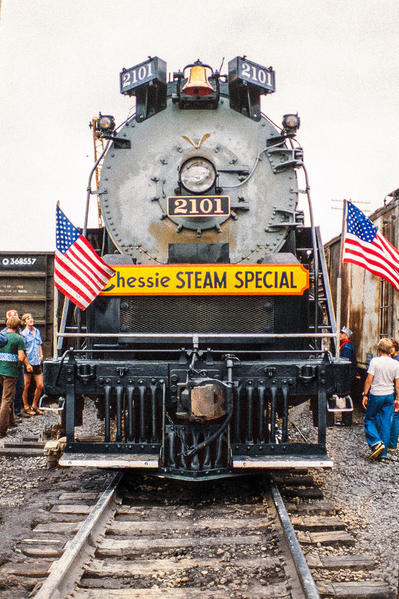
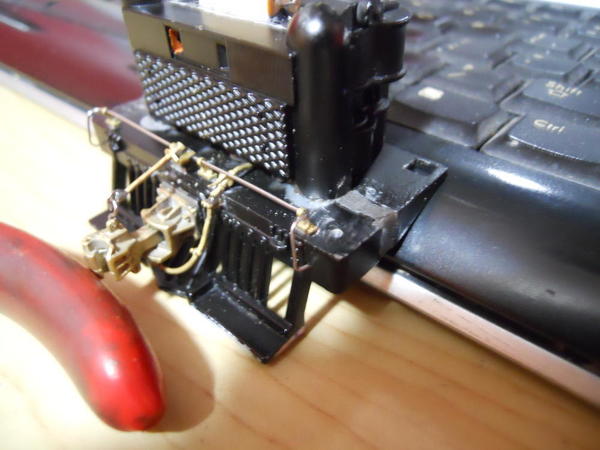
I spent half a day trying to get one of the iconic items (the Handrail/flag stantions) for the Chessie Steam Special completed. The problem I had was, It would be in the way of the cooler on the front of the Loco. So, I opted to move the "cow catcher" forward about 1/4". This allowed me access to the forward handrail that the stantions were welded too. I did this by removing the 4-40 screw underneath, adding a longer 4-40 screw, Then using 3 nuts (one on each side and one centered underneath) I was able to get the correct spacing I needed. I laid in some scotch weld under the cooler and screwed the assembly back together and I allowed that to set up.

DSCN0005

DSCN0006


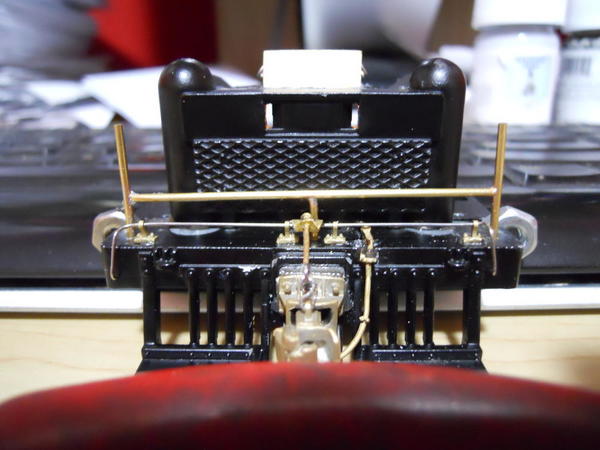
So, while that was setting up and curing, I proceeded to build the forward handrail and stantions out of 3/64" brass tubing. Once I got it this far, I needed to make small adjustments to get everything to line up with the handrail holes. I had to drill a third hole in the center for the center brace.
DSCN0007

When the scotch weld was setup enough I removed the 4-40 screw and nuts. I then put more scotch weld in the gap as a filler on each side  (one at a time, had to stand it on end). Once the scotch weld was setup enough (about 3/4 hardness) I was able to use a razor blade and cut the scotch weld flush, This saves hours of sanding. I used blue masking tape to hold the scotch weld in place until it setup. If it didn't tune out like I wanted...I just added more to it until I got a smooth finish.
DSCN0008

I got the handrail finished, and painted it silver (could be white, hard to tell) like the real loco. I plan on getting the front painted black this weekend. If all works out, I'll get the gray mixed up and hopefully get the boiler front and boiler painted as well. I'm going to be mixing Smoke Box Gray and Primer Gray in the Scalecoat ll. I opted for the Eire Lackawanna Gray, but didn't, in hindsight I should have went with it.

DSCN0009

If you wondering what the white thing is on top of the cooler...It's the tool box. I used part of a Home Depot paint stick, cut and sanded to size, then added 2 each  .020 wire handles. If this is in the way of the headlight, it will be disappearing and not returning.

So, This is where I am currently. There will be more to follow from this weekend.

I want to wish everyone a very Happy Thanksgiving. Please be safe in your travels today.

Chris

Attachments

Images (5)
  • DSCN0005
  • DSCN0006
  • DSCN0007
  • DSCN0008
  • DSCN0009
Last edited by Jayhawk500
86TA355SR posted:

Excellent work, love to see someone doing modeling in this day of instant gratification.  Can't wait to see more.

i have an FEF modification I need to take the time to do a thread on. Thanks for the reminder.

Thank You so much!  I just wanted to add, I too am looking for that instant gratification. But, I also know, good things come to those who wait.

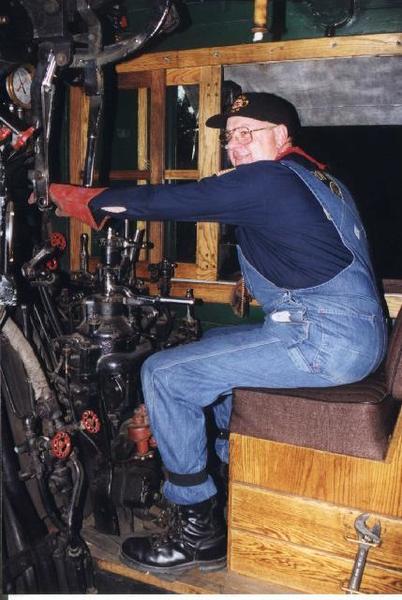
I was waiting on the wife and daughter to get out of bed to get Thanksgiving started. So I went ahead and painted my engineer to resemble Mr. Ross Rowland. I hope I depicted him in the proper way, Minus the glasses of course. His jeans could have been a shade lighter, but I couldn't find the correct shade. This was the closest.

DSCN0002

ross2

Attachments

Images (2)
  • DSCN0002
  • ross2
Last edited by Jayhawk500
Jayhawk500 posted:
86TA355SR posted:

Excellent work, love to see someone doing modeling in this day of instant gratification.  Can't wait to see more.

i have an FEF modification I need to take the time to do a thread on. Thanks for the reminder.

Thank You so much!

I was waiting on the wife and daughter to get out of bed to get Thanksgiving started. So I went ahead and painted my engineer to resemble Mr. Ross Rowland. I hope I depicted him in the proper way, Minus the glasses of course. His jeans could have been a shade lighter, but I couldn't find the correct shade. This was the closest.

DSCN0002

ross2

An excellent job on both the smokebox front and the engineer figure.  Ross would be proud.  I admire your patience and expertise.  It's far beyond what I could do in modeling work and detailing.  I enjoy seeing your progress with this engine.  Happy Thanksgiving to all. 

I'm going to be delayed in get a post up for this weekends work on the boiler front. The Matte black paint I had was uber thin and was un-usable.  The Scalecoat Black I had was glossy, Neither of which is what I wanted. I did get the Smoke Box Gray and Primer Gray from Scalecoat mixed as close to the correct proportions as possible. What worked for me was 10 drops of Smoke Box Gray and 7 drops of Primer Gray. But I multiplied everything by 10 to get the quantity I needed with some touch up paint for later. I did paint the boiler and the front so everything matched.

Below is the glossy black that is labeled "Black" on the bottle. I'm not overly pleased with the glossiness of the paint. What I am please with, is how this front end turned out. I still have some minor touches to add, but for the most part its complete.

DSCN0003DSCN0004

Stay tuned, Until next time.....

Attachments

Images (2)
  • DSCN0003
  • DSCN0004
Last edited by Jayhawk500

Need a question answered pleased.

On classification lights...I know that the lens facing forward is illuminated. Are the lenses to the side also illuminated? Or is there a shroud on the inside of the lamp that blocks the light from the sides?

I'm getting ready to put the lenses in my classification lamps and I need to know whether or not to paint the inside of the lens black to block the light from the side.

Thanks

Jayhawk500 posted:

Need a question answered pleased.

On classification lights...I know that the lens facing forward is illuminated. Are the lenses to the side also illuminated? Or is there a shroud on the inside of the lamp that blocks the light from the sides?

I'm getting ready to put the lenses in my classification lamps and I need to know whether or not to paint the inside of the lens black to block the light from the side.

Thanks

All the types of Pyle-National class lights that I have seen, were illuminated to both sides, i.e. in-board and out-board, in addition to the lens facing forward. The glass color slides inside the light assembly are placed in front of the bulb so that all the viewable lenses show the same color ( green, or red). Simply moving the lever on the rear of the class light changes the color from white (no color slide in place) to green or red.

Hot Water posted:
Jayhawk500 posted:

Need a question answered pleased.

On classification lights...I know that the lens facing forward is illuminated. Are the lenses to the side also illuminated? Or is there a shroud on the inside of the lamp that blocks the light from the sides?

I'm getting ready to put the lenses in my classification lamps and I need to know whether or not to paint the inside of the lens black to block the light from the side.

Thanks

All the types of Pyle-National class lights that I have seen, were illuminated to both sides, i.e. in-board and out-board, in addition to the lens facing forward. The glass color slides inside the light assembly are placed in front of the bulb so that all the viewable lenses show the same color ( green, or red). Simply moving the lever on the rear of the class light changes the color from white (no color slide in place) to green or red.

Thank you for the reply. That helps tremendously.

While rereading Gene Huddleston's Allegheny, Lima's Finest I found some interesting text on page 78 regarding marker lamps.  "Marker lamps were seldom illuminated on C&O freight locomotives, for with double track and automatic block signals on all the subdivisions over which the H-8's operated, no distinctions had to be made in class of train, except for passenger.  If an H-8 pulled a scheduled passenger, troop or hospital train during the War, illuminated markers (metal flags by day) were displayed to indicate section.  On the Virginian, markers were displayed on every class AG dispatched over the road.  Coal trains were usually run as extras (white flags) but could be run as of scheduled freights."  it would be interesting to learn how the C&O regarded the use of marker lamps on their passenger steam locomotives if it differed from freight engines and how the different colors displayed indicated which section of said train was being operated. 

gunrunnerjohn posted:
Jhainer posted:

That is really cool I always have loved the Chessie steam special. I have the ac motor version that I would like to upgrade to ERR and a DC motor. but have no idea where to start and I heard of timko does conversions but know nothing about them.

Such a deal I have for you.  I have one of these that was stripped for upgrade.  It has the Timko DC motor and an MTH fan driven smoke unit all mounted and ready for the electronic upgrade.  It was painted and it's all black right now and unnumbered, but you could swap your boiler and tender shell and be ready for the TMCC upgrade.   You could even sell the all black one with the AC chassis.

John what are you asking for it ?


It will be a week tomorrow since I put up a post. I must say I very pleased with the results up to this point in detailing an early 1990's vintage Lionel (LTI) locomotive. I'm not finished by any stretch, I still have to put my engineer and fireman in. I have to reorder the lenses for the class lights. I have green instead of clear and I still need to put the lens on the headlight. I also added the headlight wiring conduit. The other un-noticeable thing I did was paint both boiler handrails black. These were originally stainless steel. I still need to add the numbering to the headlight.

The boiler front was definitely trying my patients. I had broke off the left class light  and it was difficult at best to get it back on, lined up and square. All the while keeping the alignment for the LED hole in the bottom.

I do believe the gold eagle does bring a little of the Freedom Train in, even though I don't have any of that paint scheme on the engine at this time. (We'll see for the future.) I'm slowly finding pictures that the boiler and cab were painted blue. But with 40+ year old photography it's hard to tell between blue and black given the angles and lighting. This too will come in the future.

I still have touching up to do, paint wise. I don't have a hobby shop close by and none of the stores sells the Testors model paint. But as I said in an earlier post I headed to Portland to ride the SP Daylighter #4449 this Sunday, I'll get some then.

DSCN0013

          I think I did good.

26619282061_afb906db45_b

I looked to see if the front coupler on the engine would line up... If it were the correct size....It would.

DSCN0008

I tried taking some pictures under LED bulbs on my kitchen bar, Unfortunately these lights ruined the pictures. I did get two pictures and a video. I forgot to add smoke fluid to the smoke unit and by the time I got done filming the video it was starting to burn and smell up the house. But with my luck the video didn't turn out. I'll try in the morning and use YouTube.

DSCN0010


The next project is to get my layout set up for Christmas and run this beast. I'm sooooooo excited. I have 7 Lionel Steam Special passenger cars to put behind it.


Stay Tuned. More will come!


Attachments

Images (4)
  • DSCN0008
  • DSCN0010
  • DSCN0013
  • 26619282061_afb906db45_b
Last edited by Jayhawk500
Jayhawk500 posted:

It will be a week tomorrow since I put up a post. I must say I very pleased with the results up to this point in detailing an early 1990's vintage Lionel (LTI) locomotive. I'm not finished by any stretch, I still have to put my engineer and fireman in. I have to reorder the lenses for the class lights. I have green instead of clear and I still need to put the lens on the headlight. I also added the headlight wiring conduit. The other un-noticeable thing I did was paint both boiler handrails black. These were originally stainless steel. I still need to add the numbering to the headlight.

The boiler front was definitely trying my patients. I had broke off the left class light  and it was difficult at best to get it back on, lined up and square. All the while keeping the alignment for the LED hole in the bottom.

I do believe the gold eagle does bring a little of the Freedom Train in, even though I don't have any of that paint scheme on the engine at this time. (We'll see for the future.) I'm slowly finding pictures that the boiler and cab were painted blue. But with 40+ year old photography it's hard to tell between blue and black given the angles and lighting. This too will come in the future.

I still have touching up to do, paint wise. I don't have a hobby shop close by and none of the stores sells the Testors model paint. But as I said in an earlier post I headed to Portland to ride the SP Daylighter #4449 this Sunday, I'll get some then.

DSCN0013

          I think I did good.

26619282061_afb906db45_b

I looked to see if the front coupler on the engine would line up... If it were the correct size....It would.

DSCN0008

I tried taking some pictures under LED bulbs on my kitchen bar, Unfortunately these lights ruined the pictures. I did get two pictures and a video. I forgot to add smoke fluid to the smoke unit and by the time I got done filming the video it was starting to burn and smell up the house. But with my luck the video didn't turn out. I'll try in the morning and use YouTube.

DSCN0010


The next project is to get my layout set up for Christmas and run this beast. I'm sooooooo excited. I have 4 Lionel Steam Special passenger cars to put behind it.


Stay Tuned. More will come!


My Gosh!!! The engine is stunning.  You've done a magnificent job recreating Ross Rowland's 2101.  I also enjoyed the brief videos.  Painting the handrails certainly made the engine appear more realistic.  I have heard that, with early Rail Sounds, the engine's handrails often worked as an antenna.  One quick question regarding the aux. tender.  This may have been discussed earlier but I don't remember.  Was removing its coal load and replacing it with a simulated steel plate ever considered? 

Kudos to you sir.  I wish I had your patience and modeling skills.  Please keep the pictures and videos coming when time permits. 

Add Reply

Post

OGR Publishing, Inc., 1310 Eastside Centre Ct, Suite 6, Mountain Home, AR 72653
800-980-OGRR (6477)
www.ogaugerr.com

×
×
×
×
Link copied to your clipboard.
×
×