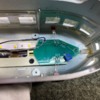
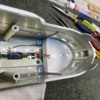
It's been a while since I did a set of Premier cars and I wanted to try out a couple of recent ideas for size on this set. Some pictures follow. Here is the first car opened up and the OEM lights (5 total) have been removed from the light track. They just slide off with a little nudging. Track power enters at the left end. I figured the best place for the constant current module would be at the right end, affixed to the track right about where the 2 screws are located. This would be basically out of site in normal operation, and fits nicely between the walls at the extreme right end of the gray seating module.
Some folks start by tearing out the OEM lighting track first, but I wanted to keep it as original as possible. So I made up the power adapter below using one of the original light sockets, per the method devised by Hokie71 a few months back. Works great. You can see the tiny wires bent back around the plastic body where the incand. bulb used to be. This will just be plugged into the nearest spot on the light track upon installation.
Here below is the module all ready to install. Note the short wire supplying AC, and note the led strip has been soldered directly to the underside of the board output pads, as documented in the topic "Enchanced Building Lighting Using Leds". Makes a simple and secure connection, and no wire fiddling other than the AC power. Premier cars really lend themselves to this method since the roof remains attached to the car body and there is no need for any inter-connecting pigtail for servicing.
Here is the module affixed to the end of the light track by the highly exotic hot glue method! ![]() I removed the screw that would have been right under the board so that the track can be removed in future if needed. The power plug is securely connected to the light track. Note the module is offset toward the near side so that the light strip runs down one side of the OEM light track. And you can still see through the end door vestibule window down the full length of the car interior. Certainly the power connections could be made by solder connection to any spot on the brass power buss strips if desired. I chose to use the plug in method instead.
I removed the screw that would have been right under the board so that the track can be removed in future if needed. The power plug is securely connected to the light track. Note the module is offset toward the near side so that the light strip runs down one side of the OEM light track. And you can still see through the end door vestibule window down the full length of the car interior. Certainly the power connections could be made by solder connection to any spot on the brass power buss strips if desired. I chose to use the plug in method instead.
And here she is on the track for testing. Module output is set to about 9.0VDC and the resulting light level looks good to my eye for a streamliner. It may get tweaked up or down a little as I try it out in different lighting conditions. The overhead room lighting is fairly bright for this picture.
Because these cars are a bit of a PITB to disassemble each time you want to adjust something (total of 11 screws to remove the floor and sub floor), I drilled the 3/16" hole shown below so as to access the blue adjustment pot for fine tuning. ![]() Time will tell how effective this idea turns out!
Time will tell how effective this idea turns out!
Now only another 7 cars to go!
Rod


