


Bob, thank you! Yes, I bought the first bunch of brackets 2 years ago, and these just last week. They are all the same. ![]()
And ladies and gentlemen he's off and look at him go! Mark, I know you're not racing but it's good to see the your bench work coming along and your railroad begin. If everyone is like me, they've been waiting to see your layout start. You are so kind to others in word, that it's nice to be able to encourage your work as well.
Dave
Thank you, Dave! ![]()
I was able to build a layout rather continuously during my teenage years, and another during the several years after we were married but before our girls were born. I have had many false starts, slowdowns, and even dormancy during the ensuing years. ![]() So I guess I am conditioned to accept similar delays now that both girls are married, but we have to help elderly relatives and have our own health issues. I think my case is rather common as I read replies from other Forum members. Life gets in the way of hobbies as it should.
So I guess I am conditioned to accept similar delays now that both girls are married, but we have to help elderly relatives and have our own health issues. I think my case is rather common as I read replies from other Forum members. Life gets in the way of hobbies as it should.
Thank you again for the encouragement!!!
Mark Boyce posted:Last week I got started putting up brackets on the second wall in the original layout room. After measuring right and then checking against the adjacent wall, I discovered the metal brackets angle is slightly over 90 degrees. This causes the front to be about 1/4 inch higher than the back. Since I had put a shelf the whole distance across the first wall, when I would add a shelf on the second wall, the heights would be different in the back, but the same in the front. A tilt away from the wall. I remedied that on the second wall by putting composite shims under the top of the bracket against the wall. Now the brackets are level from front to back in addition to being level side to side.
Then came the hard part; the brackets on the first wall. Fortunately I am building this high enough that I can sit on a chair and put my head under the shelf. I loosened the top bolt on several brackets and started slipping shims in behind the bracket and tightening it back up. Now things are level.


Mark:
That was good, outside-the-box thinking.
Randy, Thank you very much!! Occasionally I come up with a good idea! Usually I copy others' good ideas! ![]()
Very clean looking work Mark!...always enjoy seeing your expansions....hope you don’t mind, but I’m taking notes....great ideas you’ve come up with......Pat
harmonyards posted:Very clean looking work Mark!...always enjoy seeing your expansions....hope you don’t mind, but I’m taking notes....great ideas you’ve come up with......Pat
Pat, By all means please take notes. That is what is so nice here. Folks tell you what didn't work or didn't work well in addition to what worked! ![]() Thank you for the compliments! I do try to do clean work, though I am not the best carpenter, and I only have basic hand tools and hand power tools.
Thank you for the compliments! I do try to do clean work, though I am not the best carpenter, and I only have basic hand tools and hand power tools.
Mark Boyce posted:

Interesting that I've never noticed this thread topic before until tonight. Mark, I need to ask in case this was discussed before - as I only read the last 3 pages - but how did you manage to support that upper level shelf without any brackets, especially that middle section with that large depth? I don't what the material is, but there is no sagging whatsoever Great work!
Amfleet25124 posted:Mark Boyce posted:
Interesting that I've never noticed this thread topic before until tonight. Mark, I need to ask in case this was discussed before - as I only read the last 3 pages - but how did you manage to support that upper level shelf without any brackets, especially that middle section with that large depth? I don't what the material is, but there is no sagging whatsoever Great work!
Don't see how it is mounted, this thread is too long to search![]() My guess is brackets from the wall that fasten to the shelf top rather than underneath it.
My guess is brackets from the wall that fasten to the shelf top rather than underneath it.
I think it is this from page7:
Mark Boyce posted:
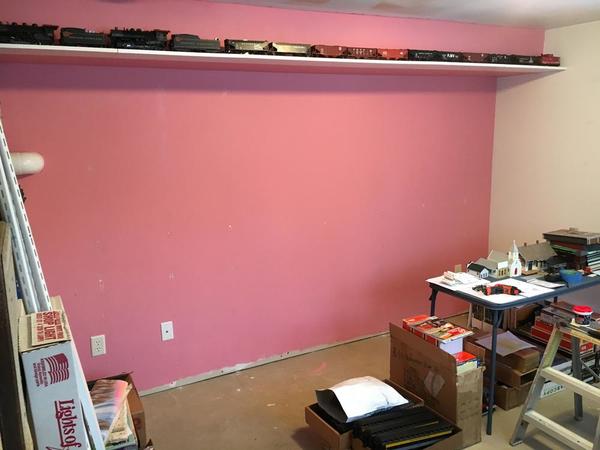
I'm sorry I haven't had much to report as of late. I have been gathering materials, but finally made some progress in the appearance of the room. I took down the shelves and spackled the holes in preparation to cover that awful pink with a nice light blue. I am going to keep the shelf on the bulkhead that covers the furnace vents exiting the house. I also shipped out some extra long cars that I am not going to use to get some more funds for the project.
Ken, Excellent question! Thank you for your interest.
Bobby, thank you. You found probably the best photograph in the long topic. I have to go plodding back through the pages myself to find things myself. I'll post photographs I just took today and answer.
To get you up to speed, this room was is an addition my in-laws put on the back of the house. The layout is on the basement level. My in-laws removed a deck on the upper level and had a 12 x 12 sunroom built, and this room to them just basically supported the sunroom. When we moved here our older daughter was in college and she made the room into her art studio. So the photograph Bobby found on page 7 shows the room once our daughter had married and moved everything out. She had put the upper shelf in. It is just the white finished 8" shelving you can get at Lowes or Home depot. I suggested she use the brackets shown in the first photograph to attach it to a bulkhead that encases the furnace intake and exhaust pipes that come from the combination furnace/laundry room in the main part of the basement.

This photograph shows the bulkhead as best as I can do it. I have the brick wall that is from the back of the original house and I removed the window to let air flow in from the laundry. I'll contend with the brick wall side of the room later.

So from the bottom, it looks like a 24" deep shelf, where actually it is only 8" deep.

I hope that clears up the confusion, but please ask any questions that come to mind. Thank you.
Attachments
Images (3)


Thanks for explanations, Bobby and Mark.
I finally got some time today to work on the wall brackets. All 7 are bolted to the studs with the shims at the top to compensate for the bracket being slightly more than 90 degrees.

I reused 1x4s from other projects to act as the joists as I did on the first wall. The one closest to the existing shelf is a 2x4 I brought home from my dad's shop last summer since I ran out of 1x4s of the proper length. On the subject of length, I am making the shelf 30" deep. I made the 1x4s 29" long and left a 1" gap next to the wall to slip in the Masonite backdrop. That looks like it will work well from trying it on the first wall. I can always go back and shim it if I need too. The two joists on the far right are cut for a 24" shelf. The will be the small peninsula in the corner for the hilltop town. I made it narrower so it doesn't interfere with the light switch and give a little room getting in and out of the sliding glass door.

Attachments
Images (2)


Files (1)
Mark
Very impressive progress on your layout!
Looking good. Nice work! It's nice to see you moving forward!
Mark, ![]()
![]()
Great work Mark and you're giving me inspiration. Keep it up!
Glad to see the plan working out in reality. Keep up the great work!
Pete, Mike, Lew, Kevin, Palallin, Thank you very much!! I'm trying to make it as simple as I can, but strong too! I have found this to be easy to build mostly sitting on a chair and not crawling, squatting, or stretching too far.
As to what's next, I plan to put risers in for the grades and upper levels, that will screw in from the bottom and do that in sections that can be taken out easily if and when we have to move. Then a flat tabletop could be added all around for a workroom for the new owners. Once my mother-in-law across the road passes or has to go into a home, we plan to move to a ranch (this house is a split entry which we have never liked, but the price was right since it was in my wife's family), and I could take the sections with me. Though the way she is going, that could be a long time. She is the youngest of our relatives of that generation at 84, but very healthy and active.
Today's progress was printing out my SCARM drawing 1:1 scale and taping together the pages for the new wall shelf. It fits perfectly!!! I'll use this as a guide for risers for the elevations and track placement. The #4 turnout against the wall fits the plan just right.

Attachments
Images (1)

Mark, it looks like you are going to have a Wye. Eggcellent! I can't seem to find room for one.
Nice work, Mark! Will you be repurposing the Mianne Benchwork into this plan?
Lew, JD, thank you!
Lew, actually the tracks to the right are planned to be two sidings. However, I would be able to to put the back leg of a wye in. The question is how long would I be able to make the tail track! I could always poke a hole through the exterior wall like Mike G plans to do!
JD, good question about the Mianne. I do plan to use it for the free standing part of the layout that allows access to the doors. Also the wall opposite the one I worked on is brick. I haven’t decided whether to try the brackets on it or use the Mianne. Since I have it, I’m leaning that way.
Congratulations Mark, you have a room to yourself. I recently started on my first O scale layout so I probably will not have any words of wisdom to pass on. I will say this, no matter how much room you have available, O scale track, switches, and other stuff take more room than I realized.
Thank you, Dan! After having HO layout, O sure does take more room. But I find it more enjoyable because I can see the trains a lot better!
I hear you Mark. I went from N scale to O scale. I can read the car numbers now! ![]()
Mark;
Nice progress... it looks like it will be easy to reach anything on your “shelf”. I may have missed it, but will this section connect to the section you built on the Mianne benchwork???
dan 77 posted:I hear you Mark. I went from N scale to O scale. I can read the car numbers now!
N scale cars have numbers on them? Who knew?
Paul, thank you for asking. A few pages back, in January, I wrote I was going to have to rethink the layout I started with the Mianne. The reason was our daughter would not be able to move her piano out any time soon, which was necessary to continue on with the build. Since I am stuck with the return loops with no where to go for who knows how long, I decided to continue in the little room with a fairly simple over and under twice around plan just so I can run trains. Time will tell when I can get back to the other layout. I can look for the page with that discussion and post the new plan later. I’m just responding now on the smart phone.
Dan, I built an N scale layout once upon a time. I’m amazed I was happy with it at the time.
Mallard, N scale cars had numbers 30 years ago, so I assume they still do. I can’t prove it because I don’t see much of anything on them now when I see a modular N layout at the Greenberg show.
geysergazer posted:Mark, it looks like you are going to have a Wye. Eggcellent! I can't seem to find room for one.
Lew- I think the middle of the room could fit the Wye and a finger track or two to turn trains ![]()
Lew and Bob, all suggestions are welcome. As you both have demonstrated recently nothing is ever etched in stone on a layout! 😄
Mark, maybe you could post your trackplan......(probably again but Senior brain here) ?
Mark Boyce posted:It's about time I post a new twist to my progress. If you follow the Forum topic What Did You Do on Your Layout Today, then you already got a heads up. For those folks, you can skip the two paragraphs in italics, since I copied it from my post a couple days ago. If not, then read on.
I might as well give a heads up on the farther reaching purpose of the cleanup. The cleanup is in the small room I started a layout in two years ago. Then my wife suggested I build in the family room since the girls were married and the furniture was junk. So many of you contributed to a layout design for that room too. However, as time passed the need for access made the room 'shrink' to some extent. So last year I started building on the end of the room that was emptied. I built the two loopback turns one on top of the other with no connection between the two. The next part of the layout that is to be built will climb up the canyon where a massive wooden shelving unit is. The shelving unit is to move across the room to where our older daughter's upright piano is. Well we hit a snag getting the piano moved. Daughter and son-in-law had moisture problems in the lower level of their house and had to throw out some stuff. Other stuff was moved upstairs. So it is dried out, but none of us has the money to put into correcting the problem where the moisture is getting in. We don't have the manpower either because my son-in-law's dad, newly retired like me, and like me he had his knee replaced 4 days before mine. So, the home repair at our daughter's is on hold, moving the piano is on hold, so freeing up the rest of the layout space is on hold.
So, I mentioned it to a few Forum members, Mike, Chris A, DoubleDAZ Dave. Dave helped me with a simplified layout plan for the old small room, just so I can get some trains running until I can do the bigger project. Besides, I'm getting tired craning my neck to see trains run on the Ceiling Central RR and blinded looking into the lights in all the passenger cars.
I still can't climb the two step ladder to replace them with freight cars.
Also, I am finding like Jim, I am a Looper. Switching back and forth on the existing track on the new layout isn't what I want to do for the foreseeable future.
So here is the proposed track plan and there is a SCARM file in the attachments box.
You may recall I used this simple method to build my shelf on the wall that is to the left on the track plan. I intend to use the same on the top wall on the drawing next. This method has proven to be rock solid considering all the stuff I have had piled up on it over the last year and a half.

Here you go Lew. This is the easiest way since I don’t have access to the computer right now
Dave, Thank you for adding the link. I wasn’t able to figure out how to do that on the phone. I’ll be able to get back to the computer tomorrow evening I think.
Great to see you making progress Mark! Glad you got the straight/level issue corrected with the brackets. If that’s not right it’ll drive you nuts. I like the track plan. Nice action.
Andy
Thank you Andy. Until I get back to the computer, please check the link DaoubleDAZ Dave posted above. I’ll try to get back to the computer and post it again here.
Let's try this Lew. I was working on the top shelf. The yellow represents a removable bridge for access.

Attachments
Images (1)

Hi Mark
What if you cut a parallel line between the the bottom loop and top loop straight sections and have the top loop swing up and the bottom loop swing down for access?
Al
Looks like it’s taking shape Mark! I’ve been MIA for a few years and finally getting back into trains again. Sadly having to go with HO. Keep up the great work!
Thanks, Mark. Somehow I lost track of this Thread during our trip to Pittsburgh. The double-loop up-and-over has always been a favorite track-plan of mine. Those scenic backdrops you have are going to make your Pike really come alive.
The 43" high knee-walls in my train-room just don't give me enough vertical space or I'd have a variant of what you are doing. But it's all good because I'm fortunate to have the dedicated space I do have.
Because two levels of track are you thinking of a lift-out bridge? Or two separate hinge-up bridges?
I look forward to seeing your Pike take shape. ![]()
Add Reply
Sign In To Reply

