@Oman posted:

Mark

For me that was a gut feel number. I don't know what the minimum (that will work) number is. I hope you can resolve it.

I'm doing a little of what Scouting Dad suggested checking with a level, shimming...  It looks like I can get away with less than 2 feet.  I think to make it work, I will have to leave the switch farther to the right of the original plan, and have the siding end on the lift up.  That's no big deal at all.  

I can't say what the transition grade is, but it works.  I left the switch at the new position 6 inches farther from the end of the curve than originally planned and shimmed some places.  The 2-6-6-2 is by far the most finicky piece of equipment I have, and it handled it fine a number of times.  Here is a video of it with a short coal train.  My vision is for this engine to handle mixed freight, with a pair of H9s or RS3s handling the coal trains.  The hoppers were handy, and heavier than the boxcars.  

Sorry, I forgot to blow the whistle.

Last edited by Mark Boyce

Looking good Mark! Always a good idea to use your most cantankerous loco and longest cars when checking out your grades, radius and clearances.

    That’s what makes it fun and challenging. I’ve lost count on  how many times I’ve had to make adjustments to all the above lol

  Spend the time now to do it right and work out the bugs.

  Love the coal train with that Mallet on the point! Longer sidings are always a good thing if possible. Not sure if you tried to run the loco down the grade(reverse direction) yet to check for any tracking issues.

 Glad to see things coming together

Al

Thank you Palallin, Firewood, George, Peter, Al, Lew, Leandro, EMD, Bob!!!

Satisfying? Yes!  Smile on my face? Yes!  Incredible feeling, Yes!  That backdrop is great looking, George!    

Al, I did try the train downhill and all is swell!!  You are absolutely right, What goes up okay, may not go down so well.  Yes, there is no point going on until each problem area is fixed even if it means tearing it all out and starting over.

EMD, I will post more video as I move forward, not with this engine, but with the H9s, RS3s, and Pacific...and even the BL2 and GP7 just for Bob!


Mark B.

With 34 OGR FORUM entries of comments, you're getting PLENTY of help with your home layout project!  Hobbyists have offered design help, freebie track and switches, even their labor -- all of which can be considered "investments" in your dream and especially in YOU.

Although my 15x19-feet "L" shaped two-level home layout isn't as engaging as your concept, I feel I have "walked in your moccasins" regarding some the issues you are now dealing with:  big dreams but limited space, desired larger curvatures but limited real estate for them, wanting action accessories but no room for their "footprints," construction challenges such as cutting holes through walls, and even height problems such as  joining a table-height platform to a ceiling-shelf route in another room. Mastery of levitation may be required for that maneuver!

It seems that your aspirations will present a claim on your time for the next few years -- nights, weekends, and even some nighttime dreaming.  All part of the fun of engagement in "the world's greatest hobby."

Carry on, regardless ... with best wishes for eventual success,

Mike Mottler    LCCA 12394
mottlerm@gmail.com


Last edited by Mike H Mottler

Mike, I'm sure you have walked in my moccasins on several of these issues and issues I haven't even brought up on this topic.  Thank you for the encouragement.  It is easier to cope with some of these things now that I am retired.  After working all day, I wasn't into problem solving on a layout to a large extent.

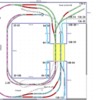
Since I have the table pretty much built all around, except for the lift out opening, I cut a section of Homasote and placed it along the brick wall (bottom in the drawing0, then just put some pieces of track around to come out to the other side of where the lift out will go.  It is there where I discovered another goof, or shall we say deviation from plan.  

InkedBack to the drawingboard 2020-05-17_drawing

When building the 4x4 Mianne section to carry the tracks out into the middle of the room, I moved it over about 5 inches as shown in the squiggly light blue lines so the Mianne would fit okay with a 1-inch plywood overhang on the side.  I don't want it too big because I need to move around, and even at only 170 pounds, there isn't a lot of room to move.  I discovered last night that it won't let me put in the siding in the lower right.  I could replace the plywood with a wider piece that overhangs the edge of the Mianne more to let me put in the siding.

I drew in with gray the siding off the 054/072 curve as Jeff suggested.  I also show one in the lower part of the drawing with a question mark under it.  I also circled the part of the inner loop that will be higher than the outer loop, that I may put on trestles that I can look through to see the Town in the valley.  I'll see how it all goes.  Thank you for looking!!!

Attachments

Images (1)
  • InkedBack to the drawingboard 2020-05-17_drawing
@Lyle posted:

Hey Mark--what are you using for risers?

Hi Lyle, you posted while I was typing.  Thank you for the question.  I used 2x4s cut to length since I put down a table top.  This worked okay on the flat portion of the top level.  I did have some trouble getting them all to the right length and had to shim some.  The last ones I did, I was able to make more exact.  On past layouts, I used an open grid benchwork and put in risers held onto the joists by clamps.  Then when I had them exactly where I wanted, I drilled and attached them to the joists with screws.  Since I already had the table top down in this case, I used Woodland Scenics foam incline for the grades.  This restricted me some, but has worked okay.  If I build again, I may go back to the open grid and adjust riser height with clamps as I did long ago.  

Sorry for the long answer to a short question.  Thank you for asking!!!

Keith, Those die cast cars are certainly heavy, but the detail is great.  I have about 20 2-bay hoppers of various manufacturers, but only a couple gondolas.  I have a few tank cars for a mixed train.  I need to test how many cars I can pull with double headed H9s and the RS3s.  There is so much variety of things to do once you get some track down.  

@Mark Boyce posted:

I can't say what the transition grade is, but it works.  I left the switch at the new position 6 inches farther from the end of the curve than originally planned and shimmed some places.  The 2-6-6-2 is by far the most finicky piece of equipment I have, and it handled it fine a number of times.  Here is a video of it with a short coal train.  My vision is for this engine to handle mixed freight, with a pair of H9s or RS3s handling the coal trains.  The hoppers were handy, and heavier than the boxcars.  

Sorry, I forgot to blow the whistle.

Hey Mark, that looks great. Question about the background that I just thought to ask. Are you going to slap some trees where able between the wall and the tracks, and have you thought of possibly putting some other scenery where it is nearly flat? I know it may be impossible to put a regular tree in some spots, but was wondering if something could be made that would be relatively flat. 

Also, looks great going up the climb.

Dave, I do plan to have a little bit of scenery between the track and backdrop.  It will be partial rock cut and vegetation to try to show the train is climbing up the side of the canyon.  I'll do something similar below the track down to a stream, to show the same canyon side.  

It's a lot like Mike Mottler wrote.  I would love to have to have more room to do the scene justice, but I will do it the best I can with what I have.  It's a lot more than I had before I started this project!!  

Thank you Mike!  Yes Kim turned 60 on Friday, Almost 4 years younger than me.  Our younger daughter and her husband came over.  Our other daughter is still hold up at her house since she has some medical issues, and her husband is a manager at a local convenience store.  So she just called.  Kim was at the doctor the day before and learned she will have to stay on Select soft foods for the rest of her life, so she needed the girls to cheer her up.

I’m glad you have been busy with family!

I turned the 2-6-6-2 around and ran downhill, backing uphill a lot yesterday without the slightest trouble, so I think we are good to go!

Thank you very much, Larry!!

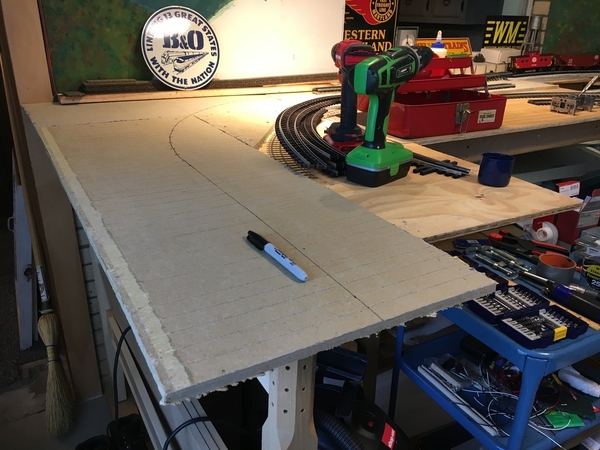
Today I cut some Homasote for the tabletop level closest to the door.  I had mentioned that I hadn't left room for the siding closest to the aisle.  I decided to put down some Homasote and see how it is for getting in and out of the room for a day or two before deciding to put in a wider piece of plywood.  Four more inches of table cuts the aisle width to 28 1/2 inches.  So far I think it will work out alright.

2020-06-07 15.59.252020-06-07 15.59.20

Attachments

Images (2)
  • 2020-06-07 15.59.25
  • 2020-06-07 15.59.20
@Mark Boyce posted:

Thank you very much, Larry!!

Today I cut some Homasote for the tabletop level closest to the door.  I had mentioned that I hadn't left room for the siding closest to the aisle.  I decided to put down some Homasote and see how it is for getting in and out of the room for a day or two before deciding to put in a wider piece of plywood.  Four more inches of table cuts the aisle width to 28 1/2 inches.  So far I think it will work out alright.


Mark

28" was a possible interior door size back in the 70's. I don't know what code says today. Anyway 28" is more than adequate.

Add Reply

Post
The Track Planning and Layout Design Forum is sponsored by

AN OGR FORUM CHARTER SPONSOR

OGR Publishing, Inc., 1310 Eastside Centre Ct, Suite 6, Mountain Home, AR 72653
800-980-OGRR (6477)
www.ogaugerr.com

×
×
×
×
Link copied to your clipboard.
×
×