
One of my goals is to reduce the number of wires under my layout. I can substantially reduce them by having a bus wire for common or ground, running the entire 35 foot length of my layout, and tapping into it with short feeder wires connected to the bus wire and the track for every few feet of track.

Lowes near me had no 14 gauge bare wires so I bought 14 gauge insulated stranded wire (of a different color, black, than the red colored hot wire). The black 14 gauge stranded wire will be my cold ground wire.

The insulated 14 gauge stranded wire for the hot wire will run from my 12 port MTH Block Terminals to beneath the places under the track where it connects to short 16 gauge insulated white solid wire.

Assuming I use the black insulated 14 gauge stranded wire for ground as a bus wire, how do I tap into it with short 16 gauge solid white wire that is connected to the track? What do you think is the best way to tap into that bus wire?

Arnold

I enjoy using Wago lever lock connectors. They are infinitely better than suitcase connectors or wire nuts and less hassle to install than crimps. They are worth the extra costs hands down and are reusable! They also are good at joining varying sizes of wire (in this case AWG sizes 28 to 12 which is just perfect for our trains).

Here is are two assortments - one is the 222 style, the other 221 (40% smaller footprint):

https://www.amazon.com/Wago-22...rtment/dp/B01GVTVY12

https://www.amazon.com/Wago-22...018MGMFDI/ref=sr_1_3

Just be sure to get real Wago ones and not the off brand knock-off lever nuts as the knockoffs do not meet UL or other safety standards and are of inconsistent quality. That is not to say that one may not find that certain knockoffs are just fine for this low voltage purpose, but I can't justify taking the chance after getting burned.

Arnold sounds like your off to a great start. I personally have never used these myself but I would trust Bob’s @RSJB18 recommendation for the suitcase connector as one method. My only thought is the more connections the more chances for a bad connection to develop leading to more headaches.

Personally I would consider placing your MTH Terminal Block mid point under your layout. Power it from your transformer with your 14 or 12 AWG wire. Than run from that directly to your track lock on’s. Have you determined the number of drops that you will use? Are they split equitably around the layout that would benefit from shifting the MTH or split and have two on each end? Evaluate if you really need a drop every few feet. Consider starting with less. With the organized power distribution system you can easily add one if its needed, just my opinion.


Assuming I use the black insulated 14 gauge stranded wire for ground as a bus wire, how do I tap into it with short 16 gauge solid white wire that is connected to the track? What do you think is the best way to tap into that bus wire?

Arnold

There are T-Taps or Posi-Taps that would work.  I don't like suitcase connectors myself.

But I don't see why your copper strip wouldn't have MORE surface area than the 14 gauge wire would and thus be at least as good if not better conductor.  Someone correct me if this is wrong.

John

Help me out here guys. I use suitcase connectors and like them. I had them under my modules for literally 20 years and never had an issue that was traceable to them. I run conventional, DCS, TMCC, and Legacy. I like them with buss wiring as you simply slip them over the buss wire, insert the butt end of the wire you need to attach to the buss, and crimp them closed. Snap the cover over the top and you are done. They work extremely well with stranded wire, but much less so with solid wire.

How do you use the Wago connectors without cutting the buss wire? Is digital signal strength that much better with the Wagos? I agree one advantage is you can reuse them or change out wires as necessary, which is something you cannot do with the suitcase connectors.


Chris

LVHR

@lehighline posted:

Help me out here guys. I use suitcase connectors and like them. I had them under my modules for literally 20 years and never had an issue that was traceable to them. I run conventional, DCS, TMCC, and Legacy. I like them with buss wiring as you simply slip them over the buss wire, insert the butt end of the wire you need to attach to the buss, and crimp them closed. Snap the cover over the top and you are done. They work extremely well with stranded wire, but much less so with solid wire.

How do you use the Wago connectors without cutting the buss wire? Is digital signal strength that much better with the Wagos? I agree one advantage is you can reuse them or change out wires as necessary, which is something you cannot do with the suitcase connectors.


Chris

LVHR

Suitcase connectors work fine if you leave them alone for 20 years like you did.  But if you are constantly messing with the layout and the wiring they aren't that good as you noted.

John

Last edited by Craftech

@lehighline, With the WAGO connectors, they actually act like mini terminal strips, but use surprisingly strong levers instead of screws to retain the wires. So yes, you need to cut/terminate your bus wire, but this is not a big deal at all. For illustrative purposes, the thick red wire could be the 14AWG BUS wire, the green could be 16AWG feeders:

In terms of command control signals or even just plain power delivery, the connectors themselves don't matter, but the quality of the electrical connection does matter, and that IS influenced by the connector type. Use of suitcase connectors are not typically used for connecting different gauge wires. Each gauge combination needs its own specific connector. The suitcase connectors actually sever the wire and can nick or even cut the copper conductor creating an intermittent hard to find wiring issue that can wreak havoc on command signals and power delivery. As such, I find suitcase connectors make a poor choice for quality electrical connections, especially compared to WAGO connectors that do not have these issues at all. Sure, some report success with suitcase connectors, but why invite the potential headache?

Attachments

Images (1)
  • mceclip1
Last edited by bmoran4

This is what I love about discussions on this board that come up, brings up different viewpoints and allows me to think about what is good for me. I agree that given the run length on your layout, Arnold, that 14gauge is the way to go. In terms of feeders, unless you are running them a long distance (which kind of negates the bus concept), 16 is plenty big, lot of people use 18 gauge for the relatively short runs that feeders represent, might be easier to work with 18 gauge whether lockon or soldering to the track.

Couple of things I have promised myself with the wiring:

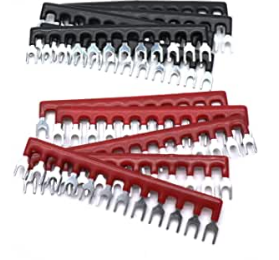
1)Use distribution block to feed the wiring for the blocks out to the track (I am wiring conventional block to start). In the past did some crazy kinds of many to one wiring, wasn't great.

2)As much as possible, use color coding with the wiring. If I can't get colored wire, then I will use colored labels or colored tape to show what it is (for example, my current wiring plan calls for purple wire for the DCS feed to the track). With color coding, it is possible to create a wiring diagram using the same color coding. Having traced wiring in cars, the color scheme they use in the harness makes life at least a little bit better when debugging. I also think labels indicating where the wire is going is not a bad idea, for example, in my block 1, having a label "P1" (power 1)  would be valuable. I am going to use a common buss that will be available easily in any part of the layout. If I use 2 transformers, I will use a common ground (and phase them), to not have 2 common busses out there.

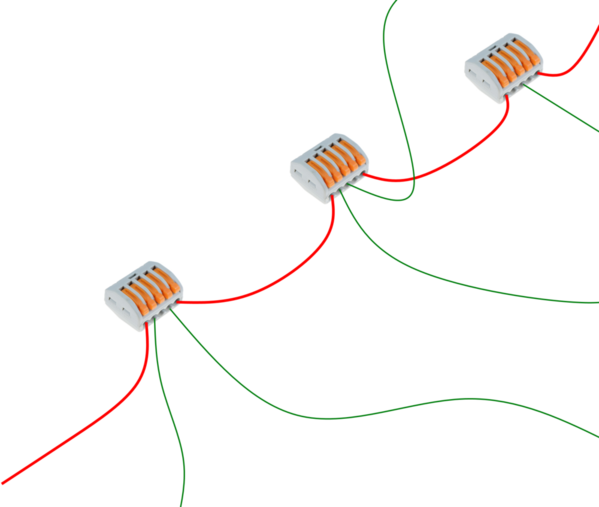
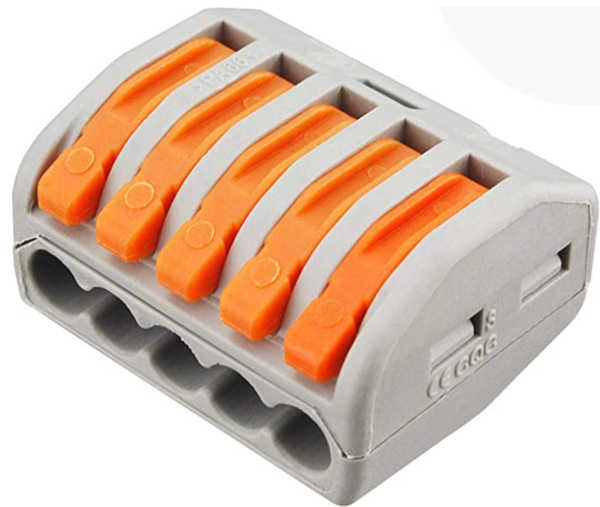
3)Use suitcase or wago connectors where possible, and use spade lug and crimp connectors to keep connections neat and minimize soldering.

4)Under the layout, I am going to use something like plastic cable clamps to run the wire through, rather than stapling wires to the underneath or running through drilled out holes in the frame. With these, you can open it up is you need to get access to a wire when tracing or doing something else.

5)Going to try not to overbuild. In my case, given how relatively small my layout is, not overdoing it. In the past I had feeders every couple of feet, which was overkill, given the length of my blocks prob having 2 feeders will do it per block.

Wish you luck, taming the flying bowl of spaghetti is kind of like weeds in a garden, you have to actively seek them out and eradicate them.

Well, you've heard from the prosecution, so let me make a statement for the defense. I LOVE your "invention". In fact, I've been using it for years for all my outer rails. I have copper-clad board at strategic locations around the layout, all wired together and all drops from my outer rails go to these boards using solder connections at both ends.

But all types of connections have their place. For the hot wires, I have 4 junction boxes around the edge of the layout from which I can access any power needed--the center rail for the two nearby local blocks (I use 8 blocks--too many--it probably should have been 4 blocks), 12VDC for LEDs, Miller signs, and etc., and 14VAC for switch machines, accessories and so on. The junction boxes are fed from a cabinet with 12VDC "ham-radio-type" power supplies and a big variac turned way down to 14VAC. At the top of the cabinet is a big line filter that (I hope) cleans the power before it gets onto the layout.

Anyway, pix below. Every setup is different I guess. I just looked for lowest-cost solutions at every step and this is what I ended up with. Everything from copper clad board to terminal strips to spade lug connectors is from my substantial junk box.

Don Merz

IMG_1724IMG_1726IMG_1727

Attachments

Images (3)
  • IMG_1724
  • IMG_1726
  • IMG_1727

The rats nest has got to go😁

As well as the bare copper-you never know what could land across them to cause an issue..better safe than sorry 😁

As far as the MTH Terminal board..

for $25 it’s overpriced in my book

You can buy Electrical Ground Lug Strips cheaper and get more terminals..

I built this ..

Because I got my Z-4000 used-and very cheap, because the display is damaged and too expensive to repair -but the output is 100% accurate  

the Amp meters were $15 each

and the 4 bus bars were about $20

And I can terminate 11 feeders on each throttle  

You can get these bus bars at any home center…

Im redoing my set up, to add individual on/off toggles for each feeder…plus an in-line fuse to add engine protection  

I like the square drive lugs…they provide great secure mechanical connection  


Good luck


3FF183AF-313B-4950-9C51-6F852F4ED580

Attachments

Images (1)
  • 3FF183AF-313B-4950-9C51-6F852F4ED580

As a follow-up to my earlier comment on cheaper alternatives to the MTH distribution block, I failed to mention that the MTH Terminal board has 12 terminals electrically connected to the red post and another 12 connected to the black post. In order to get an equivalent functionality with the cheaper 12-terminal strips, you would need to purchase two strips plus two barrier strips to electrically connect all the terminals together on each strip.

Attachments

Images (1)
  • mceclip0

Add Reply

Post

OGR Publishing, Inc., 1310 Eastside Centre Ct, Suite 6, Mountain Home, AR 72653
800-980-OGRR (6477)
www.ogaugerr.com

×
×
×
×
Link copied to your clipboard.
×
×