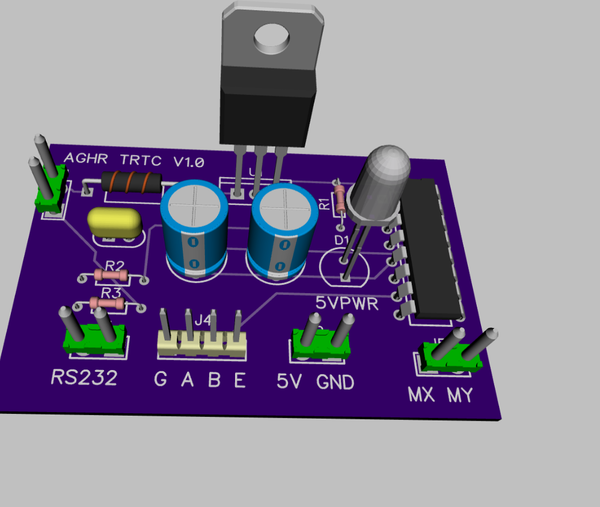
Here's a fun new one I've been working on for a few weeks...
So in our club layout we have a lot of turnouts with tortoise switching machines on them and when you go under the layout and look at the wiring it's crazy because each tortoise needs a dedicated pair of wires from the control panel to the switching machine (like a star arrangement). We're looking at adding switching machines to maybe 20-50 more turnouts in the layout over the next year so we've been looking for a way to simply how that wiring will go.
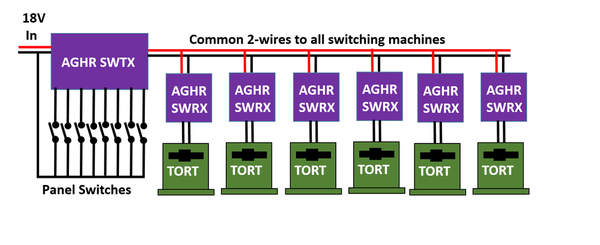
What we came up with was a simple little RS232 over power technique where we have a main power supply near the control panel, then encode all the panel switches with a micro-controller that transmits serial characters superimposed on a DC power supply that the downstream switching machines then receive. This way the same pair of two wires can snake out to all the switches in the layout, greatly simplifying the wiring:
We actually couldn't find something like this on the market commercially so we decided to make it ourselves from scratch. For the transmitter what we did was take an arduino nano board and have it read the discrete panel switches and send out a string with a single serial character for each switch every 100ms. So how it works is like this:
SW0 On (send "A") Off (Send "B")
SW1 On (send "C") Off (Send "D")
SW2 On (send "E") Off (Send "F")
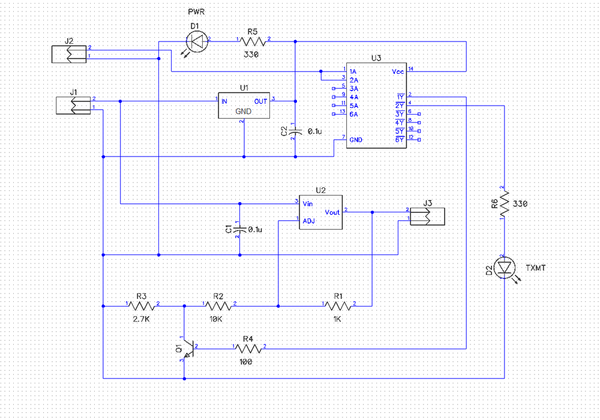
So if all the switches are off it will send a string like BDF, and if only SW1 is on it'll send "BCF" and so on. The code for this is attached on the post (TURT_TX.ino). We actually have 8 channels in the prototype. Then we feed the RS232 output of the nano board into a custom TX board that modulates the feedback network of a voltage regulator allowing the RS232 to be superimposed:
The circuit at J2 takes in the RS232 feed from the nano board. J1 is provided a power source of 14-20V DC power. U1 is a 7805 that regulates the 5V for the logic. U2 is a LM317 regulator that provides the output. When the RS232 is high it closes Q1 and changes the ratio of the feedback network (formed by R3,R2 and R1). When Q1 is off the network is R1 and (R2+R3) while when it's on the network is only R1 and R2 (R3 shorted out by Q1). This is how the modulation is applied. The output J3 is good for 1.5A at 15V and is distributed to all the tortoise machine receivers.
The output from the TX board has a very low impedance (as it offers 1.5A drive) so it's fairly robust to any noise or other parasitic signal coupling, and can drive a lot of receiver nodes (I estimate up to 30). If you wanted more nodes you could always have more than 1 TX board in parallel taking in the same RS232 feed. Anyways the waveform at the output is like this:
The duty cycle of the RS232 commands is really low, (800us every 100ms is 0.8%).
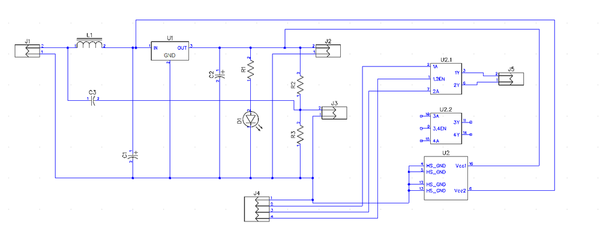
So then down the bus we have a receiver board also custom designed with this schematic:
Fairly straight forward, L1 is a choke that keeps the impedance high at the RS232 frequencies so the signal isn't loaded. C3,R2,R3 AC couple the RS232 signal back down to the 0-5V level so the receving microcontroller at J3 can decode it. We again have a 5V regulator for the logic at U1 and to power another local nano board. For our tortoise switch control application we use the SN754410 H-bridge controller to drive the tortoise winding. If you want to control other accessories I guess this part would change to something else. Since you have a microcontroller there, the possibilities are endless. The code for our tortoise controller is attached.
Note you have to change the conditionals for each motor you want to respond to each individual command.... this part:
if (ASCII_cmd == 'C') {
digitalWrite(CHA,HIGH);
digitalWrite(CHB,LOW);
digitalWrite(ENA,HIGH);
}
if (ASCII_cmd == 'D') {
digitalWrite(CHA,LOW);
digitalWrite(CHB,HIGH);
digitalWrite(ENA,HIGH);
}
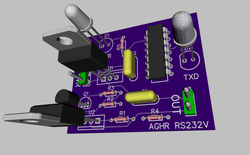
We got the PCBs made on OSHpark which is pretty cheap but in volume you could do a lot better. We'll probably do a second run where the little NANO boards pop into a socket. Right now the TX is about $30 in parts, and each RX node is down at about $17. If anyone wants to use this for a project I can send Gerber files or w/e.
Anyways a fun little project to automate things, learn some basic circuits, and simplify the wiring.


