


Wow!! Incredible layout!!!
The best Subway display I’ve ever seen is on the layout of the NJ HiRailers. It’s part EL part Under Ground. Check it out if you get a chance.
Joe F., let me add my voice to the chorus of praise for your el layout. When I was first researching my underground subway layout, googling images, your layout kept popping up and I would marvel at the extensive and accurate detail. I don't intend to attempt an el model, but if I do, your layout will be a constant reference for me.
And now I have a question: I see semaphore signals on your layout. I don't recall ever seeing images of actual el's with semaphores, so it would be very interesting to me if you could point me to actual NYC el prototype images with semaphores. Thanks.
Fantastic.
@poconotrain posted:The best Subway display I’ve ever seen is on the layout of the NJ HiRailers. It’s part EL part Under Ground. Check it out if you get a chance.
Yeah, I worked on it.


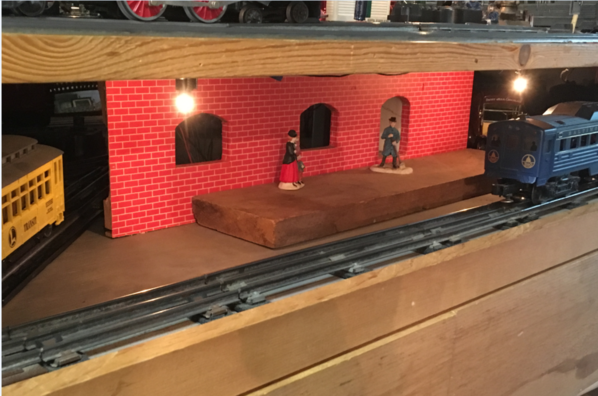
@Dwayne B posted:Great pictures and videos of wonderful subways...….Enjoy this video just made of my subway. I purchased this subway from Steve Bales a former Lionel employee from the 1950s. Steve passed away last year and I've spent the last 3 years restoring his subway....I think it's incredible work and a tribute to the fantastic modeler Steve was. I didn't think I would able to put the subway back together as it was a huge job but it all came together with hard work...….Enjoy!
Excellent subway, Dwayne. I’d give it a 10, but I have to subtract some points for Steve desecrating the subway with those Chicago signs (or are you responsible for that?). Otherwise, great work restoring Steve’s subway. Your video has given me a number of great ideas to incorporate in my subway. Thanks for sharing the video!
Hello West Side Joe
Thank you much for your nice and supportive comments. Semaphore signals were used initially on the Manhattan (Manhattan Railway Co.) and Brooklyn (Brooklyn Rapid Transit)_ Victorian Era EL's under steam engine operation and later electrified operation. When the first subways opened (IRT) the dark tunnels called for a colored illuminated lens signal lamp style. That is how the beginning of the following various types and styles of modern era "illuminated" signals became the standards, Many El lines retained semaphore signals -- the four Manhattan EL's had NO signals except ONLY at sharp (and blind) curves and at all interlocking - and on later added two-way operation center single express tracks (block signals). The subway line "EL" extensions started with semaphore signals in 1904-8 era but over the decades these were in many cases replaced by modern lighted color aspect signals.
Semaphore signals BLADES gave excellent visibility in daytimes - and the signals also had lighted aspects for evening visibility -- one bulb that illuminated one of 3 colored discs on a fixed plate that rotated with and matched the semaphore blade position of either go, slow, or stop positions. I provided BELOW some (of quite many) photos I have of most EL lines with semaphore signals in use. The Chicago and Philadelphia EL's used semaphores also.
When I started my O-Scale NYC EL layout back in 1985, there were no O SCALE "post war" modern subway cars models produced --- so I had all pre war IRT and BMT EL Gate and MUDC cars, and a number of pre war IRT Subway cars. So I modeled the 1930's thru 1960 era -- with Manhattan & Brooklyn trolleys operating under my EL. And as for signals -- I provided both Semaphore Signals and standard lighted aspect (modern) signals -- which I grew up with from mid 1940's thru 1960's. Most semaphore signals were gone from surviving BMT and IRT EL lines by late late 1970's --- tho a few (like at New Lots) here and there survived into the recent years until removed.
Below are some prototype examples -- a few of many hundreds on images of them on the EL's; The very high-post semaphores (blades) were used on (and governing) express tracks to clear the roofs of local trains that passed by ---------------
The 1st photo is a recent era image of a still working semaphore is at the yard approach lead track from the IRT New Lots Ave. Terminal Station (over Livonia Ave) -- this signal no longer exists -- a signals relay control room was built on the structure where it was located --
The 2nd (left) photo is on the IRT 9th Avenue EL at the Rector St Station - one of the rare signals on a station platform
The 3rd (right) photo is one I took from the rear of an uptown 3rd Ave EL MUDC-class Local back in late 1954 of semapore signals at interlocking on the (Bronx) 3rd Avenue EL just north of the E. 161st Street local station. Boston Post Road enters at an angle at left. These signals and switches were removed by 1957 when the center track was deactivated after having no more express service starting 8:01 PM AM Thurs. 5-12-1955 due to the then closing of the Manhattan 3rd Ave EL service below E. 149th St Station.
The 4th photo is looking north from rear car of a downtown IRT Woodlawn-Jerome Ave train about to enter the E. 167th Street Station -- with 170th St station in distance.
The 5th Photo is taken from the same location as the 6th photo - south from about E. 164th Street & River Avenue, but showing two IRT 9th Ave El trains of El Gate Cars
The 6th photo is same location as 5th photo -- but with two IRT Subway trains of the Woodlawn-Jerome (today # 4) line
The 7th photo is -- well, you know where it is I am sure .... -- Regards - Joe F
NOTE: After first posting this - I had to re-edit this twice -- as the photo orders were scrambled and some missing ...


")
")
Attachments
Images (7)
")


")
@Strap Hanger posted:Excellent subway, Dwayne. I’d give it a 10, but I have to subtract some points for Steve desecrating the subway with those Chicago signs (or are you responsible for that?). Otherwise, great work restoring Steve’s subway. Your video has given me a number of great ideas to incorporate in my subway. Thanks for sharing the video!
Thanks for your compliments glad you enjoyed the video! I can't take credit for the Chicago signs that was Steve's work. It surprises me Steve did not do New York as he grew up there and rode the subway to school. He also worked for the New York Central railroad working out of Grand Central after his employment with Lionel.
We had to piece out the subway into seven.....nine foot pieces each weighting 300 to 350 pounds. Lining everything up to make it fit into my smaller train was a challenge. I saved the best of Steve's subway but still had discard 50% of it. Roger Carp and Classic Toy Trains magazine was slated to do a article on the subway but Steve kept pushing them off and adding more details. Unfortunately Steve got sick before he thought the subway was ready and the article was never written....If your interested in hearing the whole story you can listen to the Notch 6 podcast titled the "Lionel Neighbor Next Door"
Joe F., thanks so much. That is tremendous info. The pics are great, and I have learned something really interesting today. 😀


@PRRMP54 posted:That has to be the best model subway shot that I have seen in awhile. On a par with Joe Frank's work.
Hello Dave ---- How are things in your new home and new southern State? Seems your area has been getting slammed regularly with rains and storms. We here in Nowhereadelphia get very little of it ! Thanks for the plug. Yes, Steve (SIRT) work is top shelf and first class. And I am amazed at how much "Subway" style modeling is being done more and more in the 3-rail format (well, with fake outside prototype 3rd rail - its a four rail crowd). Some serious modeling work here at OGR Subways-Transit forum by so many ! -- And I am sure SIRT and Joe Porretto are big inspirations and motivators to them.
I have been working on a lot of new Third Ave. Railway System streetcars -- and repainted some of the older ones I built decades ago with the lighter shade of ivory-cream where the yellow-cream was originally. Looks much better. And some other streetcars etc.
I been on a modeling "roll" the likes of how I was back in the 1970's-90's. Its basically "now or never" time to get long-shelved and partially done projects finally completed. You've been here -- you know how much still has to be finished (loads of carbody projects, etc). I am inspired by all the HO and O Scale subway modeling I am seeing in the past few years !
I Will have to give you a phone call to catch up. I am sure you remember this fellow and these photos from back in 2013. regards - Joe F


Attachments
Images (3)


@West Side Joe posted:Joe F., thanks so much. That is tremendous info. The pics are great, and I have learned something really interesting today. 😀
Hello W. Side Joe
You are welcome --- and knowledge is useless unless shared.... and sharing and learning is what it's all about.
A bit more background on EL siganls. The first EL lines built in the 1870 - 1910 era were miniature copycats of the then existing mainline steam railroad -- but using much smaller rolling stock and even smaller "Forney Style" steam locos for the El operations. The EL systems mimicked the operation and basic rules and operational formats of mainline commuter railroads. With modifications of course for use on El structures. Semaphore signals were a major part of then railroads (1870's-thru 1960's). So therefore, semaphore signals on the EL's were nothing unusual -- just common to most all railroading at the time.
Regards - Joe F
Just an FYI -
Most don’t know and realize all the behind the scenes work that Joe Frank did for us. He educated and helped in assisting the MTH crew in the early days with their subway models. We are lucky to have the subways, not many companies would dive into this venture. Since the 60’s, I always wanted subway cars to be made. After over a 40 year wait, I was blown away when seeing the first MTH sets appear! I still love the subways today. It’s hard to pick a favorite, but the R-40’s and R12’s are on the top of my list. I find those two designs very interesting.
Thanks Joe F.
")
Down Under
Attachments
Images (1)
")
RE: Yankee Stadium and MTH
Does anybody know if any of the green Lo_V sets has a Yankee Stadium stop? I know that the real MTA runs a LO-V historical train on the 4 line I think out to the stadium sometimes on opening day. I'd love to have a LO-V set anyway, but I can't find any info on which stops are on which train. MTH hasn't answered my email, probably short staffed, to I turn to the great hive mind--you guys!
Joe Frank is a legend and yes we all owe alot to Joe for making our passion be a reality in our modeling. Not to mention that Joe is extremely happy to help any of us even in his secrets. Extremely genuine!! Even tho I model a time in history that he hates not to mention most do he still is extremely respectful to me and he still let's me know when I create a car without graffiti on it 🤣 and I love when he points that out. Anyways Joe Frank is the type of guy that would drop what he's doing to help you out. Frank, Steve, Nate, and Jan from the New York Model Transit Association all are very genuine.


 Anyone ever model an Acid wash car...I did this R17 silver and blue ribbon car with the the silver chipping away and the Redrobin color starting to show from the previous color scheme it originally had. Hope everyone likes...enjoy ✌
Attachments
Images (5)
@Joe cardism posted:Anyone ever model an Acid wash car...I did this R17 silver and blue ribbon car with the the silver chipping away and the Redrobin color starting to show from the previous color scheme it originally had. Hope everyone likes...enjoy ✌
Nice attempt but real Subway cars just don't look that way. Al least I've never seen any book photos of them in that poor of condition. ![]()
Nice attempt but real Subway cars just don't look that way. Al least I've never seen any book photos of them in that poor of condition.


Really...? You can't be serious!! I can show you plenty of photos that look like this car and worse. 🤣🤣🤣🤣 as you were saying......
Attachments
Images (3)
@Joseph Frank posted:Hello Dave ---- How are things in your new home and new southern State? Seems your area has been getting slammed regularly with rains and storms. We here in Nowhereadelphia get very little of it ! Thanks for the plug. Yes, Steve (SIRT) work is top shelf and first class. And I am amazed at how much "Subway" style modeling is being done more and more in the 3-rail format (well, with fake outside prototype 3rd rail - its a four rail crowd). Some serious modeling work here at OGR Subways-Transit forum by so many ! -- And I am sure SIRT and Joe Porretto are big inspirations and motivators to them.
I have been working on a lot of new Third Ave. Railway System streetcars -- and repainted some of the older ones I built decades ago with the lighter shade of ivory-cream where the yellow-cream was originally. Looks much better. And some other streetcars etc.
I been on a modeling "roll" the likes of how I was back in the 1970's-90's. Its basically "now or never" time to get long-shelved and partially done projects finally completed. You've been here -- you know how much still has to be finished (loads of carbody projects, etc). I am inspired by all the HO and O Scale subway modeling I am seeing in the past few years !
I Will have to give you a phone call to catch up. I am sure you remember this fellow and these photos from back in 2013. regards - Joe F
Hmmm, that shirt looks familiar, I was wearing it just this morning! I am happy here and one day will start some kind of layout; probably modular and adhering (at least one end of one module) to the East Penn standards. Other than that, I have done nothing towards that goal except acquire a few more pieces of equipment; one that I wish that I hadn't is a NWP interurban, too big (might be 17/64 scale) and needs too much work to be presentable.
@Joe cardism posted:Nice work! I've done alot of work cars I just finished an R12-R71 Rider car


These look great!!
@Joe cardism posted:
Anyone ever model an Acid wash car...I did this R17 silver and blue ribbon car with the the silver chipping away and the Redrobin color starting to show from the previous color scheme it originally had. Hope everyone likes...enjoy ✌
This is neat too! I like the real life photo references. Just 1 thing.... why no graffiti????
@Dj'sOgaugetrains posted:These look great!!
Thanx man I truly appreciate the love 👊✌
@Dj'sOgaugetrains posted:This is neat too! I like the real life photo references. Just 1 thing.... why no graffiti????
Thanx again brotha and I actually did this car for someone who wanted it without graffiti. I'm in the process of one that I started before this one that is done inside and out graffiti and all 👍 The doors opened on the one side like it was sitting on a platform. Entire inside fully done with proper seat, wall and door colors. Advertisements as well 👌 stay tuned and stay safe...much love 👊✌
 Here's another car I've done in the past. Scrapyard cars are my favorite cars to do. This car is straight out of 1982 🤣🤣🤣


Attachments
Images (12)
Joe Cardism, how do you illuminate the interior of your car? It seems very close to the actual lighting I remember in those cars.
Joe Cardism, those are works of art. How you you do your graffiti? Hand painted, decals? From photos? Or your own?
@Joe cardism posted:
Here's another car I've done in the past. Scrapyard cars are my favorite cars to do. This car is straight out of 1982 🤣🤣🤣
Fantastic! And yeah.... how did you do your lights???
@West Side Joe posted:Joe Cardism, how do you illuminate the interior of your car? It seems very close to the actual lighting I remember in those cars.
Well funny you asked...the guy who wanted me to do this car for him sent me some kind of led lighting. He told me he uses them for his bar. I'm like ok.... so he sent me them and I ran the wiring threw out the car to be hidden from sight and I connected the open wire to the track to light the car. They do light up the car nicely I must say. I plan on doing all of my cars like this in the future but this is a whole new world to me...lol sorry I couldn't help with any real info brotha. Hope all is well stay safe ✌
@Will posted:Joe Cardism, those are works of art. How you you do your graffiti? Hand painted, decals? From photos? Or your own?
Hay what's up...I truly appreciate the love and I hand paint everything and these are all my own art. I despise graffiti decales! Nothen is recreated this is all my work. Thanx again brotha and hope all is well ✌
@Joe cardism posted:Hay what's up...I truly appreciate the love and I hand paint everything and these are all my own art. I despise graffiti decales! Nothen is recreated this is all my work. Thanx again brotha and hope all is well ✌
Well that is even more amazing. You are an artist, bro.
@Will posted:Well that is even more amazing. You are an artist, bro.
Thanx brotha and you are as well I see. That's cool. I'm going to check out your Instagram page 👍🙏👊✌
Trial and error to see what size hole best accommodates 2 1/2 foot dia scale manholes in my black foamboard street scape over my subway module.
Answer? 8 1/2 ring size! Never throw away anything, not even a 35-year old ring size gauge.
Attachments
Images (1)

A bit of fun I had when building my subway module was figuring out how to illuminate subway signals. I ended up using fiber optic lines fitted into Shapeways 3D-printed subway signal bodies, with colored bits of plastic over the lens, all powered by a 9-volt battery.
An unanticipated twist was that the light source (an LED) had a bluish tint to it, making it difficult to get reasonably accurate colors: green plastic looked yellowish, yellow plastic looked greenish, and red plastic looked purple. So, orange became the new red, yellow became the new green, and green became the new yellow!
Attachments
Images (2)


@Dj'sOgaugetrains posted:Fantastic! And yeah.... how did you do your lights???
Thank you I appreciate the love and finished led light strip that the guy I dis this car for sent me to install. But I ran the wires down inside of the car then along the floor and threw the flatcar that he has a wall plug to plug in. The car sits in a glass case on his bar as a conversation piece...lol ✌
On top of the tunnel section of my subway module, I am adding a streetscape. In the sidewalk are gratings that allow a view of the subway as it passes under the street. Of course, in real life you can't actually see the subway as it passes, only hear it and feel the breeze. But this isn't real life, is it? ![]()
Attachments
Videos (1)

@West Side Joe posted:On top of the tunnel section of my subway module, I am adding a streetscape. In the sidewalk are gratings that allow a view of the subway as it passes under the street. Of course, in real life you can't actually see the subway as it passes, only hear it and feel the breeze. But this isn't real life, is it?
West Side Joe
NICE Video ! And an excellent recreation and a novel, ingenious, imaginative and interesting idea -- I am sure it can be used by other modelers ---- especially over subway stations also. Well shot and composed ! I also like the Bus at the curb to give more depth and creativity.
Regards - Joe F
Thank you. Another view. Still a work in progress.
Attachments
Images (1)

That's fantastic. And that bus is amazing! Where did you get it? Is the signage custom?
I don't mean to hijack this thread, but since it covers subways, I thought I'd ask this question here: MTH Lo-V subways 30-2447-1. Is it common for all of the couplers on this set to randomly uncouple (due to a weak coupler spring)? Not a problem on any of my Lionel freight cars, but frequent just on this set. Bought the set used , so no history.
@pdxtrains posted:That's fantastic. And that bus is amazing! Where did you get it? Is the signage custom?
NYCTA buses were great. I rode the first 8800 series units with that new car rubber smell. https://steves3roscale.shutterfly.com/pictures/4953
Attachments
Images (1)

@Gary Liebisch posted:I don't mean to hijack this thread, but since it covers subways, I thought I'd ask this question here: MTH Lo-V subways 30-2447-1. Is it common for all of the couplers on this set to randomly uncouple (due to a weak coupler spring)? Not a problem on any of my Lionel freight cars, but frequent just on this set. Bought the set used , so no history.
Hello Gary --
NO, you are not hijacking this thread at all ! Well, I converted my MTH Low-V's (including motor trucks) with scale sized insulated wheels for 2 rail operation. Doing so I make new "unpowered" (ie: trailing) trucks using the MTH metal sideframes (which I ground down and reshaped the bottom portions of, on a large motorized grinding wheel to more scale dimensions) screwed to brass cross bolsters I fabricated to complete the truck. This made my Low V "trailing" cars 75% lighter than original MTH bodies. In the conversion I created and used my own self-built type close coupling manual more scale sized couplers. I use ONE MTH Motor truck with steel scale sized 33" wheels, installed in the rear of the train's first car. That car tows FOUR coupled trailing cars easily creating a 5 car train, and with no need for rubber "traction" tires either, NOR two motor trucks in the first car !! And running on scale profile and sized rail 2 rail track.
Those super heavy solid block metal steel truck chassis on the trailing cars create excessive weight. Those same blocks used for the 2 power trucks used on the Motorized (ie: "locomotive") car are OK so to give tractive pulling effort weight but ARE NOT NEEDED on non-powered trailing cars. If you are running 6 cars (5 cars towed by one power car) - that could be part of the problem...especially if you have up and down grades on your layout That is a lot of weight on the couplers.... especially those on the first few cars of the train. Especially if they have weak springs. Notice that on any other (Lionel or MTH) passenger cars the trucks are made more conventional to prototype. Same goers for freight cars. And THOSE cars are lighter than MTH Subway cars. Just my thoughts.
To understand, MTH never used the same truck block from one of their small diesel locomotives 4 wheel powered trucks -- on their unpowered trailing mainline R.R. passenger cars ! But they did that on the subway unpowered trailing car sets. Don't know WHY !!??
Either (1) - replace any coupler-hand springs, (2) - get new couplers, or (3) - glue the coupler hands in solid shut position (like a solid non operating coupler) so they will not open at all.
Here BELOW are photos of my MTH Low-V truck conversions from 3 rail to 2 rail scale
BELOW- Top View of reworked and converted MTH Low-V Truck (and not repainted yet)

BELOW- Bottom View of reworked and converted MTH Low-V Truck (and not repainted yet)
with a GOO applied 1/4" thick wood slab for stiffing the brass bolster plate

BELOW - Side view of completed, assembled 2 rail scale wheels truck with "trimmed down" MTH
Low V Sideframes to proper scale proportions - seen not yet repainted. Brass 3rd rail paddle shoes will be added
before painting

BELOW - at left, MTH Low-V with MTH Truck reworked and repainted, and my own scale size working
"radial swing" body mounted coupler. Car sits lower and more prototype to rail heads. Compare with
original factory-condition MTH Low-V Car and truck at right

BELOW - closeup of MTH fully reworked, repainted, scaled down to proper size-proportions, to be an
IRT type Commonwealth Motor style Truck, with a scale brass paddle-type 3rd rail shoe added

BELOW -- original MTH Low-V at left and its massive heavy unpowered trailing type truck and
huge coupler, and at right, my scale sized wheels, 2 Rail converted MTH Truck at right and my
body-mounted radial swing manual coupling coupler. My Car sits at proper scale height from track rails .

regards - Joe F
Attachments
Images (6)


I've resorted to gluing shut couplers on a few of my subway cars. This is a problem I've encountered, only I don't have the LoV set. Mine happened on the World's Fair set, and the P2 #1 train (white.)
@pdxtrains posted:I've resorted to gluing shut couplers on a few of my subway cars. This is a problem I've encountered, only I don't have the LoV set. Mine happened on the World's Fair set, and the P2 #1 train (white.)
Hello PDX --
Heh -- I have a huge ( 39' x 15 x 39" x 15) HO Scale Mainline Railroad "modular wall shelves" Layout and run 12 to 16 car locomotive hauled passenger trains. It surrounds my center-of-room huge O Scale NYC EL & Trolley Layout with aisles between the O Scale modular layout and the HO Scale wall layout.
Besides the usual HO Scale horn hook couplers -- a number of my cars have various brands-types of working HO Scale Knuckle couplers. Some of these also tend to fail at times on certain cars -- more of an occasional nuisance than a very regular event.
However, heh, when your passenger train goes around the layout a number of times successfully, and then you don't notice that 4 or 5 tail end cars are suddenly missing from its rear --- and soon find them being PUSHED by the locomotive at the head end of the same train doing the entire route-loop -- that IS ANNOYING !!! And a P I T A !! Sometimes causes a derailment additionally.
So those affected cars knuckle couplers get GLUED and locked shut. NO MORE PROBLEMS !! Many of my long distance HO passenger trains remain the same car-consists. It's no issue to me to lift a car-end up slightly to uncouple or couple-add an additional car. Worth the tiny effort to NOT have any more mid train uncouplings "on the run.."
Regards - Joe F
@pdxtrains posted:I've resorted to gluing shut couplers on a few of my subway cars. This is a problem I've encountered, only I don't have the LoV set. Mine happened on the World's Fair set, and the P2 #1 train (white.)
PDX, is that worlds fair set you referred to the R-36 one or the Q car Worlds fair set? My r-36 Worlds fair set set is a ps-2 versión and has never had a problem. However, I’m thinking about buying the Q car worlds fair set from the current catalog and was wondering if this was an issue. Thanks in advance.
@pdxtrains posted:That's fantastic. And that bus is amazing! Where did you get it? Is the signage custom?
The bus is a Hachette product, made of resin, plastic and metal, easily disassembled to enable adding figures. The signage is part of the model. Search on Hachette 1/43 "Fishbowl" bus on Ebay and you will find various versions.

Well, thank you for the feedback on random uncoupling. As I have only ONE subway set, I was wondering how common the problem is and whether there was a "manufacturer" fix. For me, I have resorted to small rubber bands around the coupling shaft to keep the locking pin in the hole. I like that better than the prospect of permanently glueing them. And depending on the rubber band used, it may be possible to still uncouple with the center rail electromagnet, if it can overcome the rubber band tension. However, in practical operation, my cars are always run in the same coupled state.
Nearing completion of the first subway module. Applied lane markings today. Remaining items include some figures coming in the mail for the streetscape, installation of manhole covers in the pavement, and an acrylic dust cover for the module. Then it's on to the next module, Times Square station.
Attachments
Images (3)


@West Side Joe posted:On top of the tunnel section of my subway module, I am adding a streetscape. In the sidewalk are gratings that allow a view of the subway as it passes under the street. Of course, in real life you can't actually see the subway as it passes, only hear it and feel the breeze. But this isn't real life, is it?
Absolutely fantastic. Gives me ideas, and I'm sure others too.
@Amfleet25124 posted:Absolutely fantastic. Gives me ideas, and I'm sure others too.
Thank you. Seeing what others in this forum have done inspired me in building this module, and I'm only too glad to return the favor. 😊
A shout-out to Marty at scalecitydesigns.com for the cool custom engraved utility access hole covers he offers. He'll engrave a set of 6 with whatever you want (all the items in each set must be the same lettering). A nice detail for my NYC streetscape over my subway tunnel module. Naturally, I asked for Con Edison, Bell Telephone, and NYC Sewer. They could also be located on underground subway station platforms. You can download the whole 20 page catalog for free from his site.
Attachments
Images (4)


Cool birthday present from my family knowing about my subway layout project. From 1954.
Attachments
Images (1)
Tracklaying begins on the second of my subway modules, Times Square station.
Attachments
Images (1)

@West Side Joe posted:On top of the tunnel section of my subway module, I am adding a streetscape. In the sidewalk are gratings that allow a view of the subway as it passes under the street. Of course, in real life you can't actually see the subway as it passes, only hear it and feel the breeze. But this isn't real life, is it?
Weeeeeelllll...on three-track portions of the IRT Broadway line (above 103 street), the center track (and thus trains passing by on it) is actually visible through the grates on the center median where they intersect some crosswalks. Peek at Broadway & 110st on Google Maps' satellite view for one such example.
---PCJ
So true. That's my old neighborhood. Thanks for reminding me!
@SIRT posted:


Steve, I've been admiring your subway module where the line emerges from tunnel into open cut. I especially like how well you captured the cement wall with that funny inward-leaning curve at the top.
I plan a similar tunnel - open cut module. Do you have any info to share on how you shaped and colored the wall and the tunnel portal? Thanks.
Here's the one I'm talking about. 
Attachments
Images (1)
Thanks
NYC SUBWAYS – Actually the cement wall and tunnel entrance were copied from BMT Brighton Line. https://www.nycsubway.org/wiki/Main_Page
I cut 1x2 sticks, bent Masonite on the curve, applied Styrofoam with liquid nails and sanded. All cement is painted with linen. Added utility lines, signals, graffiti, and overgrown bushes. Added a power sub-station building on top of the entrance between modules. Below is the inverse from the photo you posted.
Looks like you are doing some nice modeling on the subway scenes.

Attachments
Images (1)

Thank you but what I've done doesn't hold a candle to your work. I've enjoyed going through your subway albums and will revisit them as I progress my modules.
Nothing to worry about. Your modeling is top notch. ![]()
My Tunnel modules are 20 years old now. I have learned many things since then. Gad I replaced all the old Super O with G.G. Stainless a few years back. The subway modules are now a separate layout in a basement of our other property for the Grandkids.
Calling all ex-NYC residents from the 1960's and 1970's: can you remember the colors of the diagonal stripes on the panels over the counters of these food stands in the NYC subway? 
Attachments
Images (1)
Do you know what street that stand is on?
Joe, It’s been a long time, but I’m thinking 3 colors, white mixed in with the Mets orange and blue.
Glen
@BroadwayTom posted:Do you know what street that stand is on?
Don't know, but I recall seeing ones like it in the 34th St. station and possibly also in the Times Square station.
@Glen S posted:Joe, It’s been a long time, but I’m thinking 3 colors, white mixed in with the Mets orange and blue.
Glen
I thought so, too, but wanted to hear from someone else before venturing my recollection.
I received this picture from a respondent on another forum. Looks like you were correct, Glen. Good memory! Now I have something to shoot for when I try to include a similar food stand on my Times Square subway station module. 😁
Attachments
Images (1)
It turns out that color photo is a scene from the movie "The French Connection". It is a frozen custard stand that was located on the platform in the Grand Central terminal of the 42nd St Shuttle. The stand is no longer there.
The black and white "Hamburger" photo I originally posted is indeed Times Square station. I noticed it in the filename when I was moving the file from my phone to my laptop.
I've added a second photo ("Frankfurters") that could be the same stand, from the other direction. This view shows a slightly different striping in that the slanted color stripes are not all in the same direction. It also could have been taken about 10 years earlier, judging by the 50's - 60s - style hats and coats worn by the patrons, compared to the 70's - style clothing of the "Hamburger" photo.


Attachments
Images (2)


@Arnold D. Cribari posted:I would love to see photos and short videos of "The red bird" subway, others by MTH and Lionel, and especially the subway that has doors that open by remote control, which I believe is a Lionel.
Attachments
Images (2)


The geekiest subway item I have yet seen: a real-time display of the NYC subway system using 599 LED's, updated every 30 seconds by the MTA's subway status app.
I just finished putting mine in a picture frame and hanging it in my attic hobby space.
Attachments
Images (1)
Joe,
I saw this on the subway Facebook page.
How do you connect it to your WiFi network?
Glen
You turn on the board, check that your phone, tablet or PC sees the board's wifi connection, go to a website to enter the board's unique id and your own wifi's password, and the board immediately connects and starts displaying info. It was very quick.
@West Side Joe posted:You turn on the board, check that your phone, tablet or PC sees the board's wifi connection, go to a website to enter the board's unique id and your own wifi's password, and the board immediately connects and starts displaying info. It was very quick.
It's a great feature. I am using that same method with my N Gauge trains that have DCC. I built a controller out of an inexpensive Arduino and Motor Shield and connected it to an inexpensive Raspberry Pi mini computer. Using free software the Raspberry Pi puts out a WiFi signal when it starts and I can connect to it with a phone or tablet free app (Engine Driver) and run the trains and sounds. The entire setup was around $70.
This is my first Subway set and I am over the moon about it! This is my MTH BMT AB Standard subway set.


I have always wanted this and the R-1 set (still am looking for the R-1) since I saw them running around a large department store's annual Dept.56 "Christmas in the City" display (c.2004-2007)
Bryce
Attachments
Images (2)


Videos (2)


Congrats, Oscale! Sweet choice and I hope you eventually find that R-1. It’s a real beauty. Time to build that subway line under your layout!
@Strap Hanger Thank you!
I need to build a subway line, it is on the list of things to do but I have way too many projects that are already on the back burner. If only I could stop time for short intervals so I can get everything done! ![]()
Ahhhhh, youth, Oscale. I was like that when I was younger. Now, I relish the projects that pile up and all the work that I need to do. I keep a journal for all of my ideas and write down the plans for them as they develop. Now, for me, the planning and construction are as much fun as admiring the completed project. Enjoy the ride!
@West Side Joe posted:It turns out that color photo is a scene from the movie "The French Connection". It is a frozen custard stand that was located on the platform in the Grand Central terminal of the 42nd St Shuttle. The stand is no longer there.
Gee I wonder why?
I don't know the answer to that, but the station has been renovated many times, and the stand might have been a victim of one of these "improvements".
Is there a tutorial video on how to build a subway layout? I believe that it would be different than a regular layout.
@Punkrockpub posted:Is there a tutorial video on how to build a subway layout? I believe that it would be different than a regular layout.
Amen to that. I would love to see that myself.
John
I've not come across any tutorial on how to construct an under layout subway. However, It was rather easy. I just worked out a track plan that fit the dimensions around the interior legs of my benchwork. Then cut up the wood and attached everything to my existing benchwork infrastructure. If you're starting from scratch, building a two level layout is even easier. Building the platforms at strategically placed and viewable sections is also rather easy. I layed a template between the tracks where I wanted the platform to go and outlined the shape (straight sections were the easiest, curves a little trickier), then cut the basswood accordingly. Rulers from home depot or Loews are the perfect height for the base of the platforms, just cut them to height, spackle and paint black to remove the lettering and you're good to go.
The more intricate building was in constructing the elevated line on the upper level mainline. I settled on using a template and scratch building my own design with leftover wood cuttings and home depot rulers for the girder sections. However, if i was to do it all over, here is where I would start - http://nycmodeltransit.org/ModelEl.htm
Of course, there are some really detailed master builders on this site that would never settle for my level of detail, but it all worked for me. Good luck on yours!
Here is the Subway Station on my layout. Doesn't quite match the one from the movie though.
As with most things in life, my layout is a work in progress. So the Subway Station could use some added details. But there is a staircase present that leads up to the main level. My subway circuit was included in my layout's original design. Which included a feeder line that connects the Subway with the main level
Attachments
Images (3)


Hello Guys !
Well, while doing a search on Google -- this OGR thread came up. I clicked on it and realized it was started PRE-COVID ERA -- heh - 4 years ago from today (2018 to 2022) !.
Well, I started reading thru the entire 5 pages -- and now 4 years later -- I was completely "re-amazed" to see HOW MUCH GREAT subway (and EL) modeling discussion and photos of various subway models , etc., were on these pages. Including weathering and (yeah! ) combined Graffiti and weathering skilled art work was done on MTH NY subway cars. This 5 page thread has to be sort of iconic for all its compiled text and photo content. I decided to re-surface this thread to perhaps hope to get motivation juices going again in these times --- for our form of the hobby - by your re-viewing all the long ago content on these 5 pages !
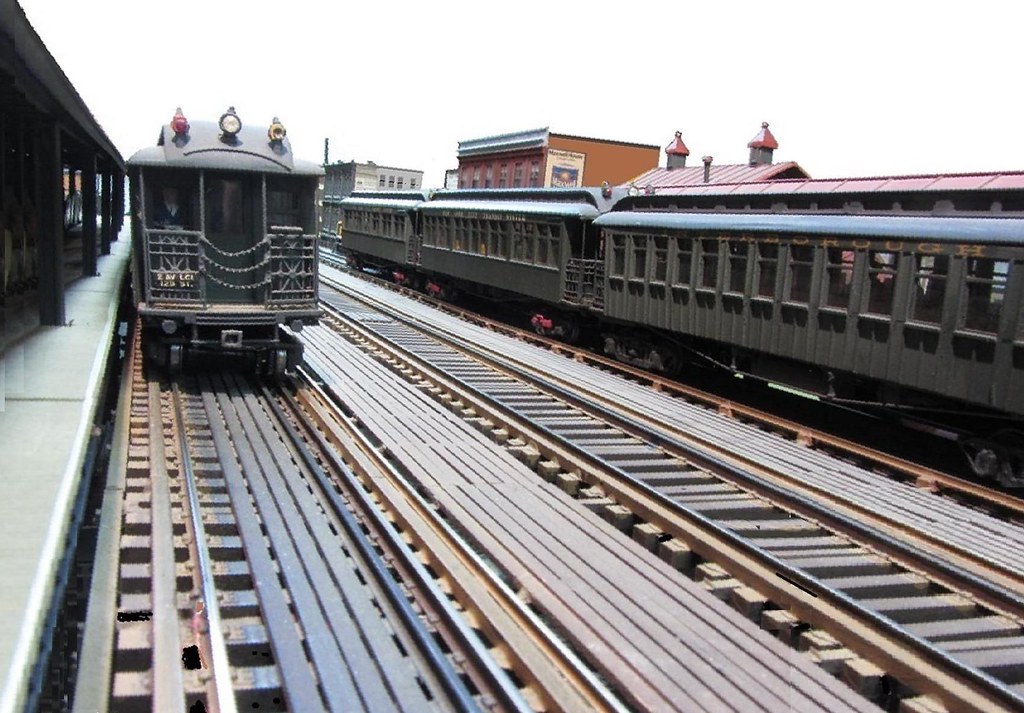
I also included a few of the newest latest photos on and around my O- Scale NYC Transit System -- for anyone who may be interested -- and get motivation going if possible. And perhaps see what you others have been up to in your modeling and layout endeavors --- Regards - Joe F


BELOW -- I could NOT RESIST permitting a G.O. (general order) for a New Haven RR "fantrip" on the EL-- my NHRR O-Scale 2-rail consist containing F Diesel unit and 9 scale NHRR 1954 Maginnis Paint Scheme passenger cars - see photos below


BELOW 2 PHOTOS -- One of my "Museum" cars (heh) on the move on city streets - BRT EL Gate Trailer ex-Kings County Elevated Railway Co. heritage


BELOW -- as was seen back in early 1955, the IRT oldest and newest, with IRT MUDC EL car at left - and newest is an IRT new R-17 car at right ---seen at a local station on my EL


BELOW -- some photos views of a visiting Flying Yankee Articulated Passenger consist, owned & operated by my pal Dave Kingston, seen at an EL station on my EL, next to my BMT Blue Bird Articulated train
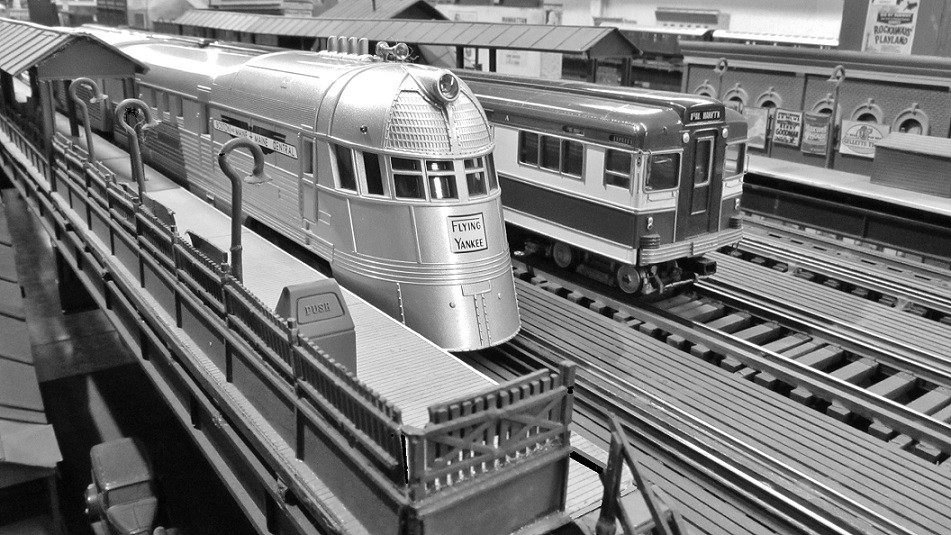


Express to Boston!
Hello Dave !
"Flying Yankee" Express to Boston ! Yeah !
Heh, well, it looks like further interest in this 5 page thread has died a fast death and is on an Express to Nowhere !
Glad you liked the Flying Yankee consist photos shown on the "EL" --
Regards - Joe F
JUst saw this thread Many amazing modelers here I attempted three layouts in my house One HO and two O For reasons beyond my control they all came down I was convinced I would never have a layout in my house and I also realized I would never have the space I wanted to build the layout I wanted so I joined the best club in America Some pics of the subway area of the club


Attachments
Images (19)
A few older pics


")


Attachments
Images (15)
")
I just went through this thread again and remain in awe of the great, detailed work out there. Very Inspirational for all of us subway fans.


Hello Ben (F)
Your club layout at NJ Hi Railer's quite much dwarfs my own NYC Transit Layout in O Scale. Your club layout has many of the things I would have wanted to build and incorporate on my own EL system if I had 3 x or more space than I have in my present (basement of) home I bought back in 1995. Double Deck EL Flyover junctions, H U G E Layout yards, subway stations, etc..
Luckily my O Scale (and my earlier HO Scale) EL & Trolley layouts are modular built -- to facilitate moving from location to location (and train shows) -- until I finally BOUGHT a home.
You should not try to build a mega city type transit layout in your home (or basement, whatever) --- just a nice compact layout to operate, showcase and test your trains and have some fun. BUT, heh, then again, you are OPERATING real NYC Subway trains for a job for the past few years --- so there is your own 1:1 scale LAYOUT !!
I operate an HO Scale mainline Railroad layout of commuter and long haul passenger trains (10 to 16 car consists !) along the walls of the 16 x 39 foot rectangular train room. It is built on modular sectional shelves set upon brackets attached to wooden studs that are anchored along the concrete white-painted walls. Its a rectangular continuous layout with removable bridges across the front and read doors. The front room door-crossing "bridge shelf module" is a 4 track, 2 island station platform section at 45 degrees to front door, so I can open and close the front door fully to enter and exit. At 5 1/2 feet high its no problem for visitors to bend and duck just a bit to pass under it, as I generally keep it in place all the time, It can quickly and easily be removed if ever necessary. The O Scale NYC EL-Trolley layout occupies the entire middle-width of the length of the floor from end to end in the train room
I posted some photos of the train room -- and the guy in 2 photos is a retired former trolley operator from the Blackpool, United Kingdom, who visited with me a few days in early March 2015.
I also just now returned here to continue posting so as to add a few extra photos (and one video) of one of my HO SCALE few New Haven RR passenger trains -- I have NHRR, PRR, LIRR, NYCRR, Jersey (CNJ) Central, Reading RR, B&O, AMTRAK, SEPTA, Metro North HO Scale passenger consists-- and some freight consists. These images show what can be done with a shelf layout and some background scenery. SEE PHOTOS (and 1 Video) BELOW ...
Regards - Joe F


Attachments
Images (11)

Videos (1)

@Strap Hanger posted:I just went through this thread again and remain in awe of the great, detailed work out there. Very Inspirational for all of us subway fans.
Hello Strap
Yes, that's what I thought when I saw this forgotten thread again, by an accidental and not-relevant Google search hit for something else transit related.
A LOT of transit modeling and creative work from so many people here. It is worth showcasing it again.
regards - Joe F
@Joseph Frank posted:Hello Ben (F)
You should not try to build a mega city type transit layout in your home (or basement, whatever) --- just a nice compact layout to operate, showcase and test your trains and have some fun. BUT, heh, then again, you are OPERATING real NYC Subway trains for a job for the past few years --- so there is your own 1:1 scale LAYOUT !!
Regards - Joe F
The last one I built had all that Compact, able to see every train, and test every train Unfortunately after operating at the NJ HiRailers club the home layout became verrry boring I still have a loop around a soffit in my basement to test trains but for the most part my operating is at the club and oh yeah at work too LOL
@bluelinec4 posted:The last one I built had all that Compact, able to see every train, and test every train Unfortunately after operating at the NJ HiRailers club the home layout became verrry boring I still have a loop around a soffit in my basement to test trains but for the most part my operating is at the club and oh yeah at work too LOL
Hello Ben
Well, you are thoroughly occupied with 1:48 and 1:1 scale train operating -- as your reply as such tends to indicate !
Regards - Joe F
Add Reply
Sign In To Reply
