


A couple of dips on my track developed over time and I shimmed them well after the area had been sceniced. As for trying to "get it all done for goodness sake", for me it is still taking years. In some places I made temporary mockup scenery on cardboard until I finally came up with a final plan. But we all know there is seldom a final final plan when it comes to model railroading. Carry on sir!
Pennsynut - I so agree. I'll just keep moving along.
I'm hopeful that no "dips" will form in my benchwork. I used the Mianne benchwork as a base, Baltic Birch multi-ply and then Homasote to top it. All of it was leveled to about 1/8" or better from end to end. So far, I see zero propensity for the multi-ply to sag or warp, which is the reason I used it.
John, I don’t think you have anything to worry about! 👍🏻
Jeff, I think I am taking a long time on the layout, but when I look back at posts here, I am surprised it hasn’t taken as much time as I would have thought.
You got your bench work just in time John. Lumber prices are rocketing.
You ain't kidding! My Baltic Birch multi-ply cost me $24 a sheet, now it's over $50!
Made a bit more progress on Twin Pines Rail Road. It is nowhere near where I want it to be, but here are a bunch of photos so you can see around the entire 9x13 layout. The right side of the layout is still a work in progress as soon as I can figure out what will look OK in the space.


The girder bridge is printed cardstock, walls are pink foam the portal is a double wide cut down by about an inch to give curve clearance on my larger locos.


The CEO placed the Christmas tree, snowman and presents in the square. A real surprise and fitting around Christmas.

The hill on the left is calling for more pine trees. The landscape behind the tracks are in two sections which can be easily lifted out, so I can pop up through the corner.


The hill in the corner used to be much taller but did not look right - so off came much of the bottom. It also provides space for an incoming rail line and another siding to "store" trains. The foreground space will have an Atlas switch tower - if I can get my hands on one. Maybe a Peco tower depending on shipping from the EU. This is a decent example of using chicken grit as ballast for the terminal rails and dark grey Scenic Express ballast for the mainlines. I did end up using paving sand between the track and covered with ground foam. (Frustratingly - I cannot get my WS static grass applicator to get the fibers to stand up - If I pour glue on my grounding rod, then it kind of works - argghhh.)

Terminal waiting for the Plastruct twin vertical tanks. I'll probably add 4 inches to provide room for a road and the tanks in front of the building and pump rack.

There are 3 bridges in the photo, the middle one is hidden by the Lionel bridge. I had to raise it 3/4 of an inch off the deck to provide clearance for my husky stacks. Two of the bridges are lift outs with banana plugs providing power and removal if necessary. The MTH bridge swings out with a 4 inch door hinge.
Well that's my space and layout so far. Jeff
Attachments
Images (12)
Looking really good Jeff. I can’t get over that the girder bridge is card stock; it looks great. Given your demonstrated skills I think the CEO should award you additional space.
Really like the girder bridge.
Yep, same here. You need to walk us through how you built that girder bridge out of cardstock. It looks fantastic (as does everything). Have you been taking lessons from RSJB18 (Bob) on the use of cardstock?, LOL! Great job!
OK Guys - regarding the bridge - I did get the idea of using cardstock from RSJB18 (Bob) See my post on page 993 describing the bridge in "What did you do ..." I made this bridge twice once in grey and then again in color. I used a laser printer - however the CA does not stick very well to the waxy laser ink - I would use ink jet when I do it again. Also color all the edges before you glue together, once coated with CA nothing you do will cover the white edge. There are several posts of the bridge in my posts - a favorite photo location for me.
Wow, Jeff, really great progress. I was worried about your grades too, but they seem to be working out.
A couple of people have commented on the difficulty of using O72 in a 9' x 13' space. 108" is of course plenty of width for 72" diameter track- the problem is if you want a complex track plan, multiple loops and engines to be able to run anywhere on the layout. Since, when you come down to it, most of us run a lot more than we switch, here is one possible solution.
Simply make the O72 a completely different layout on another level and unconnected to the other level ( either above or below) and run the big trains on that. On the second level, use a smaller radius and a more complex track plan and do most or all of your switching on that level.
Will - all that yours on the "Art Website"? impressive.
Turns out the upper/outer level is a minimum of 72" diameter - I don't know for sure because I had a box of used Ross track that went over 88". Taking a page from many on the forum, where it fit, I would place the largest diameter curve I had on hand in the middle and finish with the 072. My second level has a mix of 072, 062, 054 and 042. The inner is no more than 42" with the depot having 031" at the tightest diameter. A couple of my MTH premiers supposedly minimum 072 run just fine on the tighter curves.
For me it was important to be able to run an engine on all three tracks - given the biggies were not going to be able to do that - so all the tracks need to be interconnected. Basically I wanted more than a 30 second loop around the track.
My biggest issues are - forgetting to put bridges back in place when changing from a test run to run on the layout (and the other tracks with the missing bridges) and forgetting to electrically connect all the tracks into one common feed. I get to a turnout, get halfway through and oops no power. DRAT!
Overall running the big iron in a small space is really hard to do - other than a big circle. I was playing with SCARM and realized I need 19 feet just to have a modified dogbone with 072 - double mainline needs a touch bigger. This one is 13x23 and where do I put a multiple track passenger station (14 feet minimum length) - back is the only feasible place.

The Black Diamond RailRoad is built on a similar foot print and will probably be what I model on my next layout - with a little customization of course.
Attachments
Images (1)

Jeff, great looking work in all your photographs! So your wife places items on your layout too! Mike places them on the layout and waits for me to see them. If I take too long, she asks me if I saw anything new, then I have to look closely.
@ScoutingDad posted:Overall running the big iron in a small space is really hard to do - other than a big circle. I was playing with SCARM and realized I need 19 feet just to have a modified dogbone with 072 - double mainline needs a touch bigger. This one is 13x23 and where do I put a multiple track passenger station (14 feet minimum length) - back is the only feasible place.
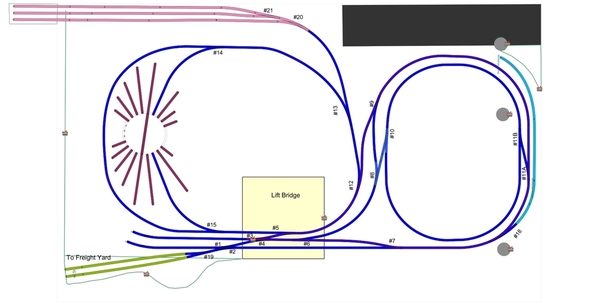
It is possible to get a nice run in a 13x23 space, my layout is roughly 24 x 12 and all my curves are O72 or larger. I went with a large folded dog-bone that has a second level. My dog-bone mainline has 140 running feet of track, and there are three smaller loops that I can either run on or park things on. I also incorporated the capability to reverse direction on the main dog-bone, something that I felt would be mandatory.
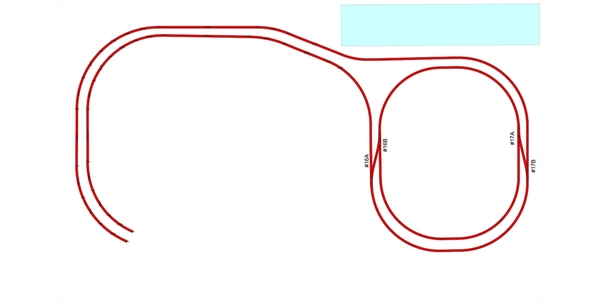
Here's two shots, on the lower left of the main level plan, the elevated section ramp starts and wraps around the back. The elevated section is depicted in the second graphic.
Main table level track plan
Elevated level track plan
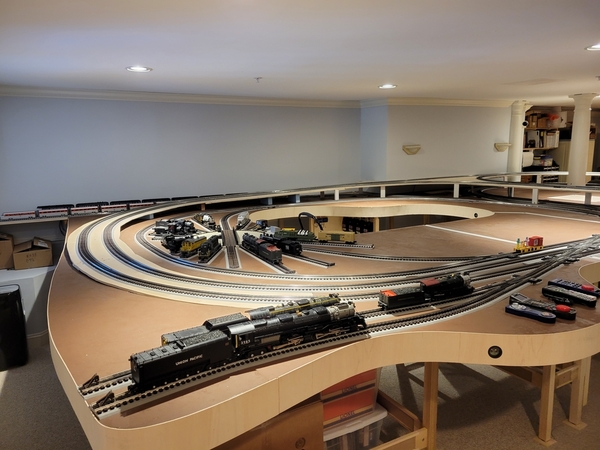
A shot from the front showing the grade
Attachments
Images (3)


Did more track ballasting and ran out of the dark gray Scenic Express. Probably need one or two more gallon containers. Updated the SCARM drawing to show what is now on the layout. I do not see any more room for track. : (
With this last update - I think I now have more curved turnouts than traditional ones. They are a real space saver as there is not much straight track on this configuration.


Attachments
Images (2)


Spooner WI.... Pretty country up there. We were on a lake in Burnett county. Deer lake. Your layout looks quite impressive Jeff. Thanks for all the updates and photos...
10’ to the right, 10’ to the left, she’ll never notice.
Scott, I don’t see your photograph.
That gives the impression of being larger than 24’x12’ John. It looks vast.
Add Reply
Sign In To Reply

