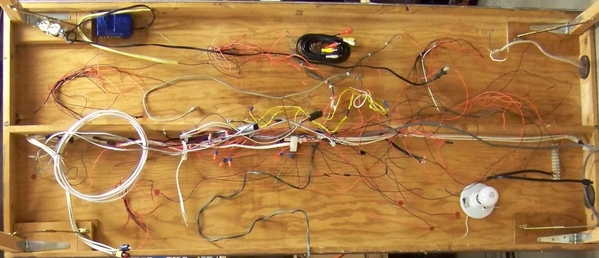
It all started with a persistent short circuit in my ZW transformer.  I finally unhooked the thing for bench testing, and it ran fine!  Can't imagine what the problem is...

GEDC2030

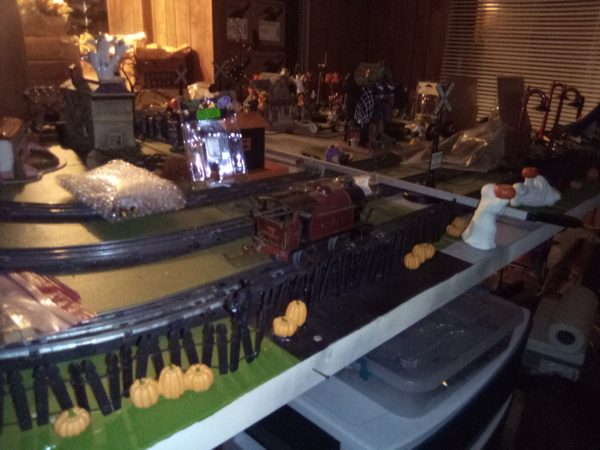
So, bid a fond farewell to the glorified test track that has served me well for over a decade...

GEDC2029

And especially farewell to that Chic Sales wiring nest! 

The general plan is to strip the 4 x 8 down to the bare wood, put a layer of Homasote on top and actually fasten the track in place!  With wires underneath and all!    The existing 1x2 perimeter frame will be discarded in favor of a 1x3 frame with clearance to run wires, while still fitting nicely on the old dining room table that serves as its legs. 

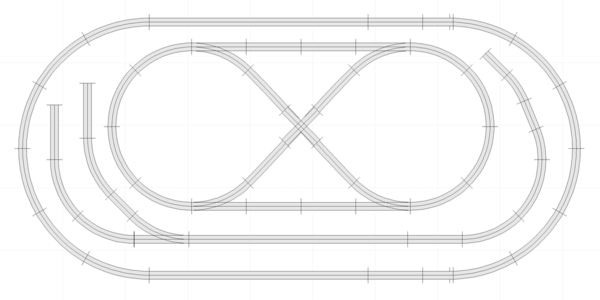
Here's a sneak peek of the track plan: 

Gfx_RTC Rework 20.12.03

As you can see, I'm retaining the essential test track ethos, with a figure 8 oval thrown in for grins and giggles.  The main difference is the bump and go test track.  Since a substantial proportion of the RTC fleet is bump and go trolleys, I figure a dedicated test track for 'em is in order... 

The fact that the layout will bear a demented grin is merely coincidental.    Honestly.   

Anyhow, watch this space!  I'll probably start work in earnest after the holidays.   

Mitch

Attachments

Images (3)
  • GEDC2030
  • GEDC2029
  • Gfx_RTC Rework 20.12.03
Original Post

Replies sorted oldest to newest

@Scotie posted:

Sorry to see it go but there's nothing worse than trying to find a problem in wiring "that just grew".

You've read the advice here before but different colors for different functions and labels wouldn't hurt.

We'll be looking forward to the new and improved--

Thanks, all!  Actually, what I plan to do is fairly simple wiring.  Feeder wires to diagonal corners of the ovals, a feed to the bump and go track (using the antiderail feature of a 1022 switch to control the siding) and feeds from the front switches to their diagonal opposites so that both ends are straight or turned at the same time.  Other than a couple of wires for lights and such, that'll be it.  I figure I'll paint the Homasote in the garage, and do the rest of the assembly in the living room, stapling the wires to the plywood underneath as I go....

Mitch

Accompanying a redo of former layout wiring patterns comes wisdom on how to do it better (at least differently) next time. I've built several garage-based O-gauge holiday train layouts, and I improved the wiring scheme and pathways with each re-doing during 12 years of being Santa's toy train helper.  Here are my "tricks of the trade" - although not a "secret" among hobbyists. Others may offer practical tips.

1)  Color-coded wire pairs according to function:  track power, accessory power (usually fixed 14 v), lighting for buildings (usually 12 volts DC), 5.5 v for Miller signs, etc. Although some hobbyists are committed to wire labeling, I'm not a neatnick. My layout isn't big enough for NASA-style wiring practices.

2)  Terminal strips for junctions (by Radio Shack online), and the nifty 12 or 24 connection terminal strips by MTH.

3) Spade lugs soldered to ends of wires for goof-proof wire connections. Time-consuming up front, but worth it.

4) Lots of plastic cable ties to support wires along their path to avoid the "explosion in a spaghetti factory" look.

5) Bus wiring with feeders along the routes to lock-ons. I prefer the Lionel lighted lock-ons for a quick visual check-up of all active track power connections. i know - some hobbyists prefer to hide all track wiring. I envy their fastidiousness, but not enough to join that fraternity.

6) Lionel metal lighted bumpers at the end of sidings. The track power wires connected to each siding can be connected to toggle switches to show on/off of track power for each siding.

7) Wiring to accessories mounted on the perimeter fascia board adjacent to each accessory. I favor Lionel #90 momentary contact pushbuttons or the classic slide switch for on/off control.

8) Master power switch for the entire layout - one switch kills all electricity.

And so it goes ...

Mike Mottler    LCCA 12394

It all started with a persistent short circuit in my ZW transformer.  I finally unhooked the thing for bench testing, and it ran fine!  Can't imagine what the problem is...

So, bid a fond farewell to the glorified test track that has served me well for over a decade...

And especially farewell to that Chic Sales wiring nest! 

The general plan is to strip the 4 x 8 down to the bare wood, put a layer of Homasote on top and actually fasten the track in place!  With wires underneath and all!    The existing 1x2 perimeter frame will be discarded in favor of a 1x3 frame with clearance to run wires, while still fitting nicely on the old dining room table that serves as its legs.

Here's a sneak peek of the track plan:

Gfx_RTC Rework 20.12.03

As you can see, I'm retaining the essential test track ethos, with a figure 8 oval thrown in for grins and giggles.  The main difference is the bump and go test track.  Since a substantial proportion of the RTC fleet is bump and go trolleys, I figure a dedicated test track for 'em is in order...

The fact that the layout will bear a demented grin is merely coincidental.    Honestly. 

Anyhow, watch this space!  I'll probably start work in earnest after the holidays. 

Mitch

Remember to scrounge ( I particularly like the Demented Grin) What about the Royal KITTEH?

miglet

Last update of 2020! 

Vehicles and buildings removed...

GEDC2045GEDC2046GEDC2047GEDC2048

As Fortescue supervises operations from the rear platform of his private sleeping car...

GEDC2049

...Sylvia Siamese is astonished by the change!

GEDC2050

Meanwhile, Norma Bates Kitteh wants to know, "Where mah trains at?"

GEDC2052

Before tearing the track up, I decided to mock up the final track plan to get an idea of what it looked like.

GEDC2053

Norma, of course, offered somewhat sketchy assistance.

GEDC2054

A less than fond farewell to Chic Sales wiring!

GEDC2055

And here, I think, we'll leave things until after New Year's...

GEDC2056

So, I let some of Miggy's sheep out to graze until then.

GEDC2057

Mitch

Attachments

Images (12)
  • GEDC2045
  • GEDC2046
  • GEDC2047
  • GEDC2048
  • GEDC2049
  • GEDC2050
  • GEDC2052
  • GEDC2053
  • GEDC2054
  • GEDC2055
  • GEDC2056
  • GEDC2057

Big work going on there.  The changes will add to operational enjoyment.  I'm glad you are letting the sheep graze.  Two thumbs up.

@O Gauge Jim posted:

Hey Mitch, it looks like you and Norma are having a great time with the rebuild. By the way, how are your giraffes doing during this pandemic? Hope you have them safely masked up.Have a Great New Year  and stay safe.

And to you, Jim!

As for Fortescue, he's socially distancing. 

GEDC2058

Attachments

Images (1)
  • GEDC2058

I decided to run at least one train for New Year's.  While the inner tracks are only mocked up and not in running condition, the original outer oval is still intact (for now), so I decided to break out one of the orphan trains I rescued a few weeks back...

The little 242 ran like a champ, as did the original 35w transformer.  In fact, once I oiled all the wheels, I had to dial back the transformer a bit so the train wouldn't overspeed!    Interesting fact:  This plastic-shelled locomotive sports a traction tire,  something I thought started in the MPC era... 

GEDC2059

Naturally, Norma Bates Kitteh got into the act.

GEDC2060

As did Sylvia Siamese.

GEDC2063

Even Fortescue was on hand...

GEDC2064

...stopping to confer with the sheep in what I suspect is going to become known as "Miggy's Meadow". 

GEDC2065

Ya know, in this era of Bluetooth remotes, digital controls and all the alphabet gobbledygook,  sometimes it's nice to just get back to basics, run a simple train around a simple oval and bask in the smell of ozone and 3-in-1 oil...

Happy New Year, all! 

Attachments

Images (5)
  • GEDC2059
  • GEDC2060
  • GEDC2063
  • GEDC2064
  • GEDC2065

2/26 Update:  Going to be using the RTC's grass mat at the NW Arkansas Train Show,  so it's finally time to take up tracks, with Norma Bates Kitteh's assistance.  However, once it became clear that Train wasn't going to be happening, she decided to clear out...

GEDC2144

For the first time since 2007, the plywood sheet sees the light of day. 

GEDC2145

Mitch

Attachments

Images (2)
  • GEDC2144
  • GEDC2145

May update: 

Temporary tracks taken up, now that the past month or so's bout of rotten weather is over, at least for now...

GEDC2228

The plywood did not leave without a fight, though...

GEDC2229

But eventually, I wrassled it into the garage for future Homasoting.

GEDC2231

Given the difficulties in getting the plywood out (the boxes on the table contain the rollling stock of the lefthand module of the Howard Roark Memorial Train Storage Facility; the Facility module in question is currently in the living room), I'm rethinking in terms of relocating the RTC to the workshop proper, and turning this room into the library...

GEDC2230

Temporary service is being provided.  While Norma takes her afternoon nap, Assistant Supervisor Sylvia Siamese is on the job...

GEDC2234

Mitch

Attachments

Images (5)
  • GEDC2228
  • GEDC2229
  • GEDC2231
  • GEDC2230
  • GEDC2234


GEDC2234

Mitch

BREAKING NEWS: @M. Mitchell Marmel, Grand Pooh-bah of the Razorback Traction Company, has been hospitalized after his foot was flattened by a falling mid century modern transformer. After recent labor unrest, the assistant shop supervisor (who was seen in the area around the time of the “accident”) is being sought as a feline of interest... film at 11:00.

Mitch

You know I love the oval an figure 8 and outside loop around it as I picked these features for my layout.

You might want to consider adding two more switches that would link the figure 8 oval with the outside oval, at the top of the layout loops, to give a way to let trains traverse from inside oval to outside oval and vise versa.  This link would allow you to reverse a train on the outside loop also.

Keep posting on your progress to up grade your layout with a complete rebuild.

Charlie

Last edited by Choo Choo Charlie

You might want to consider adding two more switches that would link the figure 8 oval with the outside oval, at the top of the layout loops, to give a way to let trains traverse from inside oval to outside oval and vise versa.  This link would allow you to reverse a train on the outside loop also.

I considered it, but rejected the idea.  You have to bear in mind that this is basically a glorified test track, so I want to keep all three tracks separate.  Imagine, for example, I'm testing an M-10000 or Zephyr or Electroliner, which require a minimum of O42 curves.  One mistake, and it gets thrown into the inner O27 oval and whoops!   

Mitch

Slow progress being made...

Most of the Howard Roark Memorial Storage Facility is being repurposed, with the rolling stock being transferred into this cabinet... Each of the two-drawer modules are separate, so they can, if need be, be placed in different locations.

GEDC2256

One unit of the Roark Memorial has been placed in the workshop to accommodate wider equipment which doesn't fit in the drawers.

GEDC2257

The new workbench corner is cleared. 

GEDC2260

The new workbench itself...well, that's another story. 

GEDC2259

Since I don't have any help (but would cheerfully accept same), this is a very slow process, straining even my vast good humor. 

Ah, well...

Mitch

Attachments

Images (4)
  • GEDC2256
  • GEDC2257
  • GEDC2260
  • GEDC2259

Mitch, the cabinet and shelves look great!!  I wish you well on clearing out the miscellaneous stuff to make the workbench available.  Our younger daughter could make quick work of it, but I'm not sure you would like to see what all she threw out.    Our older daughter, age 30, has accumulated as much stuff as we have knocking on the door of age 65. 

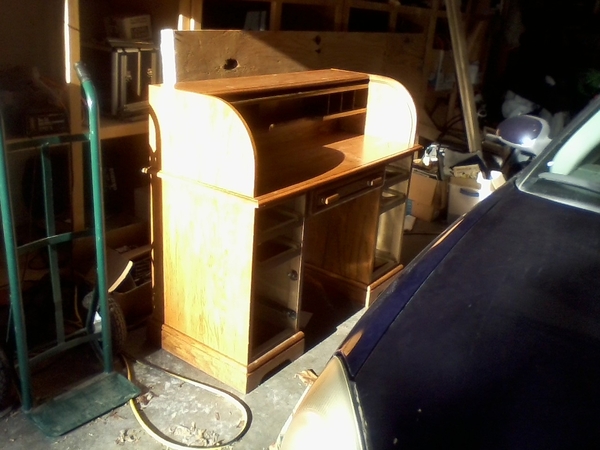
@CBS072 and I did a bit of workbench hunting on Wednesday, and found a rather bedraggled rolltop desk in the scrap heap at a local Goodwill.   $15.91 later, I was the new owner.  (The 91¢ is the part that worries me a little.)

0825211807-00

(seen here sans drawers for to make handling easier)

With the rolltop removed, here's the desk in place:

GEDC2265

I'm going to laminate these 2 x 6 sheets of Lowes soundboard together as a semi-expendable work surface:

GEDC2266

This'll allow me to make some progress without having to excavate that black desk (triple digit temps and high hum-a-ditties just ain't the kind of weather suitable for such)...

Mitch

Attachments

Images (3)
  • 0825211807-00
  • GEDC2265
  • GEDC2266
Last edited by M. Mitchell Marmel

Mitch:  I love your solution to the problem of "Too much stuff on the table"...Buy another table!  Now that's the kind of reasoning I like!!

Heh.  Well, this whole business is like one of those sliding tile games.  I have to move my old work desk in order to have room in the consolidated train room for the 4 x 8 layout.  So, while I'm moving it, I want to upgrade to more drawers so that the bench top isn't as cluttered.  The old desk will be going in the library/guest room next door.   To complicate matters, I'm having a house guest arrive next Tuesday, so there's a certain time pressure as well...

Mitch

I GET IT!  My "work bench" is a 24" X 6 ft" folding table up against a cabinet in my train room.  I keep moving stuff to make room to work but there is no additional space.  Many years ago, my Dad (an accountant by trade) made a tool for his workbench.  It was a 6 ft 2x4 with handles on one side.  He could grip the handles and push the 2x4 over the top of his work bench thus shoving everything to the rear and clearing space in the front !!  I always admired his solution as well.

Keep posting Mitch, I always enjoy what you post.

Regards

Don

Slow progress being made...

Most of the Howard Roark Memorial Storage Facility is being repurposed, with the rolling stock being transferred into this cabinet... Each of the two-drawer modules are separate, so they can, if need be, be placed in different locations.

GEDC2256


Mitch - always love your updates .  This drawer set up I really like.  Hmmm, might need to keep an eye out for something like that myself.

@Mark Boyce posted:

Yes indeed, Mitch!  It is ready for junque!!  Looks great!

The first junque to be moved was my Goodwill stereo: GEDC2269

Dunno whether it's "D**n, I'm good," "D**n, I'm lucky" or a combination of the two, but the components fit the Roark Memorial shelves perfectly, and the old Heathkit speakers boom out fine to either side of the bench...

Mitch

Attachments

Images (1)
  • GEDC2269
Last edited by M. Mitchell Marmel
@coach joe posted:

D**n you're good!  Heathkit!  S0mething I haven't heard in, I don't know, seems like forever.

Alas, turns out one of the speakers has a bum woofer.  Fortunately, I never DID put up the outdoor Dual pool speakers I got from a friend a decade or so ago...

GEDC2271

Also opens up storage space on each side of the bench.   

Mitch

Attachments

Images (1)
  • GEDC2271

Isn't this a lovely, tidy, welcoming work environment? GEDC2272GEDC2273

We shall speak no more of this.

Mitch

Back in my working days, I had a sign on the front of my desk (one of the few spots you could actually see anything) that read “A Clean Desk Is The First Sign of a Misguided Career”… In fact, most of my office resembled your second shot. I knew where everything was, other people just never appreciated my filing “system” When I retired, it took the better part of a week to clear out the clutter - I couldn’t leave it for someone else to deal with!!!

The workshop area is about as done as I'm about to get it at this point.

GEDC2277

The extra drawers have done a wonderful job of absorbing extra tools, parts et cetera. 

GEDC2278

The corner where the 4x8 is going to go has been cleared.  (Norma Bates Kitteh presented for scale.)

GEDC2279

Next up will be clearing non-train materials from the closet in order to store train things...

GEDC2280

Mitch

Attachments

Images (4)
  • GEDC2277
  • GEDC2278
  • GEDC2279
  • GEDC2280

After painstakingly loading the new train storage unit...

GEDC2289

I've reversed the process and dismantled the cabinet.

GEDC2291

Since the subcabinets are a) separate units, b) made of heavy, dense MDF board and c) painted with gloss paint, they don't stay lined up.  In addition, the bottom three units need shims installed so the drawers will open smoothly.  I'm fabricating shims from paint stir sticks, cut to length.

GEDC2292

Once I finish installing shims,  I'm going to stick the subcabinets together with Velcro, thus allowing me to adjust the height as needed by changing the number of subcabinets in the stack while holding them firmly in place...

Mitch

Attachments

Images (3)
  • GEDC2289
  • GEDC2291
  • GEDC2292

After painstakingly loading the new train storage unit...


I've reversed the process and dismantled the cabinet.


Since the subcabinets are a) separate units, b) made of heavy, dense MDF board and c) painted with gloss paint, they don't stay lined up.  In addition, the bottom three units need shims installed so the drawers will open smoothly.  I'm fabricating shims from paint stir sticks, cut to length.


Once I finish installing shims,  I'm going to stick the subcabinets together with Velcro, thus allowing me to adjust the height as needed by changing the number of subcabinets in the stack while holding them firmly in place...

Mitch

It's always somthing isn't it  Just when you think your done your not.

Last edited by Dave Ripp.

For the first time in nearly a year, I have trains running in Chez Marmel! 

GEDC2333

This Marx dealers' display has been languishing in my garage for half a decade after suffering what Space-X calls an RUD (Rapid Unexpected Disassembly) after the bungee cords holding it to the roof of my sedan let go on a back road.  So, last night, I sat down, pulled out all the old nails and staples, and reassembled the little indefinite using Gorilla Wood Glue and drywall screws.  After a bit of tweaking and repair, the original Marx track is working fine, and I was able to add some buildings and scenery!  Plus Fortescue. 

The sawhorses will be supporting the final layout whenever I get that done.  But, for now, I can at least test trains... 

Mitch

Attachments

Images (1)
  • GEDC2333

For the first time in nearly a year, I have trains running in Chez Marmel!

GEDC2333

This Marx dealers' display has been languishing in my garage for half a decade after suffering what Space-X calls an RUD (Rapid Unexpected Disassembly) after the bungee cords holding it to the roof of my sedan let go on a back road.  So, last night, I sat down, pulled out all the old nails and staples, and reassembled the little indefinite using Gorilla Wood Glue and drywall screws.  After a bit of tweaking and repair, the original Marx track is working fine, and I was able to add some buildings and scenery!  Plus Fortescue. 

The sawhorses will be supporting the final layout whenever I get that done.  But, for now, I can at least test trains...

Mitch

After two years, progress has recommenced on the Razorback Railroad, Traction and Scrapple Company test track! 

Underframing to match the sawhorses in the workshop and a Homasote top has been installed and primed with clear coat....

GEDC2909GEDC2910

Now the 4 x 8 is mounted in the workshop area...

GEDC2911

...coated with weldwood and grass mat installed1 

GEDC2912GEDC2913

Here's Fortescue ready to tee off on the brand new driving range!

GEDC2914

Mitch

Attachments

Images (6)
  • GEDC2909
  • GEDC2910
  • GEDC2911
  • GEDC2912
  • GEDC2913
  • GEDC2914

After two years, progress has recommenced on the Razorback Railroad, Traction and Scrapple Company test track!

...coated with weldwood and grass mat installed1 

GEDC2913

Here's Fortescue ready to tee off on the brand new driving range!

GEDC2914

Mitch

Looks good Mitch. I see some things never change. Fortescue and cats are always in the middle of everything.

Bob

Add Reply

Post

OGR Publishing, Inc., 1310 Eastside Centre Ct, Suite 6, Mountain Home, AR 72653
800-980-OGRR (6477)
www.ogaugerr.com

×
×
×
×
Link copied to your clipboard.
×
×