@Mark Boyce posted:

@RSJB18 Bob, thank you for asking Art about the Atlas system.

@Chugman Art, thank you for describing the Atlas system.  I had no idea they had this available until you started this thread about your signaling project.  I am following another thread where the OP is posting about a totally different system.  Of course like anything, there are many ways to go about it.  As I told him, during all you years working as an electronics technician and engineer, I wanted to keep things very simple at home.  Now that I've been retired for almost 4 years, I find myself drawn to these discussions.     Thank you for keeping us up to date.

Thanks, Mark.  I just want to add that all my comments about the more technical aspects of this system is from a real layman's perspective.  It will be easy for me to get in over my head.  If I do, I hope the "real experts" will jump in and help me out.  Other wise I will just keep pretending that I know what I'm talking about.  LOL

Art

@Chugman posted:

Thanks, Mark.  I just want to add that all my comments about the more technical aspects of this system is from a real layman's perspective.  It will be easy for me to get in over my head.  If I do, I hope the "real experts" will jump in and help me out.  Other wise I will just keep pretending that I know what I'm talking about.  LOL

Art

Art, That is one of the benefits of posting what you are doing right here.  I have posted what I was doing several times where someone pointed out something else I needed to take into consideration.  The more detail I post, the more useful feedback I get that helps me and others as well.

I have been struggling a little with producing videos lately since I lost my old program due to my hard drive crashing.  With that said, I shot another quick video to show the flashing yellow aspect on the signal bridge at the entrance to my East Proviso yard.  This aspect on my railroad will be a "restricting approach" which means you are clear to enter the yard at a restricted speed of 10 miles per hour and be prepared to stop.

I also included a meet of two mainline trains.  In this video, the UP unit coal train is waiting on mainline#1 for a BNSF Q stack train that has priority.  Once the BNSF train has safely passed the turnout, the UP coal train is cleared for the mainline.  I then shot this same meet from the other direction. 

We are getting there, but everyone is so busy that is hard to find days everyone is available. 

Art

@Chugman, Art, and helpers,  Now that I’ve seen the cool video,  your work is amazing, the video better than amazing, your layout is simply awesome. I compliment your taking on this challenge, it’s a realistic accessory (a super signal system) that separates a tin-plate layout from one’s that is scale-oriented, even though it’s three rail. Making your own signals from scratch, utilizing the Atlas O system, having great help for advice, and most importantly you’re sharing this timely workmanship with us here on the best forum in the model railroad hobby, it’s a Wow… Thank you. Happy Railroading Everyone.

@leapinlarry posted:

@Chugman, Art, and helpers,  Now that I’ve seen the cool video,  your work is amazing, the video better than amazing, your layout is simply awesome. I compliment your taking on this challenge, it’s a realistic accessory (a super signal system) that separates a tin-plate layout from one’s that is scale-oriented, even though it’s three rail. Making your own signals from scratch, utilizing the Atlas O system, having great help for advice, and most importantly you’re sharing this timely workmanship with us here on the best forum in the model railroad hobby, it’s a Wow… Thank you. Happy Railroading Everyone.

Larry, thank you so much for your comments.  It's a lot of fun sharing our project with the forum and your support reinforces that.  I agree with your comments about this being the best forum in our hobby.

Art
Just a quick update.  We have a work session scheduled for this afternoon and hope to get a lot done.  Jim has completed the wiring and painting of the three bracket signals that Alan 3D printed for us and we hope to install them on my Milwaukee branch line or my upper level today. 

Another task is to construct more signal board clusters for Wichita, and Chicago Junction.  We want to be able to get them completely wired and installed with connecting cables so we bring up a couple more blocks of mainline #1.  That will leave us with basically just the Eola yard and "race track" to complete and we will mainline #1 complete.

Art

I've been too busy to do any quality updates with pictures, but we weren't able to get as much done as usual last Sunday.  Jim was able to build three new signal board clusters, but we ran out of time to wire them.  He texted me last night that he has them wired and they are ready to install under the layout.

The three bracket signals are completely wired and after I paint the bases concrete color are ready to be installed. 

At our next work session we plan to install these clusters, light up the corresponding signals, and get all the cables made and blocks connected.  That will complete all of mainline #1 except for the Eola yard and "race track" area.

Art

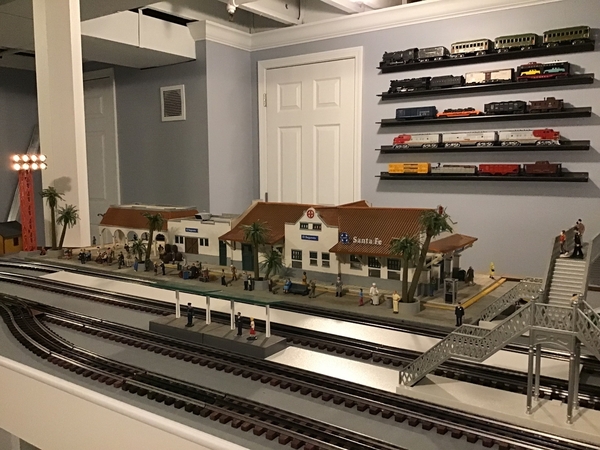
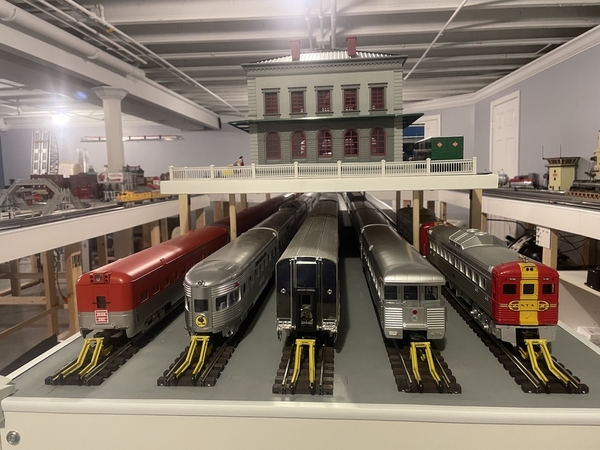
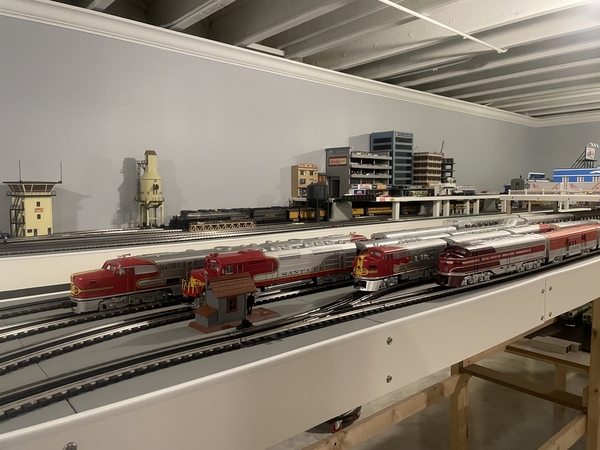
Art, after making my first post on OGR, I happened across your name and was pleasantly surprised to see that you have progressed tremendously on your layout. I always looked forward to see your posts on UTube and was concerned when there weren’t any for quite a while. You need to know that your layout was the spark for me to finally make my own setup! Being stuck at home for almost a year from March of 2020 got me motivated. Mine is much smaller and not as landscaped detailed, but I’m having fun running Santa Fe, UP, Burlington and Rock Island passenger sets. I even put in an elevated Union Station with 4 passenger sidings.
Thanks for you sharing your hobby accomplishments!IMG_0950IMG_0948IMG_0945IMG_0431IMG_0430

Attachments

Images (4)
  • IMG_0948
  • IMG_0945
  • IMG_0431
  • IMG_0430

BRicch first thank you for your comments, I really appreciate it.  What you have accomplished really looks good so far.  It looks like you have a real love of passenger trains and stations.  The Santa Fe station is gorgeous, I love the Spanish style architecture.  It seemed to me that I was never going to get to the scenery stage on my layout, which is the part that I enjoy the most.  Please show more pictures of your layout and your progress.

Art

Here are a few pictures of the signals protecting Spencer Junction.  Spencer Junction is named because it is where the interchange track from my upper level Milwaukee Road branchline at Spencer connects with the lower level BNSF trackage.  There are four pictures that show the signals from each direction when the turnout is thrown for the interchange track or for the mainline.

The first two pictures are from the interchange track and are looking West.

Spencer Junction 3Spencer Junction 4

The next two pictures are looking East.

Spencer Junction 1Spencer Junction 2

I noticed I cut off the top signal on the cantilever bridge, but it was green as the track into the tunnel was clear.  I also noticed that I still have to get the railings installed on the bridges and have some finish detailing to do on the scenery.

Art

Attachments

Images (4)
  • Spencer Junction 3
  • Spencer Junction 4
  • Spencer Junction 1
  • Spencer Junction 2

The signals look great, Chugman! In fact, your whole layout is looking fantastic. I'm also a huge Santa Fe and BNSF fan, and will be modeling those railroads (and the Union Pacific) on my own new layout that I'm currently working on designing.

BRicch, those Santa Fe Warbonnet diesels are really nice. I love that paint scheme, and I hope to have a few more ATSF Warbonnets on my new layout. I do have an older Lionel Legacy ATSF Warbonnet B40-8W that looks really good (and runs great, too).

Art, thank you for your compliments. From earlier posts, it looks like you and I are probably not too far from each other. I’m in Hoffman Estates. As to you and some others asking for more pictures, rather than hi jacking your thread, I’ll start posting more pictures on the “Weekend pictures “ thread.

thanks again! Bob

The signals look great, Chugman! In fact, your whole layout is looking fantastic. I'm also a huge Santa Fe and BNSF fan, and will be modeling those railroads (and the Union Pacific) on my own new layout that I'm currently working on designing.

BRicch, those Santa Fe Warbonnet diesels are really nice. I love that paint scheme, and I hope to have a few more ATSF Warbonnets on my new layout. I do have an older Lionel Legacy ATSF Warbonnet B40-8W that looks really good (and runs great, too).

Thanks, Dylan.  It's hard not to like those two railroads.  The Milwaukee Road was the first railroad that I saw as a boy in my home town, so I had to have that as a branchline.  It was a single track branch line in Northwest Iowa and so is mine.  I fell in love with the Union Pacific while living in Omaha in the 1970's.  I now live on the BNSF mainline and I have always been a huge fan of the Santa Fe.  So I call my lower level the BNSF with trackage rights to the BNSF to justify running both on my layout.

Art

@BRicch posted:

Art, thank you for your compliments. From earlier posts, it looks like you and I are probably not too far from each other. I’m in Hoffman Estates. As to you and some others asking for more pictures, rather than hi jacking your thread, I’ll start posting more pictures on the “Weekend pictures “ thread.

thanks again! Bob

Bob me and my son, Jim, really like what you are doing.  I think you should start a separate thread documenting your layout progress.  I would love to follow it and it sounds like many others would too.  Thanks for all your nice comments.

Art

Last edited by Chugman

I hope everyone had a great Labor Day weekend.  Jim, Doug, and I were able to work most of Monday on the signal project and got quite a bit done.

The first accomplishment I'm going to show is the installation of the bracket signals.  I have three of them on the layout.  They were all placed in areas where the real estate was difficult to find room for them.  I also wanted them somewhere that they would stand out as I think they are so cool and not readily available in O gauge. 

The first installation is at LaGrange Junction where my interchange track leaves LaGrange and goes down a 2 1/2 percent grade to Chicago Junction.  Here are two pictures, one from each direction, that shows it in place.  There are two workmen on the top trying to figure out why the heads aren't lit?  It's because there aren't any signal board clusters built yet to light them.

Bracket signal LaGrange 1

Bracket signal LaGrange 2

The other two bracket signals are mounted on each end of my Bristol passing siding.  There is no where to mount signals except between the tracks without adding platforms on the outside of the tracks.   On the first picture of East Bristol you can see where I have built out a platform to hold the double-head mast signal that protects the turnout.  I can't finish it yet, because my band saw decided that this would be a good time to a break.

Bracket signal East Bristol 1

Bracket signal East Bristol 2

This picture is at West Bristol just past the Mannheim Road highway crossing.

Bracket signal West Bristol

We were able to also install four more signal board clusters that lit up a number of additional signal bridges.  And we hooked up turnouts and occupancy wiring for the blocks at Chicago Union Station interlocking.  And Jim figured out why we were having so much difficulty getting flashing yellow (restricted approach) at all yard entrances and fixed it.

Art

Attachments

Images (5)
  • Bracket signal LaGrange 1
  • Bracket signal LaGrange 2
  • Bracket signal East Bristol 1
  • Bracket signal East Bristol 2
  • Bracket signal West Bristol
@RSJB18 posted:

And the beat goes on Art. The bracket signals look great. I just caught up on @AlanRail 's thread on his design and printing work too. You have a great team supporting the effort.

Bob

Thanks a lot, Bob.  I can't wait to get these signals lit up and then working with the  proper logic.  We ran out of Atlas signal and interlocking boards and are waiting for another shipment.  Jim things we can maybe find one more so we can install one interlocking on the upper level that will contain one of the bracket signals.

You are right about the team, I'm very blessed.

Art

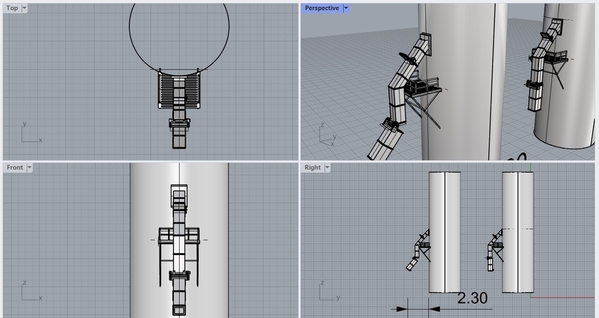
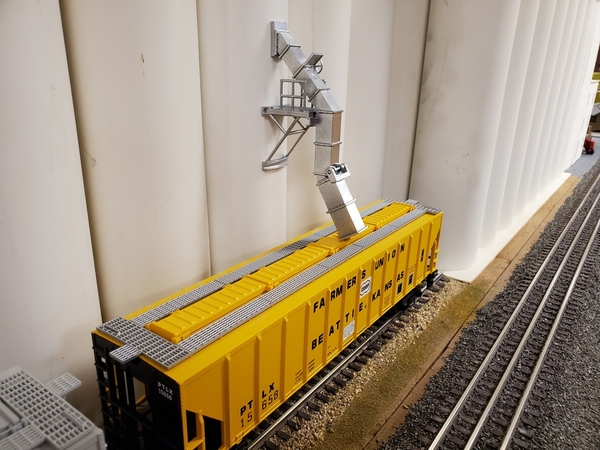
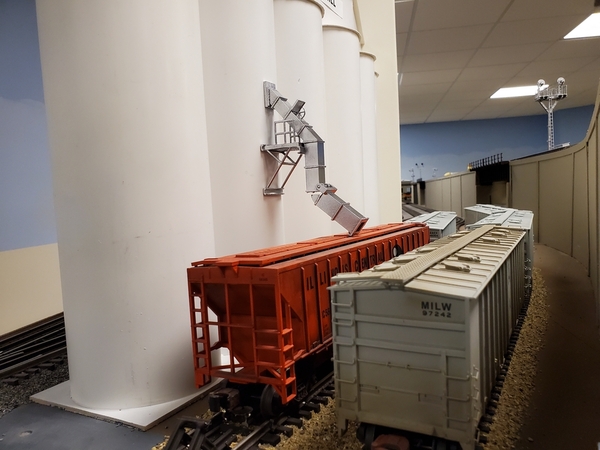
While we have been very busy working on the signals, Alan and I talked about adding details to my grain elevator and flour mill.  I described to him what I was looking for and he asked me to send him some pictures.  I had taken a number of pictures of the grain elevators in my wife's home town of Ruthven, IA.  I was particularly looking for help on the rather detailed and intricate grain unloading chutes.  Here is a picture of some of the chutes.

closeup of grain chutes 3

shed and elevator looking east

So Alan went to work and designed a 3D design.

grain showing chute at angle

He called me a day later and wanted to know what the outside diameter of the silos was.  I told him and last Saturday we were at a friend's operating session and he said had something for me.  He had a box of chutes, some printed with a chute hinged outward and others with the chute hinged inward.  We both think the inward chute probably looks the best, but he had a couple of the outward ones painted and assembled.  So I posed those on my grain elevator and my flour mill.  Here are those pictures.

Grain chutes elevator 1

Grain chutes flour mill

I don't know about you, but I'm blown away by Alan's work.  I'm  grateful to have him as a friend and helping me detail my layout.  Oh did I mention that the chutes are hinged and they work?

Art

Attachments

Images (5)
  • closeup of grain chutes 3
  • shed and elevator looking east
  • grain showing chute at angle
  • Grain chutes elevator 1
  • Grain chutes flour mill
Last edited by Chugman

As soon as time permits, I want to start documenting the process of making and installing Atlas signal boards clusters.  It's a very important part of this project, but since it's under the layout and out of sight, it is easy to not pay as much attention to it.

Thanks to all for your interest, support, and questions.

Art   

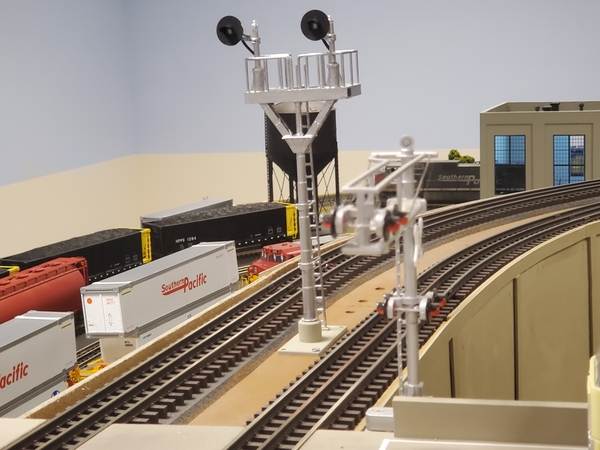
Alan the signal looks great!  This will fill one of the remaining voids in our signals for the upper level.  That with the single head mast signal you have made will enable us to get all the signals installed.  As soon as the remaining Atlas signal boards arrive, we can begin the final installations on the lower level and move to the upper level.

Art

You mentioned grain elevators, a favorite prairie railroad "industry" since my first teen passage through area, and Kansas and lowa. There is a book on Indiana elevators, but l have not blundered on those for other, prairie breadbasket states like Ill., Iowa, Kansas, and Nebraska, ND, SD, others.  In the '50's, two lane roads took me past working wooden elevators;  a recent Interstate race to Narrow Gauge Convention (l like stamp mills, too) had time only for distant concrete ones. Know of any such photo books dedicated to individual states?

Add Reply

Post

OGR Publishing, Inc., 1310 Eastside Centre Ct, Suite 6, Mountain Home, AR 72653
800-980-OGRR (6477)
www.ogaugerr.com

×
×
×
×
Link copied to your clipboard.
×
×