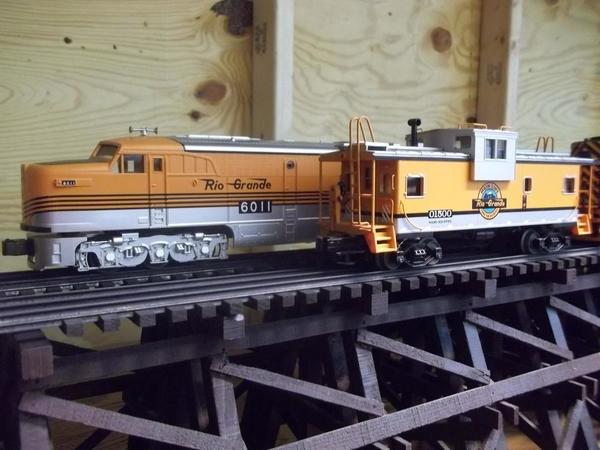
Finished up the snow pack around the parking lot, and added some patches in between the tracks. Am seriously considering making a winter tunnel system in stead of winterizing the one I have.


|
|
Finished up the snow pack around the parking lot, and added some patches in between the tracks. Am seriously considering making a winter tunnel system in stead of winterizing the one I have.
Ted,
The snow looks great! Whichever way you go on the tunnel will be interesting!
Mark Boyce posted:RSJB18 posted:paul 2 posted:RSJB18, if I had that view close to me I would take time off from trains to enjoy it too..............Paul
Thanks Paul. It's 5 hours from home but worth the trip.
Lake George N.Y.
BOB
Looks great, Bob! We visited Lake George 5 years ago, and loved it. We were planning a trip this summer, but both my parents were in the hospital, and we just got them into a personal care home, plus my widowed moth-in-law lives across the road and depends on us for most things; so we scraped the idea. I was considering the Trout House this time. We will try again another year.
One of my favorite spots Mark. I just wish it was a little closer to home. A 5 hour drive is a bit much to do all the time. Been coming here since I was a kid with my parents.
Hope all goes well with your family's health issues.
modeltrainsparts posted:Bob, if you get bored over at LG, i'm about 55 miles away - go south to Saratoga and then come 34 miles due west on NYS 29. Visitors always welcome. Email is in my profile page.
https://www.youtube.com/watch?v=gJmTzIFKvys
jackson
Thanks for the invite Jackson. Don't think a side trip like this would go over too well with the family but thanks again anyway.
Bob
RSJB18 posted:Mark Boyce posted:RSJB18 posted:paul 2 posted:RSJB18, if I had that view close to me I would take time off from trains to enjoy it too..............Paul
Thanks Paul. It's 5 hours from home but worth the trip.
Lake George N.Y.
BOB
Looks great, Bob! We visited Lake George 5 years ago, and loved it. We were planning a trip this summer, but both my parents were in the hospital, and we just got them into a personal care home, plus my widowed moth-in-law lives across the road and depends on us for most things; so we scraped the idea. I was considering the Trout House this time. We will try again another year.
One of my favorite spots Mark. I just wish it was a little closer to home. A 5 hour drive is a bit much to do all the time. Been coming here since I was a kid with my parents.
Hope all goes well with your family's health issues.
Yes, 5 hours is a long way to do very often. It is about 9 hours for us. A once every few years trip, I hope!
RSJB18 posted:modeltrainsparts posted:Bob, if you get bored over at LG, i'm about 55 miles away - go south to Saratoga and then come 34 miles due west on NYS 29. Visitors always welcome. Email is in my profile page.
https://www.youtube.com/watch?v=gJmTzIFKvys
jackson
Thanks for the invite Jackson. Don't think a side trip like this would go over too well with the family but thanks again anyway.
Bob
That is a wonderful video and layout, Jackson!


started figuring out the heights of the different levels on the layout.....
one wall will be 30' of mountainside mainline....many bridges and tunnels....

here is another bridge that will be elsewhere on the layout, can you tell i like bridges.....


That will be great, Brian!!
modeltrainsparts posted:Moonson,
Anytime your up here in the southern Adirondack - Saratoga region you are more than welcome to apply your talents to my railroad!! Your work is awesome.
Don't tempt me. I do still get around a bit. Thank You for the enthusiasm!.
FrankM
Yesterday evening, I put out a ‘Bat signal’ email among a few of the local layout owners, for an op session next week (on a week night, as many of the local guys do week night op sessions anyway). I want to get people who’ve never run before there, if I can.
This is in prep for an op session event in the area in October. A local informal group I belong to does two events each year; one is a layout tour at the start of spring, and then at the start of fall they do an event where people sign up to run op sessions on layouts made available, on certain dates. I couldn’t put my layout on the tour this year as it was my Father-In-Law’s 70th birthday, but I was glad that the op session thing won’t conflict with anything… YET.
The only issue I have is that for a small layout, 3 people running can get a little crowded and I have found myself trying to find stuff for the 3rd person to do. 2 people, with me in the room, seems to work well. I’m on the extreme southern edge of the area where the layouts will be available, but I’d think some folks would be coming from south of here, so that might work well for them. A pal of mine has a HO “Plywood Pacific” layout nearby available on the same day. I could imagine a few people might want to run on each of our layouts if the timing works out right for them.
After the email, I cleaned some track and ran a train all the way down the main and back, just because I could…


 Stared to work on our grain elevator. So for we have the base cut, mounts put in, and stared to epoxy the pices of PVC pipe together. Only got half of it epoxied togatber as I underestimated how far one small container would get me. Even was able to get T involved and keep his attention.
spent a little time under the layout doing some wiring repairs. can not find out what i did wrong on some lights and power to some buildings. some day i will get it wright.
Put a couple strips of leds on that station plarform. I think it's almost too bright. Am using the ac accessory side. Would dc be better for them? Not to change the brightness, but sometimes it seems I get 60 cycle flicker.


Answered my own question. Hooked it up to my buck converter set at 8.5vdc(for other accessories) and it's much dimmer down from 12vac.

THADDEUS, it is coming along good. What diameter pipe are you using and what length are you making them. I am going to be making a number of elevators. Thanks.............Paul
LEDs... I power all of mine with 12 VDC ac adaptors. We all have a pile of them lying around in drawers from obsolete electronics. Look for those that have 1 amp output or more. Since LEDs drawn 0.02 amps each, you can run quite a few with one adapter. You need to put a current limiter in series with the negative lead and I use the LED calculators available on the web. I also use the AC adaptors from old laptops. They put out enough power to light a whole layout's full of LEDs. I probably have four of them running right now and will add more as I need them. The refinery with its 16 LEDs will get its own adapter. Their regulation seems to be good and the lights don't flicker at all.
Today, my son Chris and I had a good long work session on the city scene in the lower level of our layout. In anticipation of major track replacement, we removed all vehicles and people from the city area. The buildings are the next things that will be removed. We are also taking out all of our Lionel, postwar O-22 remote control switches, several at a time, to go to our repair man Brian Kirsch for servicing and re-installation. One of the switches was under a tunnel. Chris performed the ultimate miracle of extracting the switch from under the tunnel with very little visual to the switch. Much of the surgery he performed was by feel. Among other amazing feats that Chris accomplished on the layout, today's was his third miracle. He is being submitted for Sainthood.
Today I finally got back to the table that had given me so much trouble trying to get it into position. And to think after all that cutting at the other end which was hard to do with the sewer line there all I had to do was cut a bit off the corner of the Masonite at the other end and it would of slid right into place. Thought I had all the bases covered on this one but apparently I am still on a learning curve. Now all I have to do is level the table so that it sits even with the other one and I can run a couple of screws to hold the two together, But here are a few pics..........Paul


Looks great, Paul! You got it in place and that is all that matters!
Randy Harrison posted:Today, my son Chris and I had a good long work session on the city scene in the lower level of our layout. In anticipation of major track replacement, we removed all vehicles and people from the city area. The buildings are the next things that will be removed. We are also taking out all of our Lionel, postwar O-22 remote control switches, several at a time, to go to our repair man Brian Kirsch for servicing and re-installation. One of the switches was under a tunnel. Chris performed the ultimate miracle of extracting the switch from under the tunnel with very little visual to the switch. Much of the surgery he performed was by feel. Among other amazing feats that Chris accomplished on the layout, today's was his third miracle. He is being submitted for Sainthood.
Let me know when you have completed your layout makeover and I'll be happy to take pictures for you like I did for Carl.
Sounds like this might be a long term project for both of you. Luckily you have Chris available to help you with this project, Randy.
Steve
Some people and circuits both are more sensitive to A.C. cycle peaks, and flicker and pulsing show. Adding capacitance should smooth things.
TedW posted:Put a couple strips of leds on that station plarform. I think it's almost too bright. Am using the ac accessory side. Would dc be better for them? Not to change the brightness, but sometimes it seems I get 60 cycle flicker.
Answered my own question. Hooked it up to my buck converter set at 8.5vdc(for other accessories) and it's much dimmer down from 12vac.
love the look with the lighting very nice job
fl9turbo2 posted:TedW posted:Put a couple strips of leds on that station plarform. I think it's almost too bright. Am using the ac accessory side. Would dc be better for them? Not to change the brightness, but sometimes it seems I get 60 cycle flicker.
Answered my own question. Hooked it up to my buck converter set at 8.5vdc(for other accessories) and it's much dimmer down from 12vac.
love the look with the lighting very nice job
Thank you Sir.
paul 2 posted:Today I finally got back to the table that had given me so much trouble trying to get it into position. And to think after all that cutting at the other end which was hard to do with the sewer line there all I had to do was cut a bit off the corner of the Masonite at the other end and it would of slid right into place. Thought I had all the bases covered on this one but apparently I am still on a learning curve. Now all I have to do is level the table so that it sits even with the other one and I can run a couple of screws to hold the two together, But here are a few pics..........Paul
looking great Paul !! Keep us up with the progress..
paul 2 posted:
I have to ask; what happens when you get derailment in there?
Lee, it is only enclosed under the stairs. If a derailment were to happen I will be able to get to it from either side. Middle track is the mainline. The other will be the yard lead and the black ballasted track is a siding going to a proposed coal mine on the other side of the stairs........Paul
So we started the day with this view

Then we decided to take a ride to see some marble caves in Pottersville, NY.
So were driving up the road to the place and I suddenly see 5 huge NYC Streamliners on the wall of a building and thought they looked familiar.

It was Dunham Studios right in front of me! WOW! We stopped briefly after the cave walk but no one was around. I was hoping to get a peak at the masters work up close but it was not to be today.
They even have a train on the roof of the shop.

Pretty cool stumbling across Clark's place.
Bob
Oh and I found these for Mitch ![]()

RSJB18 posted:So we started the day with this view
Then we decided to take a ride to see some marble caves in Pottersville, NY.
So were driving up the road to the place and I suddenly see 5 huge NYC Streamliners on the wall of a building and thought they looked familiar.
It was Dunham Studios right in front of me! WOW! We stopped briefly after the cave walk but no one was around. I was hoping to get a peak at the masters work up close but it was not to be today.
They even have a train on the roof of the shop.
Pretty cool stumbling across Clark's place.
Bob
Bob,
When we were at Lake George in 2012, we went to the Cave above Potterville, and my wife said we could stop at Clarke's on the way back. Well, I pulled in at 4:59, and they closed at 5, so I didn't see anything.
I am not able to see any of your photos, so I still have seen nothing!! LOL
Mark Boyce posted:RSJB18 posted:So we started the day with this view
Then we decided to take a ride to see some marble caves in Pottersville, NY.
So were driving up the road to the place and I suddenly see 5 huge NYC Streamliners on the wall of a building and thought they looked familiar.
It was Dunham Studios right in front of me! WOW! We stopped briefly after the cave walk but no one was around. I was hoping to get a peak at the masters work up close but it was not to be today.
They even have a train on the roof of the shop.
Pretty cool stumbling across Clark's place.
Bob
Bob,
When we were at Lake George in 2012, we went to the Cave above Potterville, and my wife said we could stop at Clarke's on the way back. Well, I pulled in at 4:59, and they closed at 5, so I didn't see anything.
I am not able to see any of your photos, so I still have seen nothing!! LOL
I will have to repost the photos later Mark.
I see them on my page so I'm not sure what happened.
Bob
Thank you, Bob! These things happen. ![]()
Today, we worked on the rebuilt Bowser Turntable. We have the PTC 3 Programmable Turntable Controller for track selection and for several years, it's been hard to stay adamant when pulling a large articulated Locomotive onto the bridge. My engineering friends brought some really good support angle iron and we now have a very good hold with the electric step motor brake made by PTC 3 NYRS and it holds tight...Wow, it's all about friends in the hobby...


Hi there guys, I have been a slacker on the layout this summer but have been looking in now and then.
I saw leaves falling today from some of the trees so I will be shifting from yard to layout sooner than I may like.
Keep up the nice work and thanks for all the ideas!
That's some scary wiring under that turntable...
Yes trainman, that's a scary wiring job indeed, and soon to be neatend up..It does work, the system is fun to run now...Thanks for the comment...Very observant.
RSJB18 posted:Mark Boyce posted:RSJB18 posted:So we started the day with this view
Then we decided to take a ride to see some marble caves in Pottersville, NY.
So were driving up the road to the place and I suddenly see 5 huge NYC Streamliners on the wall of a building and thought they looked familiar.
It was Dunham Studios right in front of me! WOW! We stopped briefly after the cave walk but no one was around. I was hoping to get a peak at the masters work up close but it was not to be today.
They even have a train on the roof of the shop.
Pretty cool stumbling across Clark's place.
Bob
Bob,
When we were at Lake George in 2012, we went to the Cave above Potterville, and my wife said we could stop at Clarke's on the way back. Well, I pulled in at 4:59, and they closed at 5, so I didn't see anything.
I am not able to see any of your photos, so I still have seen nothing!! LOL
I will have to repost the photos later Mark.
I see them on my page so I'm not sure what happened.
Bob
Repost of the photos.


leapinlarry posted:Yes trainman, that's a scary wiring job indeed, and soon to be neatend up..It does work, the system is fun to run now...Thanks for the comment...Very observant.
I'm an advocate of neat wiring, always have been, but I wouldn't want anyone to see my temporary setups! LOL
Bob,
Now I see the photographs!! Great one of the Lake!! I did not see the 5 NYC front ends five years ago! Very impressive!!! Thank you!!!
I know from what I speak. This is the wiring in my control panel. It's all labeled on both ends so it's traceable...hopefully. It's what happens when you have 6 wires from each toggle (36 of them) and three from each Z-stuff switch machine (26 of those) all leading to the terminal strips. I made a mistake and hinged the panel at the bottom below the cross member so it tends to grab the wires when I close it up. I have to put in a long dowel to hold the wires above that level so it closes flat. Instead, I should have hinged the panel at the top of the cross-member. Oh well... live and learn.


paul 2 posted:Today I finally got back to the table that had given me so much trouble trying to get it into position. And to think after all that cutting at the other end which was hard to do with the sewer line there all I had to do was cut a bit off the corner of the Masonite at the other end and it would of slid right into place. Thought I had all the bases covered on this one but apparently I am still on a learning curve. Now all I have to do is level the table so that it sits even with the other one and I can run a couple of screws to hold the two together, But here are a few pics..........Paul
Hey there Paul, I know I am a day late, but that's ok cause I am also a Dollar short! LOL I think things are looking great, Please keep up the great work and keep the post coming!![]()
Mike, you aren't the only one a dollar short! So am I! Ha ha!!
Trainman2001 posted:I know from what I speak. This is the wiring in my control panel. It's all labeled on both ends so it's traceable...hopefully. It's what happens when you have 6 wires from each toggle (36 of them) and three from each Z-stuff switch machine (26 of those) all leading to the terminal strips. I made a mistake and hinged the panel at the bottom below the cross member so it tends to grab the wires when I close it up. I have to put in a long dowel to hold the wires above that level so it closes flat. Instead, I should have hinged the panel at the top of the cross-member. Oh well... live and learn.
Yes, anytime you have wires connecting 2 panels, one of which is movable, it makes it many times harder!
Trainman2001 posted:
![]()
I'm at an utter loss for words.
All I know is if my layout had something like that, the trains would never run.
Building it is easy. You just do one wire at a time from point A to point B. It's when you look at it finished that it blows minds... mine included. It's the same as rigging a model tall ship. Completed, it looks incomprehensible, but it's one line at a time and when you're doing it, you don't even see the the others. A spider building an orb web is a good analogy. I saw an example with the panel split into two and opened from the sides. I made a much neater installation. I got stuck on the drop down after wrestling with my first panel which I built on Layout 1 and 2 where the panel opened from the top and was almost impossible to solder. I thought this was the improved version. For soldering... yes. For maintenance...not so much.
Today I got the table leveled and screwed into the other table. Took a bit of time to screw the tables together. Takes a lot more time to get into a pretzel position. At the front of the table I'll be adding another table to come out around the old door jamb but that is a bit down the road. I have to work on the section to go between the tables in front of the washer dryer. Won't be able to lay track until I get my order for switches from Steve at Ross. Later today for a change of direction Ill be cutting those building flats out so I can mount them on foam board. Tomorrow heading out to Stockyard Express for their open house. Who know maybe come home with something good. Pics........Paul


Mail came today and so did packages. Got two more weaver flats with trailers. A third one is suppose to come Saturday. And a nice box from Steve at Ross Switches came today also. That was a surprise because he said he a week or so behind but this is good for me because I can start putting the wood together to go between the tables. I thought I would do something a little different track wise. Went with a 11 degree crossover and a left hand 11 degree switch. So the switch will be on the yard lead. The 11 degree cross comes off the switch. The straight through will be the mainline and the cross over track will go to the siding with the black ballast. Pics..............Paul


Progress continues on the uncoupler project as well as a number of other fronts.
The mess at Hiawatha is indicative of a variety of activities.

The Ford Plant module is mounted to the layout and the uncouplers are connected to it.

Same just down the line at the St Paul Ave yard.

The final step in the process is to drill the fascia and mount the carriage bolts that will be used to activate the magnets. To further that cause, I've done the final Spackle touch ups, in preparation for final painting.

I added a piece of Masonite where the Cleveland Avenue bridge will cross over the Ford Plant lead.

I've started to patch the screw and nail holes in the roads.

More rolling stock keeps hitting the rails. The Western Avenue yard is nearly full.

On the other side of the room, I finally finished cleaning the rails at Interstate, allowing me to move all the cars that had been parked over at 44th Ave.

With this yard emptied, I'm ready to paint and ballast this entire section.

I noticed that my ET&WNC caboose from a kit is now featured on the kit mfg's website. Talk about validation!
I was happy to see that as I'm eternally grateful for them making a kit of a caboose that would have been a nightmare to scratch-build.
paul 2 posted:Mail came today and so did packages. Got two more weaver flats with trailers. A third one is suppose to come Saturday. And a nice box from Steve at Ross Switches came today also. That was a surprise because he said he a week or so behind but this is good for me because I can start putting the wood together to go between the tables. I thought I would do something a little different track wise. Went with a 11 degree crossover and a left hand 11 degree switch. So the switch will be on the yard lead. The 11 degree cross comes off the switch. The straight through will be the mainline and the cross over track will go to the siding with the black ballast. Pics..............Paul
Hi Paul, I have one of the Weaver trailer on flat car, the local Bessemer & Lake Erie. It's very nice, and yours are too!! I will be making an order from Steve too for the last 5 switches I need for my plan. Just looking at the ones I got, they really are nice!
Mark Boyce posted:Bob,
Now I see the photographs!! Great one of the Lake!! I did not see the 5 NYC front ends five years ago! Very impressive!!! Thank you!!!
Mark,
It's a place called Blue Water Manor. It's an old resort that new ownership is renovating. Not only is the view spectacular, the food is excellent too.
Bob
Big_Boy_4005 posted:Progress continues on the uncoupler project as well as a number of other fronts.
The mess at Hiawatha is indicative of a variety of activities.
The Ford Plant module is mounted to the layout and the uncouplers are connected to it.
Same just down the line at the St Paul Ave yard.
The final step in the process is to drill the fascia and mount the carriage bolts that will be used to activate the magnets. To further that cause, I've done the final Spackle touch ups, in preparation for final painting.
I added a piece of Masonite where the Cleveland Avenue bridge will cross over the Ford Plant lead.
I've started to patch the screw and nail holes in the roads.
More rolling stock keeps hitting the rails. The Western Avenue yard is nearly full.
On the other side of the room, I finally finished cleaning the rails at Interstate, allowing me to move all the cars that had been parked over at 44th Ave.
With this yard emptied, I'm ready to paint and ballast this entire section.
Wow Elliot, you sure have got a lot done! Question what is the chicken wire under your layout for?
paul 2 posted:Mail came today and so did packages. Got two more weaver flats with trailers. A third one is suppose to come Saturday. And a nice box from Steve at Ross Switches came today also. That was a surprise because he said he a week or so behind but this is good for me because I can start putting the wood together to go between the tables. I thought I would do something a little different track wise. Went with a 11 degree crossover and a left hand 11 degree switch. So the switch will be on the yard lead. The 11 degree cross comes off the switch. The straight through will be the mainline and the cross over track will go to the siding with the black ballast. Pics..............Paul
Paul the mail man sure likes you! LOL I hardly see him anymore, but then again I guess I have to order stuff to see him!
p51 posted:I noticed that my ET&WNC caboose from a kit is now featured on the kit mfg's website. Talk about validation!
I was happy to see that as I'm eternally grateful for them making a kit of a caboose that would have been a nightmare to scratch-build.
Well deserved! Congrat's
Just run trains for four hours. Moved train run day from thursday to friday
Clem
mike g. posted:Wow Elliot, you sure have got a lot done! Question what is the chicken wire under your layout for?
Thanks Mike. The chicken wire is under almost all of the upper deck. It acts as a ground plane for TMCC. I wish I had used it on the main level when I first started construction. It seems to make a real difference. Still not exactly sure how and why it works, but my trains run better up there. ![]()
![]()
![]()
RSJB18 posted:Mark Boyce posted:Bob,
Now I see the photographs!! Great one of the Lake!! I did not see the 5 NYC front ends five years ago! Very impressive!!! Thank you!!!
Mark,
It's a place called Blue Water Manor. It's an old resort that new ownership is renovating. Not only is the view spectacular, the food is excellent too.
Bob
Bob,
It looks very nice!! We may have driven right past it. Thank you for the tip!
Mark
Wow, Sam! You fellows have made excellent progress!! It all looks great!
Walked into the train room to check something, and there was Norma Bates Kitteh, obviously waiting for me to run something...


Mitch
M. Mitchell Marmel posted:Walked into the train room to check something, and there was Norma Bates Kitteh, obviously waiting for me to run something...
Mitch
Priceless!
Couple of packages came this morning before I went to Stockyard Express. Good turnout there. They have a well stocked shop but I came out with nothing. When I got home I opened my packages. Another Weaver flat with trailer and two more building flats. They are HO which I am going to use for distance. Probably won't do anything tonight and get a fresh start tomorrow. Pics.........................Paul


Paul, I like the idea of the HO flats for distance! Have you thought about HO Trains for the same reason?![]()
My parking blocks came in so painted them up. A couple cars on order so I'll wait for them before striping if I choose to do it. Also I'm done with this icemelt scenic element. I promise. Too much "little here little there". Am I the only one that does that? Just can't leave well enough alone. ![]()


Looking good Ted. It's the little details that really make the difference.
Bob
RSJB18 posted:Looking good Ted. It's the little details that really make the difference.
Bob
Thx Bob, and to the other members for the "likes". It's encouraging. TW
With a 7 ft. square two loop "layout" can't do too much but do enjoy running a train occasionally and working on engines and cars. I have a Standard gauge tank car I fixed up and had a Lionel latch coupler on one end and an Ives on the other so I could use it as a "transition" car. Decided that was too limiting because I really like the tank car. Removed the Ives coupler and will use a flat car instead. Have 3 of them. I have two Lionel Standard gauge passenger cars that the roofs need cleaned up and will be repainted. Found some Rustolem rattle can paint that is a close match. I will leave the sides as-is. Seems the roofs get messed up more and are more noticeable than the sides.
TedW posted:My parking blocks came in so painted them up. A couple cars on order so I'll wait for them before striping if I choose to do it. Also I'm done with this icemelt scenic element. I promise. Too much "little here little there". Am I the only one that does that? Just can't leave well enough alone.
We are always our own worst critics. I think it looks great!
Finally finished putting together Lionel USMC set #1591, circa 1958.....


TedW posted:My parking blocks came in so painted them up. A couple cars on order so I'll wait for them before striping if I choose to do it. Also I'm done with this icemelt scenic element. I promise. Too much "little here little there". Am I the only one that does that? Just can't leave well enough alone.
The Ice melt is a nice touch a lot of people seem to forget.
gandydancer1950 posted:Finally finished putting together Lionel USMC set #1591, circa 1958.....
Really like your "duck". Exciting ride at the "Dells" in Wisconsin a hundred years ago. Amtraks at Pendleton in CA in the late sixties...
M. Mitchell Marmel posted:Walked into the train room to check something, and there was Norma Bates Kitteh, obviously waiting for me to run something...
Mitch
Obviously not impressed. Maybe she was looking for the Giraffes.
suzukovich posted:TedW posted:My parking blocks came in so painted them up. A couple cars on order so I'll wait for them before striping if I choose to do it. Also I'm done with this icemelt scenic element. I promise. Too much "little here little there". Am I the only one that does that? Just can't leave well enough alone.
The Ice melt is a nice touch a lot of people seem to forget.
I agree, don't see that very often at all!
Not really on the layout, but built some shelves and helped my neighbor start building a small layout for his son who is 5. Picked up a ready to run set and some turnout so he can run trains on 2 ovals. Best time I have had in the hobby in a few years.
Mike welkie posted:Looks great Ted! Is there a post or posts showing your scenery techniques, or are you keeping them a secret Lol! I'd personally like to know more. I like the snow berms and melting ice effects. Mike
Ask me no questions, I'll tell you no lies. ![]() All my techniques are somewhere in this thread, cause I've ripped off pretty much everything I've done on this little xmas layout. It's heartening, the support I've re'cd from this forum and the recommendations and tips I've gotten through questions. So all I take credit for is implementing those suggestions. The snow berms(which will ultimately) have soft flake snow on them were made by cutting chunks of foam with a hot wire cutter. Best invention yet, IF, you work with foam.
All my techniques are somewhere in this thread, cause I've ripped off pretty much everything I've done on this little xmas layout. It's heartening, the support I've re'cd from this forum and the recommendations and tips I've gotten through questions. So all I take credit for is implementing those suggestions. The snow berms(which will ultimately) have soft flake snow on them were made by cutting chunks of foam with a hot wire cutter. Best invention yet, IF, you work with foam.

Play sand base between ballast and foam, glued down like ballast. Then clear liquid acrylic with a drop or two(to taste) of either light grey or white pigment for the "ice melt". I did three pours. My only problem was letting it go after awhile. Leave well enough alone. Hope this helps. Let me know if there is something else. Ted
Thanks, Ted and will! The ice melt looks so realistic! Btw, meant to ask, what is the number of that old Lionel scout on the inner loop? Thanks; Mike
Worked on engine railyard, ran power and fastened down.
Mike welkie posted:Thanks, Ted and will! The ice melt looks so realistic! Btw, meant to ask, what is the number of that old Lionel scout on the inner loop? Thanks; Mike
242 Don't know for positive how old it is.

Thanks Ted ,not too many of these veterans survived because of their undesireable running characteristics, Lol. Good to see one!
Mike
Mike welkie posted:Thanks Ted ,not too many of these veterans survived because of their undesireable running characteristics, Lol. Good to see one!
Mike
What chu talkin bout Willis? ![]() This one runs pretty good if ya ask me
This one runs pretty good if ya ask me ![]()
![]() This is on the 11v side of a 1033.
This is on the 11v side of a 1033.

TedW posted:My parking blocks came in so painted them up. A couple cars on order so I'll wait for them before striping if I choose to do it. Also I'm done with this icemelt scenic element. I promise. Too much "little here little there". Am I the only one that does that? Just can't leave well enough alone.
Ted, it looks great!! I want to make puddles, which I know a couple methods, but how did you make those impressive snow drifts!!! I need some of them on my mountain division!!
gandydancer1950 posted:Finally finished putting together Lionel USMC set #1591, circa 1958.....
Looks great!! A tribute to The Corps!
Ted W,
i just saw your explanation of your technique!! I work with foam but need a hot wire cutter or hot knife.
Thank you!!
I also love your array of trains and accessories you have on display,Ted. I'd love to see a broader view, esspecially of your display cabinet. I have a couple of display cases that I will be setting up shortly and would love to see yours, as I'm always looking for ideas on displaying trains. I bet yours is pretty cool based on what I can see!
Thanks again;
Mike
suzukovich posted:Obviously not impressed. Maybe she was looking for the Giraffes.
Or an actual train, not just a couple of mere streetcars. ;-)
Mitch
TedW posted:Mike welkie posted:Thanks Ted ,not too many of these veterans survived because of their undesireable running characteristics, Lol. Good to see one!
Mike
What chu talkin bout Willis?
This one runs pretty good if ya ask me

This is on the 11v side of a 1033.
I've got a 246 that I picked up a couple of years ago. It runs like a champ! A little bit of a touchy e-unit but I just leave it off when I run it. Here she is on a simple carpet central loop.

This early afternoon on 08/21/2017 I left my trains and rails alone in the big house and went outside to enjoy a once in a lifetime Total Solar Eclipse @ 2:41 PM EDT Lexington SC.
T Thompson
thebeeman posted:This early afternoon on 08/21/2017 I left my trains and rails alone in the big house and went outside to enjoy a once in a lifetime Total Solar Eclipse @ 2:41 PM EDT Lexington SC.
T Thompson
I'm about 25 miles down the road from you Tommie...
did some work on repairing some wiring for my miller engineering signs. use these signs is a very learning experience. i'm not that electrical inklined . i do like it to be very neat and it is awful all i can do is like the man said 1 wire at a time. i have learned to put in service loops for some buildings. i think i will go down a little later for more wiring problems.
decoynh posted:I've populated the elevated "yard" using the "hand switcher". I also added a rolling stock display shelf above the elevated yard and below the accessory shelf.
Using the ol' 0-5-0 are you?
gandydancer1950 posted:decoynh posted:I've populated the elevated "yard" using the "hand switcher". I also added a rolling stock display shelf above the elevated yard and below the accessory shelf.
Using the ol' 0-5-0 are you?
I'll be doing just like Matt! Either over, under, or on a rollout. Looking good, Matt!!
0-5-0, thats too funny lol !!!!
Mike welkie posted:0-5-0, thats too funny lol !!!!
Yeah, that's an old joke, I think. I've used that and, "Hand of God" when describing moving rolling stock by hand when you could use a loco.
'Didn't like the "plastic" look of the base of my MTH industrial water tower.
Added some "concrete" steps....
"Planted" some turf, weeds, and bushes and had the yard crew scatter a few rusted I beams around (leftover from an old Lionel starter set).


Woodson posted:thebeeman posted:This early afternoon on 08/21/2017 I left my trains and rails alone in the big house and went outside to enjoy a once in a lifetime Total Solar Eclipse @ 2:41 PM EDT Lexington SC.
T Thompson
I'm about 25 miles down the road from you Tommie...
Did anyone notice the shadows through the leaves on the trees casting a complete image of the sun on the ground right before and after the highest level of "totality"?
Notice the image changes on the attached photos both taken toward the same direction (first image is before totality, second image is after).


HMorgan125 posted:'Didn't like the "plastic" look of the base of my MTH industrial water tower.
Added some "concrete" steps....
"Planted" some turf, weeds, and bushes and had the yard crew scatter a few rusted I beams around (leftover from an old Lionel starter set).
Never thought of that.....looks great!
HMorgan125 posted:Woodson posted:thebeeman posted:This early afternoon on 08/21/2017 I left my trains and rails alone in the big house and went outside to enjoy a once in a lifetime Total Solar Eclipse @ 2:41 PM EDT Lexington SC.
T Thompson
I'm about 25 miles down the road from you Tommie...
Did anyone notice the shadows through the leaves on the trees casting a complete image of the sun on the ground right before and after the highest level of "totality"?
Notice the image changes on the attached photos both taken toward the same direction (first image is before totality, second image is after).
Yup, pretty cool


Ted W. I don't know if you got my reply, but I really like your train display, with your post war equipment ! Is there a possibility of you posting a picture of your display cabinet with its contents? I have a display cabinet as well and would like to see yours and how its configured.
Thanks;
Mike
Mike welkie posted:Ted W. I don't know if you got my reply, but I really like your train display, with your post war equipment ! Is there a possibility of you posting a picture of your display cabinet with its contents? I have a display cabinet as well and would like to see yours and how its configured.
Thanks;
Mike
You must have me confused with another post(ogr member). No cabinet display. Sorry. Ted
Access to this requires an OGR Forum Supporting Membership


