Sorry, I thought you were the one that had the really cool USMC train that was pieced together.
Mike


|
|
Sorry, I thought you were the one that had the really cool USMC train that was pieced together.
Mike
Mike welkie posted:Sorry, I thought you were the one that had the really cool USMC train that was pieced together.
Mike
GANDYDANCER1950 is the member with that train I think.
Sorry Ted, I see now it was Gandydancer. So Gandydancer , is it possible to see your display cabinet and contents? I really like whats displayed on the wall with the cool USMC train. Im going to set up a display cabinet and would like to see yours.
Thanks;
Mike
Mike welkie posted:Sorry Ted, I see now it was Gandydancer. So Gandydancer , is it possible to see your display cabinet and contents? I really like whats displayed on the wall with the cool USMC train. Im going to set up a display cabinet and would like to see yours.
Thanks;
Mike
Here's a few photo's...thanks for asking Mike


Wow, what an awesome collection! Was the glass display case withh the station and ither accessories on it ,custom built or was it a former store display case?
Thanks;
Mike
Mike welkie posted:Wow, what an awesome collection! Was the glass display case withh the station and ither accessories on it ,custom built or was it a former store display case?
Thanks;
Mike
Thank you, I made all of them myself except for the box collection case. The plexiglass display cover was made by a friend of mine.
Great work Sir, to compliment and display a fine collection!
Mike
Yup. We saw the interesting shadows too. It was interesting how much light the sun puts out when it's 96% covered by the moon. That sun... it's quite a big deal! And to think, there are stars that are as much bigger than the earth is too the sun. I believe there are massive red giants that extend out as far as the orbit of Neptune. To imagine a sphere of matter so many millions of miles in diameter is simply unimaginable... Interesting sentence that was.
Mike welkie posted:Great work Sir, to compliment and display a fine collection!
Mike
Many thanks!
You're quite welcome!
Mike
Was actually doing a lot the last few days, finishing up some wiring and cleaning all my track, etc. after a few months away with some medical issues, but today was reserved for watching/photographing the eclipse in NE Pennsylvania. Back to the basement tomorrow!!!

What did I do on my layout today?
Well, nuffin' really. ![]()
I've been busy earning Brownie Points by building a new kitchen for SWMABO*.
First, a new pantry . . .

First, I had to fill in the old doorway to the laundry. Then, I had no idea how long building a Tardis would take. ![]()
* "She Who Must Always Be Obeyed" - Rumpole of the Bailey.
Trainman2001 posted:..... That sun... it's quite a big deal! And to think, there arestars that are as much bigger than the earth is too the sun. I believe there are massive red giants that extend out as far as the orbit of Neptune. To imagine a sphere of matter so many millions of miles in diameter is simply unimaginable...
And to learn that they shrink to Blue Dwarfs and eventually collapse to die as Black Holes, is, indeed, unimaginably amazing, too! (I believe I got that dichotomy correct.) Sometimes, Red Giants and Blue Dwarfs exist together in partnerships. I understand that means they would cast partnership shadows, of two different intensities, on things existing on planets in their system.
FrankM
Max, nice job on the pantry. I learned that if you keep the CEO happy your railroad flourishes..................Paul
HMorgan125 posted:Woodson posted:thebeeman posted:This early afternoon on 08/21/2017 I left my trains and rails alone in the big house and went outside to enjoy a once in a lifetime Total Solar Eclipse @ 2:41 PM EDT Lexington SC.
T Thompson
I'm about 25 miles down the road from you Tommie...
Did anyone notice the shadows through the leaves on the trees casting a complete image of the sun on the ground right before and after the highest level of "totality"?
Notice the image changes on the attached photos both taken toward the same direction (first image is before totality, second image is after).
Very cool. My daughter said her friends family did something similar with a colander, got the same effect.
MaxSouthOz posted:What did I do on my layout today?
Well, nuffin' really.
I've been busy earning Brownie Points by building a new kitchen for SWMABO*.
First, a new pantry . . .
First, I had to fill in the old doorway to the laundry. Then, I had no idea how long building a Tardis would take.
* "She Who Must Always Be Obeyed" - Rumpole of the Bailey.
Just went through the same thing for the CEO Max. Good luck with the renovation.


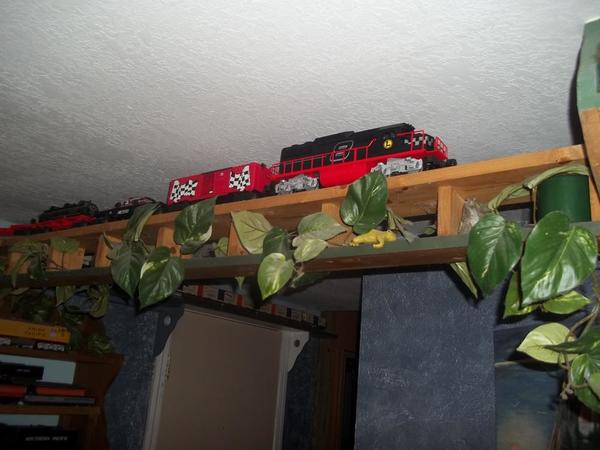
Only problem is I lost the debate about running a loop of track on the ledge around the room ![]()
Bob


You have to pick your battles, Bob. ![]()
Now that the CEO's project is substantially complete, I've had a little time to work on the trains again.
Added some more ground cover around a switch and cleaned up the loose ballast from the sides of the Fastrack. Looks much better than the bare plastic.
Bob


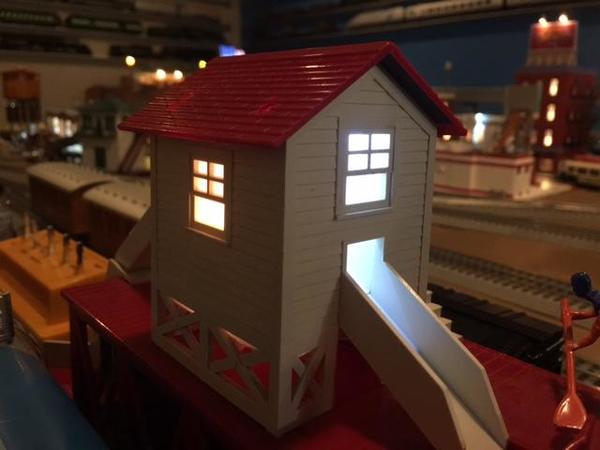
I bought a small shack from Woodland for the new engine yard. It's kind of plain so I'm adding a couple of lights to it. I'm scratch building them with a couple of small LED's. I made the "fixtures" from some 1/4" square dowel I have. I still have to paint them and do the wiring. I'm going to mount them just under the peak of the roof.


As you may recall, I put a modern fan-driven smoke unit in my 2020 turbine some months back. Went back and did a bit more work last night...

I had taped a control switch into the cab while I made sure the system worked. Since it does, I JB Welded the switch in place.

I also installed a brass tube to fit into the smoke unit, thus eliminating any smoke going inside the shell.


A view down the flue. The brass tubing will be painted at a later date.

A perfect seal!

Naturally, Shop Supervisor Norma Bates Kitteh was on hand to make sure the work was done properly.

Bench testing.

I got tired of monkeying with multiple transformers when I had a perfectly serviceable ZW in the workshop...

Under steam on the layout!


ProTip of the day: If, like me, you have a few crossing gates that like to stay down, a 1/4 ounce wheel weight, discreetly placed, works wonders...

Mitch
p51 posted:I put down some hay remnants in the cow pasture. It's a little detail that I knew was missing, I just had to find some material that would look correct for it.
I can smell the cow pies from here Lee!
Naturally, Shop Supervisor Norma Bates Kitteh was on hand to make sure the work was done properly.

Looks like Norma's sporting some new jewlery there Mitch. Gotta love flea and tick season. ![]()
Bob
Big_Boy_4005 posted:mike g. posted:Wow Elliot, you sure have got a lot done! Question what is the chicken wire under your layout for?
Thanks Mike. The chicken wire is under almost all of the upper deck. It acts as a ground plane for TMCC. I wish I had used it on the main level when I first started construction. It seems to make a real difference. Still not exactly sure how and why it works, but my trains run better up there.
Hey Elliot- we had an issue with stray RF signal a while back when our water department installed "smart" meters that they can read via a wireless signal. My wife was concerned with the stray RF so we did some reading and found that aluminum window screen knocks it down to almost 0. I was sceptical but to make sure I bought an RF meter and tried it out.
I was amazed at what a difference the screen made. I don't remember the exact numbers but if the meter was at 100 uf in free air, it went to almost 0 when I wrapped the screen around it.
I suspect that the chicken wire has a similar effect on the signal for the trains and keeps the noise from below isolated.
Bob
Exactly what is the screen connected to? I seem to have no signal problems, but am always looking for ways to improve operations.
modeltrainsparts posted:Exactly what is the screen connected to? I seem to have no signal problems, but am always looking for ways to improve operations.
In my case I fastened the screen to the copper pipe with hose clamps. My guess is that as long as it's grounded to a good earth ground it will work.
Bob
RSJB18 posted:modeltrainsparts posted:Exactly what is the screen connected to? I seem to have no signal problems, but am always looking for ways to improve operations.
In my case I fastened the screen to the copper pipe with hose clamps. My guess is that as long as it's grounded to a good earth ground it will work.
Bob
I would say if it ain't broke don't fix it. In my case the chicken wire is tied to the earth ground via the house electrical system. My layout lighting is done with metal conduit and metal junction boxes. The whole thing is grounded by code. The chicken wire is sandwiched between the plywood and the metal boxes.

I haven't done anything today, but yesterday, I planned out my roundhouse area, even though I don't have the turntable yet, so it may or may not work, not 100% sure yet. As well as figuring out exactly what I need for the backdrop, since I need to get that put in before I do any scenery work. Then figuring out how I am going to get the Masonite for my backdrop, since I don't own a truck.
Finished installing the lights on my shed. I painted the LEDs with a little silver paint to cut the glare a little. I tested them with a 9v battery, they will run at 6 volts on the layout so they shouldn't be too bright.
Bob


Great looking work there Bob! Thanks for sharing!![]()
I agree with Mike, Bob!! Thank you for the interior photograph also! Your shed is better lit than mine in my backyard! I have a flashlight sitting on a shelf! LOL
Mark Boyce posted:I agree with Mike, Bob!! Thank you for the interior photograph also! Your shed is better lit than mine in my backyard! I have a flashlight sitting on a shelf! LOL
Thanks Mike and Mark.
Funny you mentioned outdoor sheds Mark. I had run a wire out to mine years ago and then struggled with a flashlight until I finally got around to installing the lights and switches. And I'm a licensed electrician!
Thanks for the "like" Max.
Bob
Big_Boy_4005 posted:Progress continues on the uncoupler project as well as a number of other fronts.
The mess at Hiawatha is indicative of a variety of activities.
The Ford Plant module is mounted to the layout and the uncouplers are connected to it.
Same just down the line at the St Paul Ave yard.
The final step in the process is to drill the fascia and mount the carriage bolts that will be used to activate the magnets. To further that cause, I've done the final Spackle touch ups, in preparation for final painting.
I added a piece of Masonite where the Cleveland Avenue bridge will cross over the Ford Plant lead.
I've started to patch the screw and nail holes in the roads.
More rolling stock keeps hitting the rails. The Western Avenue yard is nearly full.
On the other side of the room, I finally finished cleaning the rails at Interstate, allowing me to move all the cars that had been parked over at 44th Ave.
With this yard emptied, I'm ready to paint and ballast this entire section.
Good morning Eliot,
I'm a little late commenting on this & I apologize if you already answered this. In picture #1 above, what is the turkey baster being used for? Thanks for the ongoing updates, always fun to see what happens on your full time job.
Working on cleaning some of the mess on the layout and with the grain elevator we ran beads of caulk where the pieces of PVC come together, and cut and am trying to glue the piece of wood for the top (I'm not convinced that the glue I used is going to hold). Plan B is already being thought out.


Finished the shed and installed it on the layout. On to the next project. ![]()
Bob


decoynh posted:Good morning Eliot,
I'm a little late commenting on this & I apologize if you already answered this. In picture #1 above, what is the turkey baster being used for? Thanks for the ongoing updates, always fun to see what happens on your full time job.
Matt, in the past, I've used the turkey baster for ballast glue, but I gave that up in favor of a simple squeeze bottle. Better control.
I currently use it to transfer rail paint from the gallon can (it's regular latex wall paint thinned for spraying) to my airbrush bottles. Works well too! When I get rolling, quick refills are a big help.![]()
And no, I didn't steal it from my wife.![]() Now you know.
Now you know.![]()
Off and on the last few years, I ran my Christmas layout with an old Radio Shack 12vdc contant voltage power suppy and a few diodes added to knock down voltage till my 1061 was happy. Later I added a toggle switch and second set of diodes taylored to run my hot rod flame job 0-4-0.
The four amp supply isnt all that strong, but can handle small engines well. The lack of voltage control kinda locked what is run, down to even fewer trains. I needed more variance.
So Ive salvaged an old HO controller's project box, and emptied my storage box of toggle switches. One more dpdt at the top, horizontal, for a high low +/- 6v and I'll call it quits. That will give me direction (on dc locos only) plus low voltage at 3v, 4.5, 6, & 7.5 or high setting of, 7.5, 9 ,10.5v, & 12v. Kinda like the prewar transformers; but on a simple loop, fine control isnt really needed, +/-  1.5v at a time is good enough. Any switch on the right raises or lowers voltage by 1.5v; no special order of operation. Off is the direction switch (and a second "off" will come with Hi-lo]
RSJB18 posted:Finished the shed and installed it on the layout. On to the next project.
Bob
GMTA Bob, I put some lights in my shack too. Yours is quite a bit nicer application I must say. ![]()

TedW posted:RSJB18 posted:Finished the shed and installed it on the layout. On to the next project.
Bob
GMTA Bob, I put some lights in my shack too. Yours is quite a bit nicer application I must say.

Thanks Ted. I first thought about lighting the interior but decided to do the exterior instead. I still need to weather it. I didn't glue the roof down so I could always pop another LED inside. HMMMM![]() .
.
Yours looks very nice next to the camp fire.
Bob
RSJB18 posted:TedW posted:RSJB18 posted:Finished the shed and installed it on the layout. On to the next project.
Bob
GMTA Bob, I put some lights in my shack too. Yours is quite a bit nicer application I must say.
Thanks Ted. I first thought about lighting the interior but decided to do the exterior instead. I still need to weather it. I didn't glue the roof down so I could always pop another LED inside. HMMMM
.
Yours looks very nice next to the camp fire.
Bob
Help me understand the resistor you used. The part number and, does it reduce voltage on the ac side or what, exactly. May help me in a future application. Thx
TedW posted:RSJB18 posted:TedW posted:RSJB18 posted:Finished the shed and installed it on the layout. On to the next project.
Bob
GMTA Bob, I put some lights in my shack too. Yours is quite a bit nicer application I must say.
Thanks Ted. I first thought about lighting the interior but decided to do the exterior instead. I still need to weather it. I didn't glue the roof down so I could always pop another LED inside. HMMMM
Yours looks very nice next to the camp fire.
Bob
Help me understand the resistor you used. The part number and, does it reduce voltage on the ac side or what, exactly. May help me in a future application. Thx
Ted- they are 1000 ohm, 1/2 watt resistors. The LEDS are powered by 9 VDC (not AC). I'm no electronics wiz, but I know that they work. I hooked a LED up and forgot to put the resistor in line and fried it instantly. I have some that I bought pre-made that have a small diode as well for AC applications.
I'm sure some of the experts can weigh in with more info.
Bob


Very nice shacks, Ted and Bob!!!!
Thank you for showing what you used, Bob!
RSJB18 posted:Finished the shed and installed it on the layout. On to the next project.
Bob
Very nice!
RSJB18 posted:TedW posted:RSJB18 posted:TedW posted:RSJB18 posted:Finished the shed and installed it on the layout. On to the next project.
Bob
GMTA Bob, I put some lights in my shack too. Yours is quite a bit nicer application I must say.
Thanks Ted. I first thought about lighting the interior but decided to do the exterior instead. I still need to weather it. I didn't glue the roof down so I could always pop another LED inside. HMMMM
Yours looks very nice next to the camp fire.
Bob
Help me understand the resistor you used. The part number and, does it reduce voltage on the ac side or what, exactly. May help me in a future application. Thx
Ted- they are 1000 ohm, 1/2 watt resistors. The LEDS are powered by 9 VDC (not AC). I'm no electronics wiz, but I know that they work. I hooked a LED up and forgot to put the resistor in line and fried it instantly. I have some that I bought pre-made that have a small diode as well for AC applications.
I'm sure some of the experts can weigh in with more info.
Bob
So the difference is I use these led with the resistor installed, and you have just the led that you apply components to for proper current limits. Is that right?


I have a question and I hope it is not out of line on this post. I'm getting ready to install my new control panel I'm looking for LED's to show red or green to track power.When I turn power on I need the track to show green with power on and red power with off. Can any body help me with what kind and how to wire them up
Thanks
Carl CEO EA&T RR
TedW posted:RSJB18 posted:TedW posted:RSJB18 posted:TedW posted:RSJB18 posted:Finished the shed and installed it on the layout. On to the next project.
Bob
GMTA Bob, I put some lights in my shack too. Yours is quite a bit nicer application I must say.
Thanks Ted. I first thought about lighting the interior but decided to do the exterior instead. I still need to weather it. I didn't glue the roof down so I could always pop another LED inside. HMMMM
Yours looks very nice next to the camp fire.
Bob
Help me understand the resistor you used. The part number and, does it reduce voltage on the ac side or what, exactly. May help me in a future application. Thx
Ted- they are 1000 ohm, 1/2 watt resistors. The LEDS are powered by 9 VDC (not AC). I'm no electronics wiz, but I know that they work. I hooked a LED up and forgot to put the resistor in line and fried it instantly. I have some that I bought pre-made that have a small diode as well for AC applications.
I'm sure some of the experts can weigh in with more info.
Bob
So the difference is I use these led with the resistor installed, and you have just the led that you apply components to for proper current limits. Is that right?
Yes- exactly right Ted.
Carl Machen posted:I have a question and I hope it is not out of line on this post. I'm getting ready to install my new control panel I'm looking for LED's to show red or green to track power.When I turn power on I need the track to show green with power on and red power with off. Can any body help me with what kind and how to wire them up
Thanks
Carl CEO EA&T RR
Carl, in this topic, almost anything goes. However, you'll get more answers by starting your own topic, in this case over in the electrical forum.
We just had a kind of similar question come in its own topic the other day. I would use an SPDT relay that would activate with track power. You'll need one per segment of track that you want to monitor. Then use a 3 lead R/G LED. The LED's would be powered by a separate supply.
Not all l.e.d. are exactly alike, it's voltage range and expected brightness would come into play too in choosing the resistance, as well as the supply output.
Add a lot of resistance while at max supply output, then reducing the resistance slightly is the way to "dial in" unknowns. Cheap assortment packs of resistors are commonplace; variation ranges between values vary too. A need for dialing random components in, then ordering accordingly is not unknown to good suppliers.
You know you'll get help, but this bit of side reading might help you too.
Adriatic posted:You know you'll get help, but this bit of side reading might help you too.
Thx I read the 3 steps, and think I can do the math.
Last swim of the summer......
Adriatic posted:Not all l.e.d. are exactly alike, it's voltage range and expected brightness would come into play too in choosing the resistance, as well as the supply output.
Add a lot of resistance while at max supply output, then reducing the resistance slightly is the way to "dial in" unknowns. Cheap assortment packs of resistors are commonplace; variation ranges between values vary too. A need for dialing random components in, then ordering accordingly is not unknown to good suppliers.
A couple of things about LEDs.
1 KΩ 1/4 Watt resistor is a safe place to start if you're feeding in 9 to 16 Volts.
LEDs will run on AC as well as DC. LEDs have an almost unlimited life and using AC power will reduce it; but they will still outlive you on AC if you treat them correctly.
Some people pair LEDs with a diode. While there is a logical reason for doing it, I never have and I've never had one fail as a result.
Finally, if you want to customise the brightness of your LED, connect a resistance wheel into the circuit, set it to 1KΩ and then try variations up or down from there. You will soon see the desired result.
https://www.jaycar.com.au/resistance-wheel/p/RR0700
Here, I'm not happy with the over-brightness of the green LEDs in my wheelhouse. When I get some time, I plan to insert my resistance wheel and find a more pleasing value of resistor.

Cheers

I just finished an op session and it went great. The two guys who ran on the layout had never been here before and gave me some pretty good feedback on a couple of things that I think I'm going to use the next time people run trains here, and they seemed to really enjoy everything. You never know how people are going to take these things, so it's always nice when it works out well.
p51 posted:I just finished an op session and it went great. The two guys who ran on the layout had never been here before and gave me some pretty good feedback on a couple of things that I think I'm going to use the next time people run trains here, and they seemed to really enjoy everything. You never know how people are going to take these things, so it's always nice when it works out well.
Learning the many ways to skin the cat is always the best part. At least you have time to run trains.
MaxSouthOz posted:Adriatic posted:Not all l.e.d. are exactly alike, it's voltage range and expected brightness would come into play too in choosing the resistance, as well as the supply output.
Add a lot of resistance while at max supply output, then reducing the resistance slightly is the way to "dial in" unknowns. Cheap assortment packs of resistors are commonplace; variation ranges between values vary too. A need for dialing random components in, then ordering accordingly is not unknown to good suppliers.
A couple of things about LEDs.
1 KΩ 1/4 Watt resistor is a safe place to start if you're feeding in 9 to 16 Volts.
LEDs will run on AC as well as DC. LEDs have an almost unlimited life and using AC power will reduce it; but they will still outlive you on AC if you treat them correctly.
Some people pair LEDs with a diode. While there is a logical reason for doing it, I never have and I've never had one fail as a result.
Finally, if you want to customise the brightness of your LED, connect a resistance wheel into the circuit, set it to 1KΩ and then try variations up or down from there. You will soon see the desired result.
https://www.jaycar.com.au/resistance-wheel/p/RR0700
Here, I'm not happy with the over-brightness of the green LEDs in my wheelhouse. When I get some time, I plan to insert my resistance wheel and find a more pleasing value of resistor.
Cheers
Valuable info Max and Adriatic.
Unfortunately the wheel is out of stock on line so now I've gotta fly 10,000 miles to get one ![]()
![]()
![]()
Bob
Plus 1 from me Max, ![]() You could help a brother(s) out n send me n Bob a couple of those wheels.
You could help a brother(s) out n send me n Bob a couple of those wheels. ![]() thx. Ted
thx. Ted
Today I finished two projects: Holsters for my Cab2 and DCS remote; added lights to the Ice Depot and Gateman.
I couldn't find holsters for my cabs so I decided to cobble two together.

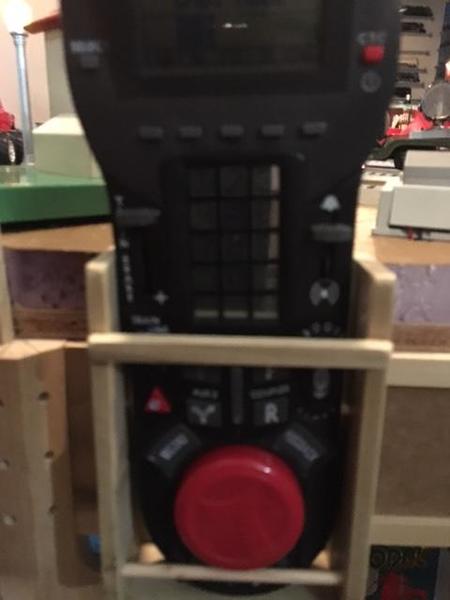
I turn on my power using a remote key fob originally used on our christmas tree. I keep that on a hook attached to the holster.
I also decided to add lighting to my gateman and my Ice Depot. I activate the Gateman through an ASC2 so I was never sure it was on until a train passed by. Often I'm at opposite ends of the table so to be sure it was powered up when I hit the ASC 2 I added a cool white LED. It's pretty cool when the lights are turned down in the room...

In the Ice Depot I added cool white in the "ice business" of the building thinking it looked more industrial...in the small window I put in a warm white LED more office like. I also closed off the bottom of the building so the lights didn't light up the base of the Depot.
Now, I have to get the sounds in my Backshop to work again...it's been a pain.


Nice holsters; i kept mine a little more simple.
suzukovich posted:p51 posted:I just finished an op session and it went great. The two guys who ran on the layout had never been here before and gave me some pretty good feedback on a couple of things that I think I'm going to use the next time people run trains here, and they seemed to really enjoy everything. You never know how people are going to take these things, so it's always nice when it works out well.
Learning the many ways to skin the cat is always the best part. At least you have time to run trains.
I'm not one of these guys who has a layout and has everything engraved in stone. I've run on other layouts like that and it's a drag sometimes.
You can always learn from someone else when it comes to operation as a fresh set of eyes will always find something you didn't. This is why I put out the call to people who've never been to my place before.
As for the time, if I'd bought a Humvee like you just did, I probably wouldn't have had the time! My sympathy meter for you in that regard registers a 0.0 (even though I've taken my 1944 Willys MB Jeep to two car shows this month)...
Well, it's back to the future. Don't know where I'll end up.
Before:

After:

TedW posted:Plus 1 from me Max,
thx. Ted
Thanks, Guys.
I can get them here and post them over.
My email address is below my signature.
Cheers
modeltrainsparts posted:Nice holsters; i kept mine a little more simple.
I like this one. When you take the remote out you have someplace to put your beer ![]()
RSJB18 posted:modeltrainsparts posted:Nice holsters; i kept mine a little more simple.
I like this one. When you take the remote out you have someplace to put your beer
Wait a minute... remember, no drinking and driving trains ![]()
![]()
![]()
p51 posted:suzukovich posted:p51 posted:I just finished an op session and it went great. The two guys who ran on the layout had never been here before and gave me some pretty good feedback on a couple of things that I think I'm going to use the next time people run trains here, and they seemed to really enjoy everything. You never know how people are going to take these things, so it's always nice when it works out well.
Learning the many ways to skin the cat is always the best part. At least you have time to run trains.
I'm not one of these guys who has a layout and has everything engraved in stone. I've run on other layouts like that and it's a drag sometimes.
You can always learn from someone else when it comes to operation as a fresh set of eyes will always find something you didn't. This is why I put out the call to people who've never been to my place before.
As for the time, if I'd bought a Humvee like you just did, I probably wouldn't have had the time! My sympathy meter for you in that regard registers a 0.0 (even though I've taken my 1944 Willys MB Jeep to two car shows this month)...
As you can see by the late response Humvee not only thing I have going on. Usually no matter what I manage to run them at some point in the day. Not right now at least.
Got things set up for Frisco Fest in Rogers, AR! ![]()
just came up from wiring more Miller Engineering signs. mounted my final sign on my Esso Gas Station. got to drill holes for the wires and then it will be under the layout for a while soldering all the wires. man I hope I can finish them tomorrow. it is hard for an old fat man to go down under. I will try to take pictures with all signs lit up.
Howdy Everyone,
So, I was in the mood to try to accomplish something (anything) on the layout today and here are the results. The upper level (Track 3) where most of the village buildings will go is basically all roughed in. When the extended trestle is complete track 3 will be continuous with a short passing siding behind where the buildings will be located (East end of the layout) . Track 3 is basically for running anything that requires O72 curves to operate. Here are a few pictures. Thank you for taking the time to look.
Chief Bob (Retired) 


Looks great, Bob! How high is the upper level? I'm thinking you will get a great near eye level view of your largest engines.
Today I finished the lower level of my main station. Then I positioned the buildings in Christianville. They still need detailing but I will do that later when some of the other basic scenery is finished. Finally i planted grass and a few trees near my wooden bridge. When we got back from Florida this Spring I set a goal of spending at least 1 hour a day in the basement. For the most part I have done that. Of course I work very inefficiently so it still takes a long time. Fortunately I have a lot of time.
AL


I did something on my layout, though it was more of yesterday, I also put an image up in a picture a day. I digress, yesterday I added more lights to my Atlas Theater, it looked a little bare, not quite like a theater all lit up. So I added more lights to my theater. I also ran a couple of trains.


Got out today after locating the size black foam board I needed to glue the buildings to plus the glue dots. Got them at Staples. Plus the larger sheets had a bit of damage on the end so I asked if they could take something off because there was not much to choose from and they did. Now I can start gluing the buildings to the sheets and start leaning them against the Masonite to see how I will place them. I also decided that because these buildings have doors for loading or unloading I am going to add some sidings behind the mainline that is there. I have enough room using 11 degree switches, which I will have to order. But this is where I will focusing my attention for the time being........Paul
Disregard the caboose photo, but the two metal signs on the top edge of the wall I recently got from a vendor in Tennessee. They made a ET&WNC one, but it was really small. The other is a reproduction of an ad the locomotive company took out during World War II. It's screams of that time period, so I had to have it. Along the top edge seemed to be a pretty good place for them.

I also took one of the cups sticking out from the edge of the fascia, as there was one on the opposite side of the aisle. At the op session I had on Thursday, one of the operators suggested that the two cups didn't have to stick out so far and there was too much of a tendency to brush against them. When they took a really good look I realized he was right. You can always learn something from visitors to your layout because they always see something that never crossed your mind.
Went into the layout room for the first time in a month and got hit in the face with some cobwebs.
I guess it's time for forget about fixing the cursed truck and run some wire to non-powered upper level turnouts.
Put some traction tires on this ol' gal. The magna traction didn't cut it on  gargraves track. Also gave her a good oil & lube job.
Mark Boyce posted:Looks great, Bob! How high is the upper level? I'm thinking you will get a great near eye level view of your largest engines.
Thanks Mark! The upper level is 53" to the top of the pink foam.
Chief Bob (Retired)
Greetings Everyone,
Still feeling ambitious today, I continued working the elevated portion of my layout (Track 3). ![]() Got most of the pink foam glued down and I was able to start working on the bridge. The bridge (an Atlas Pratt Truss) is removable so that the lift-out section can be raised to facilitate access to the interior of the layout.
Got most of the pink foam glued down and I was able to start working on the bridge. The bridge (an Atlas Pratt Truss) is removable so that the lift-out section can be raised to facilitate access to the interior of the layout. ![]() Since Track 3 is O72 min. radius I hope to finish this before York.
Since Track 3 is O72 min. radius I hope to finish this before York. ![]() That way, I won't have to pass-up that set of Pennsy Centipedes I'll be looking for.
That way, I won't have to pass-up that set of Pennsy Centipedes I'll be looking for. ![]() Thanks again for the "Likes" and encouraging responses. Both are greatly appreciated!
Thanks again for the "Likes" and encouraging responses. Both are greatly appreciated! ![]()
Chief Bob (Retired) 


After months-long hiatus from playing with my trains, I pulled everything off my SG layout table to dust and rethink. Almost all is back on the table, albeit some items in different locations.
One of my husband Tom's favorites is the polar bear that I got for my Ives Circus set.. This time he is climbing over the railing of the station terrace, and the soldiers (and a police dog) are called to aid in the town's rescue.
Decided not to put back on my vintage Barclay winter sports enthusiasts (skaters, sledders, and skiers). They don't go with the rest of the layout at present, but they are indeed such terrific pieces! They want me to make them a snow mountain someday!


I received my new(old) Lionel Standard gauge steam loco, #384, today and gave it some laps around my carpet layout. Nice engine, original paint, clean, no rust. Runs god, bought sight unseen. Made my day.
Well since my injury early this summer I pretty much run the trains everyday. Of course that means more maintenance, so now most my NYC power is do for grease and oil. Doc says no lifting above shoulder high. Run five trains this evening on my one loop without problem, I can do six but I really have to watch close. All the trains are on one 300' loop.
Carey TeaRose posted:After months-long hiatus from playing with my trains, I pulled everything off my SG layout table to dust and rethink. Almost all is back on the table, albeit some items in different locations.
One of my husband Tom's favorites is the polar bear that I got for my Ives Circus set.. This time he is climbing over the railing of the station terrace, and the soldiers (and a police dog) are called to aid in the town's rescue.
Decided not to put back on my vintage Barclay winter sports enthusiasts (skaters, sledders, and skiers). They don't go with the rest of the layout at present, but they are indeed such terrific pieces! They want me to make them a snow mountain someday!
Very nice!
ran my "Dale" train on the upper loop, and.....

started putting up new train shelves in the back room....


PUFFRBELLY posted:Greetings Everyone,
Still feeling ambitious today, I continued working the elevated portion of my layout (Track 3).
Got most of the pink foam glued down and I was able to start working on the bridge. The bridge (an Atlas Pratt Truss) is removable so that the lift-out section can be raised to facilitate access to the interior of the layout.
Thanks again for the "Likes" and encouraging responses. Both are greatly appreciated!
Chief Bob (Retired)
Looks great, Bob! The centipede will great running on the high line!
Added some weeds to the tie piles and installed some street lights in the depot parking lot and community park. The village Xmas tree will fill the "hole on the hill" ![]()


Today was a great day. First the new Lionel catalog. Placed my order for a number of things I liked in the catalog. Second was the Menards release. Third was I finally got back down to the basement. A few days ago I got black foam board in the sizes I needed. So late this afternoon I glued the building to the board. I was trying to figure out how I would get these big pieces glue without too much trouble or mistakes. I had some PVC pipe left over from the furnace drain pipe I relocated. Rolled the building pics on the pipe and then sprayed the board with adhesive spray and rolled the building out. Worked great. No wrinkles. I put the buildings against the Masonite to see how they are going to look and I am quite happy with them. Tomorrow I cut the excess foam board off and they will be set to mount. Pics.


Nice work there Paul! now your going to have to weather the Morton building! LOL![]()
paul 2 posted:I was trying to figure out how I would get these big pieces glue without too much trouble or mistakes. I had some PVC pipe left over from the furnace drain pipe I relocated. Rolled the building pics on the pipe and then sprayed the board with adhesive spray and rolled the building out. Worked great. No wrinkles. I put the buildings against the Masonite to see how they are going to look and I am quite happy with them. Tomorrow I cut the excess foam board off and they will be set to mount. Pics.
This is a great tip. It's actually quite analogous to the method for transferring rolled out dough in baking, when you gather it onto your rolling pin. Your results are spectacular. Gotta get me some of that action. I have hundreds of feet of backdrop to fill.![]()
--------------------------------------------------------------------------------------------------------------------------
I spent four hours under the layout rewiring the small hidden yard, by dragging new power and control lines over to the new relay panel under Red Wing. Yesterday, I spent three hours relocating the turnout control lines. I've been having trouble with a couple of switches not working, including a critical one in the big hidden yard.
I finally figured out what was wrong. Originally, I thought it was a matter of overall distance and voltage drop. That wasn't it! It turned out that the conductor going over the door is bad. Fortunately, I have 40 others to choose from to replace it. Just have to do the swap. It will be nice to have both yards fully functional again.
Should be done by Thursday night, just in time for the monthly update![]()
TedW posted:Added some weeds to the tie piles and installed some street lights in the depot parking lot and community park. The village Xmas tree will fill the "hole on the hill"
Ted, it is looking great!! The additions to the parking lot and Christmas tree will really make it come alive!
Mark Boyce posted:TedW posted:Added some weeds to the tie piles and installed some street lights in the depot parking lot and community park. The village Xmas tree will fill the "hole on the hill"
Ted, it is looking great!! The additions to the parking lot and Christmas tree will really make it come alive!
Thx Mark. Appreciate the encouragement. Ted
Package came this morning from PTF designs. A Petroleum plant. They are foamed back and have a light built into each. I plan on using these with the Refinery backdrop I got from Scenic Express. Going to see what arrangement works the best. Both of these sort of side by should give me a nice long siding for tank cars. First I have to find my X-Acto knife so I can cut all the excess foam of the buildings I glued yesterday. Pics............Paul


Ran trains
TedW posted:Added some weeds to the tie piles and installed some street lights in the depot parking lot and community park. The village Xmas tree will fill the "hole on the hill"
Very well done!
Paul 2, Ted, and Elliot,
Nice progress on your respective layouts.
Elliot- glad you finally found the wiring problem with your yards.
Ted- the little details are great.
Paul- I like the roller idea too. Kinda have a craving for apple pie now for some strange reason. ![]()
Today was Std. Gauge Tinplate "freight car dreaming" day... I looked up ALL the available 200 series freight cars on the evilBay. I only have one thus far to run with my pink 408E, or a future 400E. I'd of course need for a full consist (at least 11).
Finally oriented switches correctly and finished the actual soldering of my homemade speed control. I accidently pushed a very long resistor leg a bit to far to access another terminal, and didnt notice I'd left it shorted, bypassing the resistor.
I cooked the fwd motion led on power up...aarg!
It works, except for one diode that takes a few seconds to drop voltage when its been off a while. Diodes usually don't fail that way; or "forget" what to do, then remember the next try; that trait is usually found in more complex components. Watching that switch to see if the diode is "forgetful" or just plain dying will be kinda fun. It will only lose a single "throttle notch" and swapping those diodes is no big deal..
The cooked l.e.d. on the other hand is "factory glued" with some strong stuff. The box is a normal project box with fiber plastc face. It was a former ho shop's custom dc pot & variable regulator type control. Not even enough amps for an 0-4-0 in O, its circuits would glow red hot in minutes. Impressive it did survive an hour or so of that abuse and still worked. I saved most of the guts intact.
I don't know if the led removal is going to be clean and I dont think I have any tiny dim reds anyhow, so a larger diameter green diode and second resistor taylored to dim it might be there later...it would be big green for fwd, and small red for reverse, logical enough eh?
gandydancer1950 posted:TedW posted:Added some weeds to the tie piles and installed some street lights in the depot parking lot and community park. The village Xmas tree will fill the "hole on the hill"
Very well done!
Thank you sir. I appreciate your comments based on the fine work on your own layout. TW
Paul I like the direction you are going with the backdrops! I agree they should make a really nice siding!![]()
Ted, Things are looking great in winter wonderland! I like the new street lights! I do have a question thought, where is your town located? Tahoe or something like that? You sure have some sporty cars for a winter area! But I still like it a lot!![]()
Mike, yeah, right you are about the cars. The convertibles will come off I suppose, but they are new so I wanna show em' off for a bit. Menards had a sale, $2.99 for the Shelbys. My last real convertible was a Z4 BMW. I did run around in that with the top down in winter some times "just because I could"! Sigh... Those days are gone so now I can only do it in models.
Today I played "dream extension" of my existing layout! IF I ever culled more SG real estate at add to what I already have. I drew things up on graph paper... basically adding a second table of same dimensions and design as my existing one, and adding a triangle in the inner corner.

Access to this requires an OGR Forum Supporting Membership


