


Dave, That is an excellent way to put it about Al's sawmill!!
Al, Absolutely stunning work on the lumber saw mill. Thanks for sharing.
Mark, I haven't logged on in a few days, glad your back is improving. Good luck getting started with the Mianne benchwork.
Paul: Nice work finally swapping out all the screws, the warehouse district is looking great.
Mike G: Just went back and read about your challenges with the control panel, bummer. I prefer to use 1/8 inch pin striping tape, and although I had Plexiglas and lexan around the shop, I decided to use 5 to 6 MM plywood for my control panels. I paint them flat black first, then use a flat acrylic clear coat to seal them, then pin stripes and finally I drill for the switches, LED's etc. It's way more forgiving material than plastics, just a thought.
Yesterday, I finished cleaning up the not so well done wiring in the panel in the last 2 photos below. Ended up making some changes to the Power Districts which entailed going in there, and decided while I was there that it needed improvement. It was the first panel I completed for the current layout.
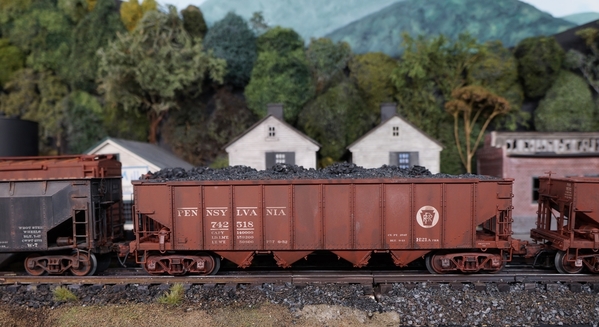
NSRailfan: I agree with Eliot, your weathering looks good, but could use some additional touches, which will make the weathering "less uniform". I also highly recommend that you try acrylic paint washes applied with brushes. It's sounds complicated, it's nothing more than acrylic craft paints diluted with water, and touch of alcohol to act as a wetting agent so the wash doesn't 'bead up". If you seal your base coat with flat clear coat, you can do the acrylic wash, and as Eliot noted, if you don't like the result, you can remove it with a damp cloth, or tooth brush with some water. I usually get to similar colors going at the same time, like a raw sienna wash, and a burnt umber wash. The burnt umber will make shadow areas on red oxide boxcars, and the raw sienna is more in the "rust" family. The PRR H21a hoppers below were done with washes only.


Attachments
Images (9)
")
")
")
Mike G, regarding your control panel: Since you are back to square one, you might want to reconsider locating your switch controllers to the fascia, close to the switches. You mentioned that you were waiting on the fascia until the scenery was started or done. Putting the fascia up early would help with the scenery design as it would provide a rolling contour to attach rolling terrain. Placing your switch controls adjacent to the switch would also ease the wiring. With all the hand held controls today, such as DCS and the Lionel system, most operators are free to move around the layout and follow train operations and thus are not confined to a large control panel. When little engineers visit, stationing them at the switch would provide them active participation. This would also apply to operating accessories - place their controls on the fascia close to the accessory. Just a thought! Cheers, Dave
PS: I avoided toggle switches as they have a tendency to get caught on clothing as one moves about the layout. I do not have that problem with the rocker switches.

The red rocker switch controls the turnout, the two rockers with white dots control power to the sidings. The lighted rocker switch on the far left activates the freight station and the one just to the left of the red switch, turns on yard lights.


Attachments
Images (3)
I put my switches on a panel in front of the area that they operate. Going to see if I can get the vinyl graphic folks to make me a diagram overlay. <----- off on-----> and line it out like yall folks have been doing.
Jim


carsntrains posted:I put my switches on a panel in front of the area that they operate. Going to see if I can get the vinyl graphic folks to make me a diagram overlay. <----- off on-----> and line it out like yall folks have been doing.
Jim
Depending on what kind of switches you used, you probably can find off the shelf "on/off" labels/covers for them.
For example:
https://www.grainger.com/produ...77!!!g!340352457831!
Bob and Jim, that photo with the Saurekraut factory at the bottom is looking toward the front of the basement. It is going to be a 95% switching layout but eventually I will have one mainline running around the whole layout.
Mike, I agree with Jim. Mount your controls for the switches where the switches are. If you are running remeotely you do not want to keep going back to the control panel to control the switches.
Mark, I got out to Menards and got what I needed. 1X4's and more Balsa wood for loading platforms. After lunch I will be working on taking out the wall on the other side of the doorway by the sanitary tub. So if the storm is going to be a big one I now have what I need to work on the layout. Once that is out I can make up my next table. It will contain two Menards double track bridges and underneath will be a lot of water falls over rocks coming from the back to the front. The one double track bridge will have two tracks going through it and the other double track bridge will have one track and the other side will be for coal trucks. ................Paul


Attachments
Images (2)
Last night the Bald Rock Mountain RR surrendered it's holdings in the living room for a better location in a bedroom. Trains are moving again this morning. Additional roadbed patterns will be made this afternoon. I have 73 pieces of o27 track, six switches, and three custom cut pieces. A large turn around and four spurs keeps me busy. I added a chair next to the operating position since there are fewer derailments. Here we are now.


Attachments
Images (3)


paul 2 posted:Bob and Jim, that photo with the Saurekraut factory at the bottom is looking toward the front of the basement. It is going to be a 95% switching layout but eventually I will have one mainline running around the whole layout.
Mike, I agree with Jim. Mount your controls for the switches where the switches are. If you are running remeotely you do not want to keep going back to the control panel to control the switches.
Mark, I got out to Menards and got what I needed. 1X4's and more Balsa wood for loading platforms. After lunch I will be working on taking out the wall on the other side of the doorway by the sanitary tub. So if the storm is going to be a big one I now have what I need to work on the layout. Once that is out I can make up my next table. It will contain two Menards double track bridges and underneath will be a lot of water falls over rocks coming from the back to the front. The one double track bridge will have two tracks going through it and the other double track bridge will have one track and the other side will be for coal trucks. ................Paul
MR. Paul! Tear Down That Wall!!! LOL YAY! Now I may take down that 4x4 area no matter what anybody else says! : )
Jim
great photos Chris !! looking GOOD ![]()
awesome scene here Chris, looks very real !!

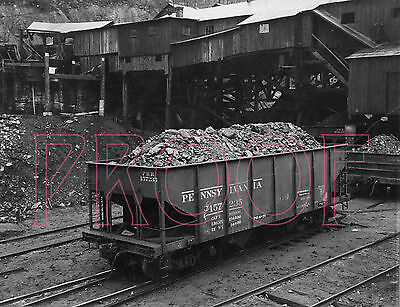
PS hope you don't mind the black & white photo Chris,
thought it went good with the real train photos...
your layout, scenery, and weathering are looking great, good job !!!
Attachments
Images (4)


carsntrains posted:paul 2 posted:Bob and Jim, that photo with the Saurekraut factory at the bottom is looking toward the front of the basement. It is going to be a 95% switching layout but eventually I will have one mainline running around the whole layout.
Mike, I agree with Jim. Mount your controls for the switches where the switches are. If you are running remeotely you do not want to keep going back to the control panel to control the switches.
Mark, I got out to Menards and got what I needed. 1X4's and more Balsa wood for loading platforms. After lunch I will be working on taking out the wall on the other side of the doorway by the sanitary tub. So if the storm is going to be a big one I now have what I need to work on the layout. Once that is out I can make up my next table. It will contain two Menards double track bridges and underneath will be a lot of water falls over rocks coming from the back to the front. The one double track bridge will have two tracks going through it and the other double track bridge will have one track and the other side will be for coal trucks. ................Paul
MR. Paul! Tear Down That Wall!!! LOL YAY! Now I may take down that 4x4 area no matter what anybody else says! : )
Jim
FUDGE STRIPE COOKIES! YUMMMMMM! ![]()
Elliot and Chris-I will try to do that with my future tries. I appreciate the input. There is nothing wrong with constructive criticism!
carsntrains posted:RSJB18 posted:paul 2 posted:I was going to say I got all the drywall screws out but when I was checking the pics I see I missed one. The only place I could not change out the screws is where the track goes under the stairs, So after dinner I'll head down to the basement, take care of that screw and then maybe add some more ground cover around the Saurekraut factory. Tomorow if the weather is good I get to Menards and buy some lumber for the next table. Pics........Paul
This is a great shot Paul. Shows the complexity of your track plan. Lot's of switching fun to be had.
Bob
Yes I agree. Awesome switching to be done there!! Now can we see the whole layout please?? LOL
CSX Al nice work. Id been considering doing a kit. BUT.. I broke the windshield frame on one of my little army jeeps. Cant even get it fixed. Guess I'll have to get my wife or son to do it lol Some of us just aint cut out for that stuff!! You have a gift!
Mike keep a diggin! LOL
Jim

2nd on seeing the whole layout! and a track plan if you have one?
also, it would be awesome if you started a thread with all the various sidings and switching areas on your layout. I've been seeing different parts of your layout for the past couple of weeks in this thread but its hard to find them all in the same place. I'm in the process of adding a few sidings for switching operations and could use some inspiration.
NSRailfan100 posted:Elliot and Chris-I will try to do that with my future tries. I appreciate the input. There is nothing wrong with constructive criticism!
Thanks and you're welcome. I do try to keep it constructive. We're to help each other get better at this hobby. You could try working with the ones you've "started" to improve them.![]()


Attachments
Images (5)


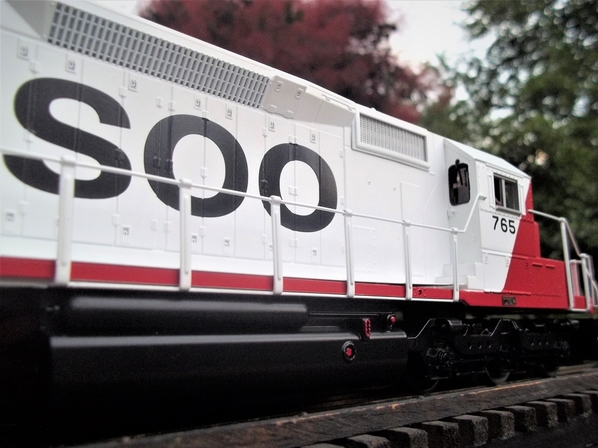
By coincidence, I have a couple of Soo F unit shells on order from eBay for future "Little Mitch" conversion into a double ended electric on an RMT GG-1 chassis...
(seller's photos)


In other news, I repaired a waif N scale gondola with a broken truck pin...

Fortescue rather likes it, as it's more his size... ![]()
Mitch
Attachments
Images (9)
Awww Mitch, those Soo shells are too nice to chop up. I wish I had something to swap you for them. I even love the way the lettering is scratched up. I might have a couple Williams shells I'd trade.
Let's make a deal! I once did a similar transaction at a TCA convention where I ran home to get get a piece to trade in a 3 way deal, so the guy wouldn't destroy a Milwaukee Road Roosevelt campaign car. He was going to buy it for repaint, and I had one without the bunting. Took me a half hour round trip, but I got it done.
I'll pay the shipping both ways. and throw in some extra goodies too.![]()
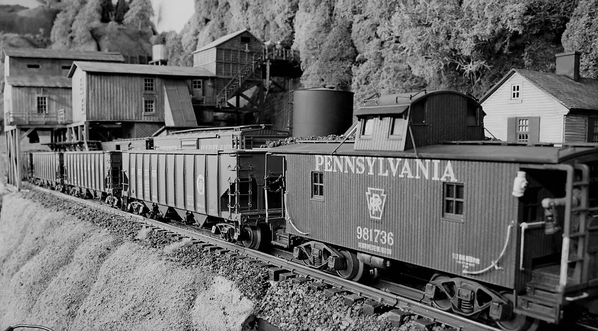
awesome scene here Chris, looks very real !!
PS hope you don't mind the black & white photo Chris,
thought it went good with the real train photos...
your layout, scenery, and weathering are looking great, good job !!!
Brian: I love it, no I totally don't mind. Some your great photos of Coal Tipples and Hoppers filled with all different grades of coal were an unbelievable help when I was building that scene.... You do a great job mixing prototype and model RR train photos on this thread, it's always appreciated. Chris
NS Railfan - The weathering is an evolution process for me, the more I learn, and the more I do, the better the results get, and the more willing I am to try different techniques. I do think you'll like working with the acrylic washes, once you do one or two, you'll realize the difference between what it looks like "wet" versus dry after the water dries out and leaves the pigments behind. The other thing I think you'll find is that it's fun to go back and do different colors/shades in specific areas to make final adjustments. That's how I ended up getting the different shades on the roof, doors and sides of the boxcars below.
")
")
")
Attachments
Images (3)
")
")
")

Attachments
Images (1)
Big_Boy_4005 posted:Awww Mitch, those Soo shells are too nice to chop up. I wish I had something to swap you for them. I even love the way the lettering is scratched up. I might have a couple Williams shells I'd trade.
Let's make a deal! I once did a similar transaction at a TCA convention where I ran home to get get a piece to trade in a 3 way deal, so the guy wouldn't destroy a Milwaukee Road Roosevelt campaign car. He was going to buy it for repaint, and I had one without the bunting. Took me a half hour round trip, but I got it done.
I'll pay the shipping both ways. and throw in some extra goodies too.
Yer on! I agree, those shells are too nice to chop, but they were what I could find.
Drop me an email! ![]()
Mitch
Corner Field Model Railroad Museum posted:Another busy day at Corner Field Model Railroad Museum & Hobby Shop. Remember, kids are what it's all about and boy what a group. And they really enjoyed themselves.
Interesting streetcar connexion, FYI: The Thomas schoolbus company used to be known as Perley Thomas, the folks who manufactured the iconic New Orleans streetcars...
https://en.wikipedia.org/wiki/..._A._Thomas_Car_Works
Mitch
M. Mitchell Marmel posted:Big_Boy_4005 posted:Awww Mitch, those Soo shells are too nice to chop up. I wish I had something to swap you for them. I even love the way the lettering is scratched up. I might have a couple Williams shells I'd trade.
Let's make a deal! I once did a similar transaction at a TCA convention where I ran home to get get a piece to trade in a 3 way deal, so the guy wouldn't destroy a Milwaukee Road Roosevelt campaign car. He was going to buy it for repaint, and I had one without the bunting. Took me a half hour round trip, but I got it done.
I'll pay the shipping both ways. and throw in some extra goodies too.
Yer on! I agree, those shells are too nice to chop, but they were what I could find.
Drop me an email!

Mitch
Hang on there, Mitch - F unit shells are too nice to adulterate, but GG1’s are fair game??? I think I need to get a lawyer and Soo you...
Sorry, but you tee’d that one up too well... just couldn’t resist.

Chris, Thank you on the back well wishes and on the Mianne purchase. It is scheduled for delivery on tomorrow, but we will see if that happens since they are predicting 8-12" of snow starting tomorrow morning.
Dave, The fascia switches look real smart as does the whole layout!
Tom, Wow they brought a bus!! I hope everyone had a great day at Corner Field!!
Paul, Yes, we only got a smidgen of snow last night and it has been sprinkling off and on just over freezing. You are all set for demolition and construction during tomorrow's snow!
Jim, Mr. Paul, Tear down that wall! I love it!
Bill, Yes moving the layout from the living room to the bedroom is a great idea!
Brian, The PRR Coal Country photographs are great, as arr the SOO engines!
Mitch, So do you have an engine to pull Fortesque around in that N scale gondola? It does fit him well!
Johan, That is a very dramatic photo angle of the Lehigh Valley engine!
I finalized the last roster sale this morning to raise funds for the Mianne and other layout building supplies. This one wasn't as hard to let go of as some others. I started cutting when I had to use the money I saved for the layout on car repair and dog repair. ![]() Then I saw the Shay, so by that time I had cut so much, I just kept going. I now have The Shay, a WM H9, and a PRR 0-4-0 switcher I want to re-letter for the WM. On the diesel side, I have a BL2 and an A-B-A F3 set that I want to repaint and upgrade from PS to PS3, I have the kits. I already upgraded the BL2. I do have a WM PS3 Hudson on preorder for the passenger train, so no order from the new Lionel catalog.
Then I saw the Shay, so by that time I had cut so much, I just kept going. I now have The Shay, a WM H9, and a PRR 0-4-0 switcher I want to re-letter for the WM. On the diesel side, I have a BL2 and an A-B-A F3 set that I want to repaint and upgrade from PS to PS3, I have the kits. I already upgraded the BL2. I do have a WM PS3 Hudson on preorder for the passenger train, so no order from the new Lionel catalog. ![]() That doesn't count the Christmas sets.
That doesn't count the Christmas sets.
It's been a long time coming. I purchased the Starlight Diner by Miller Engineering in 2013 without ever checking what was involved to build it. I opened the box and closed it in about 10 minutes, deciding that this was well beyond my scope. At the time Alex M was building my Penn Station using MTH banks. I asked Alex if he would take on this project. With some reluctance Alex took the kit and started researching the build. He came back to me and asked if he could get Alan Graziano involved. I agreed, and the diner got built; it was beautiful. However I was preparing to move so the diner never found a home on the layout in Brooklyn. I started the new layout in the fall of 2015. Eventually the diner building was unpacked an placed on the layout to claim its real estate; but I was reluctant to put the roof on during construction. This week I decided that it was time and I unpacked the roof and tested the lighting and sign. Today I wired it to the layout; landscaping and the whole road thing still has to be done. I wanted to post this today as a way to thank Alex and Alan for their collaborative effort in putting this fine structure together. They did a fantastic job! THANK YOU Alex and Alan!
Attachments
Images (1)

Apples55 posted:Hang on there, Mitch - F unit shells are too nice to adulterate, but GG1’s are fair game??? I think I need to get a lawyer and Soo you...
Sorry, but you tee’d that one up too well... just couldn’t resist.
Hee! ![]()
Mark Boyce posted:Mitch, So do you have an engine to pull Fortesque around in that N scale gondola? It does fit him well!
Oddly enough, yes.

(The N scale equipment will be going to the Sugar Creek MRR club, as I've got my hands full with three rail O...) ![]()
Mitch
Attachments
Images (1)
pennsyfan posted:It's been a long time coming. I purchased the Starlight Diner by Miller Engineering in 2013 without ever checking what was involved to build it. I opened the box and closed it in about 10 minutes, deciding that this was well beyond my scope. At the time Alex M was building my Penn Station using MTH banks. I asked Alex if he would take on this project. With some reluctance Alex took the kit and started researching the build. He came back to me and asked if he could get Alan Graziano involved. I agreed, and the diner got built; it was beautiful. However I was preparing to move so the diner never found a home on the layout in Brooklyn. I started the new layout in the fall of 2015. Eventually the diner building was unpacked an placed on the layout to claim its real estate; but I was reluctant to put the roof on during construction. This week I decided that it was time and I unpacked the roof and tested the lighting and sign. Today I wired it to the layout; landscaping and the whole road thing still has to be done. I wanted to post this today as a way to thank Alex and Alan for their collaborative effort in putting this fine structure together. They did a fantastic job! THANK YOU Alex and Alan!
Bob, Alex and Alan did a great job! Looks so good, but what would I expect from them!!! ![]()
Well just keep your eyes on Fortesque.![]()
Big_Boy_4005 posted:Well just keep your eyes on Fortesque.
Yes, we don't want him running off with the Sugar Creek Club!!!
I put my Vetter's building and trucks on the layout tonight in a temporary spot. Tested them all and they work great! Been checking out the new Lionel catalog and folks its groundbreaking! Just saw a few pages and I am in awe! Lots of new rolling stock in what little of the book Ive seen. Hope everyone has a great and productive weekend!
Jim

Haven't put interior in the logging bunkhouse, although rest is done. Kit only had four double bunks with eight lockers, but l can fit many

CSX Al posted:I got an early start this morning before heading out to the shop to build turntables. I got all of the equipment glued in and will tackle saw floor lights and saw filers floor lighting tonight.

Wow!!Talk about going all out in detail.Just wow I am impressed by your skills.
Andy, The signs look great all done ready to go on the layout! You always have great action on your videos!
Colorado Highrailer, Sounds great you got the bunkhouse ready except some detail.


Attachments
Images (10)


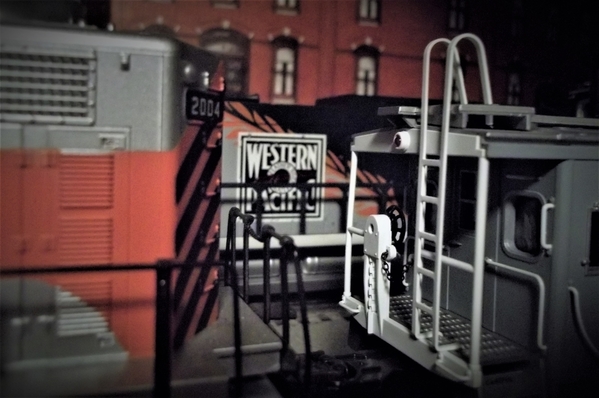
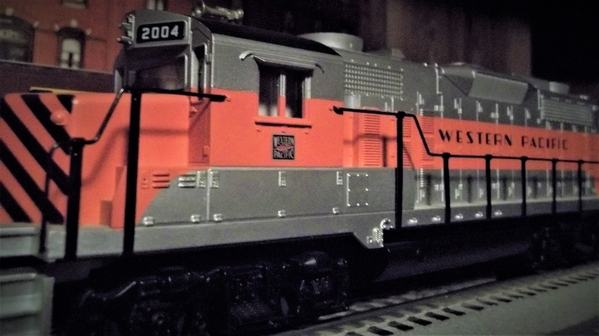
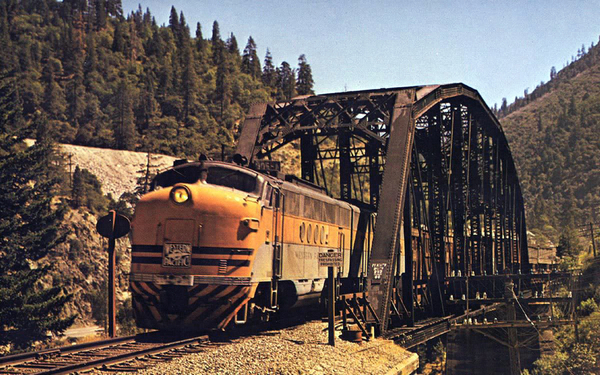
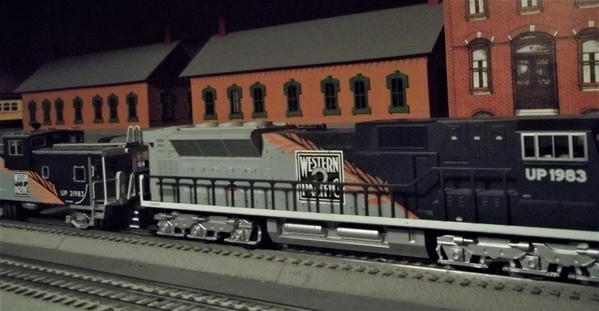
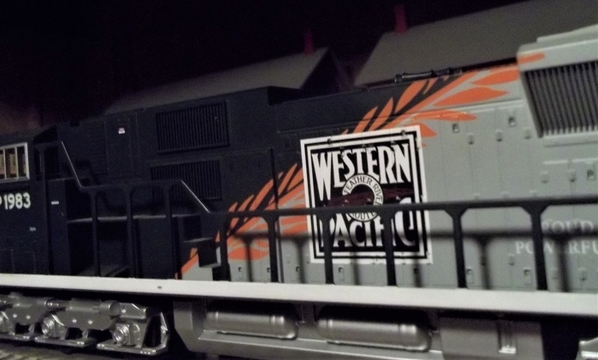
The railroad of the day is......Western Pacific!! Those are more great photographs, Brian!! ![]()


Very nice !! great looking scene and scenery !!!
Attachments
Images (1)

Yesterday and today, I put away all the Christmas trains and decorations, back in their boxes and back under the layout till Thanksgiving. Depressing on one hand, but on the other hand it’s great to get back to normal operations.
Last night ran the mail train behind a K-line scale K4s with TMCC. Ran my fantasy nine car tanker consist, MJHX, behind the Decapod. The port traction tire came off so I replaced it. Switched the tankers to the engine yard and switched the Gla coal hoppers from the engine yard to the main yard tracks with the #505 K-line B6s.
Today I want to clean the the drive wheels and rollers on the #505 B6s. And hope to switch mixed freights to the yard with #520 Lionel B6s and complete the coal train for a drag behind the H9 or the Decapod.


definitely needing this today... ![]()
Attachments
Images (4)


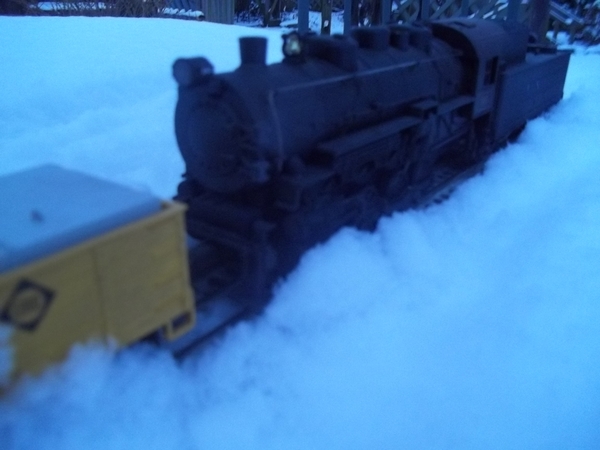
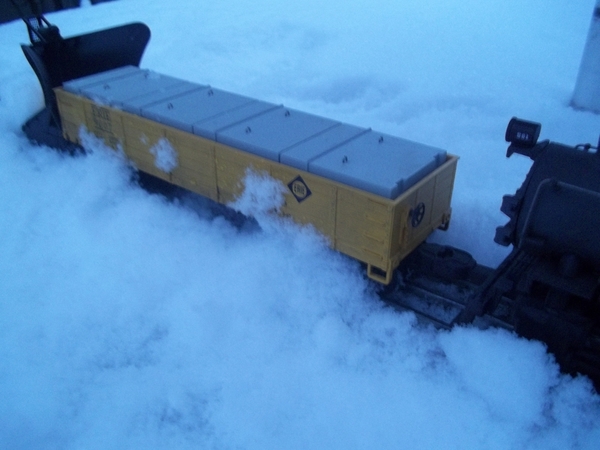
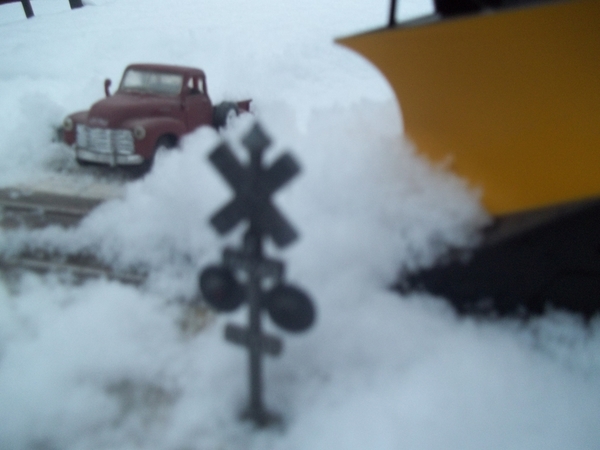
That white stuff is on its way to us in the form of a Nor'Easter. NH is expected to get 12-24" from south to north. Need to get the old wing plow ready with a switcher pushing. Car is backed into garage. Shovels are at the ready. After filling the car with gas, I talked to Pete at Jones' General Store and they're about out of milk & bread. Storm warning from 5PM today until 1AM on Monday. Scary times! LOL. (Yes, the only store in town is Jones'.)
I'm getting close to finishing an old Palace theater redo. Two thumbs up to Miller Engineering.
Attachments
Images (1)

working on Howard Park, a small town that traverses my laundry room. Should be interesting.....


Attachments
Images (4)
Howard Park is looking like a nice town!! Can you tell us where you got the printed buildings from?
Unboxed my new Legacy E8 A-A in the Louisville and Nashville scheme 
 locomotive and took it around the layout a few times.
I just received it from Michael at Crocodile Train Store. I would highly recommend him and his business. FYI, check out his store, I got this for more than 50% off retail, there are a couple of other legacy BTO items for a steal on his site too.
Attachments
Images (2)
Didn't get to the basement till late this afternoon. I marked off where I will be cutting the wall. I di start to take down some of the smaller boards. Maybe after dinner I can pull some more down. On the backside of the wall is a very old handmade shelf I'll have to get out of the way and into the garbage for Monday. It started snowing here around noon and has been snowing ever since. Watching the weather reports I made the decision not to go to the NJHR's Trainstock 11. I sure wanted too but the weekend didn't look promising. I really hated to cancel. But hopefully next year if they do it again in January the weather will be on my side to travel that far. Couple of pics of where I am tearing the wall and door frame down.............Paul


Attachments
Images (2)
Nice work everyone.
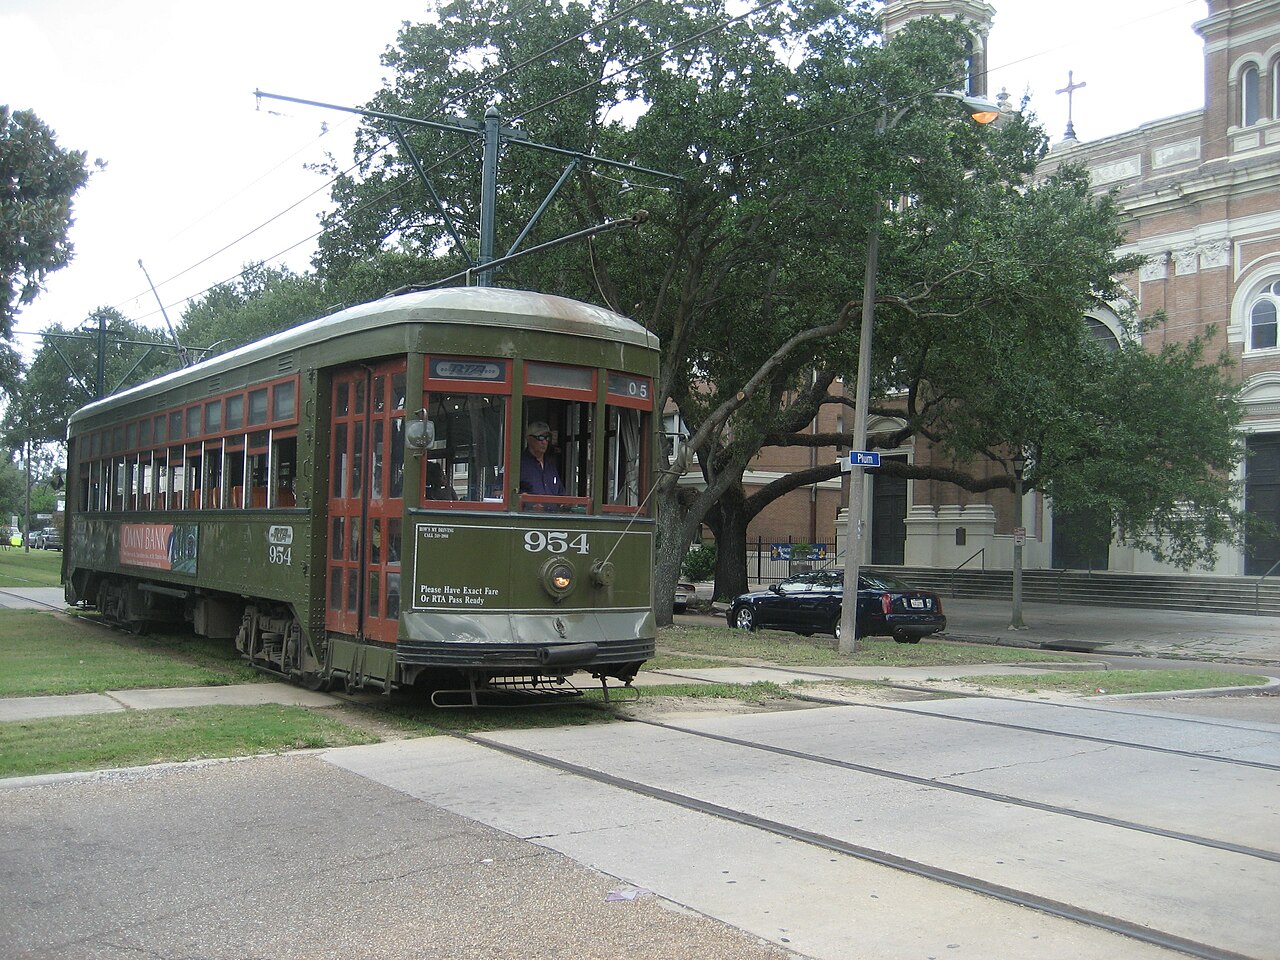
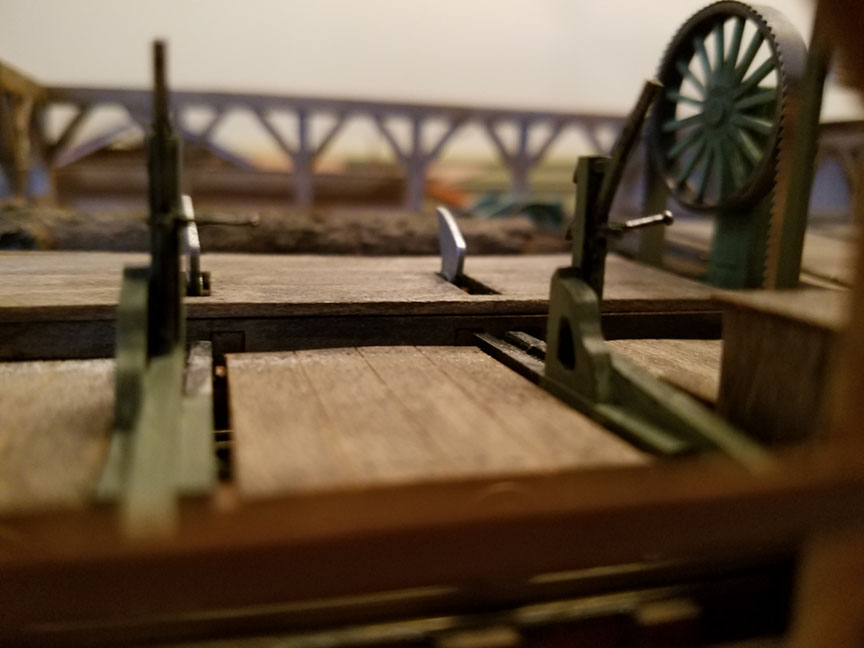
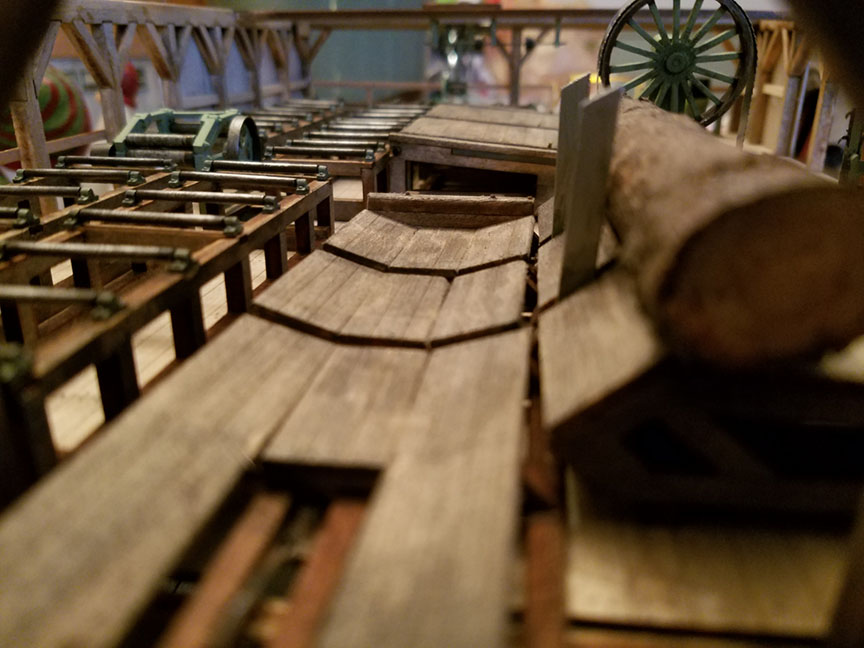
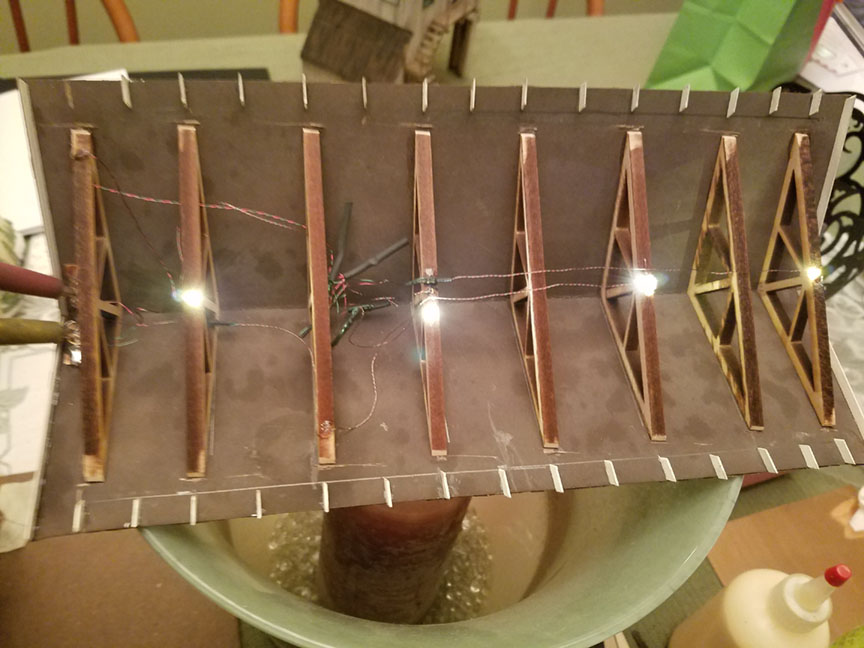
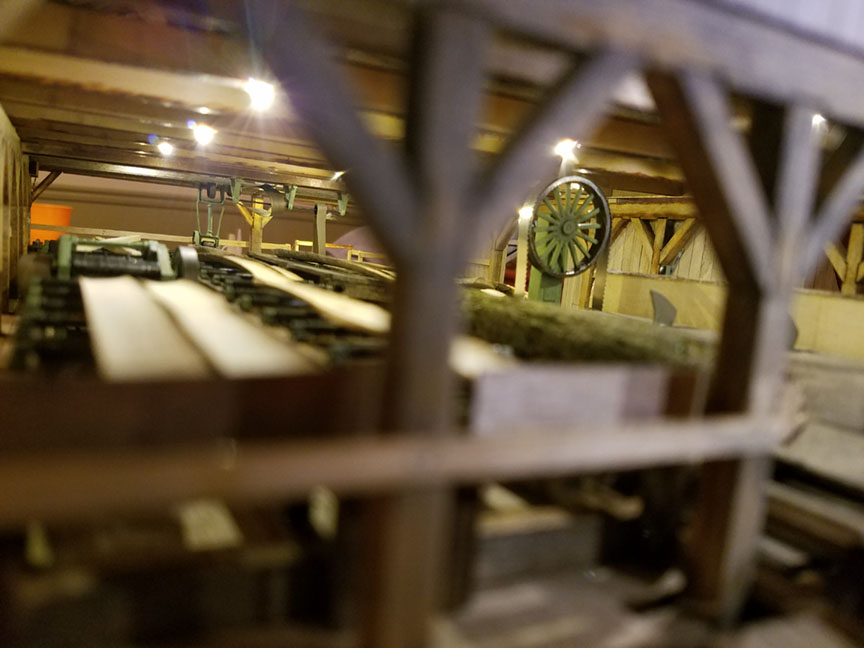
I have all the lights installed in the mill. One thing I wanted was being able to remove roofs etc. without having to unplug lighting. So I use some phosphorous bronze sheeting and also some Kadee coupler springs soldered onto bronze plates to make connections.
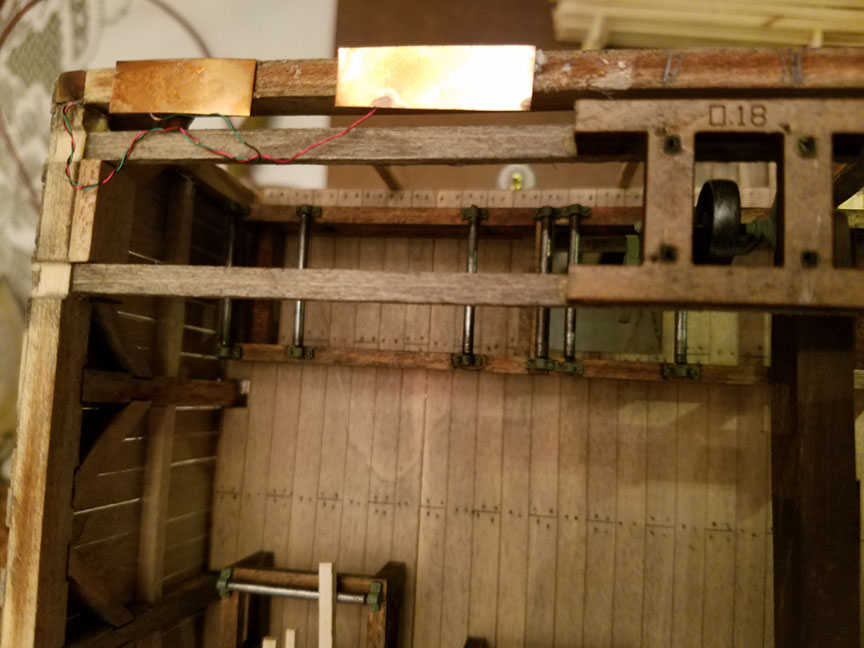
Here is the bottom of main roof section with leds installed on bottom of rafters.
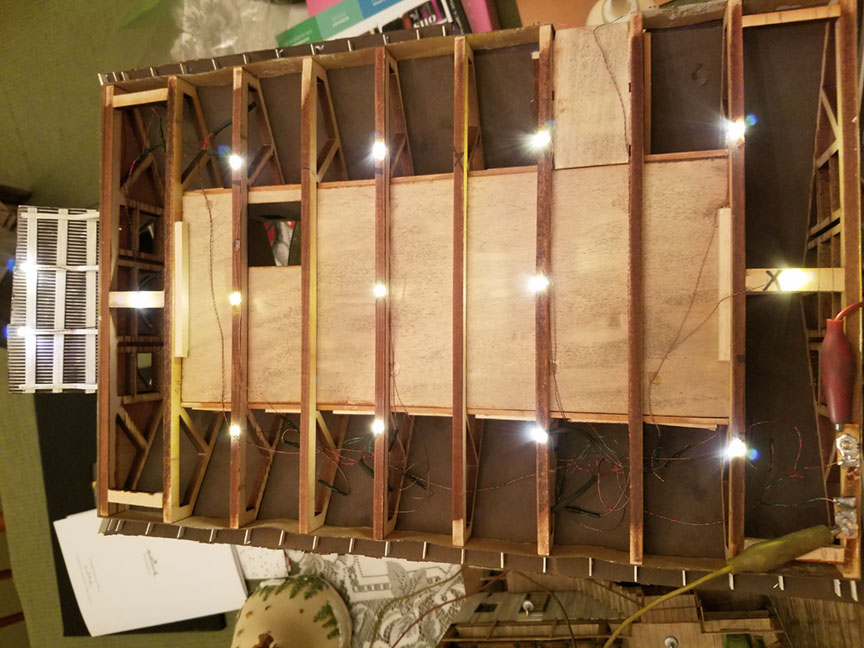
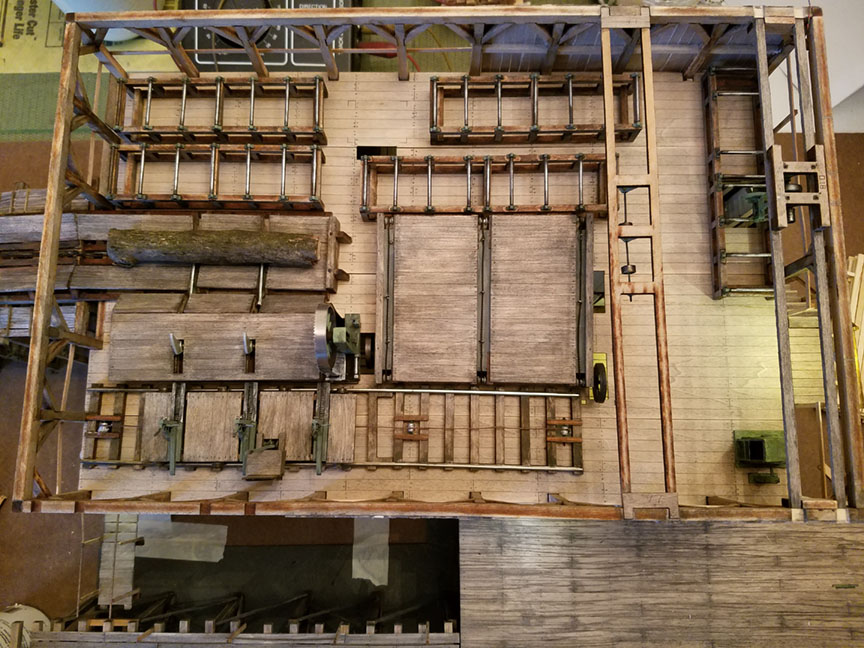
Here are the 2 spring contacts on the bottom of the roof
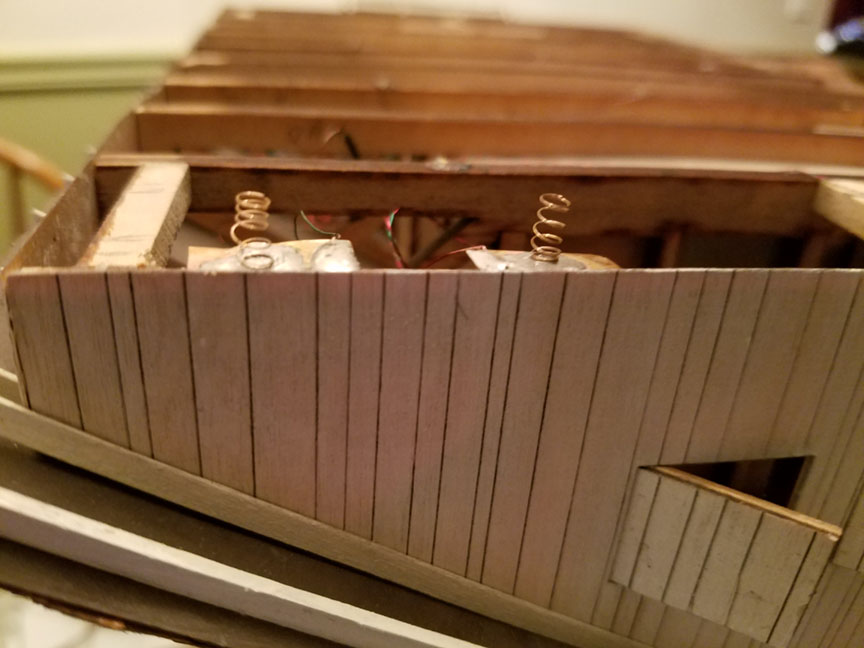
Here are the two contacts on top of saw floor wall that contact with springs above
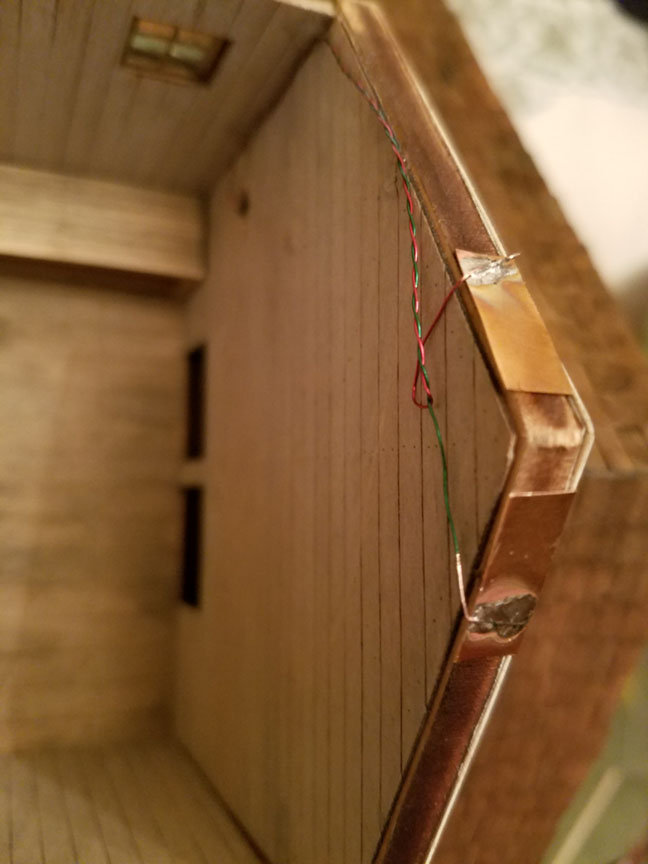
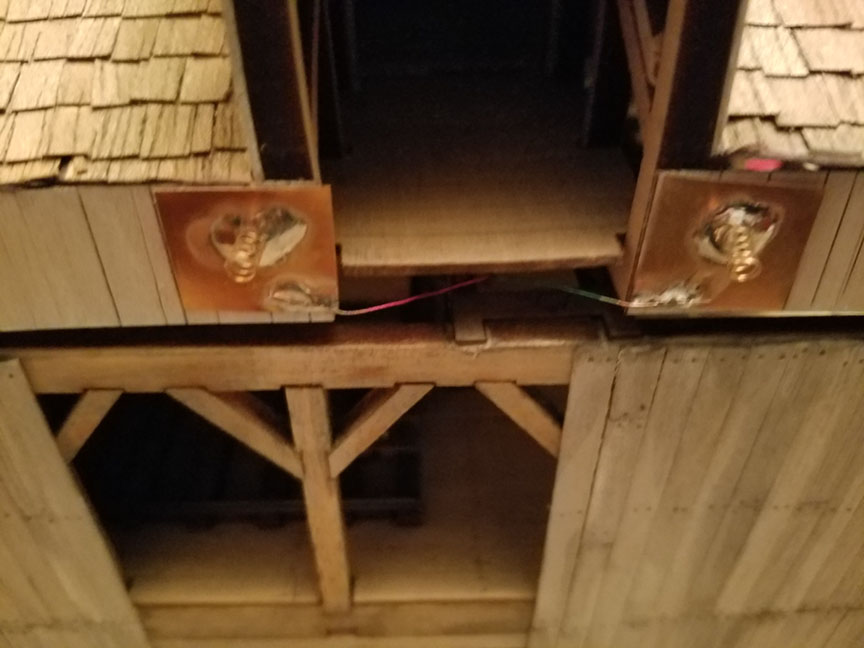
Here are the 2 contacts on the peak of the saw filers wall that is at the very top of mill
Here is the underside of the filers roof with LED's and you can see the 2 spring contacts in the foreground
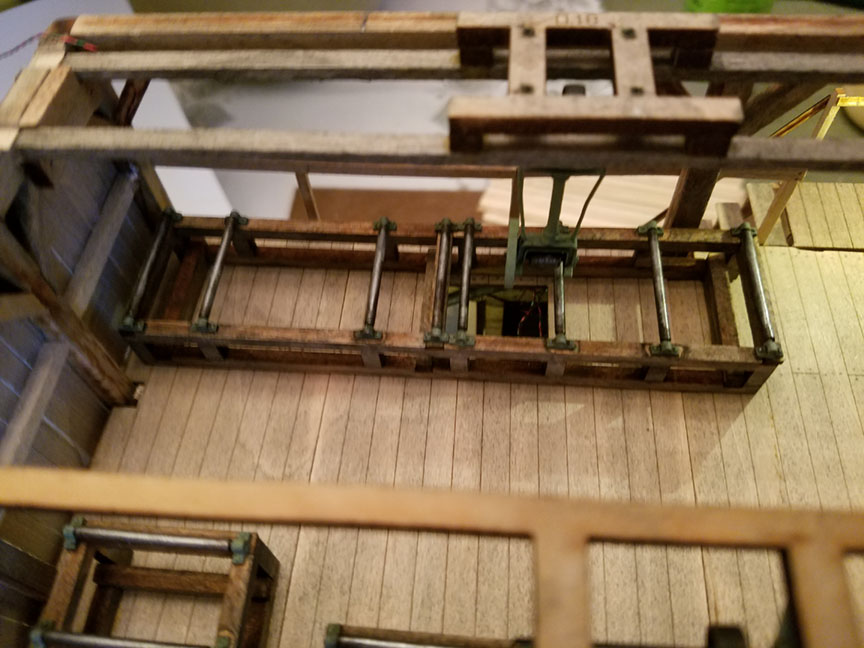
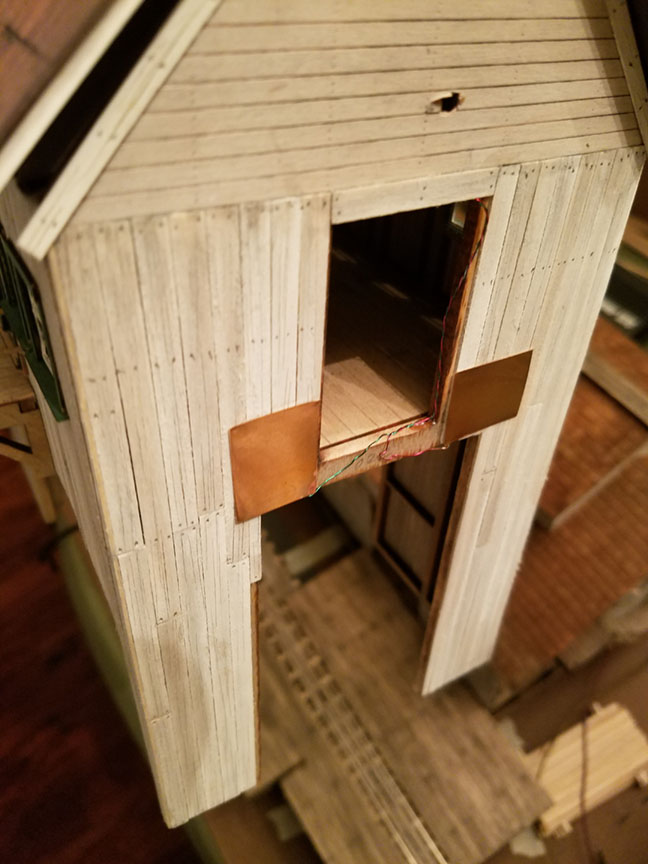
The side office section that goes over trestle/track is a seperate piece that can be lifted off trestle.
I wired these two contacts to the side of the main roof of mill
and here is the side of the office that goes up against mill
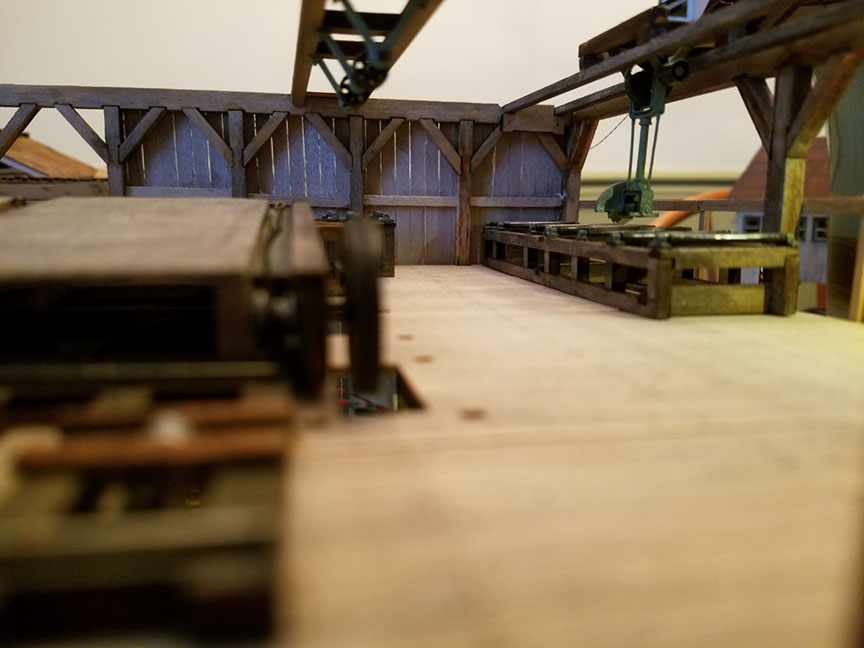
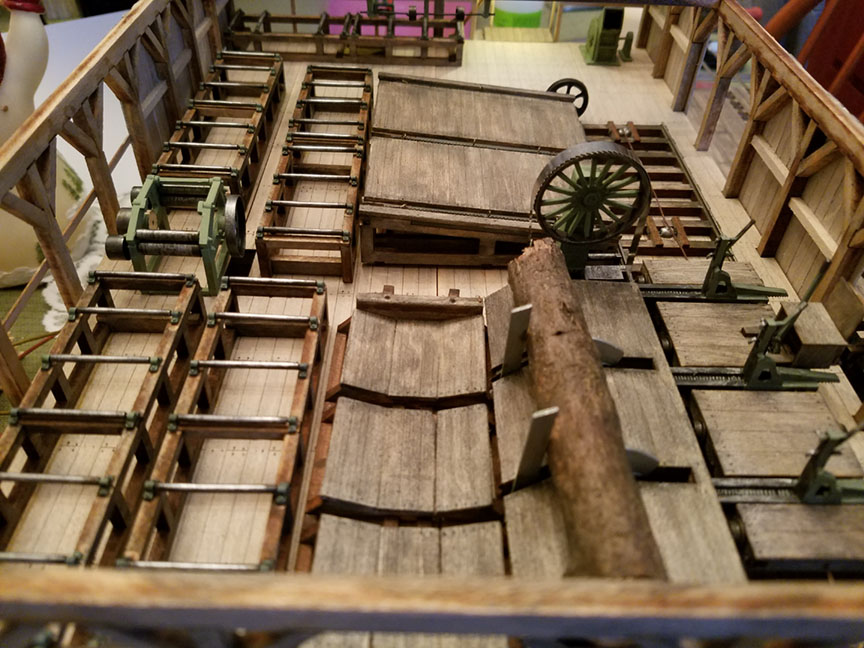
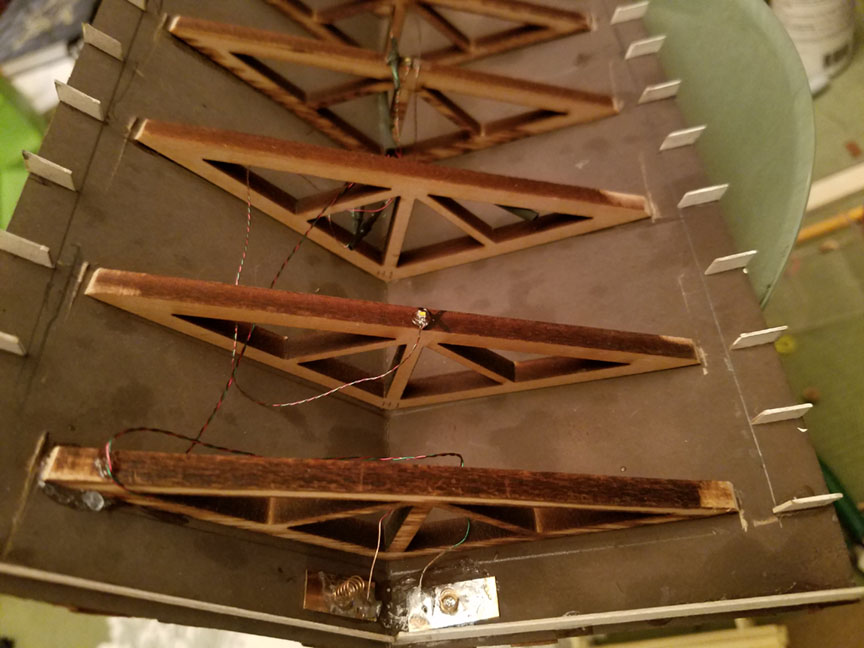
And here are some photos with the mill put back together
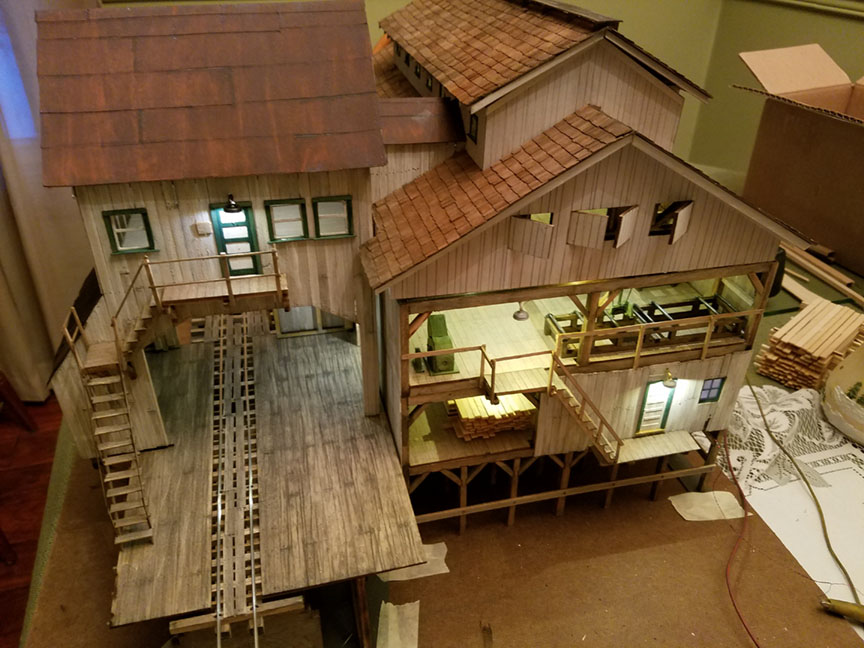


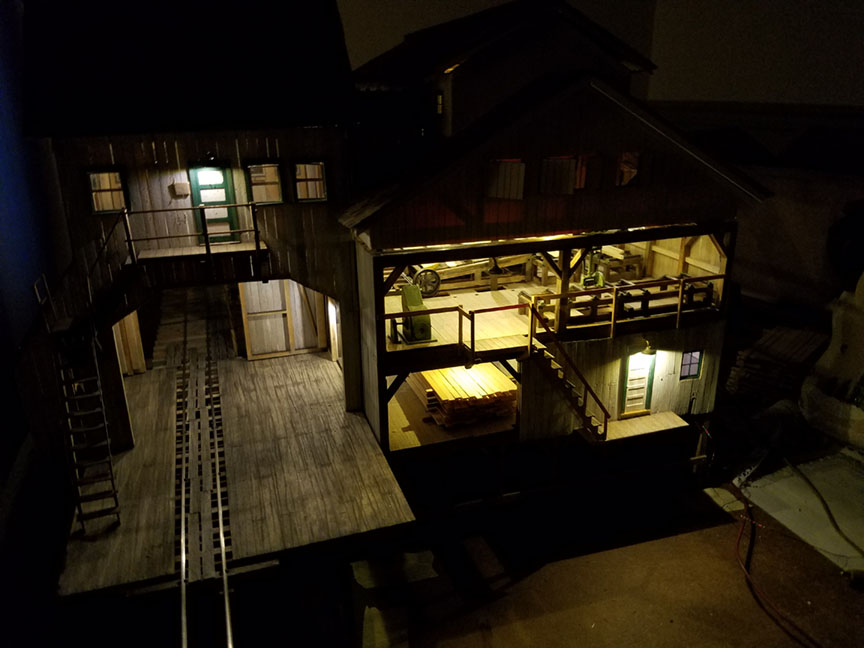
Now I have to glue down boards in saw tables, put some figures in and install control levers on saw floor and put the details up in the saw filers room. Got give him something to do. Oh yea, add some saw dust ![]()
brewcrew posted:Unboxed my new Legacy E8 A-A in the Louisville and Nashville scheme locomotive and took it around the layout a few times.
I just received it from Michael at Crocodile Train Store. I would highly recommend him and his business. FYI, check out his store, I got this for more than 50% off retail, there are a couple of other legacy BTO items for a steal on his site too.
Love that paint !!
CSX AL, your build is completely awesome. Beyond belief.
What is newest to me is your engineering of the electrical. You've given me a few ideas that are completely new. Where did you get bronze sheeting, and what type of lamps have you included?
I remain, completely envious of your obvious talent for this thing of ours. (haha, La Cosa Nostra)
Jerry
Al, I’d be interested in some technical info on your lighting. If it wouldn’t be too much trouble. How many leds did you say were in the mill and additions? What were the specs on them, e.g. 3mm or ?, warm white or ?. Got any idea how many milliamps they all draw? Did they have resistors in series already? Your spring and contact pad idea was clever. They really look nice by the way. Will be really attention grabbing in a night operatons shot. Thx in advance.
WOW lots of good stuff going on here. Everybody is getting something done! Excellent! I had to work today and man is it raining! We are luck, no snow here.... yet! Tomorrow the temperature falls like a rock from a trestle !!! So stuff is expected to freeze.
Meanwhile I am getting ready to take down that 4 foot x 4 foot bump out! Too many ideas of what to do when its gone going through my head. Here is a picture of my current layout in scarm. Its missing a small section due to the track limit lol The "swerve" on the leftt must stay so the door will open but I can add a straight track to move it closer to the wall. Then everything to the right of the bulge can be changed! 17 feet by 11 feet.

Jim
Attachments
Images (1)
Ok folks, I will start by saying I have been gone for 2 days, I open my computer and there are 259 e-mails! Took me forever just to get threw this page! LOL
There is great work being done by all! For you that are getting snow or about too! GOOD FOR YOU! LOL We are just getting rain here in the great northwest! first off I would like to say I really love this forum!
Chris, great work on the control panels! I will PM you about how you wired the LED's!![]()
Dave, thanks but I got the control panel all repainted and it looks good!![]()
Paul my plan is to sit my butt in that nice comfy chair and watch trains go by if I ever get it done! LOL make sure you take lots of pictures taking down the wall, so Jim has an idea!![]()
Jim, watch out for the boss with the frying Pan! LOL Also look at getting the door to swing out!![]()
CSX AL, your work is just mind blowing! I could see walking threw that as a little kid! Wonderful work!![]()
Brian, a usual great pictures! You sure know how to capture the hobby!![]()
I might get to the train room to work on the control panel today. I just got home from the local train show, didn't find anything I needed but did buy some rock molds to try!![]()
P.S. Let it snow anywhere but here! LOL![]()
I started land scaping a small aria for a few Woodland Scenic Trailers and removed my lake. Lots left to do after glue dries.


Attachments
Images (10)
Dave, looks good! Don't forget your sewer and water hook ups for the trailers! LOL![]()
Mike, I agree there is a lot going on!!
Brewcrew, The L&N E-units look really great! I got some great pricing from Mike at Crocodile last year on a lot of GarGraves track, and recently got a great price on a double sheathed boxcar. He is a really nice guy to work with!!
Paul, So far we are still getting rain in Butler, but it has been snowing just a bit north in Grove City for some time. The temperatures are forecast to drop around midnight, so we will start getting the snow. Looks like you have a nice demolition job for you tomorrow inside the warm house.
Al, The lighting is superb. That is an extremely well thought out plan for removing the roof with no plugs to have to worry about. The springs remind me of MTH F-units and BL2 ProtoSound and PS2 I have.
Jim, Taking out that bump out will really give you a much nicer space to work with!
Dave, The trailer court is taking shape nicely! Are you going to add some nice outdoor living areas for detail and for use of the residents of the cramped trailers?
Young Mr. Brown arrived with a long brown box on his shoulder and said, "Here's 60 pounds of wood for you." I was expecting it from Tim Foley. I bought the Mianne CL02-24 kit which will fit in nicely along the left hand side of the layout. I'll buy more when funds permit.
Annie has just finished the sniff inspection as I was getting the phone out to take her photograph. She gave final approval!

I already have all the leg assemblies and one of the 2' x 4' sections made. Building benchwork sitting in a chair! Hard to beat! ![]()
Attachments
Images (1)

Mark Boyce posted:Young Mr. Brown arrived with a long brown box on his shoulder and said, "Here's 60 pounds of wood for you." I was expecting it from Tim Foley. I bought the Mianne CL02-24 kit which will fit in nicely along the left hand side of the layout. I'll buy more when funds permit.
Annie has just finished the sniff inspection as I was getting the phone out to take her photograph. She gave final approval!
I already have all the leg assemblies and one of the 2' x 4' sections made. Building benchwork sitting in a chair! Hard to beat!
Mark, congrats!! As an LOL, when you said Annie sniff inspection, hope it didn't pass for the part where it smelled so good to her, that she started eating it? LOLOLOL.
Mark Boyce posted:Young Mr. Brown arrived with a long brown box on his shoulder and said, "Here's 60 pounds of wood for you." I was expecting it from Tim Foley. I bought the Mianne CL02-24 kit which will fit in nicely along the left hand side of the layout. I'll buy more when funds permit.
Annie has just finished the sniff inspection as I was getting the phone out to take her photograph. She gave final approval!
I already have all the leg assemblies and one of the 2' x 4' sections made. Building benchwork sitting in a chair! Hard to beat!
Mark, That ready to assemble bench work is really nice stuff. I wish I could start over with that but 7 layouts in the last 14 years is enough. I was sick for a couple weeks and contemplated starting over but decided I enjoy being married LOL.
You go Mark, Maybe you could put some wheels on that recliner and move it into the train room! LOL Cant wait to see more!![]()
Tom, Annie found the fresh sawed wood smell interesting, but not enough to take a bite. She was a drop off at our house 9 years ago when she was half grown. The vet said she has terrier in her, and she sure does sniff everything!!
Dave, I am not a good carpenter, and have only basic tools, so my layouts have always looked rough, and shimmed hear and there until I got them covered with scenery. After having back, knee, and foot troubles for a while, I am just not up for building from scratch in this new-to-me space. I have and am still willing to sell trains to help pay for this Mianne benchwork! ![]() By all means do whatever it takes to keep your wife happy!
By all means do whatever it takes to keep your wife happy!
mike g. posted:You go Mark, Maybe you could put some wheels on that recliner and move it into the train room! LOL Cant wait to see more!
Mike, the wheels are already on it! ![]() Now my wife understands what she needs to do to finish cleaning out the space she offered.
Now my wife understands what she needs to do to finish cleaning out the space she offered. ![]()

Attachments
Images (1)

Mark Boyce posted:mike g. posted:You go Mark, Maybe you could put some wheels on that recliner and move it into the train room! LOL Cant wait to see more!
Mike, the wheels are already on it!
HMM, any Clive Cussler there, LOL.
Cool looking table. But as another LOL moment to the Annie eating joke, well now we know that if she ate some, you have the Operation Game on the shelf, LOL.
Tom, I found a Clive Cussler 'The Grey Ghost' for a dollar Thursday. He is in the closet to the right of the photograph under the stairs. ![]() Yes, there are games and records we had when we were kids on those shelves. It is a hodge podge my wife wanted to clean out anyway.
Yes, there are games and records we had when we were kids on those shelves. It is a hodge podge my wife wanted to clean out anyway.
Looks great Mark!
Since I moved the Christmas board to the spare room and added some spurs and such my son has had more interest in running his trains. He loves his Legos so I felt that it was a great opportunity to find a way to tie the two together and do something together. The result, a colorful single engine house.
Attachments
Images (3)


Wow, CSX Al, Your Saw Mill Refinery is Magnificently crafted, just need to hire some workers, just kidding, and Kon, great signs, and Briansilvermustang, beautiful pictures of the WP Trains, and everyone else, your layouts and works looks great.....I finally programmed my new Sante Fe ABBA (Lionel Legacy) and hooked it up to my Sante Fe El Capitan Passenger Set, with new LED lighting. The sounds are simply amazing...


Attachments
Images (11)


 Finally got this gondola with load done. I will some post pics of it on the layout soon
Attachments
Images (8)
Looks great, Larry!
Lee, I like the transformer load!
LEE, I like your transformers. One detail would be good to add to them would be some lifting eyes on or near the tops so that they could be lifted by a crane.
Thanks Al I was thinking of putting about 4 of them 2 for each. I’ll start looking for some lift rings I have some old grante line some where thank for reminding me
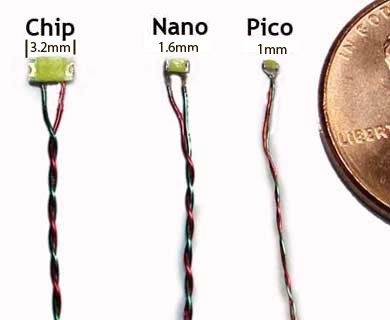
TedW posted:Al, I’d be interested in some technical info on your lighting. If it wouldn’t be too much trouble. How many leds did you say were in the mill and additions? What were the specs on them, e.g. 3mm or ?, warm white or ?. Got any idea how many milliamps they all draw? Did they have resistors in series already? Your spring and contact pad idea was clever. They really look nice by the way. Will be really attention grabbing in a night operatons shot. Thx in advance.
Ted,
I used 27 pico and Nano LED's. I got them from Evans Design. They are warm white. They have a resistor wired on them. These ones are rated for up to 12v DC. I wired them all together and are hooked to a DC transformer running less than 12v.
Larry, what a great train to run on such a wonderful layout! Looks Great!![]()
Lee the transformers turned out very nice! Great Job!![]()
Al, thanks for sharing the information on the lighting! We can all use that information!![]()
Tonight after the train show I worked on my control panel, I hope to do more tomorrow! Here is a picture of the control panel and the rock molds I picked up at the train show. Also a crane I picked up on the way home at a garage sale for $10. Something for the grandkids to play with in the train room. Now all I have to do is figure out how to switch it from batteries to ac power!![]()


Attachments
Images (4)
Mike, get yourself a wall wart AC adapter. Just add up the voltage of the batteries and get one off eBay. Just that simple.
Thanks Elliot! I will check that out tomorrow, I ma just have one laying around. Whenever I find one I grab it never knowing when I can use it!![]()
Mike, The panel looks really sharp! Looks like you did good at the show. That crane is impressive!! The molds are nice too! ![]()
![]()

Long as the voltage matches, you're golden. (get the polarity right)![]()
Big_Boy_4005 posted:Long as the voltage matches, you're golden. (get the polarity right)
Ok Whats the best way to get the polarity correct?
Mark Boyce posted:Mike, The panel looks really sharp! Looks like you did good at the show. That crane is impressive!! The molds are nice too!
Thanks Mark, the train show was kind of a bust. Not as many vendors or tables as before! But it was a good time, got a chance to meet P51 Lee! What a nice guy we chatted for a little while! ![]()
Today l worked on (dunno if you call this scratch-building, if using plans from an almost completed logging bunkhouse kit to build a matching cook house) the cookhouse. Exterior walls with windows and doors cut, as is floor. Building the subframe under the floor that sits on two skid logs. Wonder how loggers skidded these...with crawler tractors, locomotives along side the track, or "20 mule teams" before crawlers? These are about twice as wide as a flatcar. Can't picture these on a flatcar, when the car itself might be too wide to more than barely get over some of the logging roads in photos
Former Member
Lou1985 posted:Installed an ERR AC Commander in a 69 year old 2343 Santa Fe F3. An ABBA set with a Railsounds II B unit from 1997 leads El Capitan from a signal stop. Runs pretty well for 69 years old if you ask me.
That's a good looking set of F3s. Is it restored or original ?
Leapin Larry, Great photos, those Santa Fe F3's pulling the El Capitan make one beautiful train.
Al, Thanks for sharing the photos of the removable roof electrical. It would be a shame to permanently mount a roof on that piece of work. Just incredible attention to detail, an amazing well done build.
Mark - Congratulations, you're on the way . I know it's been a long time since the design started, and then the re-design to incorporate the expansion , so it must feel really good to be assembling benchwork.
For me another 6 hours of wiring, and making improvements to some early wiring today, but I finally got the trains running again around 9:30 tonight. At least now all (4) 180 watt power districts are wired in, and the 24 individual sidings, spurs and mains have all their 10 to 15 amp switches wired.
Dan Padova posted:Lou1985 posted:Installed an ERR AC Commander in a 69 year old 2343 Santa Fe F3. An ABBA set with a Railsounds II B unit from 1997 leads El Capitan from a signal stop. Runs pretty well for 69 years old if you ask me.
That's a good looking set of F3s. Is it restored or original ?
The A (one powered, one dummy) units are 1950 2343 chassis that I repainted. I never cared for black pilot shields and black rear steps so I painted them silver. The shells on the A units are replacement shells Lionel issued for the conventional classics F3s. The Railsounds II F3B (6-18136) is from 1997, the other dummy F3B is from 1994 (6-18115).
mike g. posted:Big_Boy_4005 posted:Long as the voltage matches, you're golden. (get the polarity right)
Ok Whats the best way to get the polarity correct?
Forgot, make sure it's DC. Sometimes it says on the body, sometimes the wire is marked. You can always use a meter on DC volts.
Corner Field Model RR Museum posted:HMM, any Clive Cussler there, LOL.
Yanno, Dirk Pitt Sr.'s hangar would make a nifty scene to model... Private railcar, Me-262 and more classic cars than one can shake a stick at! ![]()
In other news, here's James' first day at work at the Museum pulling the Hogwarts Express...

Apologies for the cellphone image, but my camera was out of batteries. ![]()
Mitch
Attachments
Images (1)
Orderly Chaos: It's 3:00 A.M. and I am calling it a night. Finishing the Lionel Challenger Dining Car is taking more time than usual. I painted the interior a few days ago. Now I am painting more people to put in the car.
Tomorrow I will hopefully finish the car. There is a lot of grinding and careful cutting to place these figures in a realistic pose in such confined areas. I feel like a Civil War surgeon with a pile of limbs, all legs, in the trash can.
I also get to dig out from all the snow that is continuing to fall here in Cleveland, Ohio. It is NOT HOT in Cleveland. Burrrr.
Sincerely, John Rowlen
Attachments
Images (3)


mike g. posted:Mark Boyce posted:Mike, The panel looks really sharp! Looks like you did good at the show. That crane is impressive!! The molds are nice too!
Thanks Mark, the train show was kind of a bust. Not as many vendors or tables as before! But it was a good time, got a chance to meet P51 Lee! What a nice guy we chatted for a little while!
I agree with every point you made. Not nearly as many vendors, but worth the trip as I also enjoyed our discussion.
Afterward, I ran into several other friends in the hobby. I also encountered two guys from my WW2 living history group who I had no idea were model railroaders as well!
Also had a good BBQ lunch at Famous Dave's after the show.
CSX Al posted:TedW posted:Al, I’d be interested in some technical info on your lighting.
I used 27 pico and Nano LED's. I got them from Evans Design. They are warm white. They have a resistor wired on them. These ones are rated for up to 12v DC. I wired them all together and are hooked to a DC transformer running less than 12v.
Thanks so much. They do look great. I’ll look for them on the Evans site.
Well we got only about 6” of snow so far. Ice pellets are really beating the house now. Time to head down to the layout. I’ll use the US ARMY 44 Ton diesel with the old winged plow. Need to add extra sand. Storm should end by 5PM. I heard a Train go by Jones’ at 7AM when I was out with the dog. Not sure if it was a freight or Passenger train between Maine & Boston.
GO PATRIOTS!
Chris, I am glad you got the wiring done under the table! I bet it really feels good to have the trains running again!![]()
Elliot, right now it runs on 4 AA Batteries. I hope to get some work on that and my control panel today as long as nothing comes up!![]()
John, the car looks great! I am so sorry you had to stay up till 3AM to get where you are, but it does take a while to cut legs off! LOL![]()
Lee, it was really nice to meet you! Sounds like you had a more productive time then I did. Nice that you were able to meet others there that you know. I should have got some Dave's before I left, but I was ready to go! I sure hope its better next year~!![]()
OK Mike, that means you need a 6V adapter. Just plug it into your layout power strip so it turns on with the rest of the layout. Done!
I'm off to "train church". Later guys.
Matt, I hope the snow and Ice don't cause to much of a problem for you! Be safe!![]() Sounds like a great time to be in the train room! Hot coffee and some trains, What a great morning!
Sounds like a great time to be in the train room! Hot coffee and some trains, What a great morning!![]()
Elliot, sounds easy enough, I will give it a try when I get out there! Let you know later today!![]()
Lou1985 posted:Installed an ERR AC Commander in a 69 year old 2343 Santa Fe F3. An ABBA set with a Railsounds II B unit from 1997 leads El Capitan from a signal stop. Runs pretty well for 69 years old if you ask me.
What a gorgeous set. As a kid, that's the exact set I used to dream about, except back then, we had only battery operated sound! And yours I stunning! Nicely done, Lou!
George
mike g. posted:Larry, what a great train to run on such a wonderful layout! Looks Great!
Lee the transformers turned out very nice! Great Job!
Al, thanks for sharing the information on the lighting! We can all use that information!
Tonight after the train show I worked on my control panel, I hope to do more tomorrow! Here is a picture of the control panel and the rock molds I picked up at the train show. Also a crane I picked up on the way home at a garage sale for $10. Something for the grandkids to play with in the train room. Now all I have to do is figure out how to switch it from batteries to ac power!
I see great cranes..., I mean brains, think alike! Gotta keep those kids entertained! True kid empathy if ever I saw it!
George
Well, the train room is for fun! Not a do not touch room, I want them to come in and do whatever they want! When I know there coming I set the high speed limit and let them go!![]()
JerryG posted:CSX AL, your build is completely awesome. Beyond belief.
What is newest to me is your engineering of the electrical. You've given me a few ideas that are completely new. Where did you get bronze sheeting, and what type of lamps have you included?
I remain, completely envious of your obvious talent for this thing of ours. (haha, La Cosa Nostra)
Jerry
Jerry, You can buy the bronze sheeting from McMaster Carr
Last weekend I got the last of the track in place for the west end of my yard. This weekend I wired and tested; so far, so good. I also started to place dwarf and mast signals for the running tracks.
Here's the west end with mains 1 and 2 to the left.


Here's a view from the east end.

Attachments
Images (3)
Add Reply
Sign In To Reply
